Page 137 of 343
Heating and Cooling
To remove exterior frost or ice from the windshield and side windowsafter the vehicle has been sitting out
in cold weather:
1. Start the engine. 2. Select
When you select the
system automatically switches to
Fresh Air mode and turns on the
A/C.
3. Switch the fan and temperature controls to maximum.
To rapidly remove exterior frost or ice from the windshield (on very colddays), first select the Recirculation
mode. Once the windshield is clear, select the Fresh Air mode to avoid
fogging the windows. FAN CONTROL
DIAL
MODE BUTTONS
TEMPERATURE
CONTROL DIAL
Comfort and Convenience Features RECIRCULATION
BUTTON
AIR CONDITIONING
BUTTONProCarManuals.comMain Menu Table of Contents s t
Page 138 of 343
Heating and Cooling
These settings direct all the air flow to the defroster vents at the base ofthe windshield and the side windowdefroster vents. The air flow will get
warmer and clear the windows faster as the engine warms up. You can
close the corner vents with the dial
beside each vent. This will send
more warm air to the windshield
defroster vents.
For safety, make sure you have a
clear view through all the windows
before driving away. To Turn Everything Off
To shut off the system temporarily,
turn the fan speed and temperaturecontrol dials all the way to the left.
You should shut the system completely off only for the first few
minutes of driving in cold weather,
until the engine coolant warms up
enough to operate the heater. Keep
the fan on at all other times so stale air does not build up in the interior.
Comfort and Convenience FeaturesProCarManuals.comMain Menu Table of Contents s t
Page 139 of 343

Climate Control System
On EX model
The automatic climate control system in your Honda picks the
proper combination of air condi-
tioning, heating, and ventilation to maintain the interior temperature
you select. The system also adjusts the fan speed and air flow levels.
Your vehicle also has a rear A/C unit that allows the rear passengers toadjust the heating, cooling, and air
flow (see page 146).
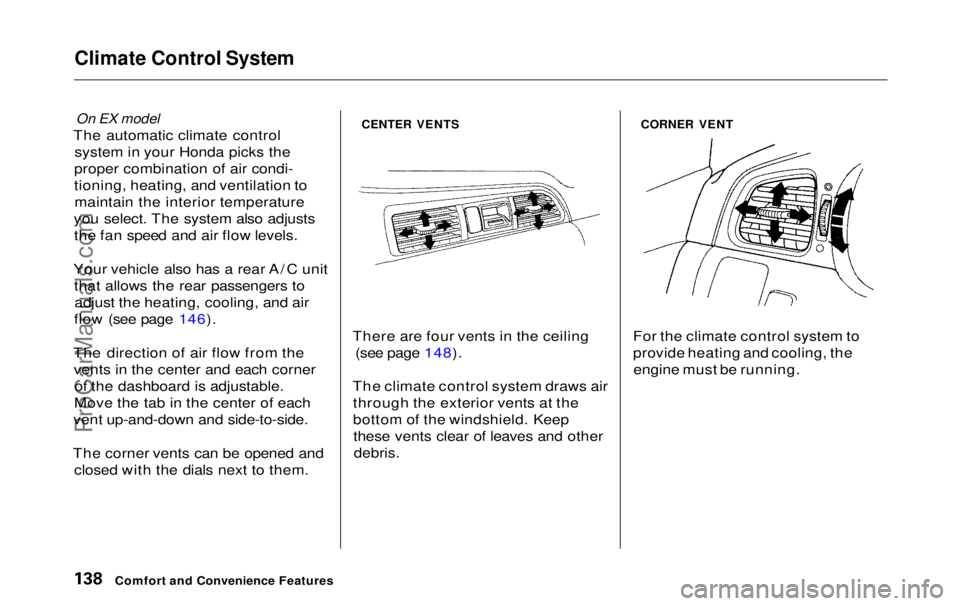
The direction of air flow from the vents in the center and each corner of the dashboard is adjustable.
Move the tab in the center of each
vent up-and-down and side-to-side.
The corner vents can be opened and closed with the dials next to them.
CENTER VENTS
There are four vents in the ceiling (see page 148).
The climate control system draws air through the exterior vents at the
bottom of the windshield. Keepthese vents clear of leaves and other
debris.
CORNER VENT
For the climate control system to
provide heating and cooling, the engine must be running.
Comfort and Convenience FeaturesProCarManuals.comMain Menu Table of Contents s t
Page 182 of 343
Before Driving
Before you begin driving your Honda,
you should know what gasoline to use, and how to check the levels of
important fluids. You also need to
know how to properly store luggageor packages. The information in thissection will help you. If you plan to
add any accessories to your vehicle,
please read the information in this section first. Break-in Period.............................. 182
Gasoline.......................................... 182
Service Station Procedures .......... 183 Filling the Fuel Tank................. 183Opening the Hood..................... 184 Oil Check................................ 186
Engine Coolant Check.......... 187
Fuel Economy................................ 188
Vehicle Condition...................... 188Driving Habits............................ 188
Accessories and Modifications.... 189 Carrying Cargo.............................. 191
Before DrivingProCarManuals.comMain Menu s t
Page 183 of 343

Break-in Period, Gasoline
Break-in Period
Help assure your vehicle's future
reliability and performance by paying extra attention to how you driveduring the first 600 miles (1,000 km).
During this period:
Avoid full-throttle starts and rapid
acceleration.
Avoid hard braking. New brakes need to be broken-in by moderate
use for the first 200 miles (300
km). You should follow these same re-
commendations with an overhauled
or exchanged engine, or when the
brakes are replaced.
We also recommend that you should not tow a trailer during the first 500
miles (800 km).
Gasoline
Your Honda is designed to operate on unleaded gasoline with a pump
octane number of 86 or higher. Use
of a lower octane gasoline can cause
a persistent, heavy metallic rapping
noise in the engine that can lead to
mechanical damage.
We recommend gasolines containing detergent additives that help prevent
fuel system and engine deposits.
Using gasoline containing lead will
damage your vehicle's emissions
controls. This contributes to air
pollution.
Before DrivingProCarManuals.comMain Menu Table of Contents s t
Page 184 of 343
Gasoline, Service Station Procedures
In Canada, some gasolines contain
an octane-enhancing additive called
MMT. If you use such gasolines,
your emission control system performance may deteriorate and
the Malfunction Indicator Lamp on
your instrument panel may turn on. If this happens, contact your
authorized Honda dealer for service.
Filling the Fuel Tank
1. Because the fuel fill cap is on the driver's side of the vehicle, park
with that side closest to the service station pumps.
2. Open the fuel fill door by pulling on the handle to the left of the
driver's seat.
Before refueling, make sure the rear
sliding door on the driver's side is
closed.
CONTINUED
Before Driving
FUEL FILL CAP
Gasoline is highly flammable
and explosive. You can be
burned or seriously injured
when handling fuel.
Stop the engine and keep
heat, sparks, and flame away.Handle fuel only outdoors.
Wipe up spills immediately.
PullProCarManuals.comMain Menu Table of Contents s t
Page 187 of 343
Service Station Procedures
Oil Check
Check the engine oil level every time
you fill the vehicle with fuel. Wait a few minutes after turning the engineoff before you check the oil.
1. Remove the dipstick (orange
handle).
2. Wipe the dipstick with a clean
cloth or paper towel. 3. Insert it all the way back in its tube.
Before Driving
DIPSTICKProCarManuals.comMain Menu Table of Contents s t
Page 188 of 343
Service Station Procedures
4. Remove the dipstick again and check the level. It should be
between the upper and lower marks.
If it is near or below the lower mark, see Adding Oil on page 233 . Engine Coolant Check
Look at the coolant level in the
radiator reserve tank. Make sure it is
between the MAX and MIN lines. If
it is below the MIN line, see Adding
Engine Coolant on page 237 for
information on adding the proper coolant. Refer to Owner Maintenance
Checks on page 231 for information
on checking other items in your
Honda.
Before Driving
UPPER MARK
LOWER MARK
MAX
MIN
RESERVE TANKProCarManuals.comMain Menu Table of Contents s t