1999 HONDA ODYSSEY brake light
[x] Cancel search: brake lightPage 210 of 343
Traction Control System
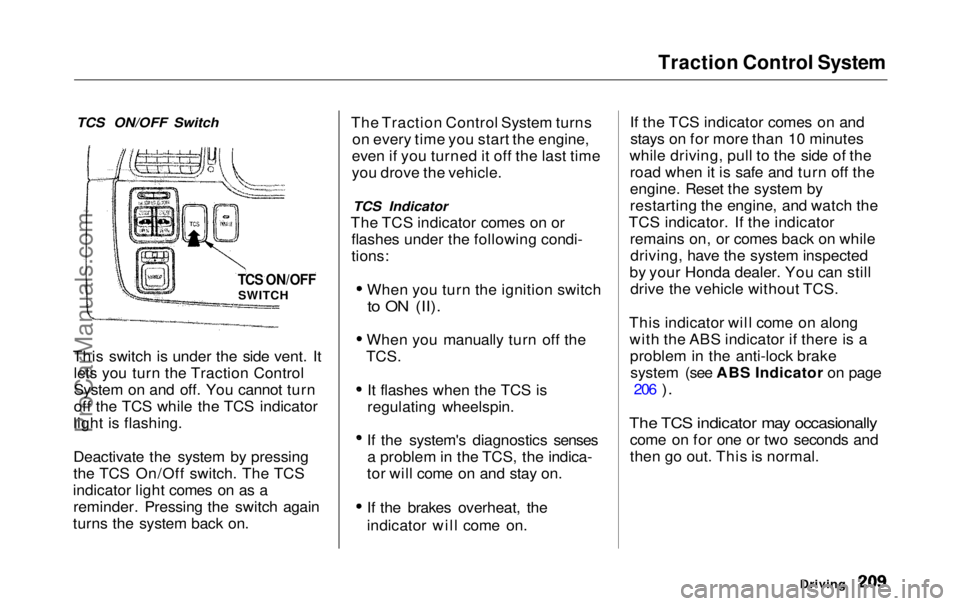
TCS ON/OFF Switch
This switch is under the side vent. It lets you turn the Traction Control
System on and off. You cannot turn
off the TCS while the TCS indicator
light is flashing.
Deactivate the system by pressing
the TCS On/Off switch. The TCS
indicator light comes on as a reminder. Pressing the switch again
turns the system back on. The Traction Control System turns
on every time you start the engine,
even if you turned it off the last time
you drove the vehicle.
TCS Indicator
The TCS indicator comes on or flashes under the following condi-
tions:
When you turn the ignition switch
to ON (II).
When you manually turn off the
TCS.
It flashes when the TCS is
regulating wheelspin.
If the system's diagnostics senses a problem in the TCS, the indica-
tor will come on and stay on.
If the brakes overheat, the
indicator will come on. If the TCS indicator comes on and
stays on for more than 10 minutes
while driving, pull to the side of the road when it is safe and turn off the
engine. Reset the system by
restarting the engine, and watch the
TCS indicator. If the indicator remains on, or comes back on whiledriving, have the system inspected
by your Honda dealer. You can still drive the vehicle without TCS.
This indicator will come on along with the ABS indicator if there is aproblem in the anti-lock brakesystem (see ABS Indicator on page 206
).
The TCS indicator may occasionally
come on for one or two seconds and
then go out. This is normal.
Driving
TCS ON/OFF
SWITCHProCarManuals.comMain Menu Table of Contents s t
Page 211 of 343

Driving in Bad Weather
Rain, fog, and snow conditions re-quire a different driving technique
because of reduced traction and
visibility. Keep your vehicle well- maintained and exercise greater
caution when you need to drive in
bad weather. The cruise control should not be used in these condi-
tions.
Driving Technique — Always drive
slower than you would in dry
weather. It takes your vehicle longer to react, even in conditions that mayseem just barely damp. Applysmooth, even pressure to all the
controls. Abrupt steering wheel
movements or sudden, hard appli-
cation of the brakes can cause loss of control in wet weather. Be extra
cautious for the first few miles (kilometers) of driving while you
adjust to the change in driving
conditions. This is especially true in snow. A person can forget some
snow-driving techniques during the
summer months. Practice is needed
to relearn those skills.
Exercise extra caution when driving
in rain after a long dry spell. After
months of dry weather, the first
rains bring oil to the surface of the
roadway, making it slippery. Visibility — Being able to see
clearly in all directions and being
visible to other drivers are important in all weather conditions. This ismore difficult in bad weather. To beseen more clearly during daylight
hours, turn on your headlights.
Inspect your windshield wipers and
washers frequently. Keep the wind- shield washer reservoir full of the
proper fluid. Have the windshield
wiper blades replaced if they start to streak the windshield or leave parts
unwiped. Use the defroster and air conditioning to keep the windows
from fogging up on the inside (see
pages 135 and 144 ).
DrivingProCarManuals.comMain Menu Table of Contents s t
Page 216 of 343
Towing a Trailer
Trailer Brakes
Honda recommends that any trailer
having a total weight of 1,000 Ibs (450 kg) or more be equipped with
its own electric or surge-type brakes.
If you choose electric brakes, be
sure they are electronically actuated.
Do not attempt to tap into your
vehicle's hydraulic system. No matter how successful it may seem,
any attempt to attach trailer brakes
to your vehicle's hydraulic system
will lower braking effectiveness and create a potential hazard.
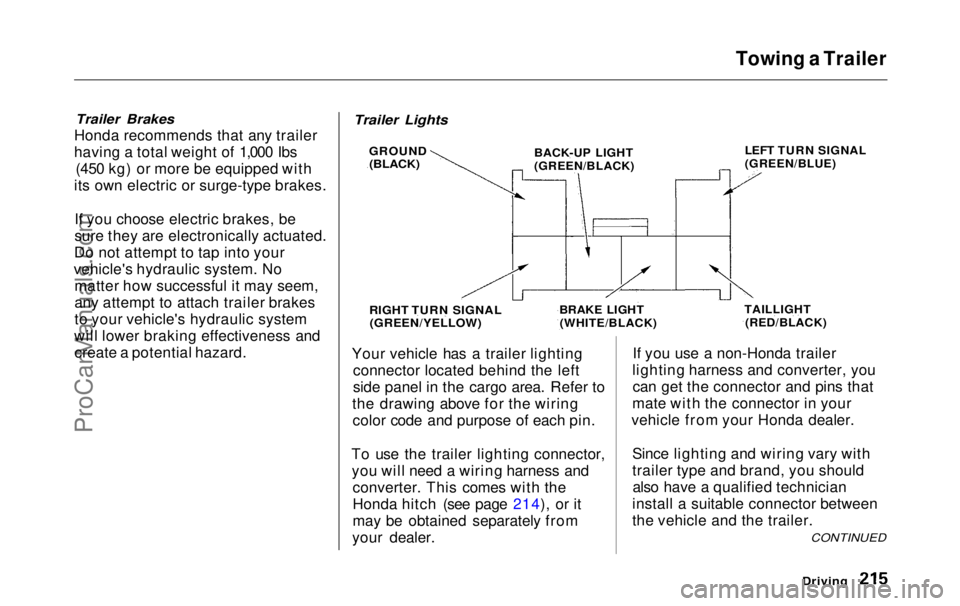
Your vehicle has a trailer lighting
connector located behind the left
side panel in the cargo area. Refer to
the drawing above for the wiring color code and purpose of each pin.
To use the trailer lighting connector, you will need a wiring harness and converter. This comes with the
Honda hitch (see page 214), or it
may be obtained separately from
your dealer. If you use a non-Honda trailer
lighting harness and converter, you can get the connector and pins that
mate with the connector in your
vehicle from your Honda dealer.
Since lighting and wiring vary with
trailer type and brand, you shouldalso have a qualified technician
install a suitable connector between
the vehicle and the trailer.
Driving
CONTINUED
Trailer Lights
GROUND
(BLACK)
BACK-UP LIGHT
(GREEN/BLACK)
LEFT TURN SIGNAL
(GREEN/BLUE)
TAILLIGHT
(RED/BLACK)
BRAKE LIGHT
(WHITE/BLACK)
RIGHT TURN SIGNAL
(GREEN/YELLOW)ProCarManuals.comMain Menu Table of Contents s t
Page 217 of 343
Towing a Trailer
Spare Vehicle Tire
When towing a trailer, you should carry a full-size wheel and tire as aspare in case you have a flat. If you
use the compact spare tire that came
with the vehicle, it may adversely affect vehicle handling. See page 317 for information on proper tire
size, and page 293 for information on
how to store a full-size tire. When storing a full-size spare tire in the
trailer, follow the trailer maker's
instructions.
Additional Trailer equipment
Many states and provinces require
special outside mirrors when towing
a trailer. Even if they don't, you should install special mirrors if you
cannot clearly see behind you, or if
the trailer creates a blind spot.
Ask your trailer sales or rental agency if any other items are
recommended or required for your
towing situation. Pre-Tow Checklist
When preparing to tow, and before driving away, be sure to check the
following:
The vehicle has been properlyserviced, and the tires, brakes,
suspension, and cooling system
are in good operating condition.
All weights and loads are within limits (see pages 212 and 213).
The hitch, safety chain, and any other attachments are secure.
All items on and in the trailer are properly secured and cannot shift
while you drive.
The lights and brakes on your vehicle and the trailer are workingproperly. Your vehicle tires and spare are
properly inflated (see page 317),and the trailer tires and spare are
inflated as recommended by the
trailer maker.
You may want to fill the fuel tank with premium fuel. Premium fuelprovides improved performance.
DrivingProCarManuals.comMain Menu Table of Contents s t
Page 220 of 343

Maintenance
This section explains why it is important to keep your vehicle well
maintained and to follow basic
maintenance safety precautions.
This section also includes Maintenance Schedules for normaldriving and severe driving conditions,
a Maintenance Record, and instruc-
tions for simple maintenance tasks
you may want to take care of yourself.
If you have the skills and tools to per-
form more complex maintenance tasks on your Honda, you may want
to purchase the Service Manual. See page 333 for information on how toobtain a copy, or see your Honda
dealer.
Maintenance Safety.......................
220
Important Safet
y
Precautions ..
221
Maintenance Schedule.................
.
222
Required Maintenance Record.... 229
Owner Maintenance Checks........ 231
Fluid Locations............................... 232
Engine Oil....................................... 233
Adding Oil................................... 233
Recommended Oil..................... 233
Synthetic Oil............................... 234
Additives..................................... 235
Changing the Oil and Filter...... 235
Cooling System.............................. 237
Adding Engine Coolant............. 237Replacing Engine Coolant........ 239
Windshield Washers..................... 242
Automatic Transmission Fluid..... 243
Brake Fluid..................................... 244
Brake System............................. 244
Power Steering............................... 245
Air Cleaner Element...................... 246
Hood Latch..................................... 248
Spark Plugs..................................... 248
Replacement............................... 248
Specifications............................. 250
Battery............................................ 251
Wiper Blades.................................. 253
Air Conditioning System............... 255
Air Conditioning Filter.................. 256
Drive Belts...................................... 256
Timing Belt..................................... 257
Tires................................................ 257 Inflation....................................... 257
Inspection................................... 259Maintenance............................... 260
Tire Rotation.............................. 260
Replacing Tires and Wheels.... 261
Wheels and Tires....................... 262 Winter Driving........................... 262
Snow Tires.............................. 263
Tire Chains............................. 263
Lights..............................................264
Headlight Aiming...................... 266
Replacing Bulbs......................... 266
Storing Your Vehicle..................... 275
MaintenanceProCarManuals.comMain Menu s t
Page 232 of 343
Owner Maintenance Checks
You should check the following items at the specified intervals. If
you are unsure of how to perform any check, turn to the page given. Engine oil level — Check every
time you fill the fuel tank. See
page 186.
Engine coolant level — Check the
radiator reserve tank every time
you fill the fuel tank. See page 187 .
Windshield washer fluid — Check the level in the reservoir monthly.
If weather conditions cause you to
use the washers frequently, check
the reservoir each time you stop
for fuel. See page 242 .
Automatic transmission — Check the fluid level monthly. See page 243.
Brakes — Check the fluid level
monthly. See page 244. Tires — Check the tire pressure
monthly. Examine the tread for
wear and foreign objects. See page
257.
Lights — Check the operation of
the headlights, parking lights,
taillights, high-mount brake light,
turn signals, brake lights, and
license plate light monthly. See
page 264.
MaintenanceProCarManuals.comMain Menu Table of Contents s t
Page 266 of 343

Lights
STOP/TAILLIGHTS/
SIDE MARKER LIGHTS
TAILLIGHT
HIGH-MOUNT BRAKE LIGHT
TURN SIGNAL LIGHT
BACK-UP LIGHT
LICENSE PLATE LIGHT
Check the following: Headlights (low and high beam)
Parking lights
Taillights Brake lights High-mount brake light
Turn signals
Back-up lights
Hazard light function
License plate light
Side marker lights
Daytime running lights
(Canadian models)
If you find any bulbs are burned out,
replace them as soon as possible. Refer to the chart on page 317 to
determine what type of replacement
bulb is needed.
MaintenanceProCarManuals.comMain Menu Table of Contents s t
Page 271 of 343
Lights
4. Pull the bulb straight out of its
socket.
Push the new bulb straight into
the socket until it bottoms.
5. Insert the socket back into the light assembly. Turn it clockwise
to lock it in place.
6. Test the lights to make sure the new bulb is working.
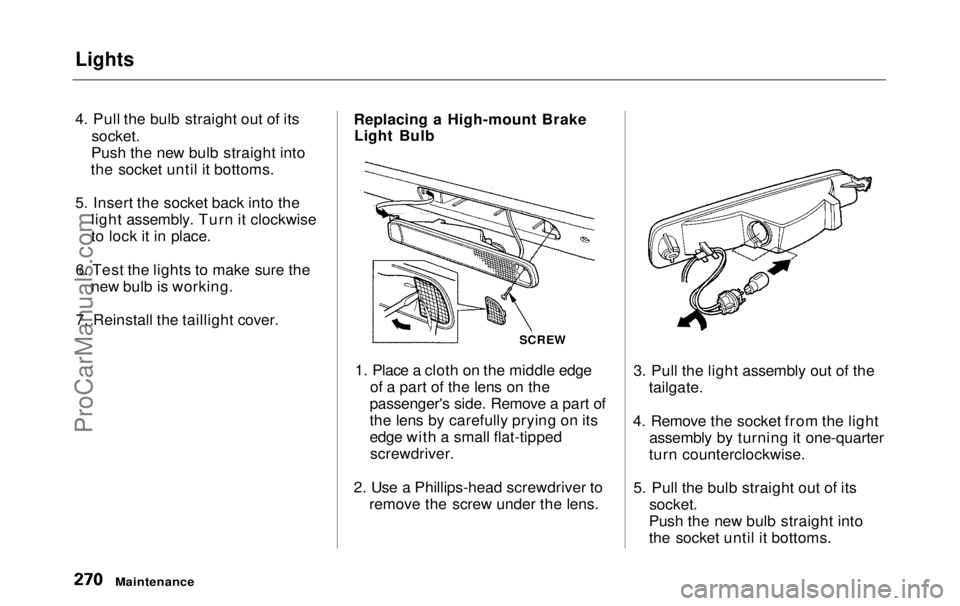
7. Reinstall the taillight cover. Replacing a High-mount Brake
Light Bulb
1. Place a cloth on the middle edge of a part of the lens on the
passenger's side. Remove a part of
the lens by carefully prying on its
edge with a small flat-tipped screwdriver.
2. Use a Phillips-head screwdriver to remove the screw under the lens. 3. Pull the light assembly out of the
tailgate.
4. Remove the socket from the light assembly by turning it one-quarter
turn counterclockwise.
5. Pull the bulb straight out of its
socket.
Push the new bulb straight into
the socket until it bottoms.
Maintenance
SCREWProCarManuals.comMain Menu Table of Contents s t