1999 HONDA CIVIC alignment
[x] Cancel search: alignmentPage 1153 of 2189
Rear Damper
Ilnstallation
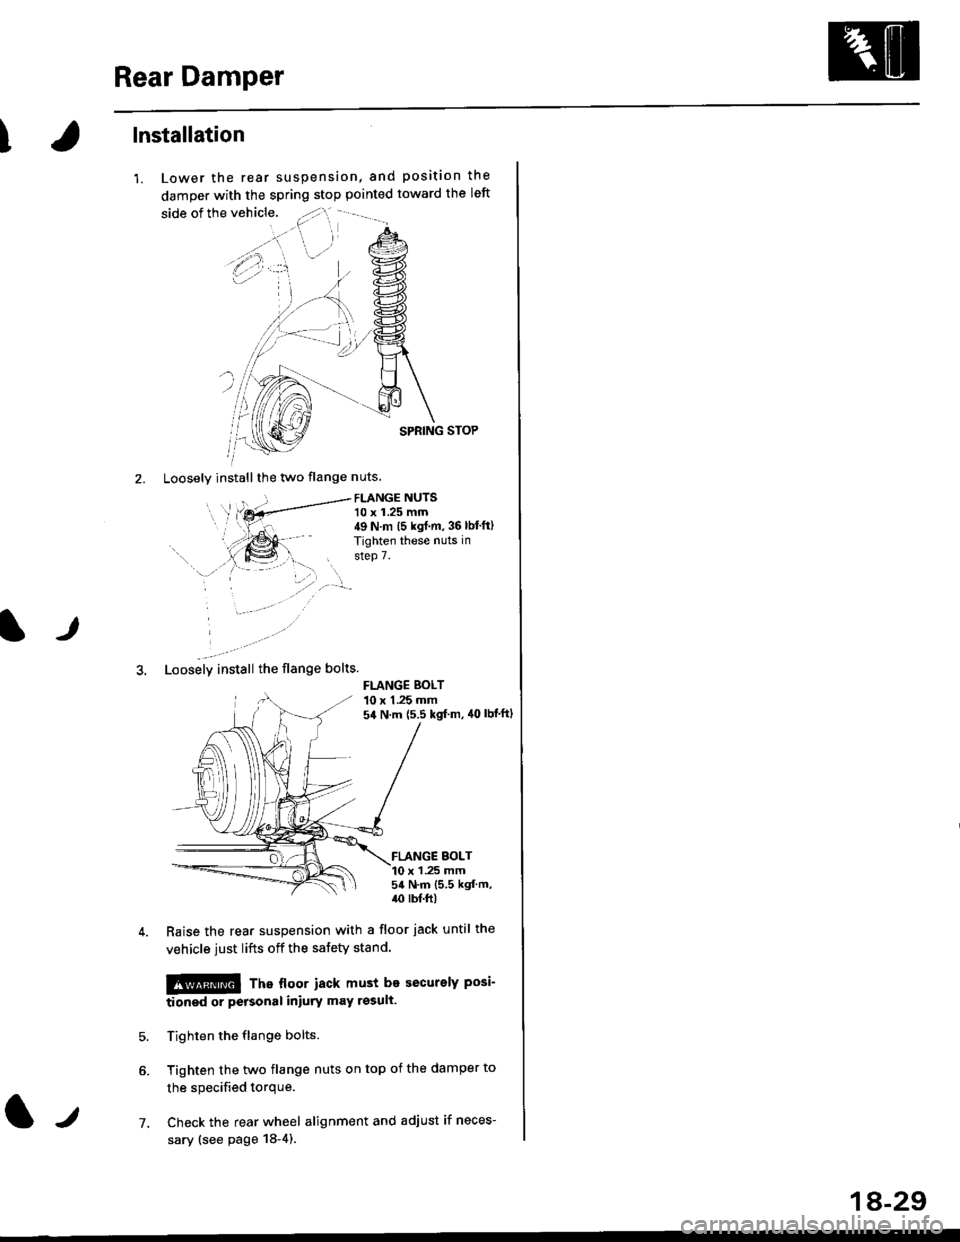
'1. Lower the rear suspension, and position the
damper with the spring stop pointed toward the left
SPRING STOP
2. Loosely installthe two flange nuts
FLANGE NUTS10 x 1.25 mm49 N.m (5 kgf.m, 36 lbt'ft)
Tighten these nuts in
step 7.
lr
3. Loosely install the flange bolts.
FLANGE BOLT10 x 1.25 mm54 N.m {5.5 kgf m, 40 lbt'ft1
FLANGE BOLT10 x 1 .25 mm54 N.m {5.5 kgf.m,/r0 lb{.ft|
7.
Raise the rear suspension with a floor jack until the
vehicle just lifts off the safety stand.
!@@ Tne floor iacx must be securelY Posi-
tionod or peFonal iniury may rssull
Tighten the flange bolts.
Tighten the two flange nuts on top of the damper to
the specified torque.
Check the rear wheel alignment and adjust if neces-
sary (see page 18-4).
1A-29
Page 1259 of 2189
tInstallation
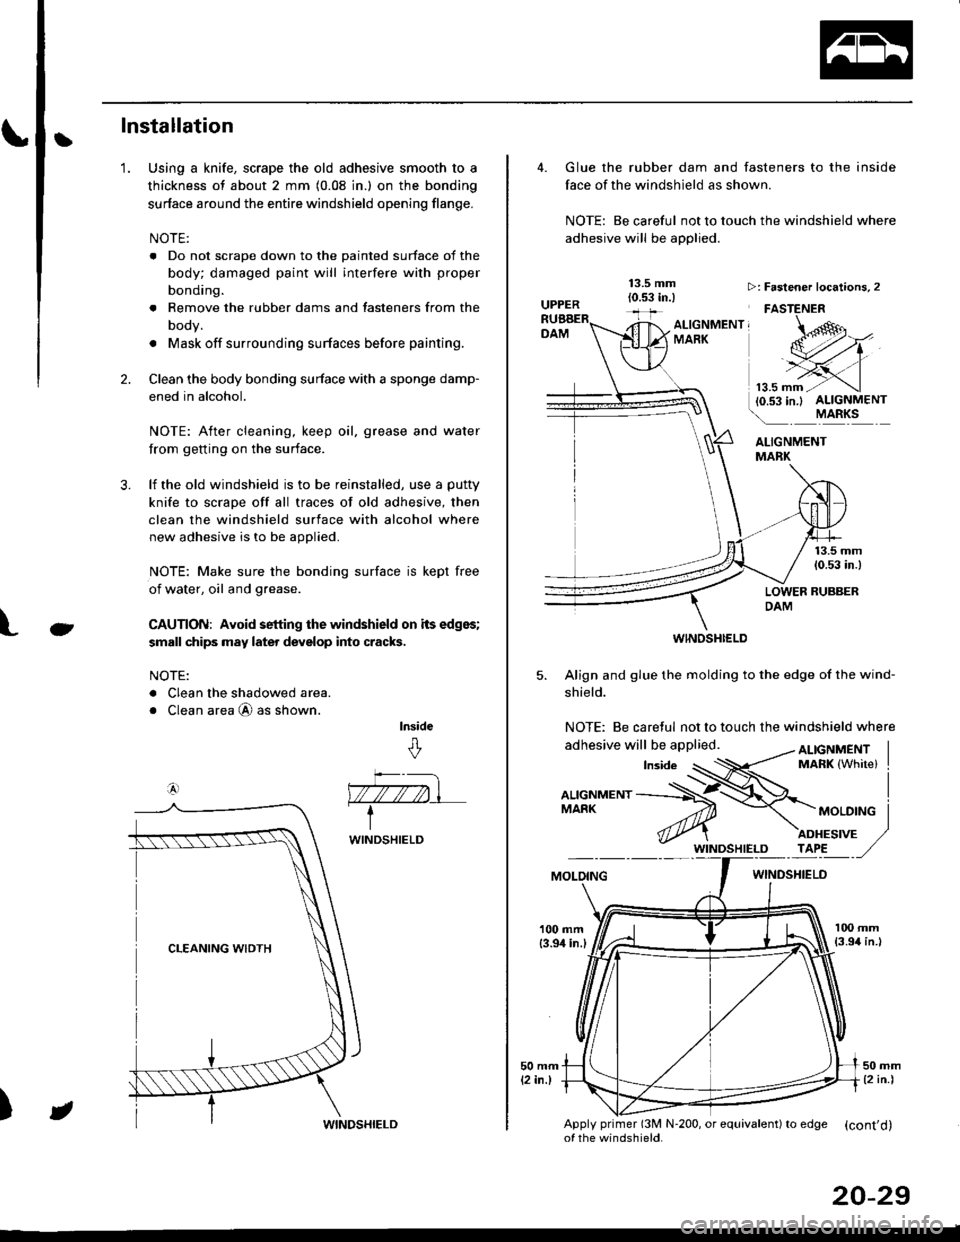
Using a knife, scrape the old adhesive smooth to a
thickness of about 2 mm (0.08 in.) on the bonding
surface around the entire windshield opening flange.
NOTE:
. Do not scrape down to the painted surface of the
body; damaged paint will interfere with proper
bonding.
. Remove the rubber dams and tasteners from the
body.
. Mask off surrounding surfaces before painting.
Clean the body bonding surface with a sponge damp-
ened in alcohol.
NOTE: After cleaning, keep oil, grease and water
from getting on the surface.
lf the old windshield is to be reinstalled, use a putty
knife to scrape off all traces of old adhesive, then
clean the windshield surface with alcohol where
new adhesive is to be applied.
NOTE: Make sure the bonding surface is kept free
of water, oil and grease.
CAUTION: Avoid setting the windshield on its edges;
small chips may later deyelop into cracks.
NOTE:
. Clean the shadowed area.
o Clean area @ as shown.
lnside
&
'1.
2.
3.
Ct
a4)
)
WINDSHIELD
JWINDSHIELD
20-29
Glue the rubber dam and fasteners to the inside
face of the windshield as shown.
NOTE: Be careful not to touch the windshield where
adhesive will be applied.
ALIGNMENTMABK
13.5 mm(0.53 in.)
LOWER RUBBERDAM
WINOSHI€LD
5. Align and glue the molding to the edge of the wind-
shield.
NOTE: Be caretul not to touch the windshield where
>: Faslener localions, 2
FASTENER
ALTGNMENT, -oMARK
MOLOINGWINDSHIELO
100 mm{3.94 in.l
Apply primer (3M N'200, or equivalent) to edSe (cont'd)of the windshield.
Page 1260 of 2189
Windshield
Installation (cont'd)
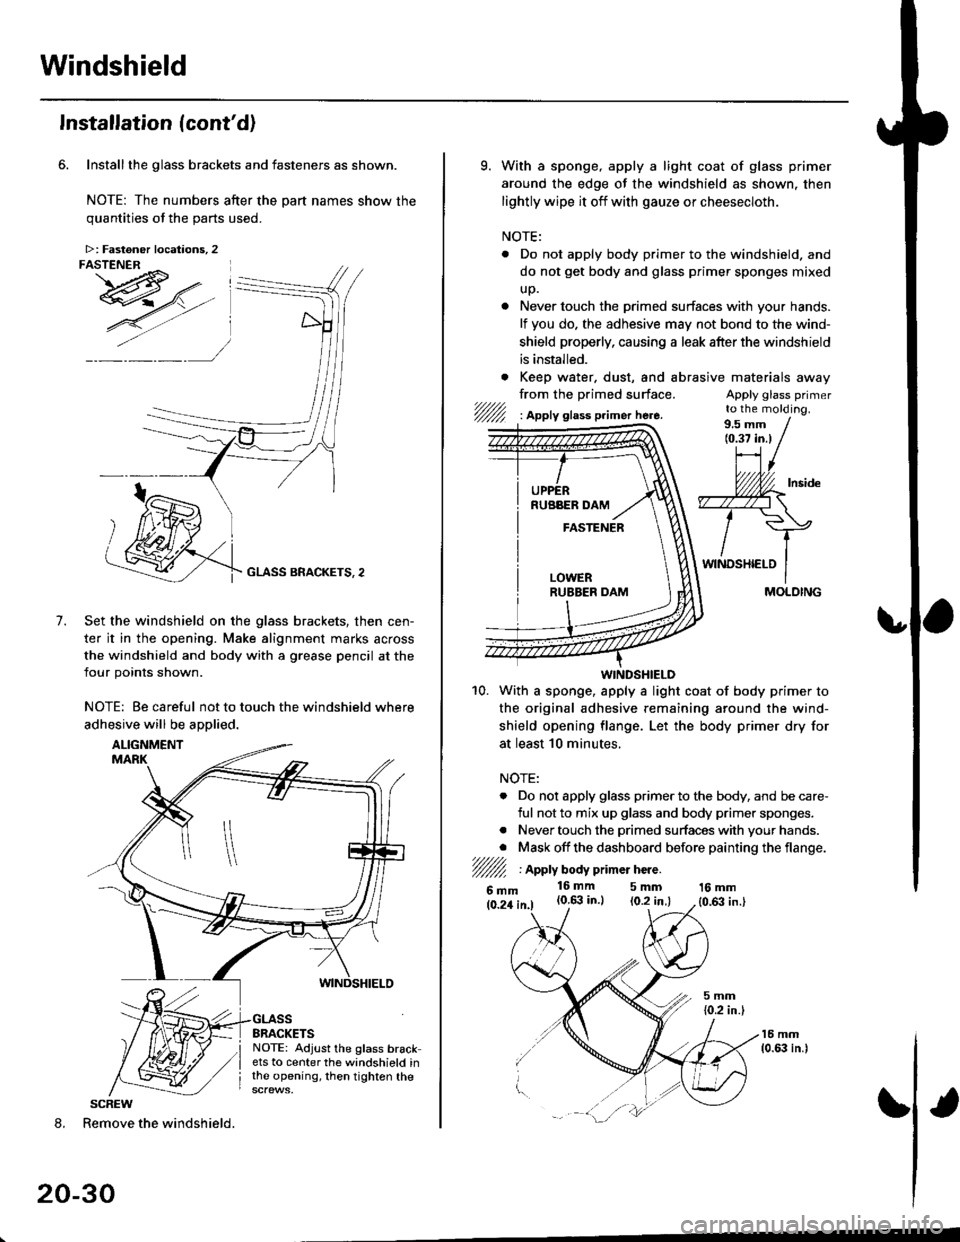
Installthe glass brackets and fasteners as shown.
NOTE: The numbers after the part names show thequantities of the oarts used.
GLASS BRACKETS, 2
Set the windshield on the glass brackets, then cen-
ter it in the opening. Make alignment marks across
the windshield and body with a grease pencil at the
four points shown.
NOTE: Be careful not to touch the windshield where
adhesive will be aDolied.
7.
8. Remove the windshield.
20-30
>: Fastoner locations, 2FASTENER ^ I
I
SCREW
9. With a sponge, apply a light coat of glass primer
around the edge of the windshield as shown. then
lightly wipe it off with gauze or cheesecloth.
NOTE:
. Do not apply body primer to the windshield. and
do not get body and glass primer sponges mixed
up.
. Never touch the primed surfaces with your hands.
lf you do. the adhesive may not bond to the wind-
shield properly, causing a leak after the windshield
is installed.
. Keep water. dust, and abrasrve
from the primed surface.t/////,'/////l I Apply glass p.imer here.
materaals away
Apply glass primerto the molding.
WINDSHIELD
10. With a sponge. apply a light coat of body primer to
the original adhesive remaining around the wind-
shield opening flange. Let the body primer dry for
at least 10 minutes.
NOTE:
. Do not apply glass primer to the body, and be care-
ful not to mix up glass and body primer sponges.
. Never touch the primed surfaces with your hands.
. Mask off the dashboard before painting the flange.7////l/////l I Apply body p mer hcre.
6mm16mm 5mm(0.6:| in.) (0.2 in.l16 mm
{0,63 in.}
/
MOLDING
Page 1261 of 2189
3
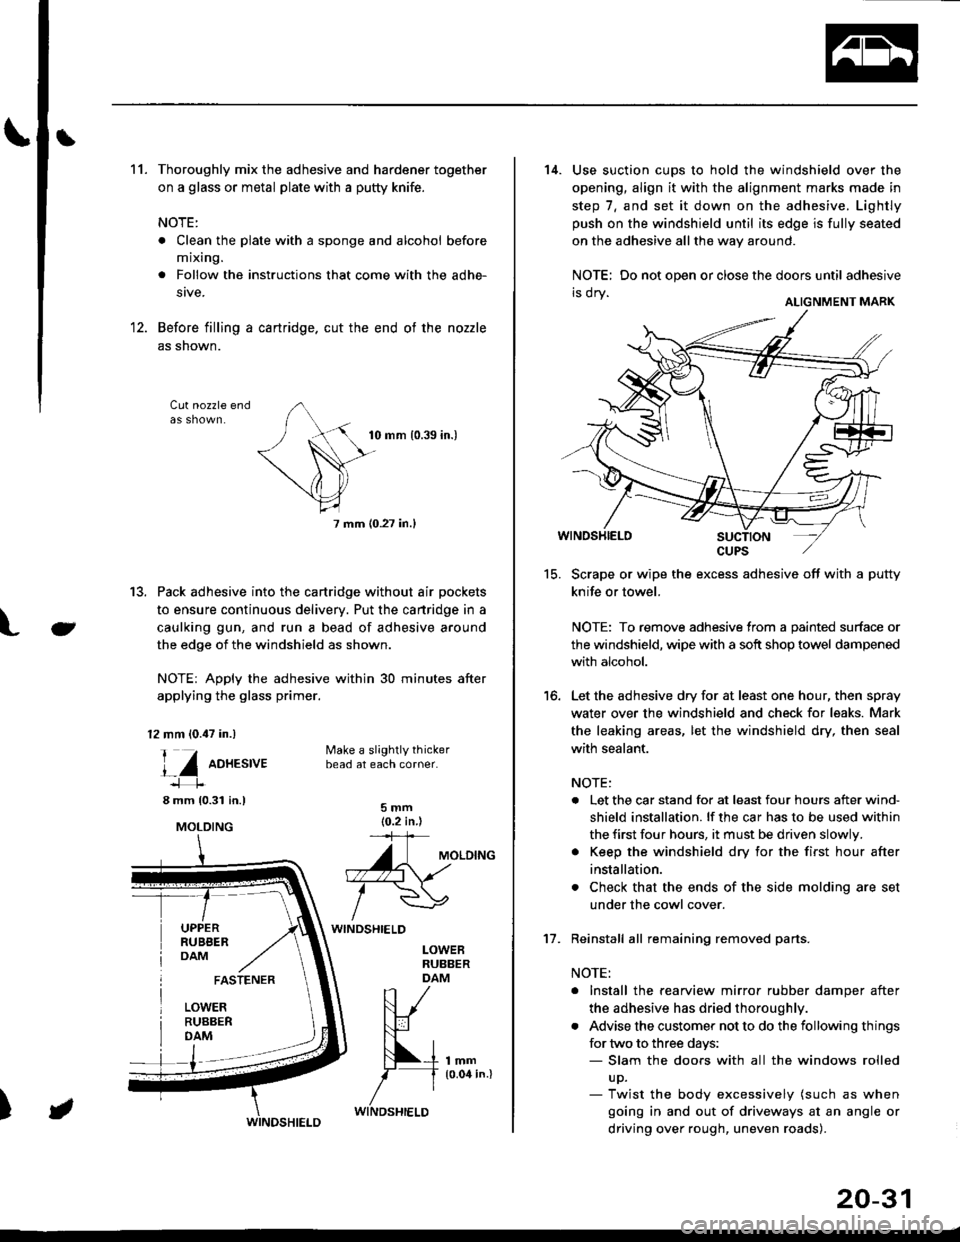
11.Thoroughly mix the adhesive and hardener together
on a glass or metal plate with a putty knife.
NOTE:
. Clean the plate with a sponge and alcohol before
mixing.
. Follow the instructions that come with the adhe-
stve.
Before filling a cartridge. cut the end of the nozzle
as shown.
Cut nozzle end
tu
10 mm 10.39 in.)
7 mm (0.27 in.l
13. Pack adhesive into the cartridge without air pockets
to ensure continuous delivery. Put the cartridge in a
caulking gun, and run a bead of adhesive around
the edge of the windshield as shown.
NOTE: Apply the adhesive within 30 minutes after
applying the glass primer.
12 mm (0.47 in.)
l_Z oo*.t,ut
8 mm 10.31 in.l
UPPERRUBBERDAM
Make a slightly thickerbead at each corner.
5mm(0.2 in )='+
A\uloto^o. -.\
/wWINDSHIELD
LOWEBRUBBERDAM
lmm10.04 in.l
FASTENER
LOWERRUBBERDAM
)
MOLDING
WINDSHIELD
20-31
15.
16.
14. Use suction cups to hold the windshield over the
opening, align it with the alignment marks made in
step 7, and set it down on the adhesive. Lightly
push on the windshield until its edge is fully seated
on the adhesive all the way around.
NOTE: Do not open or close the doors until adhesive
ri vI Y ALTGNMENT MARK
Scrape or wipe the excess adhesive off with a putty
knife or towel.
NOTE: To remove adhesive from a painted surface or
the windshield, wipe with a soft shop towel dampened
with alcohol.
Let the adhesive dry for at least one hour, then spray
water over the windshield and check for leaks. Mark
the leaking areas, let the windshield dry, then seal
with sealant.
NOTE:
. Let the car stand for at least four hours after wind-
shield installation. lf the car has to be used within
the first four hours, it must be driven slowly.
. Keep the windshield dry for the first hour after
installation.
. Check that the ends of the side molding are set
under the cowl cover.
Reinstall all remaining removed parts.
NOTE:
. Install the rearview mirror rubber damper after
the adhesive has dried thoroughl',.
. Advise the customer not to do the following things
for two to three days:- Slam the doors with all the windows rolled
up.- Twist the body excessively (such as when
going in and out of driveways at an angle or
driving over rough, uneven roads).
't7.
Page 1263 of 2189
Ilnstallation
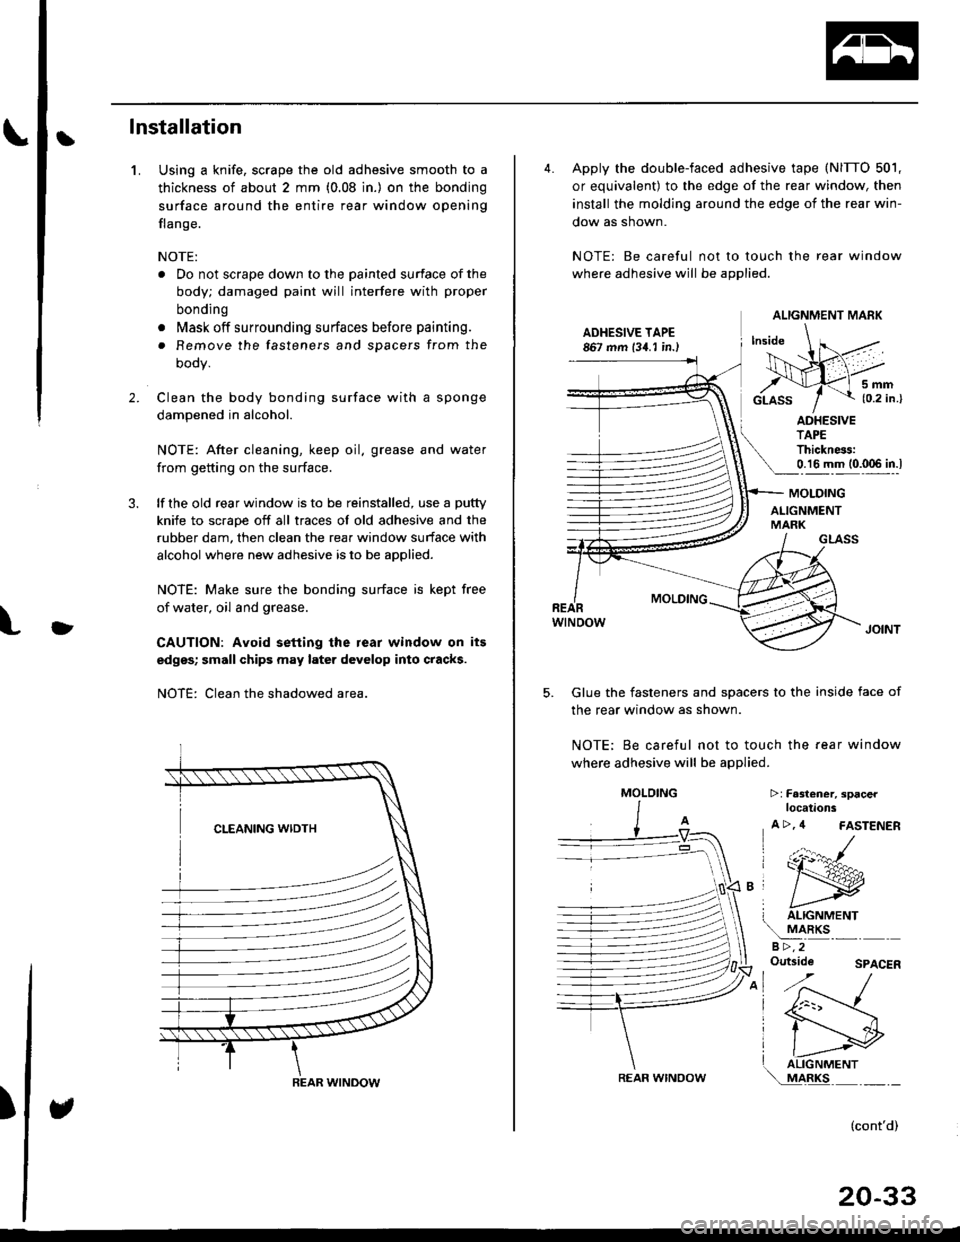
Using a knife, scrape the old adhesive smooth to a
thickness of about 2 mm (0.08 in.) on the bonding
surface around the entire rear window opening
flange.
NOTE:
. Do not scrape down to the painted surface of the
body; damaged paint will interfere with proper
bonding
o Mask off surrounding surfaces before painting.
. Remove the fasteners and spacers from the
oooy.
Clean the body bonding surface with a sponge
dampened in alcohol.
NOTE: After cleaning, keep oil. grease and water
from getting on the surface.
lf the old rear window is to be reinstalled, use a putty
knife to scrape off all traces of old adhesive and the
rubber dam, then clean the rear window surface with
alcohol where new adhesive is to be applied.
NOTE: Make sure the bonding surface is kept free
of water, oil and grease.
CAUTION: Avoid setting the rear window on its
edges; small chips may later develop into cracks.
NOTE: Clean the shadowed area.
1.
2.
)
)
REAR WINDOW
4. Apply the double-faced adhesive tape (NITTO 501,
or equivalent) to the edge of the rear window, then
install the molding around the edge of the rear win-
dow as shown.
NOTE: Be careful not to touch the rear window
where adhesive will be applied.
ADHESIVE TAPE867 mm 134. I in.)
5mm{0.2 in.}
ADHESIVETAPEThickness:0.16 mm (0.006 in.l
GLASS
MOLDING
wtNoow
Glue the fasteners and spacers to the inside face of
the rear window as shown.
NOTE; Be careful not to touch the fear window
where adhesive will be applied.
5.
MOLDING
ALIGNMENTMARK
T ALIGNMENT
!
aRKsa >,2Outside
>:Fa3l€ner, spacerlocations
A >, 4 FASTENER
(:r:^#-
ry
I liGrtrrrrertrr\..!44llc-''' - -
SPACER
(cont'd)
20-33
ALIGNMENT MARK
REAR WINOOW
MOLOING
Page 1264 of 2189
Rear Window
Installation (cont'dl
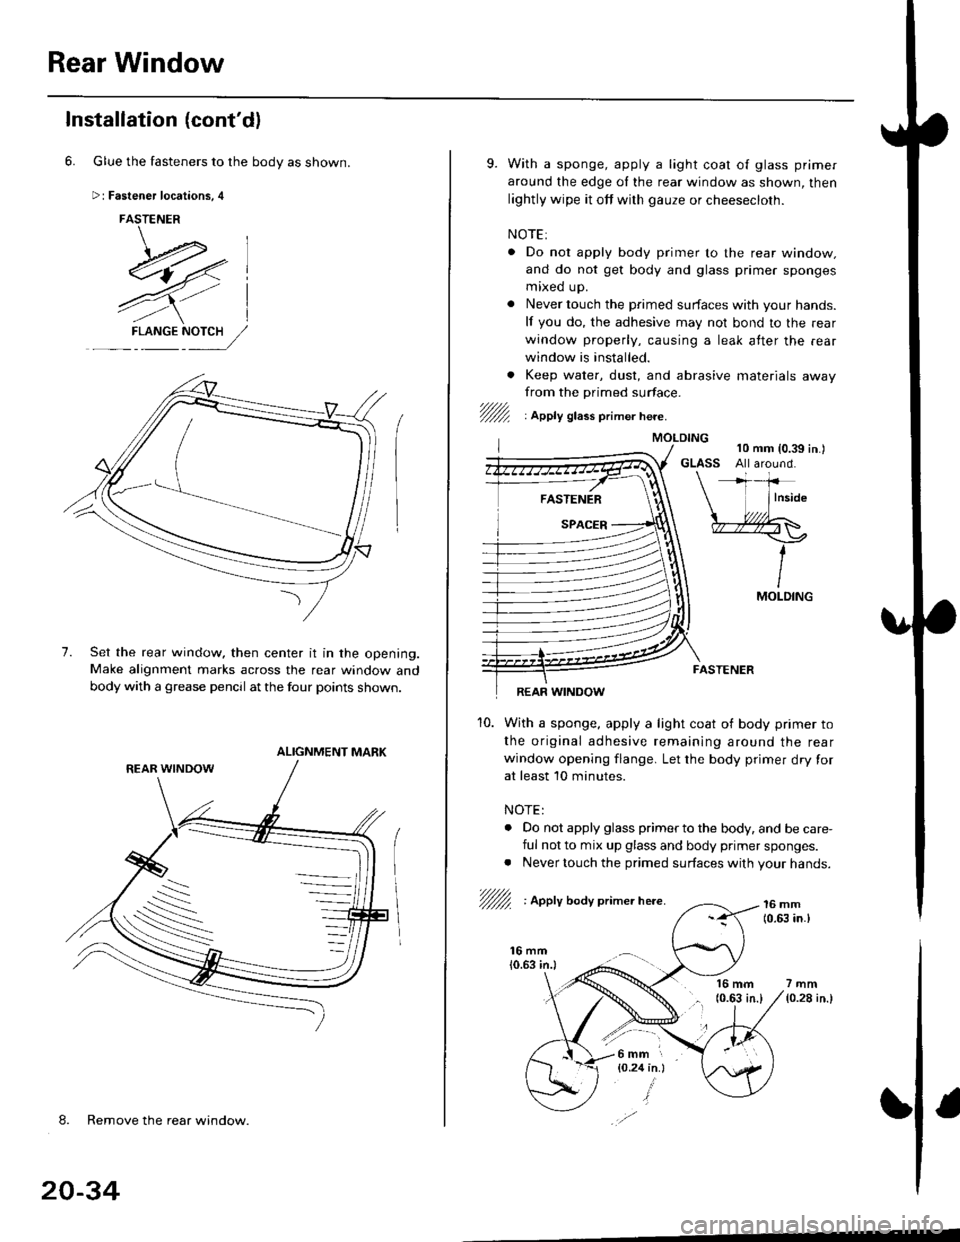
6. Glue the fasteners to the body as shown.
Fastener locations, 4
FASTENER
\-.*l-E4,7-- ,.--
7),/l
4Yl
7.
F-L NGENY:,//
Set the rear window, then center it in the opening.Make alignment marks across the rear window and
body with a grease pencll at the four points shown.
ALIGNMENT MARK
-\
-.._s
-
8. Remove the rear window.
20-34
9. With a sponge, apply a light coat o{ glass primer
around the edge oI the rear window as shown, then
lightly wipe it off with gauze or cheesecloth.
NOTE:
. Do nol apply body primer to the rear window.
and do not get body and glass primer sponges
mixed up.
. Never touch the primed surfaces with your hands.
lf you do, the adhesive may not bond to the rear
window properly, causing a leak atter the .ear
window is installed.
. Keep water, dust, and abrasive materials awayfrom the primed surface.'/fur1 : lppty gtass primer here.
16 mm(0.63 in.l7mm
{0.28 in.}
FASTENER
REAR WINDOW
10. With a sponge, apply a light coat of body primer to
the original adhesive remaining around the rear
window opening flange. Let the body primer dry for
at least 10 minutes.
NOTE:
. Do not apply glass primer to the body. and be care,
ful not to mix up glass and body primer sponges.. Never touch the primed surfaces with your hands.
/fu/ : Apply boay primer here.16 mm(0.(I, in.l
MOI-DING
l6mm r
{O.24 in.}
Page 1265 of 2189
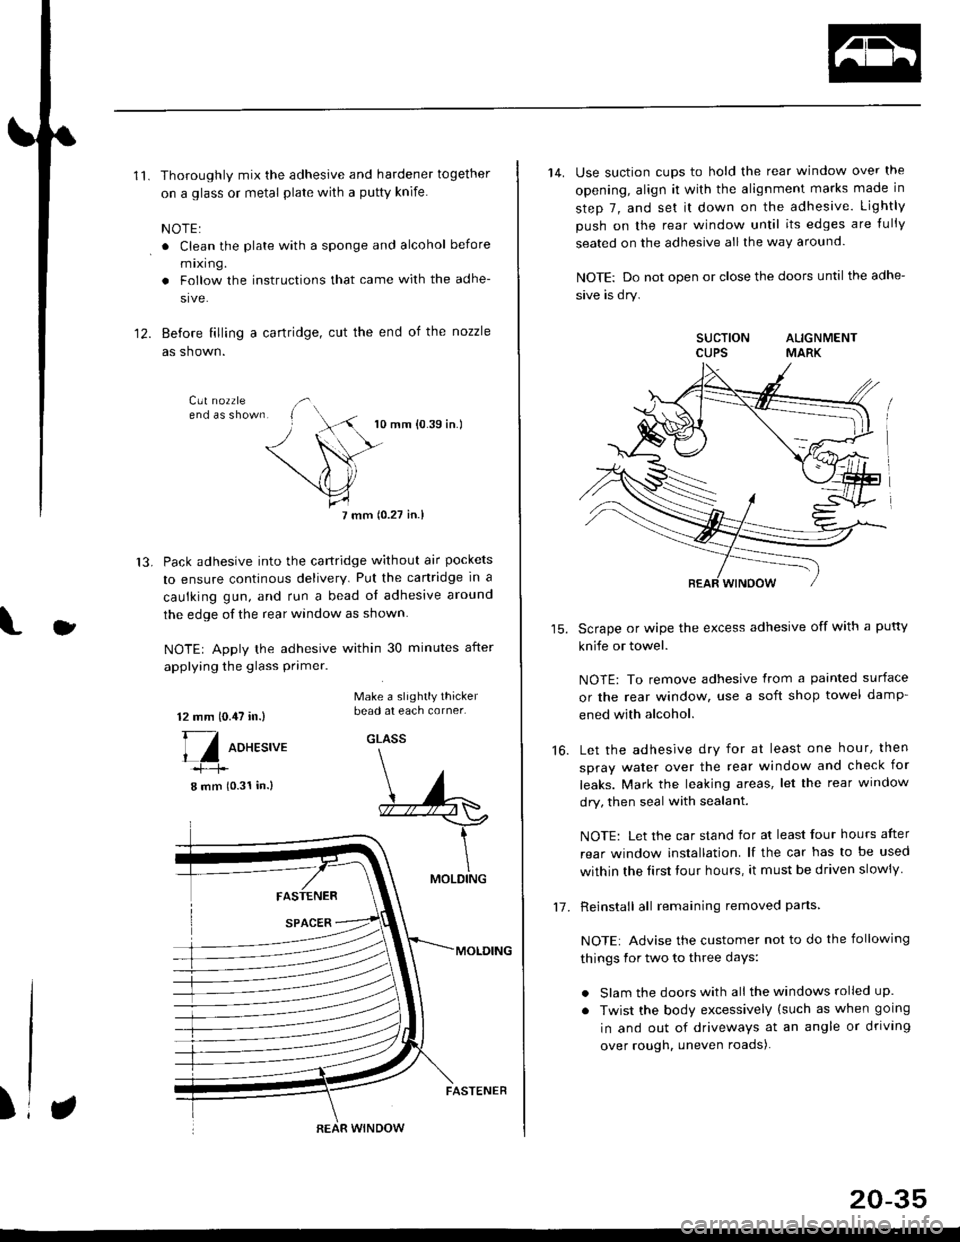
'11.Thoroughly mix the adhesive and hardener together
on a glass or metal plate wilh a putty knife.
NOTE:
. Clean the plate with a sponge and alcohol before
mixing.
. Follow the instructions that came with the adhe-
sive.
Before filling a cartridge, cut the end of the nozzle
as shown.
10 mm {0.39 in.)
7 mm (0.27 in.l
Pack adhesive into the cartridge without air pockets
to ensure continous delivery. Put the canridge in a
caulking gun, and run a bead ol adhesive around
the edge of the rear window as shown.
NOTE| Apply the adhesive within 30 minutes after
applying the glass primer.
12.
13.
J
12 mm 10.,U in.)
[/ oo*r.,u.
8 mm (0.31 in.)
Make a slightly thickerbead at each corner.
GLASS
FASTENER
SPACER
MOLDING
MOLDING
)REAR WINDOW
FASTENER
20-35
14. Use suction cups to hold the rear window over the
opening, align it with the alignment marks made in
step 7, and set it down on the adhesive. Lightly
push on the rear window until its edges are {ully
seated on the adhesive all the way around.
NOTE: Do not open or close the doors until the adhe-
sive is dry.
SUCTION ALIGNMENTCUPS MARK
Scrape or wipe the excess adhesive off with a putty
knife or towel.
NOTE: To remove adhesive from a painted surface
or the rear window, use a soft shop towel damp-
ened with alcohol.
Let the adhesive dry for at least one hour, then
spray water over the rear window and check for
leaks. Mark the leaking areas, let the rear window
dry, then seal with sealant.
NOTE: Let the car stand for at least four hours after
rear window installation. lf the car has to be used
within the Iirst tour hours, it must be driven slowly
Reinstall all remaining removed parts
NOTE: Advise the customer not to do the following
things for two to three days:
. Slam the doors with all the windows rolled up.
. Twist the body excessively (such as when going
in and out of driveways at an angle or driving
over rough. uneven roads).
16.
1-7 .
Page 1268 of 2189
Rear Window
Installation (cont'd)
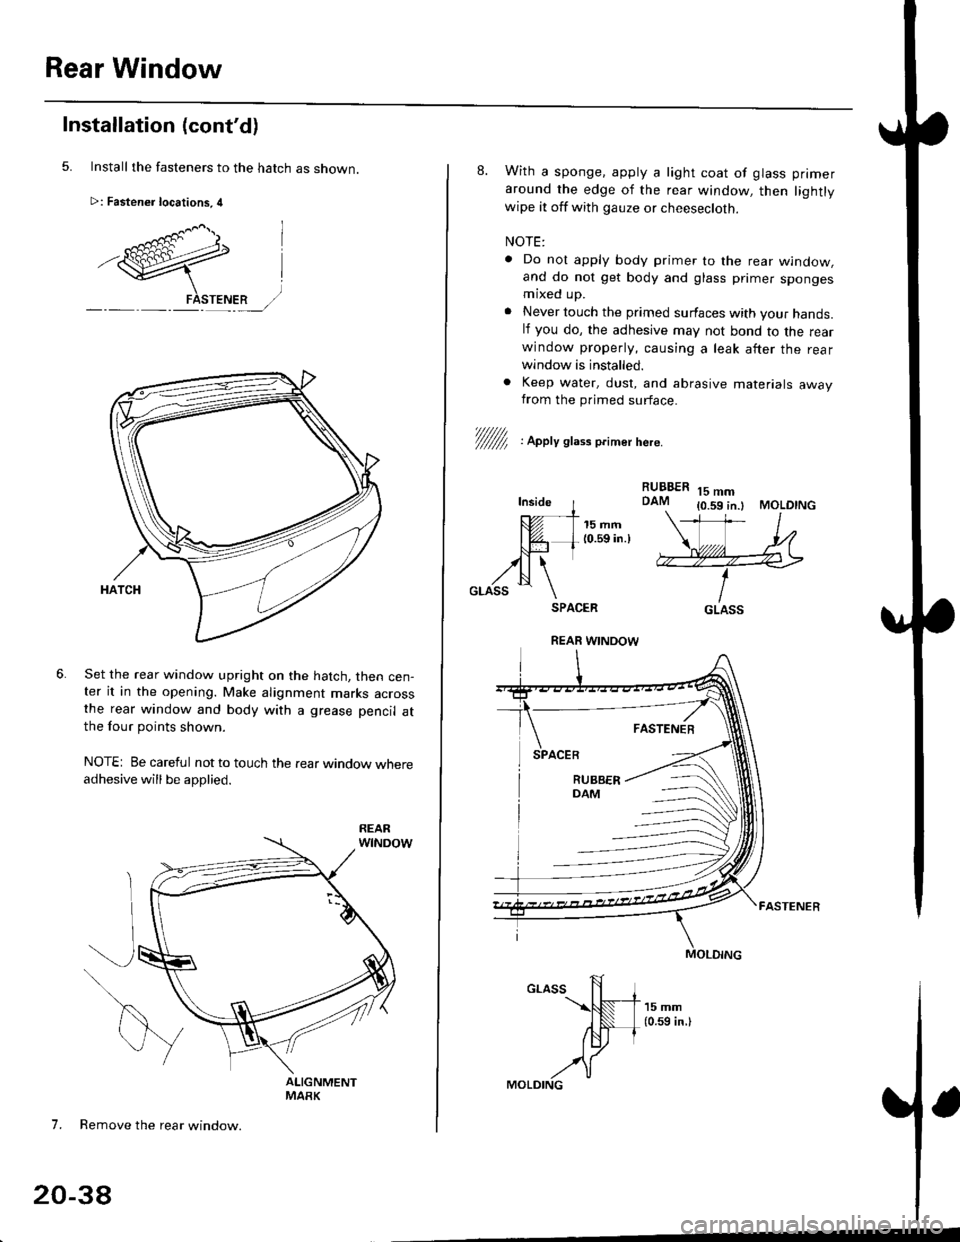
Install the fasteners to the hatch as snown.
>: Fastener locations, 4
Set the rear window upright on the hatch, then cen-ter it in the opening. Make alignment marks acrossthe rear window and body with a grease pencil atthe four points shown.
NOTE: Be careful not to touch the rear window whereadhesive will be applied.
7. Remove the rear window.
20-38
8. With a sponge. apply a light coat of glass primer
around the edge of the rear window, then lightlywipe it off with gauze or cheesecloth.
NOTE:
. Do nol apply body primer to the rear window,and do not get body and glass primer spongesmaxed up.
. Never touch the primed surfaces with your hands.lf you do, the adhesive may not bond to the rearwindow properly, causing a leak after the rearwindow is installed.
. Keep water, dust, and abrasive materials awayfrom the primed surface.
RUBBERDAM15 mm{0.59 in.l MOLDING
V/////f , apety st,." o.imer here.
Inside I---- - -t-
tUt I 15mm| @- L 10.59 in.lNJ-l trll \
,zN \GLASS \SPACER
FASTENER
GLASS
REAR WINOOW