Page 1571 of 1691
Fig. 1: Measuring Riding Height (Dakota & Durango 4WD)
Courtesy of Chrysler Corp.
JACKING & HOISTING
FLOOR JACK
CAUTION: DO NOT place jack under any part of vehicle underbody. DO NOT
attempt to raise one entire side of vehicle by placing a jack
midway between front and rear wheels, as permanent body
damage could occur. DO NOT place jack under an axle tube,
aluminum differential, steering linkage, engine or
transmission oil pan, fuel tank or front suspension arm.
Caravan, Town & Country, & Voyager
To raise front end, place floor jack under front crossmember
forward flange, inboard of lower control arm pivot. To raise rear end,
place floor jack under rear axle, next to leaf spring mount. See
Fig. 2 .
Page 1580 of 1691
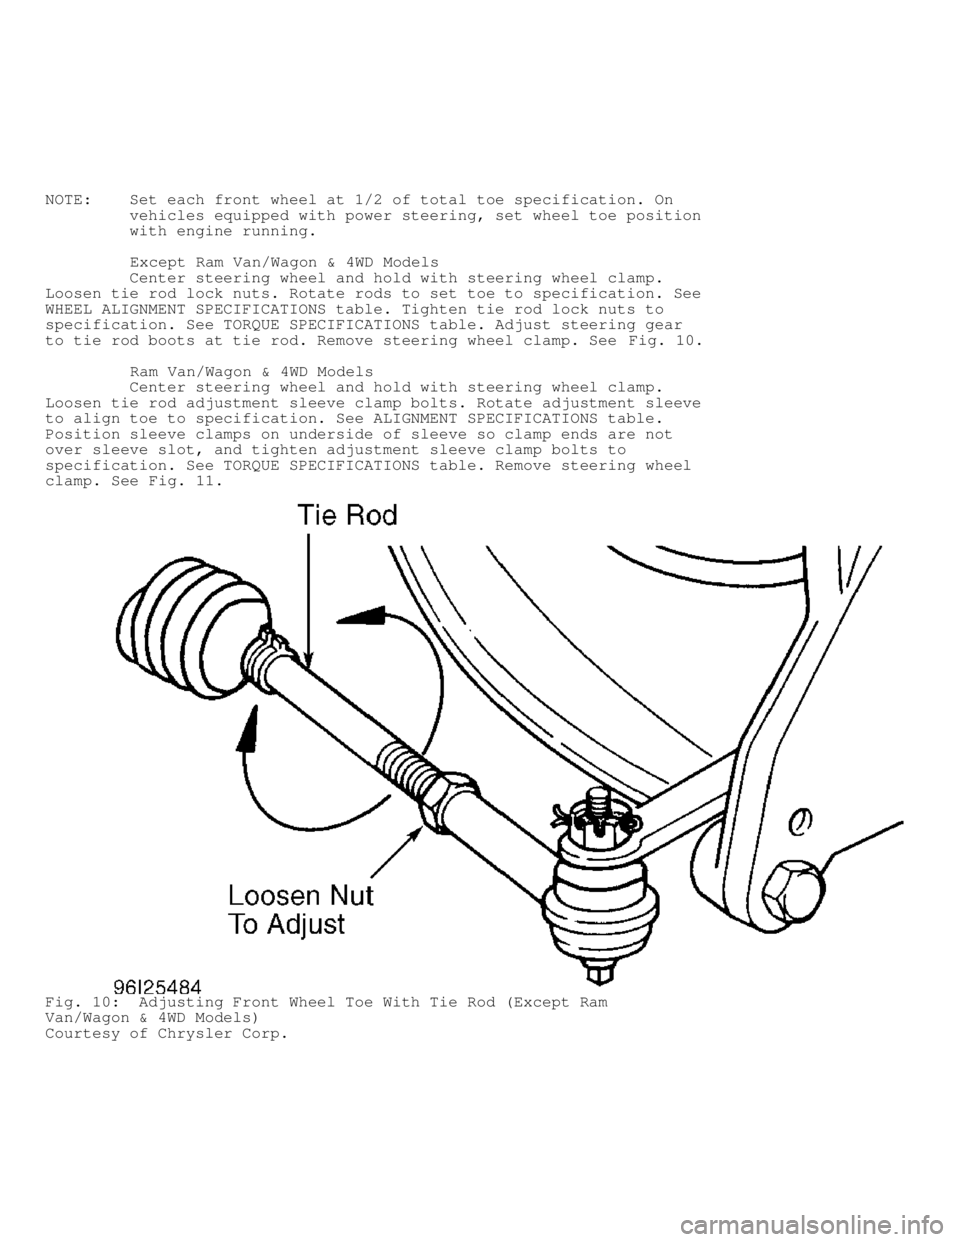
NOTE: Set each front wheel at 1/2 of total toe specification. On
vehicles equipped with power steering, set wheel toe position
with engine running.
Except Ram Van/Wagon & 4WD Models
Center steering wheel and hold with steering wheel clamp.
Loosen tie rod lock nuts. Rotate rods to set toe to specification. See
WHEEL ALIGNMENT SPECIFICATIONS table. Tighten tie rod lock nuts to
specification. See TORQUE SPECIFICATIONS table. Adjust steering gear
to tie rod boots at tie rod. Remove steering wheel clamp. See Fig. 10.
Ram Van/Wagon & 4WD Models
Center steering wheel and hold with steering wheel clamp.
Loosen tie rod adjustment sleeve clamp bolts. Rotate adjustment sleeve
to align toe to specification. See ALIGNMENT SPECIFICATIONS table.
Position sleeve clamps on underside of sleeve so clamp ends are not
over sleeve slot, and tighten adjustment sleeve clamp bolts to
specification. See TORQUE SPECIFICATIONS table. Remove steering wheel
clamp. See Fig. 11.
Fig. 10: Adjusting Front Wheel Toe With Tie Rod (Except Ram
Van/Wagon & 4WD Models)
Courtesy of Chrysler Corp.
Page 1585 of 1691
�
WHEEL A LIG NM EN T T H EO RY/O PER ATIO N
�
1999 D odge P ic ku p R 1500
GENERAL INFORMATION
Wheel Alignment Theory & Operation
ALL MODELS
* PLEASE READ THIS FIRST *
NOTE: This article is intended for general information purposes
only. This information may not apply to all makes and models.
PRE-ALIGNMENT INSTRUCTIONS
GENERAL ALIGNMENT CHECKS
Before adjusting wheel alignment, check the following:
* Each axle uses tires of same construction and tread style,
equal in tread wear and overall diameter. Verify that radial
and axial runout is not excessive. Inflation should be at
manufacturer's specifications.
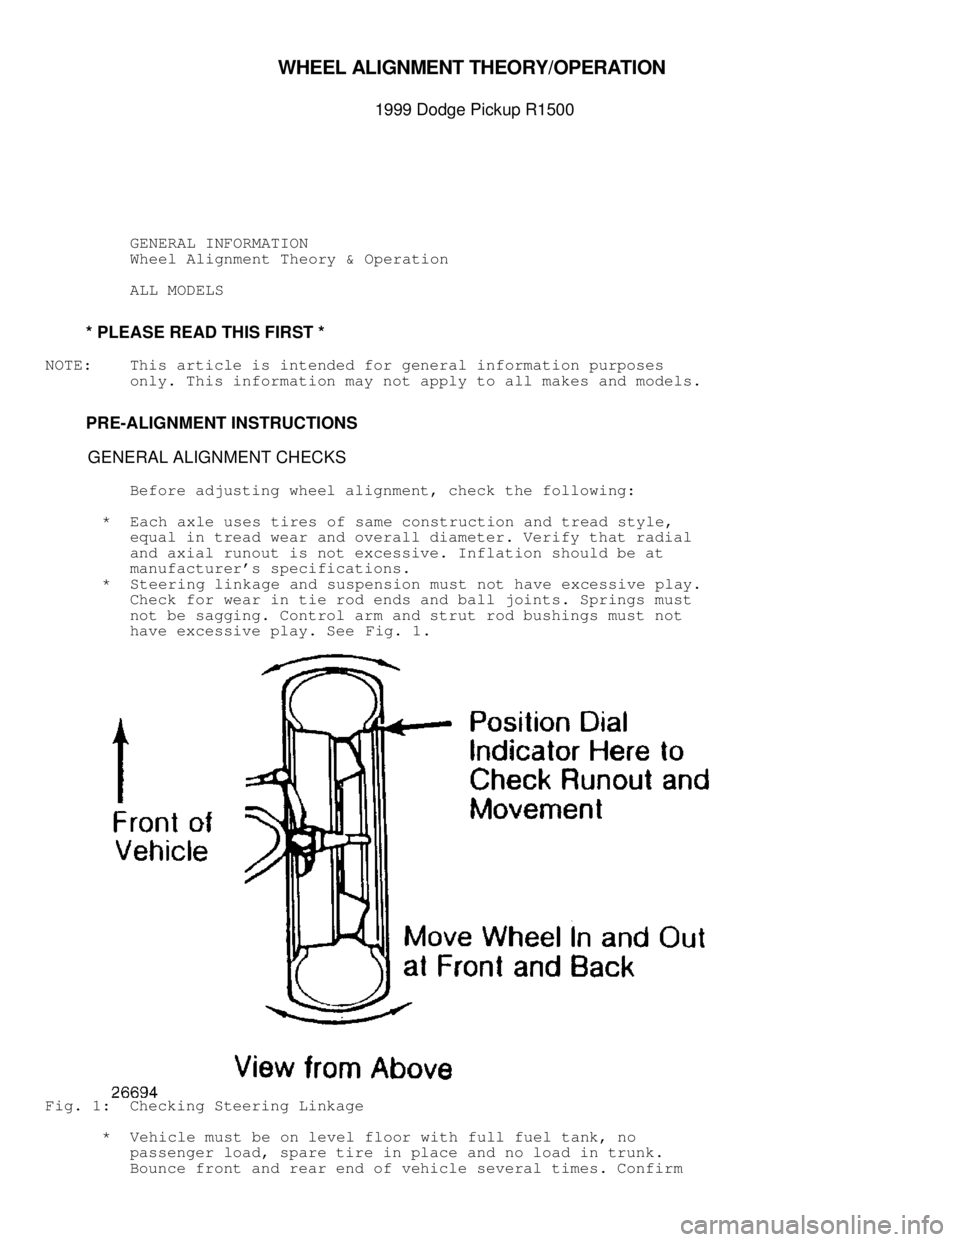
* Steering linkage and suspension must not have excessive play.
Check for wear in tie rod ends and ball joints. Springs must
not be sagging. Control arm and strut rod bushings must not
have excessive play. See Fig. 1.
Fig. 1: Checking Steering Linkage
* Vehicle must be on level floor with full fuel tank, no
passenger load, spare tire in place and no load in trunk.
Bounce front and rear end of vehicle several times. Confirm
Page 1586 of 1691
vehicle is at normal riding height.
* Steering wheel must be centered with wheels in straight ahead
position. If required, shorten one tie rod adjusting sleeve
and lengthen opposite sleeve (equal amount of turns). See
Fig. 2.
* Wheel bearings should have the correct preload and lug nuts
must be tightened to manufacturer's specifications. Adjust
camber, caster and toe-in using this sequence. Follow
instructions of the alignment equipment manufacturer.
CAUTION: Do not attempt to correct alignment by straightening parts.
Damaged parts must be replaced.
Fig. 2: Adjusting Tie Rod Sleeves (Top View)
CAMBER
1) Camber is the tilting of the wheel, outward at either top
or bottom, as viewed from front of vehicle. See Fig. 3.
2) When wheels tilts outward at the top (from centerline of
vehicle), camber is positive. When wheels tilt inward at top, camber
is negative. Amount of tilt is measured in degrees from vertical.
Page 1587 of 1691
Fig. 3: Determining Camber Angle
CASTER
1) Caster is tilting of front steering axis either forward or
backward from vertical, as viewed from side of vehicle. See Fig. 4.
2) When axis is tilted backward from vertical, caster is
positive. This creates a trailing action on front wheels. When axis is
tilted forward, caster is negative, causing a leading action on front
wheels.
Fig. 4: Determining Caster Angle
TOE-IN ADJUSTMENT
Toe-in is the width measured at the rear of the tires
Page 1588 of 1691
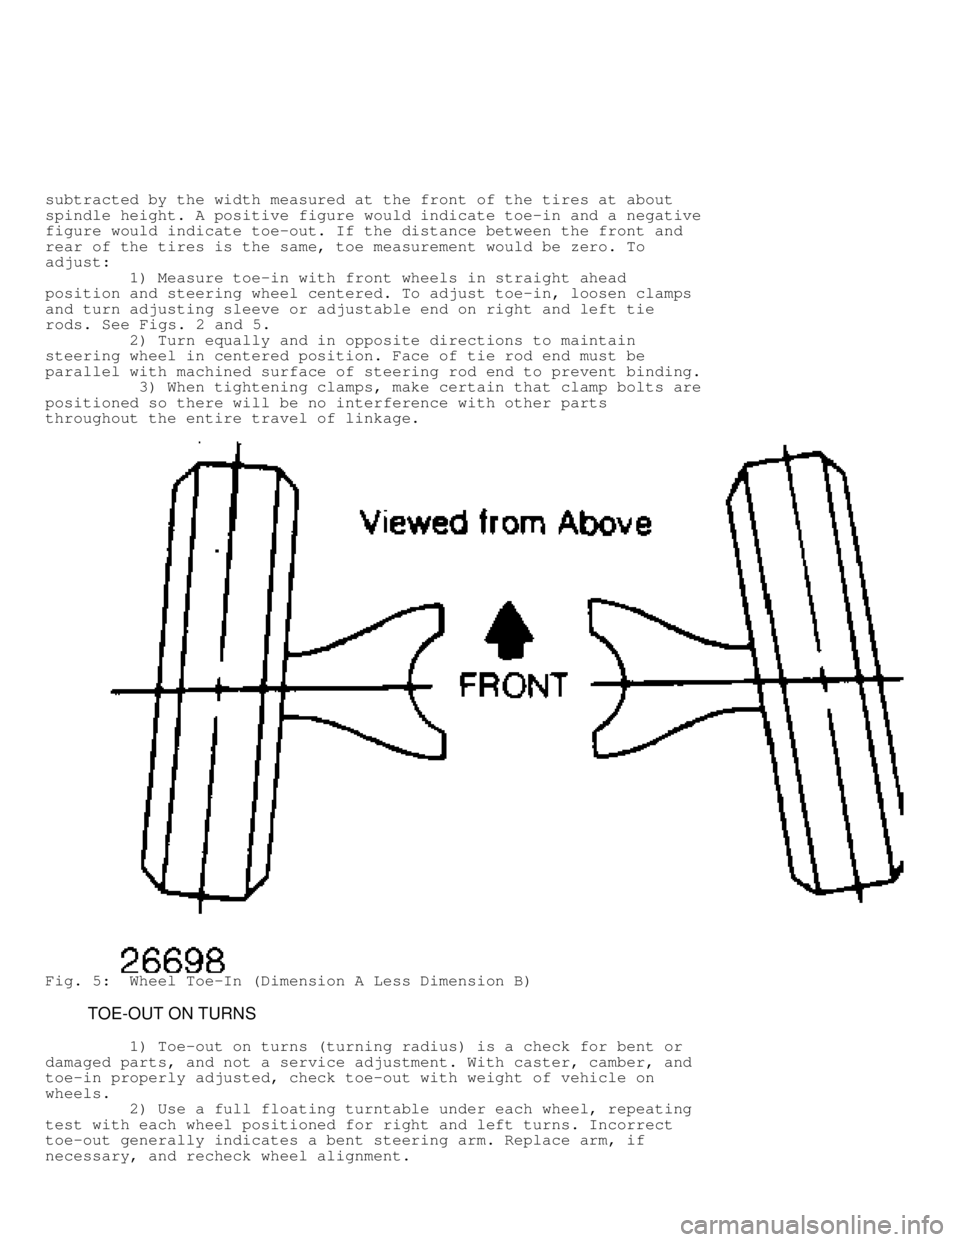
subtracted by the width measured at the front of the tires at about
spindle height. A positive figure would indicate toe-in and a negative
figure would indicate toe-out. If the distance between the front and
rear of the tires is the same, toe measurement would be zero. To
adjust:
1) Measure toe-in with front wheels in straight ahead
position and steering wheel centered. To adjust toe-in, loosen clamps
and turn adjusting sleeve or adjustable end on right and left tie
rods. See Figs. 2 and 5.
2) Turn equally and in opposite directions to maintain
steering wheel in centered position. Face of tie rod end must be
parallel with machined surface of steering rod end to prevent binding.
3) When tightening clamps, make certain that clamp bolts are
positioned so there will be no interference with other parts
throughout the entire travel of linkage.
Fig. 5: Wheel Toe-In (Dimension A Less Dimension B)
TOE-OUT ON TURNS
1) Toe-out on turns (turning radius) is a check for bent or
damaged parts, and not a service adjustment. With caster, camber, and
toe-in properly adjusted, check toe-out with weight of vehicle on
wheels.
2) Use a full floating turntable under each wheel, repeating
test with each wheel positioned for right and left turns. Incorrect
toe-out generally indicates a bent steering arm. Replace arm, if
necessary, and recheck wheel alignment.
Page 1613 of 1691
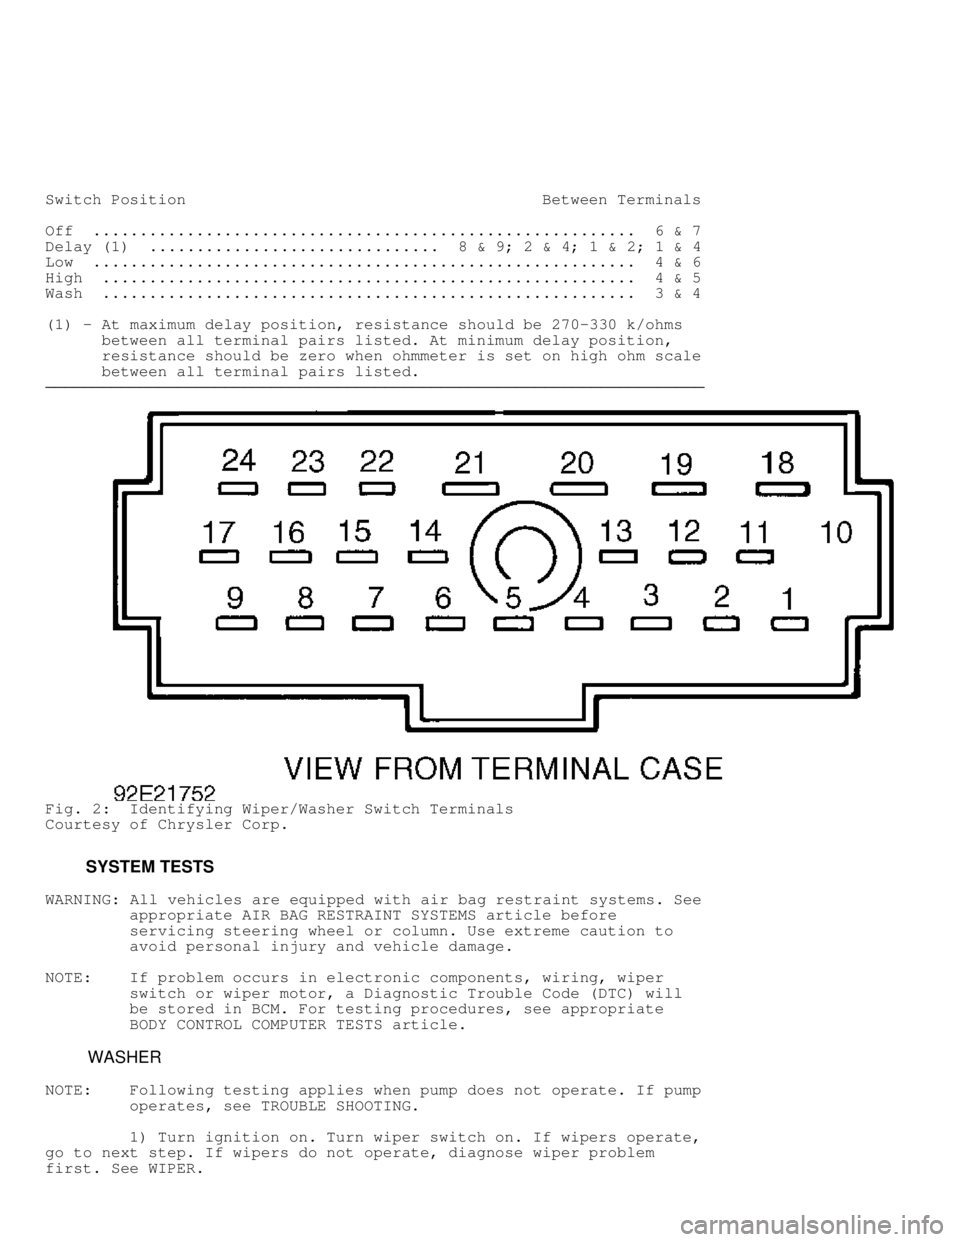
Switch Position Between Terminals
Off .......................................................... 6 & 7
Delay (1) ............................... 8 & 9; 2 & 4; 1 & 2; 1 & 4
Low .......................................................... 4 & 6
High ......................................................... 4 & 5
Wash ......................................................... 3 & 4
( 1) - At maximum delay position, resistance should be 270-330 k/ohms
between all terminal pairs listed. At minimum delay position,
resistance should be zero when ohmmeter is set on high ohm scale
between all terminal pairs listed.
������������������\
������������������\
������������������\
������������������\
������������������\
������������������\
������������������\
�������������
Fig. 2: Identifying Wiper/Washer Switch Terminals
Courtesy of Chrysler Corp.
SYSTEM TESTS
WARNING: All vehicles are equipped with air bag restraint systems. See
appropriate AIR BAG RESTRAINT SYSTEMS article before
servicing steering wheel or column. Use extreme caution to
avoid personal injury and vehicle damage.
NOTE: If problem occurs in electronic components, wiring, wiper
switch or wiper motor, a Diagnostic Trouble Code (DTC) will
be stored in BCM. For testing procedures, see appropriate
BODY CONTROL COMPUTER TESTS article.
WASHER
NOTE: Following testing applies when pump does not operate. If pump
operates, see TROUBLE SHOOTING.
1) Turn ignition on. Turn wiper switch on. If wipers operate,
go to next step. If wipers do not operate, diagnose wiper problem
first. See WIPER.
Page 1616 of 1691
High ............................................................. 1������������������\
������������������\
������������������\
������������������\
������������������\
������������������\
������������������\
�������������
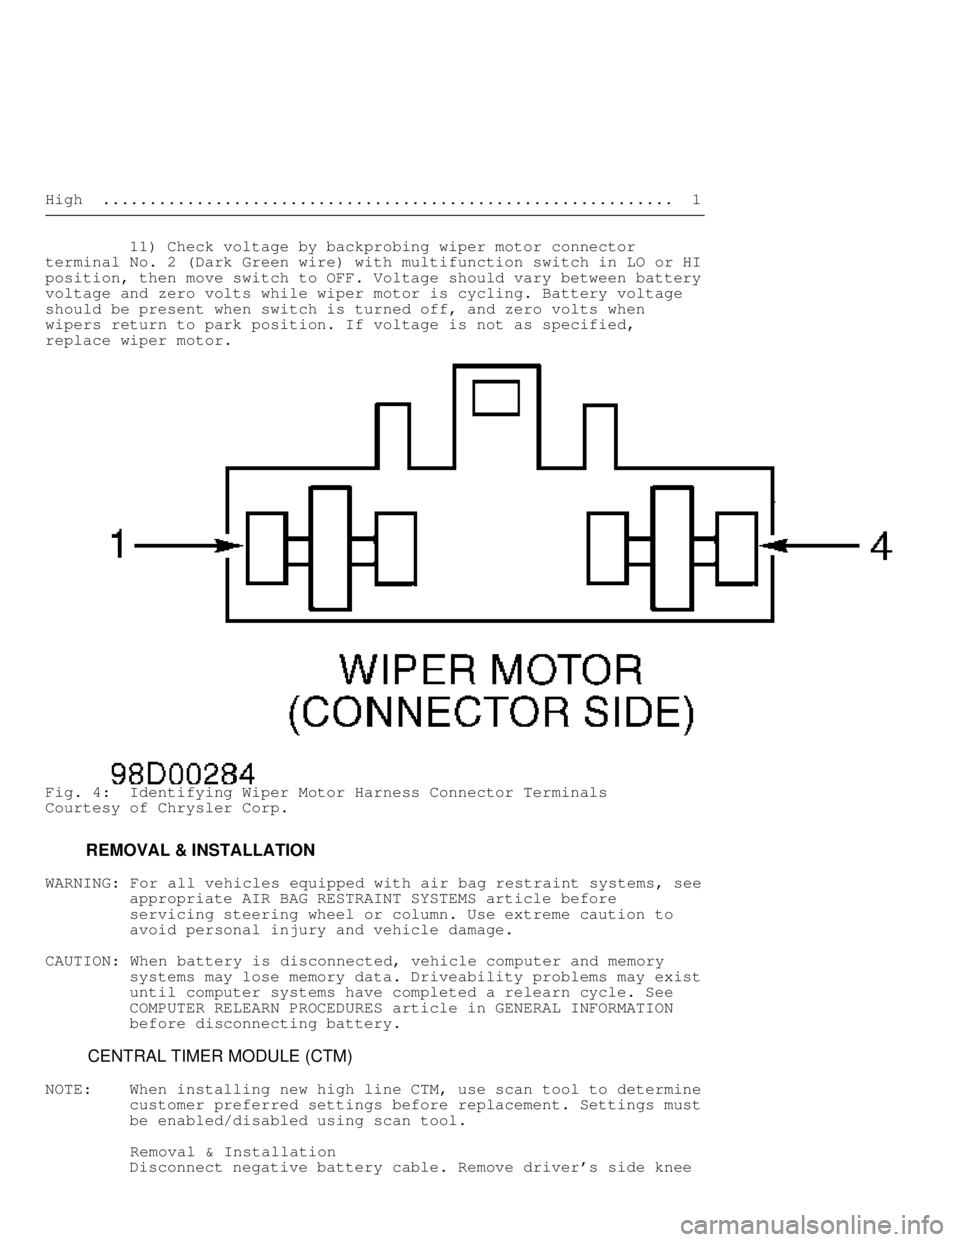
11) Check voltage by backprobing wiper motor connector
terminal No. 2 (Dark Green wire) with multifunction switch in LO or HI\
position, then move switch to OFF. Voltage should vary between battery
voltage and zero volts while wiper motor is cycling. Battery voltage
should be present when switch is turned off, and zero volts when
wipers return to park position. If voltage is not as specified,
replace wiper motor.
Fig. 4: Identifying Wiper Motor Harness Connector Terminals
Courtesy of Chrysler Corp.
REMOVAL & INSTALLATION
WARNING: For all vehicles equipped with air bag restraint systems, see
appropriate AIR BAG RESTRAINT SYSTEMS article before
servicing steering wheel or column. Use extreme caution to
avoid personal injury and vehicle damage.
CAUTION: When battery is disconnected, vehicle computer and memory
systems may lose memory data. Driveability problems may exist
until computer systems have completed a relearn cycle. See
COMPUTER RELEARN PROCEDURES article in GENERAL INFORMATION
before disconnecting battery.
CENTRAL TIMER MODULE (CTM)
NOTE: When installing new high line CTM, use scan tool to determine
customer preferred settings before replacement. Settings must
be enabled/disabled using scan tool.
Removal & Installation
Disconnect negative battery cable. Remove driver's side knee