1999 DODGE RAM instrument panel
[x] Cancel search: instrument panelPage 899 of 1691
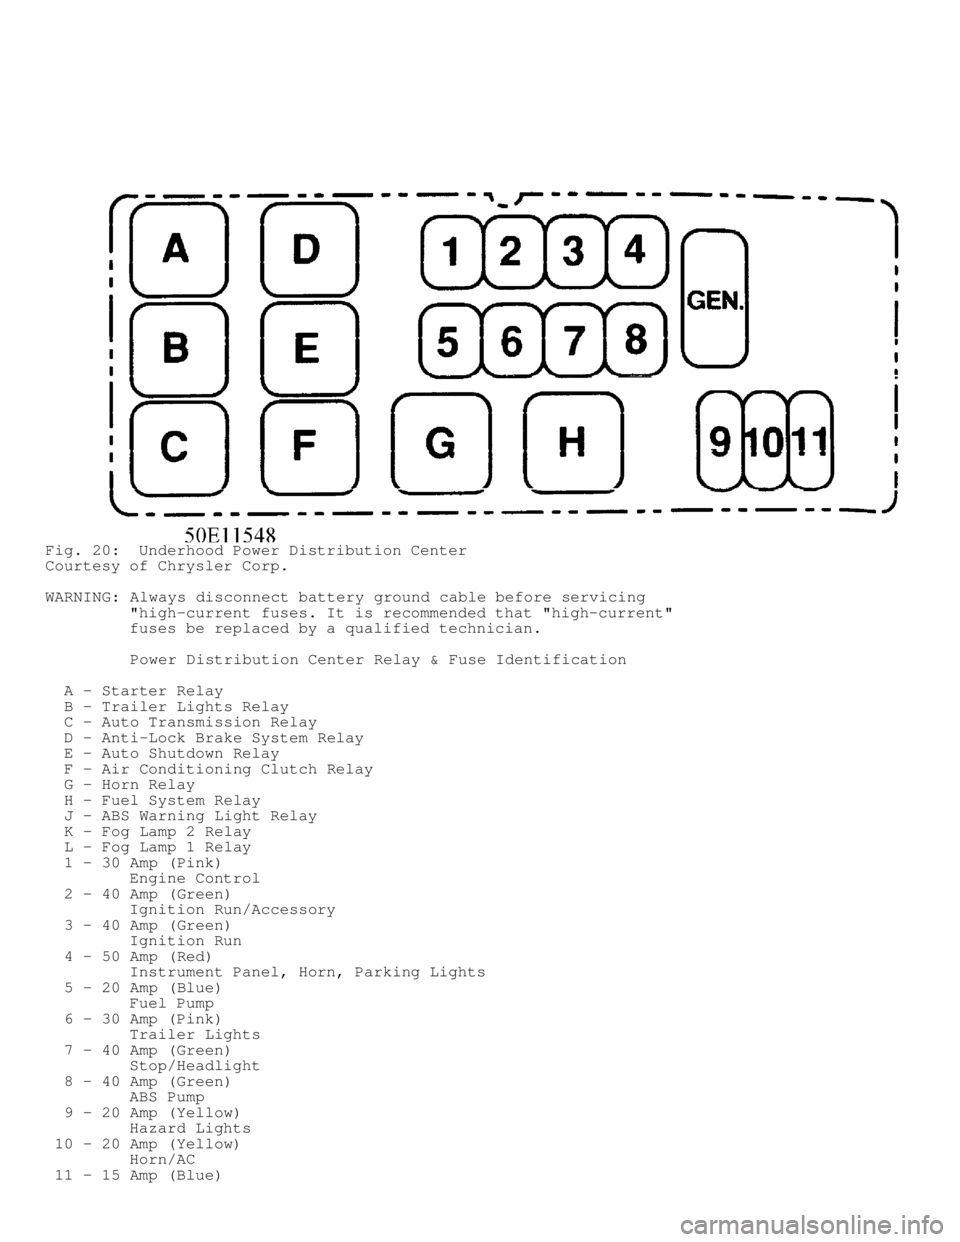
Fig. 20: Underhood Power Distribution Center
Courtesy of Chrysler Corp.
WARNING: Always disconnect battery ground cable before servicing
"high-current fuses. It is recommended that "high-current"
fuses be replaced by a qualified technician.
Power Distribution Center Relay & Fuse Identification
A - Starter Relay
B - Trailer Lights Relay
C - Auto Transmission Relay
D - Anti-Lock Brake System Relay
E - Auto Shutdown Relay
F - Air Conditioning Clutch Relay
G - Horn Relay
H - Fuel System Relay
J - ABS Warning Light Relay
K - Fog Lamp 2 Relay
L - Fog Lamp 1 Relay
1 - 30 Amp (Pink)
Engine Control
2 - 40 Amp (Green)
Ignition Run/Accessory
3 - 40 Amp (Green)
Ignition Run
4 - 50 Amp (Red)
Instrument Panel, Horn, Parking Lights
5 - 20 Amp (Blue)
Fuel Pump
6 - 30 Amp (Pink)
Trailer Lights
7 - 40 Amp (Green)
Stop/Headlight
8 - 40 Amp (Green)
ABS Pump
9 - 20 Amp (Yellow)
Hazard Lights
10 - 20 Amp (Yellow)
Horn/AC
11 - 15 Amp (Blue)
Page 910 of 1691

2) Apply voltage to Light Blue/Yellow wire at heated mirror
and ground Black wire at heated mirror. Mirror should become warm to
touch. If mirror is not warm to touch, remove mirror and test wires
for continuity. If no continuity exists, repair wires. If wires are
okay, replace mirror. To test defogger switch, see appropriate wiring
diagram in REAR WINDOW DEFOGGERS article.
NOTE: On Ram Pickup, heated mirror is controlled by mirror defogger
switch.
Ram Pickup
1) Turn ignition on. While watching instrument panel
voltmeter, turn heated mirror switch on. Voltmeter needle should
deflect. With heated mirror on, mirror should be warm to touch after
3-4 minutes. If system operates as described, system is okay at this
time.
2) If system does not operate as described, go to next step.
Illuminated indicator light means only that voltage exists at heated
mirror relay.
3) Ensure ignition is on. Check fuses in Power Distribution
Center (PDC) and junction block. Ensure fuses are fully seated and
connections are secure. If mirrors are still inoperative, problem is
in heated mirror control, mirror heating grid and/or heated mirror
harness or connectors. If turning switch on causes a large deflection
in instrument panel voltmeter, check for a short circuit in system.
Repair as necessary.
REMOVAL & INSTALLATION
CAUTION: When battery is disconnected, vehicle computer and memory
systems may lose memory data. Driveability problems may exist
until computer systems have completed a relearn cycle. See
COMPUTER RELEARN PROCEDURES article in GENERAL INFORMATION
before disconnecting battery.
HEATED MIRROR SWITCH
Removal & Installation (Ram Pickup)
Heated mirror switch is part of HVAC control unit. See
appropriate AUTOMATIC A/C-HEATER SYSTEMS article in appropriate AIR
CONDITIONING & HEATING SERVICE & REPAIR section.
POWER MIRROR SWITCH
Removal & Installation (Caravan, Town & Country, & Voyager)
1) Remove cover from over steering column. Remove screws
holding instrument cluster bezel to dash (above cluster lens). Remove
screws holding instrument cluster bezel to dash from each side of
steering column. Disconnect clip holding instrument cluster bezel to
dash from above right vent louver.
2) Separate instrument cluster bezel from dash. Disconnect
wires from back of bezel. Disengage lock tabs above and below mirror
switch. Pull mirror switch from headlight switch bezel. To install,
reverse removal procedure.
Removal & Installation (Dakota & Durango)
1) Pull power mirror switch control knob rearward to remove
it from switch body. Remove nut securing switch to door trim panel.
Pull door latch handle to open position and remove screw securing trim
panel to door. Remove manual window crank handle, if equipped. Release
locking tab on power window/lock switch, if equipped. Remove power
window/lock switch and unplug connector.
Page 911 of 1691

2) Remove remaining screws from door trim panel. Using a trim
stick, pry perimeter of trim panel away from door sufficiently to
unplug power mirror switch connector. Remove power mirror switch. To
install, reverse removal procedure.
Removal & Installation (Ram Pickup)
1) Remove door pull cup from door trim panel. Reach through
door pull cup opening to release locking tab on power window/lock
switch. Remove power window/lock switch and unplug connector.
2) Using a trim stick, pry perimeter of trim panel away from
door. Remove door trim panel. Unplug power mirror switch connector.
Remove power mirror switch. To install, reverse removal procedure.
Removal & Installation (Ram Van & Ram Wagon)
Disconnect battery. Remove knee blocker and lower instrument
panel cover. Remove mirror control knob by pulling straight out.
Remove inside hood release handle screws and lower handle. Reach under
instrument panel and disconnect switch connector. Remove 2 switch
mounting plate screws and pull switch from panel. Remove switch-to-
mounting plate nut and remove switch. To install, reverse removal
procedure.
POWER MIRROR ASSEMBLY
Removal & Installation (Caravan, Town & Country, & Voyager)
Remove screw and power mirror front cover. Remove 3 mirror
attaching screws and pull mirror away from door. Disconnect mirror
electrical connectors. To install, reverse removal procedure.
Removal & Installation (Dakota & Durango)
1) Unscrew door lock knob. Remove power window/lock switch
assembly by inserting a screwdriver in notch at forward end of switch
housing to release locking tabs. Pull switch assembly forward and out
from door panel. Remove trim plug from top of trim panel. Remove screw
under trim plug.
2) Remove 2 screws from bottom of door trim panel. Remove arm
rest screw. Using a trim stick, pry trim panel away from door. Roll
door watershield away from lower rear corner of door to expose panel
access. Reach inside door and disconnect mirror wiring connector.
3) Remove 3 mirror nuts and pull mirror loose from door. Feed
wiring harness out through hole in outer door panel. To install,
reverse removal procedure.
Removal & Installation (Ram Pickup, Ram Van & Ram Wagon)
1) Raise window to full up position. Remove remote door latch
control handle. Remove power window/lock switch by inserting thin-
blade screwdriver into switch housing forward notch and depressing
locking tab. Pull switch bezel out and forward to remove from door
panel.
2) Remove 2 screws from bottom (front and rear) of trim
panel. Using trim stick, pry trim panel away from door. Roll door
watershield away from lower rear corner of door to expose panel
access. Reach inside door and disconnect mirror wiring connector.
NOTE: Spray silicone on mounting bracket cover grommet to prevent
grommet from coming off when cover is moved up on mirror
stem.
3) Remove mirror mounting bracket cover and slide up on
mirror stem. Remove mirror mounting bracket nuts. Pull mirror loose
from door and feed wiring harness out through hole in outer door
panel. To install, reverse removal procedure.
Page 944 of 1691
Procedure For Programming PCM & Clearing DTCs From ABS & SRS
Modules
Connect scan tool to Data Link Connector (DLC). DLC is
located under left side of instrument panel. Using scan tool, enter
correct VIN and mileage into PCM. Using scan tool manufacturer's
instructions, clear DTCs from ABS and SRS modules.
Procedure For Updating Secret Key Data
1) Connect scan tool to Data Link Connector (DLC). DLC is
located under left side of instrument panel.
2) Go to ENGINE and then MISC menus on scan tool. Place the
SKIM in SECURED ACCESS MODE by using the appropriate Personal
Identification Number (PIN) for this vehicle. PIN may be obtained from\
the owner, vehicle's invoice, or from the manufacturer. Select UPDATE
THE SECRET KEY DATA. The data will be transferred from Smart Key
Immobilizer Module (SKIM) to the PCM, allowing the vehicle to start.
NOTE: On Ram Van and Ram Wagon, if 3 attempts are made to enter the
SECURED ACCESS MODE using the incorrect Personal
Identification Number (PIN), the SECURED ACCESS MODE will be
locked out for one hour. To exit this locked out mode, leave
ignition switch in the ON position for one hour with all
accessories turned off. It may be necessary to monitor
battery state and connect a battery charger if necessary.
ENGINE SENSORS & SWITCHES
BATTERY TEMPERATURE SENSOR
Removal & Installation
Battery temperature sensor is snapped into center of battery
tray, directly below the battery. Remove battery. Disconnect
electrical connector for battery temperature sensor. Pry battery
temperature sensor straight upward from battery tray. To install,
reverse removal procedure.
BRAKE SWITCH
NOTE: Brake switch may also be referred to as brakelight switch or
stoplight switch.
Removal (Dakota, Durango & Ram Pickup)
1) Brake switch is located near top of brake pedal. Remove
lower instrument panel cover for access to brake switch if necessary.
Disconnect electrical connector from brake switch. Depress and hold
brake pedal downward.
2) Rotate brake switch counterclockwise approximately 30
degrees so alignment tab on brake switch aligns with opening on
mounting bracket. Pull brake switch rearward from mounting bracket.
NOTE: Before installing brake switch, plunger on brake switch must
be pulled outward to fully extended position and then pushed
inward 4 detent positions to ensure proper brake switch
adjustment.
Installation
1) Pull plunger on brake switch outward to the fully extended
position. Push plunger on brake switch inward 4 detent positions. The
brake switch will click at each detent position when pushing plunger
inward.
2) Install electrical connector on brake switch. Depress
brake pedal as far as possible. Install brake switch in mounting
Page 945 of 1691
bracket. Ensure alignment tab on brake switch aligns with opening on
mounting bracket.
CAUTION: When adjusting brake switch, DO NOT pull brake pedal back
toward brake switch with excessive pressure, or brake switch
may be damaged.
3) When brake switch is fully installed in mounting bracket,
rotate brake switch clockwise approximately 30 degrees. To ensure
proper brake switch adjustment, gently pull brake pedal back toward
brake switch as far as possible. DO NOT apply excessive pressure on
brake pedal and brake switch.
Removal (Ram Van & Ram Wagon)
1) Brake switch is located near top of brake pedal. Remove
lower steering column cover. Remove data link connector, hood release
lever and parking brake lever from lower instrument panel cover.
2) Remove lower instrument panel cover for access to brake
switch. Depress and hold brake pedal downward. Rotate brake switch
counterclockwise approximately 1/16 turn to so locking collar on brake
switch aligns with opening on mounting bracket. Pull brake switch
rearward from mounting bracket. Disconnect electrical connector from
brake switch.
NOTE: Before installing brake switch, plunger on brake switch must
be pulled outward to fully extended position and then pushed
inward 4 detent positions to ensure proper brake switch
adjustment.
Installation
1) Pull plunger on brake switch outward to the fully extended
position. Push plunger on brake switch inward 4 detent positions. The
brake switch will click at each detent position when pushing plunger
inward.
2) Install electrical connector on brake switch. Depress
brake pedal as far as possible. Install brake switch in mounting
bracket. Ensure locking collar on brake switch aligns with opening on
mounting bracket.
CAUTION: When adjusting brake switch, DO NOT pull brake pedal back
toward brake switch with excessive pressure, or brake switch
may be damaged.
3) When brake switch is fully installed in mounting bracket,
rotate brake switch clockwise approximately 1/16 turn. To ensure
proper brake switch adjustment, gently pull brake pedal back toward
brake switch as far as possible. DO NOT apply excessive pressure on
brake pedal and brake switch.
CAMSHAFT POSITION SENSOR
Removal & Installation
See CAMSHAFT POSITION SENSOR under IGNITION SYSTEM.
CRANKSHAFT POSITION SENSOR
Removal & Installation
See CRANKSHAFT POSITION SENSOR under IGNITION SYSTEM.
DOWNSTREAM OXYGEN SENSOR
NOTE: Downstream oxygen sensor may also be referred to as post
-catalyst oxygen sensor.
Page 982 of 1691
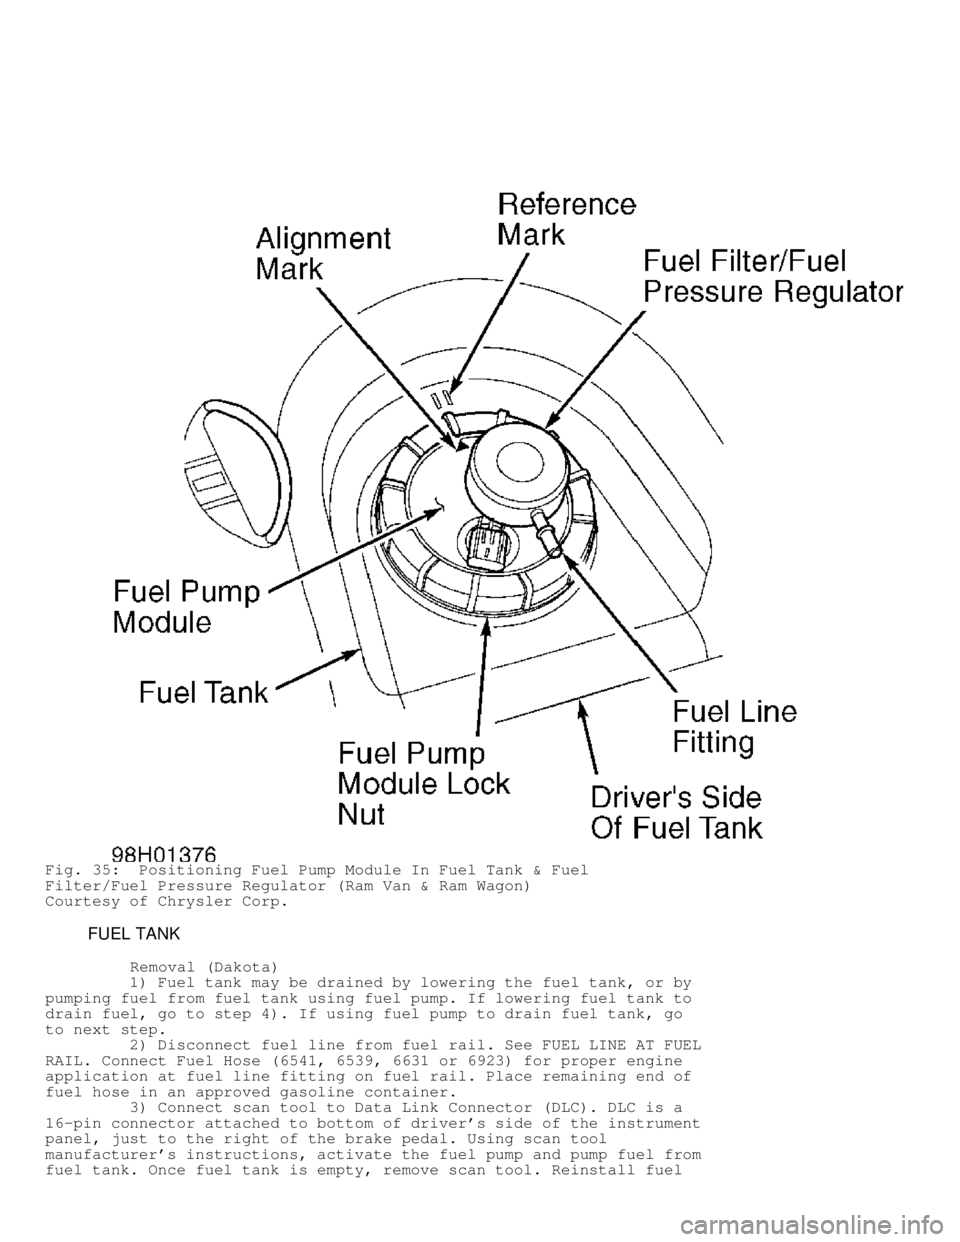
Fig. 35: Positioning Fuel Pump Module In Fuel Tank & Fuel
Filter/Fuel Pressure Regulator (Ram Van & Ram Wagon)
Courtesy of Chrysler Corp.
FUEL TANK
Removal (Dakota)
1) Fuel tank may be drained by lowering the fuel tank, or by
pumping fuel from fuel tank using fuel pump. If lowering fuel tank to
drain fuel, go to step 4). If using fuel pump to drain fuel tank, go
to next step.
2) Disconnect fuel line from fuel rail. See FUEL LINE AT FUEL
RAIL. Connect Fuel Hose (6541, 6539, 6631 or 6923) for proper engine
application at fuel line fitting on fuel rail. Place remaining end of
fuel hose in an approved gasoline container.
3) Connect scan tool to Data Link Connector (DLC). DLC is a
16-pin connector attached to bottom of driver's side of the instrument
panel, just to the right of the brake pedal. Using scan tool
manufacturer's instructions, activate the fuel pump and pump fuel from
fuel tank. Once fuel tank is empty, remove scan tool. Reinstall fuel
Page 985 of 1691
1) To install, reverse removal procedure. If installing small
vent tube and large fill tube on fuel tank, ensure fuel tank fittings
are clean.
2) Install disconnect fitting on fuel tank fitting until
disconnect fitting snaps onto fuel tank fitting. Pull on small vent
tube or and large fill tube to ensure disconnect fitting is locked on
fuel tank fitting. To verify proper installation of disconnect
fitting, ensure the distance between release sleeve and top of fuel
tank fitting is .50" (12.7 mm) on small vent tube or .25" (6.4 mm) o\
n
large fill tube. See Fig. 37.
3) Install fuel lines on fuel filter/fuel pressure regulator
on fuel pump module using proper procedure. See FUEL LINE DISCONNECT
FITTINGS under FUEL SYSTEM.
CAUTION: DO NOT overtighten fuel tank strap retaining nuts during
installation.
4) Tighten fuel tank strap retaining nuts to specification.
See TORQUE SPECIFICATIONS. To install remaining components, reverse
removal procedure. Start engine and check for fuel leaks.
Removal (Durango)
1) Fuel tank may be drained by removing vent hose from rear
of fuel tank, or by pumping fuel from fuel tank using the fuel pump if
fuel pump is operating. If removing vent hose from fuel tank to drain
the fuel, go to step 4). If using fuel pump to drain the fuel tank, go
to next step.
2) Disconnect fuel line from fuel rail. See FUEL LINE AT FUEL
RAIL under FUEL SYSTEM. Connect Fuel Hose (6541, 6539, 6631 or 6923)
for proper engine application at fuel line fitting on fuel rail. Place
remaining end of fuel hose in an approved gasoline container.
3) Connect scan tool to Data Link Connector (DLC). DLC is a
16-pin connector attached to bottom of driver's side of the instrument
panel, just to the right of the brake pedal. Using scan tool
manufacturer's instructions, activate the fuel pump and pump fuel from
fuel tank. Once fuel tank is empty, remove scan tool. Reinstall fuel
line on fuel rail using proper procedure. Go to step 5).
4) Release fuel pressure from fuel system. See FUEL SYSTEM
PRESSURE RELEASE. Ensure negative battery cable is disconnected.
Remove fuel tank cap to release any residual fuel tank pressure.
5) Raise and support vehicle. Remove necessary skid plates
for access to fuel tank. Disconnect vent and filler hose from rear of
fuel tank. If fuel tank was not previously drained, place drain hose
in vent hose fitting at rear of fuel tank. Drain fuel from fuel tank
into an approved gasoline container.
6) Support fuel tank with transmission jack. Remove fuel tank
strap retaining nuts. Position fuel tank straps toward outside of
vehicle. Slightly lower fuel tank. Ensure rear of fuel tank is higher
than front of fuel tank to prevent any spilling any remaining fuel in
fuel tank.
7) Disconnect fuel line from fuel filter/fuel pressure
regulator on fuel pump module using proper procedure for fuel line
disconnect fitting. See FUEL LINE DISCONNECT FITTINGS. Fuel pump
module is located on top of fuel tank. See Fig. 28. Disconnect
electrical connector at fuel pump module. Disconnect vapor line from
rollover valves on top of fuel tank and EVAP line from fuel pump
module. Lower fuel tank from vehicle.
CAUTION: DO NOT overtighten fuel tank strap retaining nuts during
installation.
Installation
1) To install, reverse removal procedure. Install fuel lines
Page 986 of 1691
on fuel filter/fuel pressure regulator on fuel pump module using
proper procedure. See FUEL LINE DISCONNECT FITTINGS.
2) Tighten fuel tank strap retaining nuts to specification.
See TORQUE SPECIFICATIONS. Start engine and check for fuel leaks.
Removal (Ram Pickup)
1) Fuel tank may be drained by lowering fuel tank, or by
pumping fuel from fuel tank using the fuel pump if fuel pump is
operating. If lowering fuel tank to drain the fuel, go to step 4). If
using fuel pump to drain the fuel tank, go to next step.
2) Disconnect fuel line from fuel rail. See FUEL LINE AT FUEL
RAIL. Connect Fuel Hose (6541, 6539, 6631 or 6923) for proper engine
application at fuel line fitting on fuel rail. Place remaining end of
fuel hose in an approved gasoline container.
3) Connect scan tool to Data Link Connector (DLC). DLC is a
16-pin connector attached to bottom of driver's side of the instrument
panel, just straight above the accelerator pedal. Using scan tool
manufacturer's instructions, activate the fuel pump and pump fuel from
fuel tank. Once fuel tank is empty, remove scan tool. Reinstall fuel
line on fuel rail using proper procedure. Go to step 5).
4) Release fuel pressure from fuel system. See FUEL SYSTEM
PRESSURE RELEASE. Ensure negative battery cable is disconnected.
Remove fuel tank cap to release any residual fuel tank pressure.
5) Raise and support vehicle. Open fuel tank filler door.
Remove fuel tank filler tube assembly-to-body screws. Support fuel
tank with transmission jack. Remove fuel tank strap retaining nuts.
6) Slightly lower fuel tank. If fuel tank was not previously
drained, slightly rotate fuel tank so vent hose and filler hose on
fuel tank are above the fuel level in the fuel tank to prevent fuel
leakage when hoses are disconnected. Vent hose and filler hose attach
to fitting on the fuel tank. See Fig. 29.
7) Disconnect vent hose from vent hose fitting on fuel tank.
If fuel tank was previously drained, go to next step. If fuel tank was
not previously drained, place drain hose in vent hose fitting on fuel
tank. Drain fuel from fuel tank into an approved gasoline container.
Go to next step.
8) Disconnect filler hose from filler hose fitting on fuel
tank. Disconnect electrical connector at fuel pump module. Fuel pump
module is located on top of fuel tank. See Fig. 29.
9) Disconnect fuel line from fuel filter/fuel pressure
regulator on fuel pump module using proper procedure for fuel line
disconnect fitting. See FUEL LINE DISCONNECT FITTINGS under FUEL
SYSTEM.
10) Disconnect necessary vapor hoses from rollover valves on
top of fuel tank or fuel pump module. See Fig. 29. Lower fuel tank
from vehicle.
CAUTION: DO NOT overtighten fuel tank strap retaining nuts during
installation.
Installation
1) To install, reverse removal procedure. Install fuel lines
on fuel filter/fuel pressure regulator on fuel pump module using
proper procedure. See FUEL LINE DISCONNECT FITTINGS.
2) Tighten fuel tank strap retaining nuts to specification.
See TORQUE SPECIFICATIONS. Start engine and check for fuel leaks.
Removal (Ram Van & Ram Wagon)
1) Fuel tank may be drained by siphoning fuel out through
small vent hose on fuel and vent hose fitting assembly on fuel tank,
or by pumping fuel from fuel tank using the fuel pump if fuel pump is
operating. If siphoning fuel out through small vent hose on fuel and
vent hose fitting assembly on fuel tank, go to step 4). If using fuel