1999 DODGE RAM engine oil
[x] Cancel search: engine oilPage 680 of 1691
interchangeable. Inspect all components for wear. Note amount of wear
in lifter body-to-camshaft contact area. Surface must have smooth and
convex contact face. If wear is apparent, carefully inspect cam lobe.
Inspect push rod contact area and lifter body for scoring
or signs of wear. If body is scored, inspect lifter bore for damage
and lack of lubrication. On roller type lifters, inspect roller for
flaking, pitting, loss of needle bearings and roughness during
rotation.
Measure lifter body O.D. in several areas. Measure lifter
bore I.D. of cylinder block. Some models offer oversized lifters.
Replace lifter if damaged.
If lifter check valve is not operating, obstructions may be
preventing it from closing or valve spring may be broken. Clean or
replace components as necessary.
Check plunger operation. Plunger should drop to bottom of the
body by its own weight when assembled dry. If plunger is not free,
soak lifter in solvent to dissolve deposits.
Lifter leak-down test can be performed on lifter. Lifter
must be filled with special test oil. New lifters contain special test
oil. Using lifter leak-down tester, perform leak-down test following
manufacturer's instructions. If leak-down time is not within
specifications, replace lifter assembly.
Lifters should be soaked in clean engine oil several hours
prior to installation. Coat lifter base, roller (if equipped) and
lifter body with ample amount of Molykote or camshaft lubricant. See
Fig. 13. Install lifter in original location. Install remaining
components. Valve lash adjustment is not required on most hydraulic
lifters. Preload of hydraulic lifter is automatic. Some models may
require adjustment.
Mechanical Lifters
Lifter assemblies must be installed in original locations.
Remove rocker arm assembly and push rod. Mark components for location.
Some applications require intake manifold or lifter cover removal.
Remove lifter retainer plate (if used). To remove lifters, use lifter
remover or magnet.
Inspect push rod contact area and lifter body for scoring or
signs of wear. If body is scored, inspect lifter bore for damage and
lack of lubrication. Note amount of wear in lifter body-to-camshaft
contact area. Surface must have smooth and convex contact face. If
wear is apparent, carefully inspect cam lobe.
Coat lifter base, roller (if equipped) and lifter body with
ample amount of Molykote or camshaft lubricant. Install lifter in
original location. Install remaining components. Tighten bolts to
specification. Adjust valves. See VALVE ADJUSTMENT in this article.
PISTONS, CONNECTING RODS & BEARINGS
* PLEASE READ THIS FIRST *
NOTE: Always refer to appropriate engine overhaul article in the
ENGINES section for complete overhaul procedures and
specifications for the vehicle being repaired.
RIDGE REMOVAL
Ridge in cylinder wall must be removed prior to piston
removal. Failure to remove ridge prior to removing pistons will cause
piston damage in piston ring locations.
With the piston at bottom dead center, place a rag in the
bore to trap metal chips. Install ridge reamer in cylinder bore.
Adjust ridge reamer using manufacturer's instructions. Remove ridge
Page 684 of 1691
PISTON & CONNECTING ROD INSTALLATION
Cylinders must be honed prior to piston installation. See
CYLINDER HONING under CYLINDER BLOCK in this article.
Install upper connecting rod bearings. Lubricate upper
bearings with engine oil. Install lower bearings in rod caps. Ensure
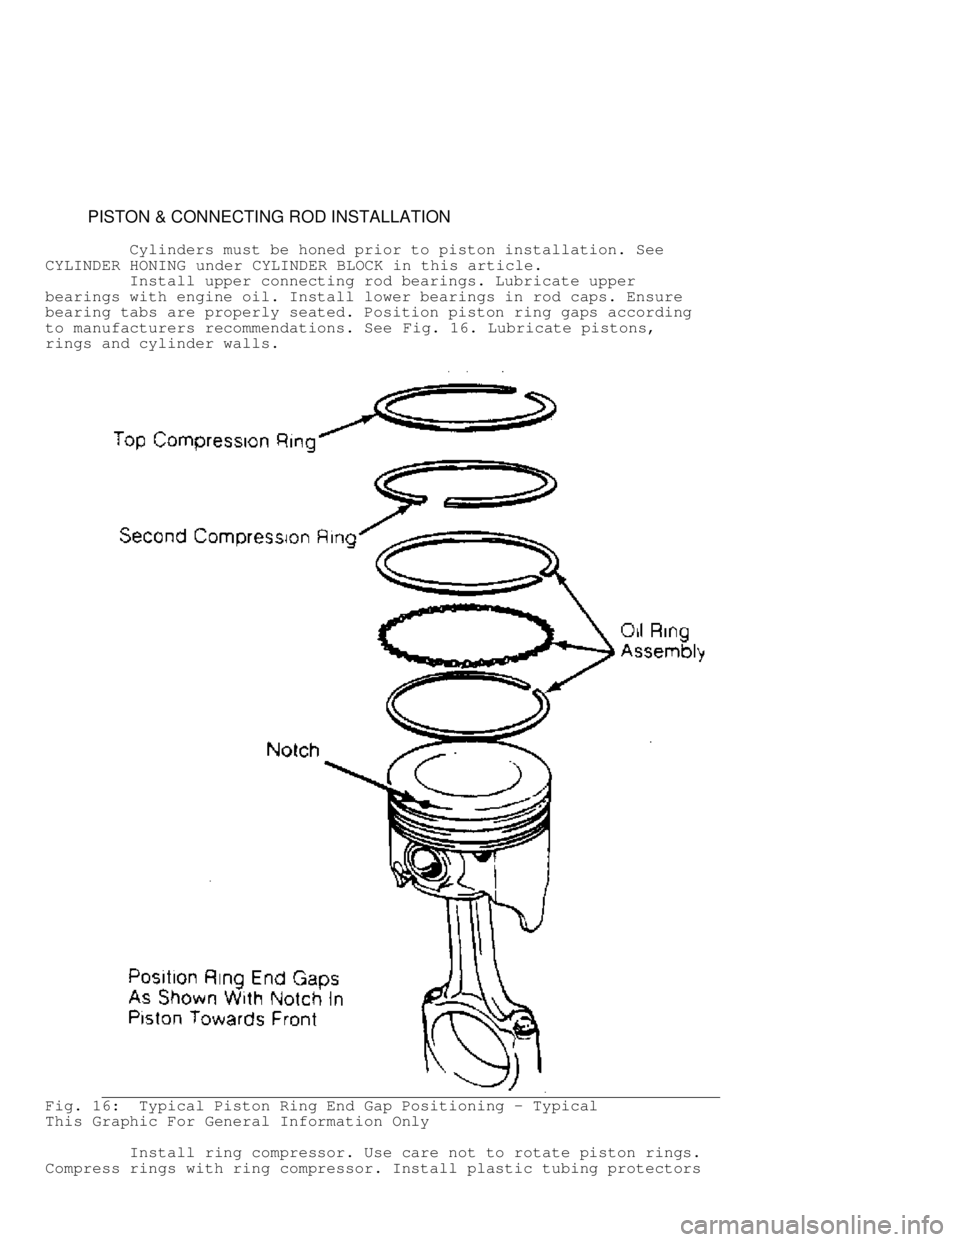
bearing tabs are properly seated. Position piston ring gaps according
to manufacturers recommendations. See Fig. 16. Lubricate pistons,
rings and cylinder walls.
Fig. 16: Typical Piston Ring End Gap Positioning - Typical
This Graphic For General Information Only
Install ring compressor. Use care not to rotate piston rings.
Compress rings with ring compressor. Install plastic tubing protectors
Page 686 of 1691

Fig. 18: Measuring Connecting Rod Side Clearance - Typical
This Graphic For General Information Only
Check for improper bearing installation, wrong bearing cap
or insufficient bearing clearance if side clearance is insufficient.
Connecting rod may require machining to obtain proper clearance.
Excessive clearance usually indicates excessive wear at crankshaft.
Crankshaft must be repaired or replaced.
MAIN & CONNECTING ROD BEARING CLEARANCE
Plastigage Method
Plastigage method may be used to determine bearing clearance.
Plastigage can be used with an engine in service or during reassembly.
Plastigage material is oil soluble.
Ensure journals and bearings are free of oil or solvent.
Oil or solvent will dissolve material and false reading will be
obtained. Install small piece of Plastigage along full length of
bearing journal. Install bearing cap in original location. Tighten
bolts to specification.
CAUTION: DO NOT rotate crankshaft while Plastigage is installed.
Bearing clearance will not be obtained if crankshaft is
rotated.
Remove bearing cap. Compare Plastigage width with scale on
Plastigage container to determine bearing clearance. See Fig. 19.
Rotate crankshaft 90 degrees. Repeat procedure. this is done to check
journal eccentricity. This procedure can be used to check oil
clearance on both connecting rod and main bearings.
Page 688 of 1691
CRANKSHAFT & MAIN BEARINGS
* PLEASE READ THIS FIRST *
NOTE: Always refer to appropriate engine overhaul article in the
ENGINES section for complete overhaul procedures and
specifications for the vehicle being repaired.
REMOVAL
Ensure all main bearing caps are marked for location on
cylinder block. Some main bearing caps have an arrow stamped on it
which must face front of engine. Remove main bearing cap bolts. Remove
main bearing caps. Carefully remove crankshaft. Use care not to bind
crankshaft in cylinder block during removal.
CLEANING & INSPECTION
Thoroughly clean crankshaft using solvent. Dry with
compressed air. Ensure all oil passages are clear and free of sludge,
rust, dirt, and metal chips.
Inspect crankshaft for scoring and nicks. Inspect crankshaft
for cracks using Magnaflux procedure. Inspect rear seal area for
grooving or damage. Inspect bolt hole threads for damage. If pilot
bearing or bushing is used, check pilot bearing or bushing fit in
crankshaft. Inspect crankshaft gear for damaged or cracked teeth.
Replace gear if damaged. Check that oil passage plugs are tight (if
equipped).
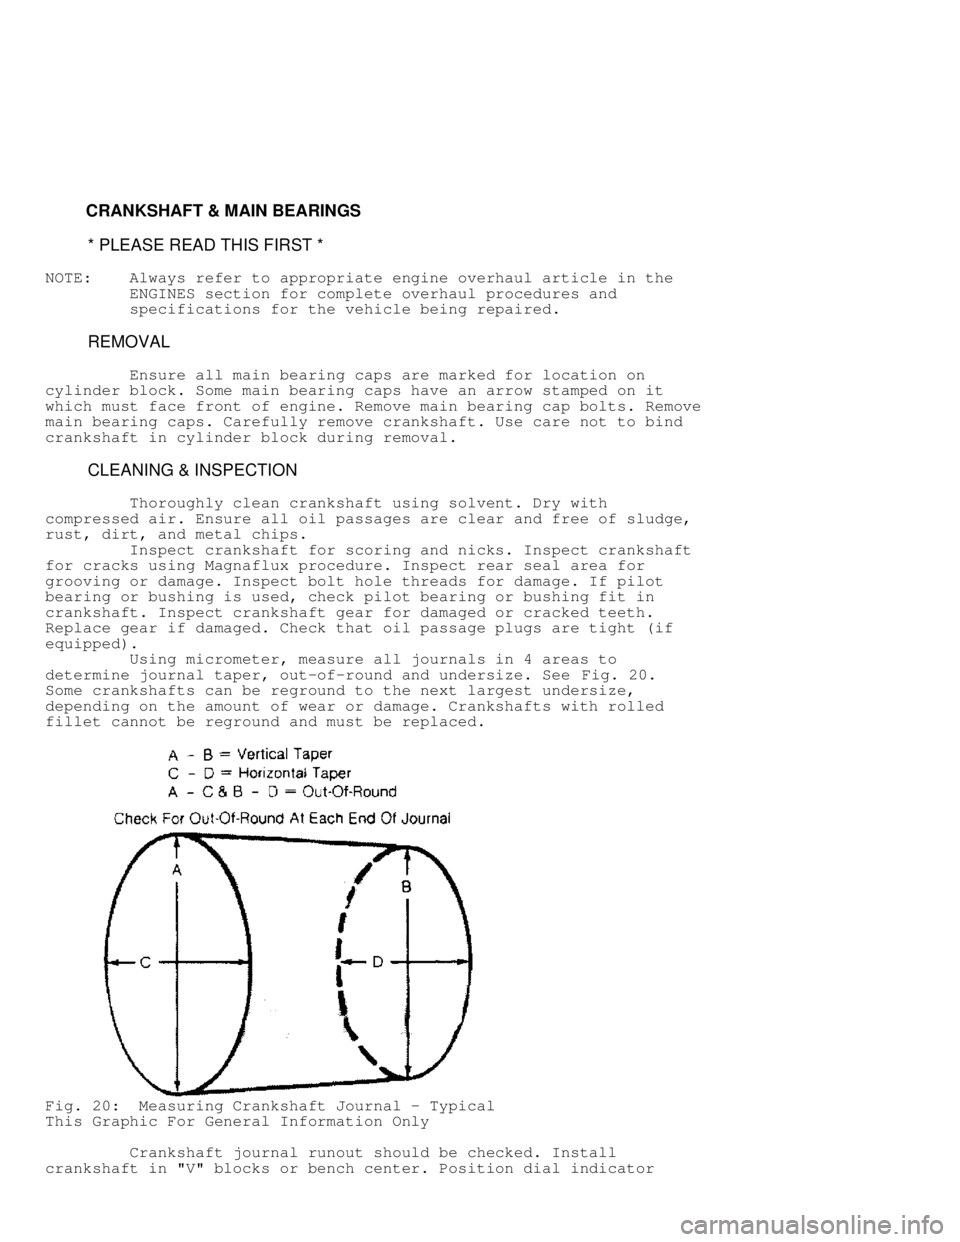
Using micrometer, measure all journals in 4 areas to
determine journal taper, out-of-round and undersize. See Fig. 20.
Some crankshafts can be reground to the next largest undersize,
depending on the amount of wear or damage. Crankshafts with rolled
fillet cannot be reground and must be replaced.
Fig. 20: Measuring Crankshaft Journal - Typical
This Graphic For General Information Only
Crankshaft journal runout should be checked. Install
crankshaft in "V" blocks or bench center. Position dial indicator
Page 689 of 1691
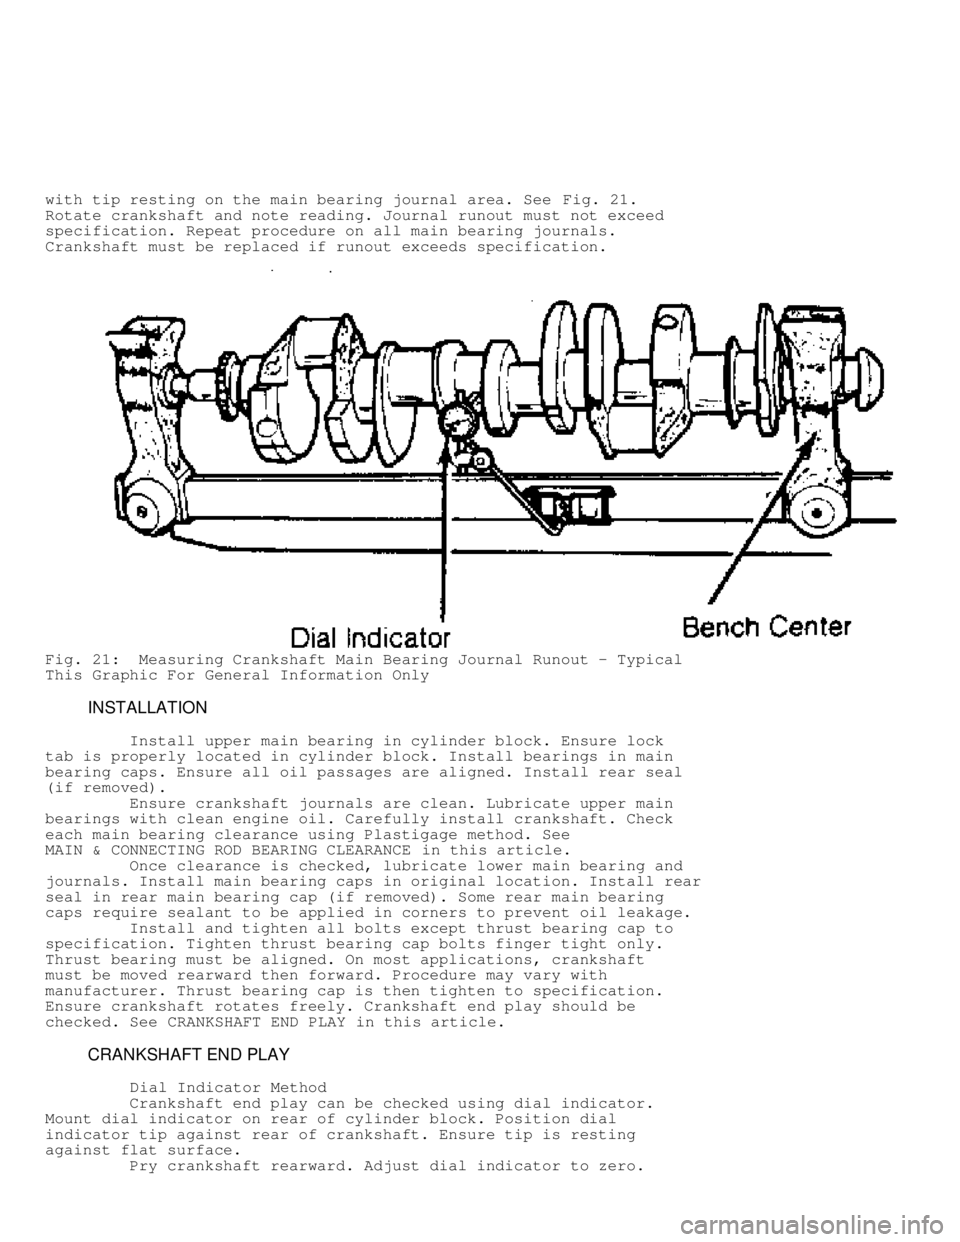
with tip resting on the main bearing journal area. See Fig. 21.
Rotate crankshaft and note reading. Journal runout must not exceed
specification. Repeat procedure on all main bearing journals.
Crankshaft must be replaced if runout exceeds specification.
Fig. 21: Measuring Crankshaft Main Bearing Journal Runout - Typical
This Graphic For General Information Only
INSTALLATION
Install upper main bearing in cylinder block. Ensure lock
tab is properly located in cylinder block. Install bearings in main
bearing caps. Ensure all oil passages are aligned. Install rear seal
(if removed).
Ensure crankshaft journals are clean. Lubricate upper main
bearings with clean engine oil. Carefully install crankshaft. Check
each main bearing clearance using Plastigage method. See
MAIN & CONNECTING ROD BEARING CLEARANCE in this article.
Once clearance is checked, lubricate lower main bearing and
journals. Install main bearing caps in original location. Install rear
seal in rear main bearing cap (if removed). Some rear main bearing
caps require sealant to be applied in corners to prevent oil leakage.
Install and tighten all bolts except thrust bearing cap to
specification. Tighten thrust bearing cap bolts finger tight only.
Thrust bearing must be aligned. On most applications, crankshaft
must be moved rearward then forward. Procedure may vary with
manufacturer. Thrust bearing cap is then tighten to specification.
Ensure crankshaft rotates freely. Crankshaft end play should be
checked. See CRANKSHAFT END PLAY in this article.
CRANKSHAFT END PLAY
Dial Indicator Method
Crankshaft end play can be checked using dial indicator.
Mount dial indicator on rear of cylinder block. Position dial
indicator tip against rear of crankshaft. Ensure tip is resting
against flat surface.
Pry crankshaft rearward. Adjust dial indicator to zero.
Page 691 of 1691
CYLINDER BLOCK
* PLEASE READ THIS FIRST *
NOTE: Always refer to appropriate engine overhaul article in the
ENGINES section for complete overhaul procedures and
specifications for the vehicle being repaired.
BLOCK CLEANING
Only cast cylinder blocks should be hot tank cleaned.
Aluminum cylinder blocks should be cleaned using cold tank method.
Cylinder block is cleaned in order to remove carbon deposits, gasket
residue and water jacket scale. Remove oil galley plugs, freeze plugs
and cam bearings prior to block cleaning.
BLOCK INSPECTION
Visually inspect the block. Check suspected areas for cracks
using the Dye Penetrant inspection method. Block may be checked for
cracks using the Magnaflux method.
Cracks are most commonly found at the bottom of the
cylinders, the main bearing saddles, near expansion plugs and between
the cylinders and water jackets. Inspect lifter bores for damage.
Inspect all head bolt holes for damaged threads. Threads should be
cleaned using tap to ensure proper head bolt torque. Consult machine
shop concerning possible welding and machining (if required).
CYLINDER BORE INSPECTION
Inspect the bore for scuffing or roughness. Cylinder bore
is dimensionally checked for out-of-round and taper using dial bore
gauge. For determining out-of-round, measure cylinder parallel and
perpendicular to the block centerline. Difference in the 2 readings
is the bore out-of-round. Cylinder bore must be checked at top, middle
and bottom of piston travel area.
Bore taper is obtained by measuring bore at the top and
bottom. If wear has exceeded allowable limits, block must be honed
or bored to next available oversize piston dimension.
CYLINDER HONING
Cylinder must be properly honed to allow new piston rings to
properly seat. Cross-hatching at correct angle and depth is critical
to lubrication of cylinder walls and pistons.
A flexible drive hone and power drill are commonly used.
Drive hone must be lubricated during operation. Mix equal parts of
kerosene and SAE 20w engine oil for lubrication.
Apply lubrication to cylinder wall. Operate cylinder hone
from top to bottom of cylinder using even strokes to produce 45 degree
cross-hatch pattern on the cylinder wall. DO NOT allow cylinder hone
to extend below cylinder during operation.
Recheck bore dimension after final honing. Wash cylinder
wall with hot soapy water to remove abrasive particles. Blow dry with
compressed air. Coat cleaned cylinder walls with lubricating oil.
DECK WARPAGE
Check deck for damage or warped head sealing surface. Place
a straightedge across gasket surface of the deck. Using feeler gauge,
measure clearance at center of straightedge. Measure across width and
Page 693 of 1691

NOTE: Always refer to appropriate engine overhaul article in the
ENGINES section for complete overhaul procedures and
specifications for the vehicle being repaired.
CLEANING & INSPECTION
Clean camshaft with solvent. Ensure all oil passages are
clear. Inspect cam lobes and bearing journals for pitting, flaking or
scoring. Using micrometer, measure bearing journal O.D.
Support camshaft at each end with "V" blocks. Position dial
indicator with tip resting on center bearing journal. Rotate camshaft
and note reading. If reading exceeds specification, replace camshaft.
Check cam lobe lift by measuring base circle of camshaft
using micrometer. Measure again at 90 degrees to tip of cam lobe. Cam
lift can be determined by subtracting base circle diameter from tip of
cam lobe measurement.
Different lift dimensions are given for intake and exhaust
cam lobes. Reading must be within specifications. Replace camshaft if
cam lobes or bearing journals are not within specifications.
Inspect camshaft gear for chipped, eroded or damaged teeth.
Replace gear if damaged. On camshafts using thrust plate, measure
distance between thrust plate and camshaft shoulder. Replace thrust
plate if not within specification.
CAMSHAFT BEARINGS
Removal & Installation
Remove the camshaft rear plug. The camshaft bearing remover
is assembled with its shoulder resting on the bearing to be removed
according to manufacturer's instructions. Tighten puller nut until
bearing is removed. Remove remaining bearings, leaving front and rear
bearings until last. These bearings act as guide for camshaft bearing
remover.
To install new bearings, puller is rearranged to pull
bearings toward the center of block. Ensure all lubrication passages
of bearing are aligned with cylinder block. Coat new camshaft rear
plug with sealant. Install camshaft rear plug. Ensure plug is even
in cylinder block.
CAMSHAFT INSTALLATION
Lubricate bearing surfaces and cam lobes with ample amount of
Molykote or camshaft lubricant. Carefully install camshaft. Use care
not to damage bearing journals during installation. Install thrust
plate retaining bolts (if equipped). Tighten bolts to specification.
On overhead camshafts, install bearing caps in original location.
Tighten bolts to specification. Check end play.
CAMSHAFT END PLAY
Using dial indicator, check end play. Position dial indicator
on front of engine block. Position indicator tip against camshaft.
Push camshaft toward rear of engine and adjust indicator to zero.
Move camshaft forward and note reading. Camshaft end play
must be within specification. End play may be adjusted by relocating
gear, shimming thrust plate or replacing thrust plate depending on
manufacturer.
TIMING CHAINS & BELTS
Page 695 of 1691
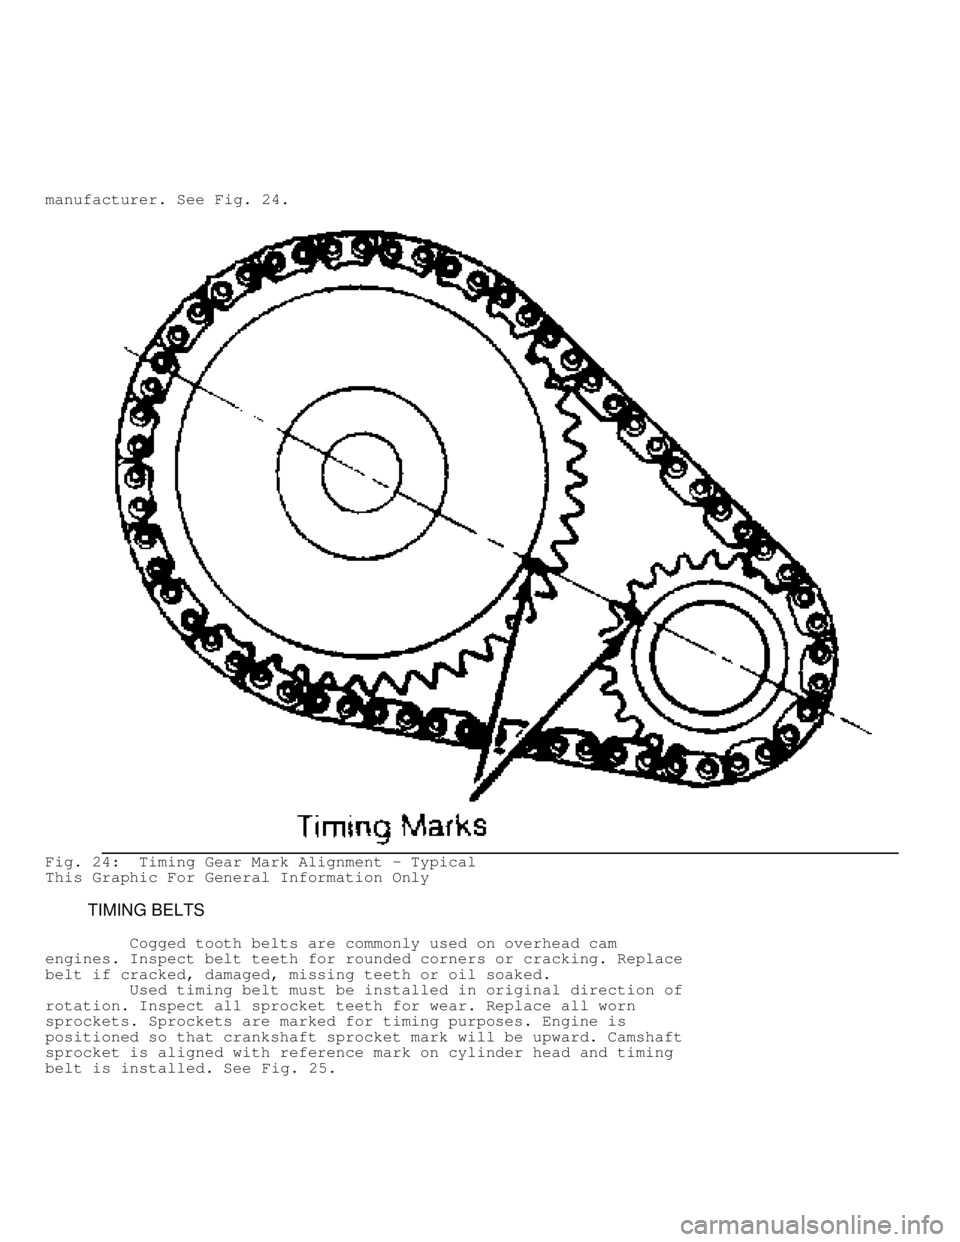
manufacturer. See Fig. 24.
Fig. 24: Timing Gear Mark Alignment - Typical
This Graphic For General Information Only
TIMING BELTS
Cogged tooth belts are commonly used on overhead cam
engines. Inspect belt teeth for rounded corners or cracking. Replace
belt if cracked, damaged, missing teeth or oil soaked.
Used timing belt must be installed in original direction of
rotation. Inspect all sprocket teeth for wear. Replace all worn
sprockets. Sprockets are marked for timing purposes. Engine is
positioned so that crankshaft sprocket mark will be upward. Camshaft
sprocket is aligned with reference mark on cylinder head and timing
belt is installed. See Fig. 25.