1999 DODGE NEON engine
[x] Cancel search: enginePage 768 of 1200
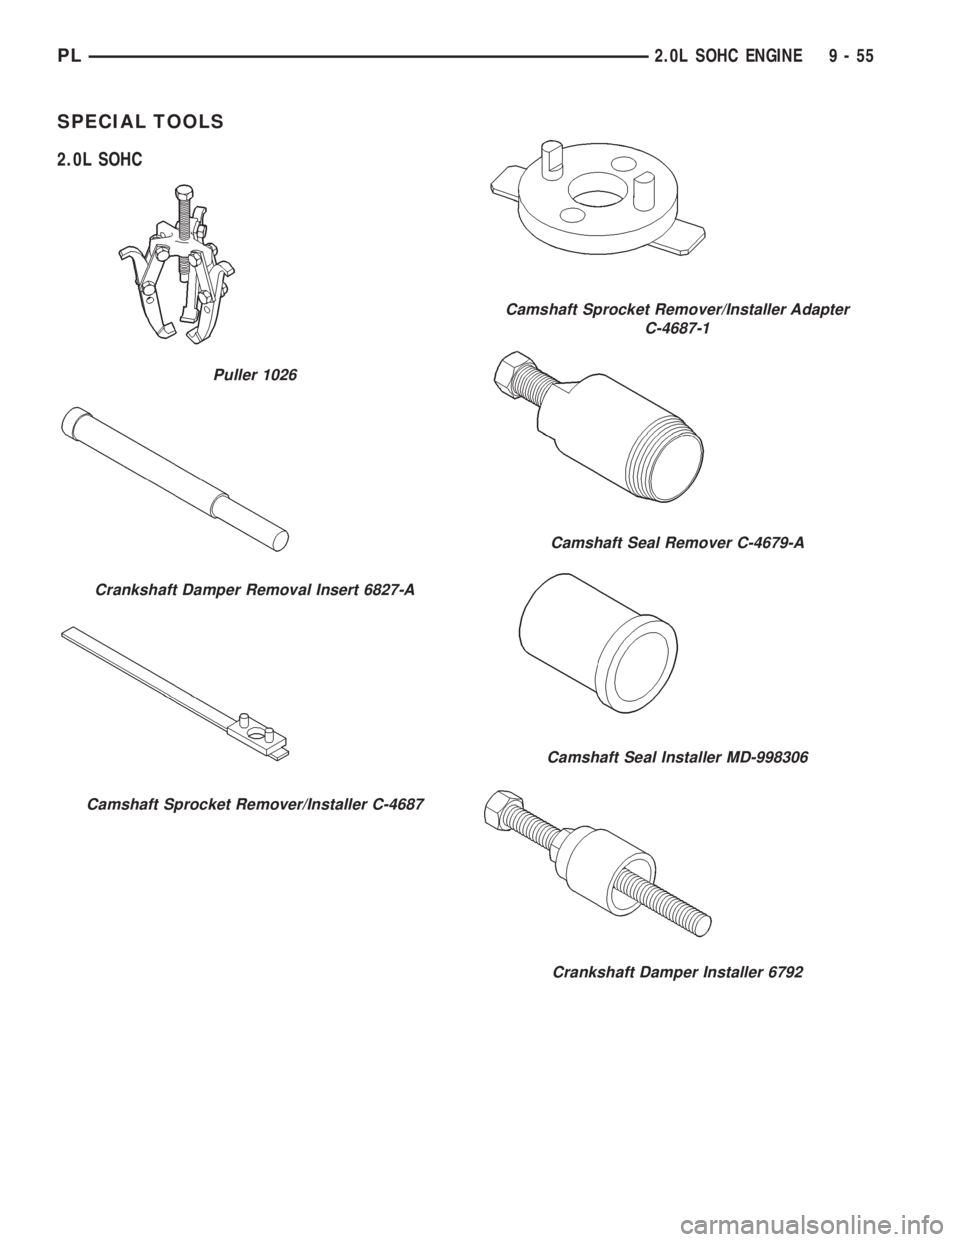
SPECIAL TOOLS
2.0L SOHC
Camshaft Sprocket Remover/Installer Adapter
C-4687-1
Camshaft Seal Remover C-4679-A
Camshaft Seal Installer MD-998306
Crankshaft Damper Installer 6792
Puller 1026
Crankshaft Damper Removal Insert 6827-A
Camshaft Sprocket Remover/Installer C-4687
PL2.0L SOHC ENGINE 9 - 55
Page 769 of 1200
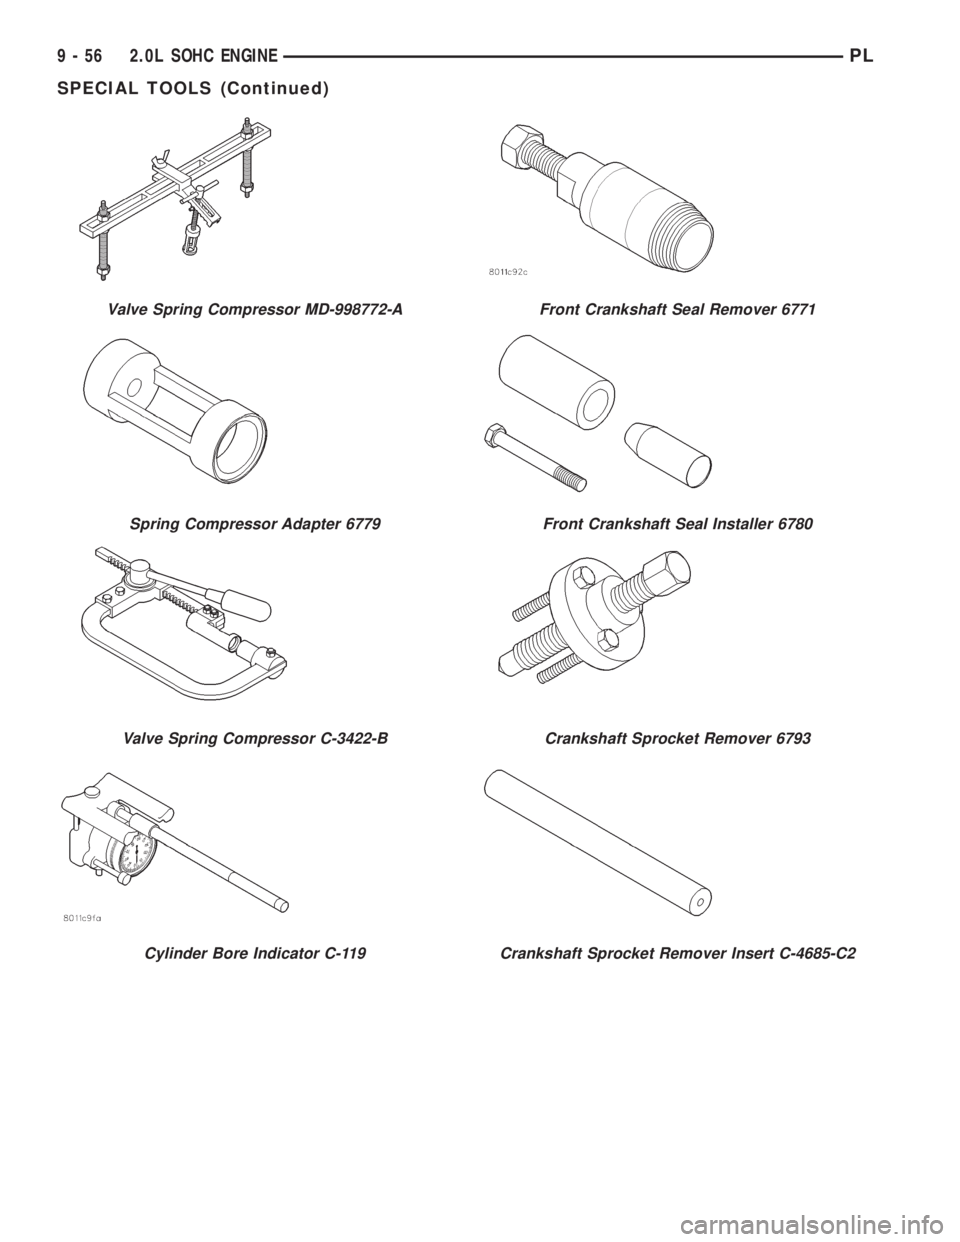
Valve Spring Compressor MD-998772-A
Spring Compressor Adapter 6779
Valve Spring Compressor C-3422-B
Cylinder Bore Indicator C-119
Front Crankshaft Seal Remover 6771
Front Crankshaft Seal Installer 6780
Crankshaft Sprocket Remover 6793
Crankshaft Sprocket Remover Insert C-4685-C2
9 - 56 2.0L SOHC ENGINEPL
SPECIAL TOOLS (Continued)
Page 770 of 1200
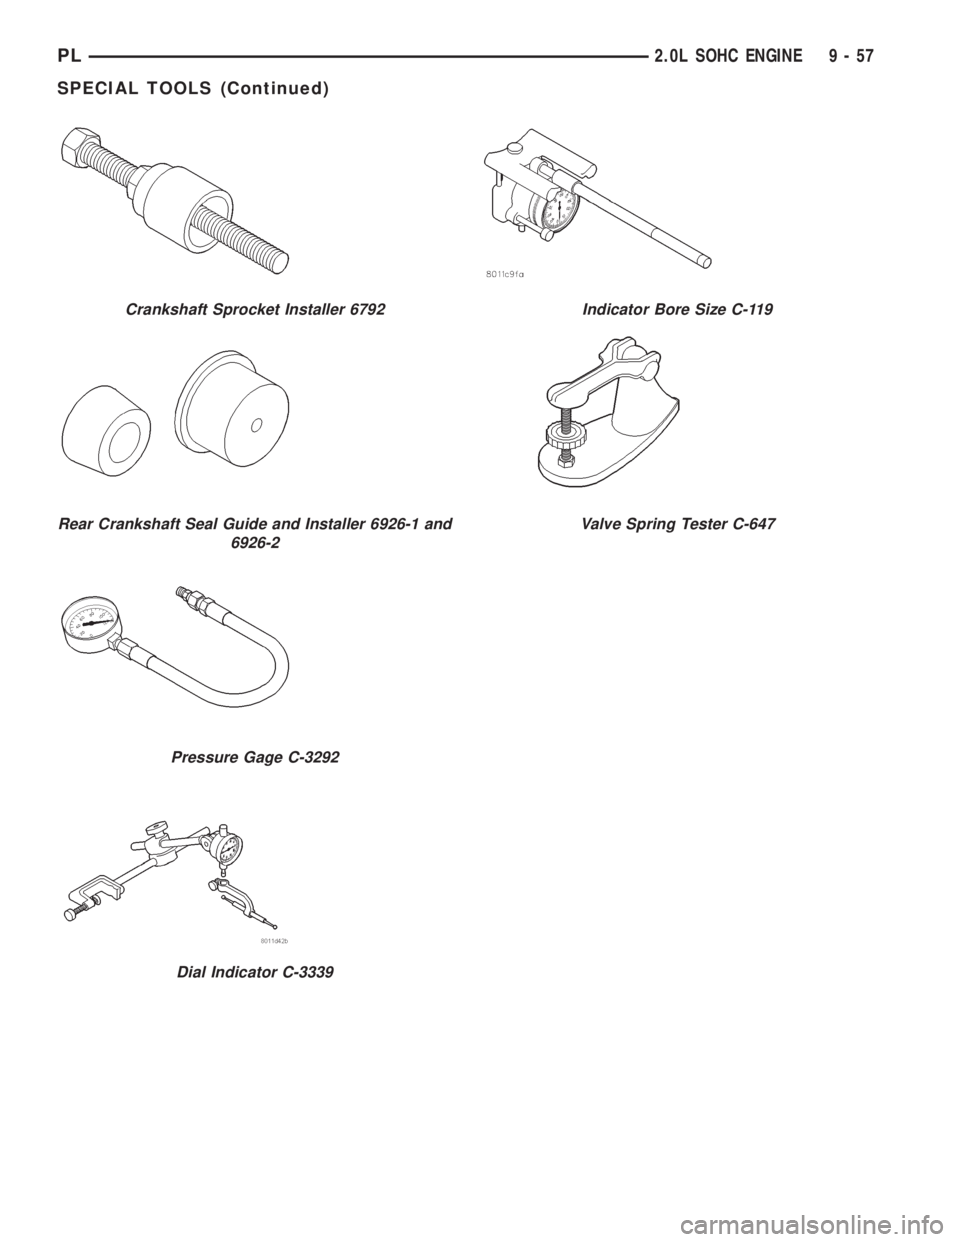
Crankshaft Sprocket Installer 6792
Rear Crankshaft Seal Guide and Installer 6926-1 and
6926-2
Pressure Gage C-3292
Dial Indicator C-3339
Indicator Bore Size C-119
Valve Spring Tester C-647
PL2.0L SOHC ENGINE 9 - 57
SPECIAL TOOLS (Continued)
Page 771 of 1200
2.0L DOHC ENGINE
INDEX
page page
DESCRIPTION AND OPERATION
ENGINE COMPONENTS.................. 59
ENGINE IDENTIFICATION NUMBER......... 58
ENGINE LUBRICATION SYSTEM............ 58
GENERAL SPECIFICATION................ 58
DIAGNOSIS AND TESTING
CHECKING ENGINE OIL PRESSURE......... 60
SERVICE PROCEDURES
CRANKSHAFT END PLAY................. 63
CYLINDER BORE AND PISTON SIZING....... 60
FITTING CONNECTING RODS.............. 62
FITTING CRANKSHAFT BEARINGS.......... 62
FITTING PISTON RINGS.................. 61
REMOVAL AND INSTALLATION
CAMSHAFT OIL SEALS................... 81
CAM FOLLOWER AND HYDRAULIC LASH
ADJUSTER ASSEMBLY.................. 69
CAMSHAFT............................ 67
CRANKSHAFT DAMPER.................. 73
CRANKSHAFT OIL SEALÐFRONT........... 82
CRANKSHAFT OIL SEALÐREAR............ 83
CRANKSHAFT.......................... 85
CYLINDER HEAD COVER................. 67
CYLINDER HEAD........................ 71
ENGINE ASSEMBLY...................... 65
ENGINE MOUNTÐFRONT................. 63
ENGINE MOUNTÐLEFT................... 63
ENGINE MOUNTÐRIGHT................. 64OIL FILTER ADAPTER.................... 87
OILFILTER ............................ 87
OILPAN ............................... 81
OIL PUMP............................. 88
PISTON AND CONNECTING ROD........... 89
POWER HOP DAMPER................... 64
STRUCTURAL COLLARÐ2.0L.............. 64
TIMING BELT COVER.................... 74
TIMING BELT TENSIONERÐMECHANICAL.... 80
TIMING BELTÐWITH HYDRAULIC TENSIONER . 75
TIMING BELTÐWITH MECHANICAL
TENSIONER.......................... 78
VALVE SPRING AND SEALSÐ
CYLINDER HEAD NOT REMOVED......... 69
DISASSEMBLY AND ASSEMBLY
OIL PUMP............................. 91
VALVE SERVICE WITH CYLINDER HEAD
REMOVED........................... 91
CLEANING AND INSPECTION
CYLINDER BLOCK AND BORE............. 96
CYLINDER HEAD AND CAMSHAFT JOURNALS . 94
OIL PUMP............................. 94
SPECIFICATIONS
2.0L DOHC............................. 96
TORQUE CHART 2.0L DOHC............... 98
SPECIAL TOOLS
2.0L DOHC............................. 98
DESCRIPTION AND OPERATION
ENGINE IDENTIFICATION NUMBER
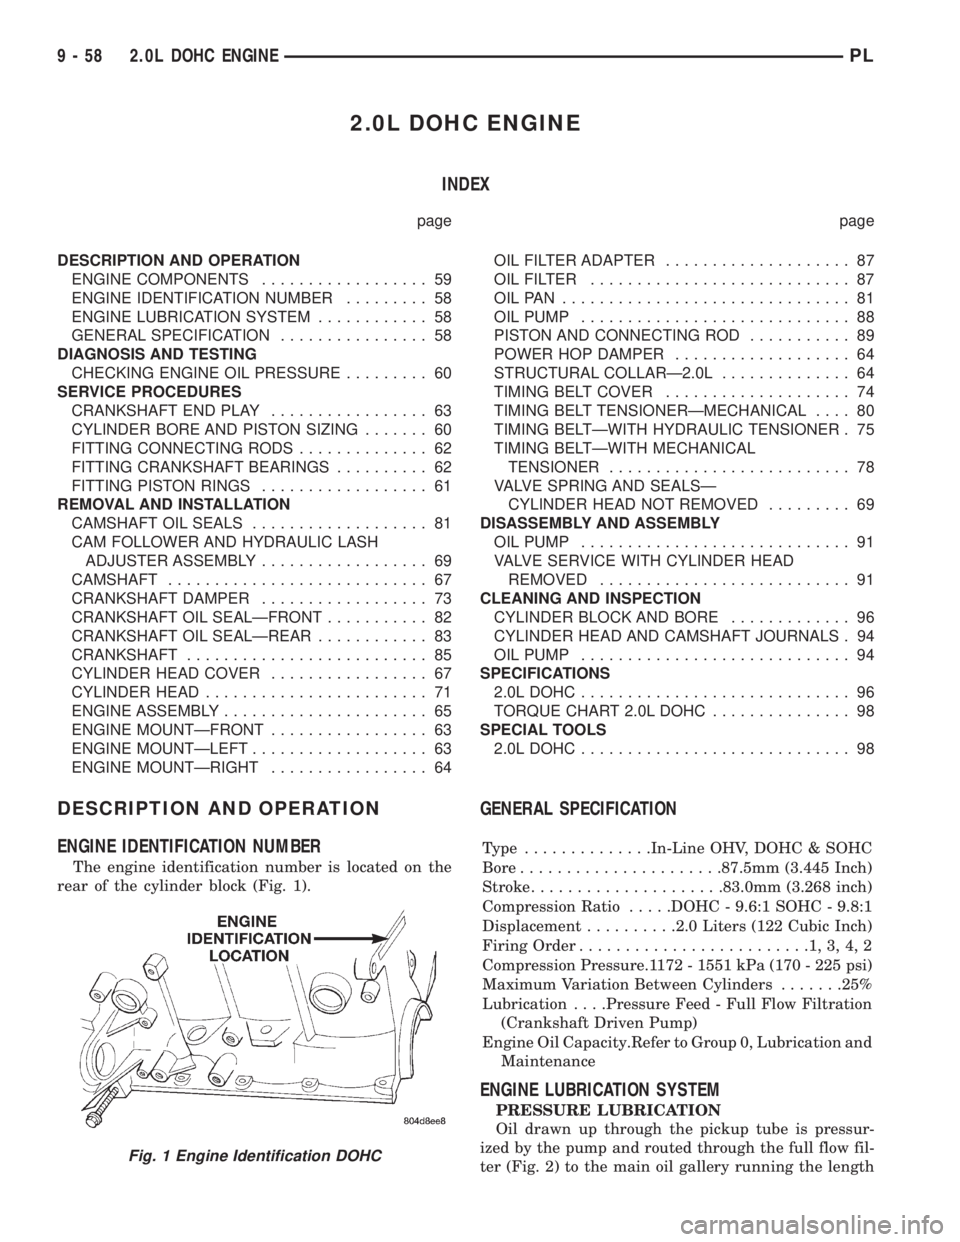
The engine identification number is located on the
rear of the cylinder block (Fig. 1).
GENERAL SPECIFICATION
Type ..............In-Line OHV, DOHC & SOHC
Bore......................87.5mm (3.445 Inch)
Stroke.....................83.0mm (3.268 inch)
Compression Ratio.....DOHC - 9.6:1 SOHC - 9.8:1
Displacement..........2.0 Liters (122 Cubic Inch)
Firing Order.........................1,3,4,2
Compression Pressure.1172 - 1551 kPa (170 - 225 psi)
Maximum Variation Between Cylinders.......25%
Lubrication. . . .Pressure Feed - Full Flow Filtration
(Crankshaft Driven Pump)
Engine Oil Capacity.Refer to Group 0, Lubrication and
Maintenance
ENGINE LUBRICATION SYSTEM
PRESSURE LUBRICATION
Oil drawn up through the pickup tube is pressur-
ized by the pump and routed through the full flow fil-
ter (Fig. 2) to the main oil gallery running the length
Fig. 1 Engine Identification DOHC
9 - 58 2.0L DOHC ENGINEPL
Page 772 of 1200
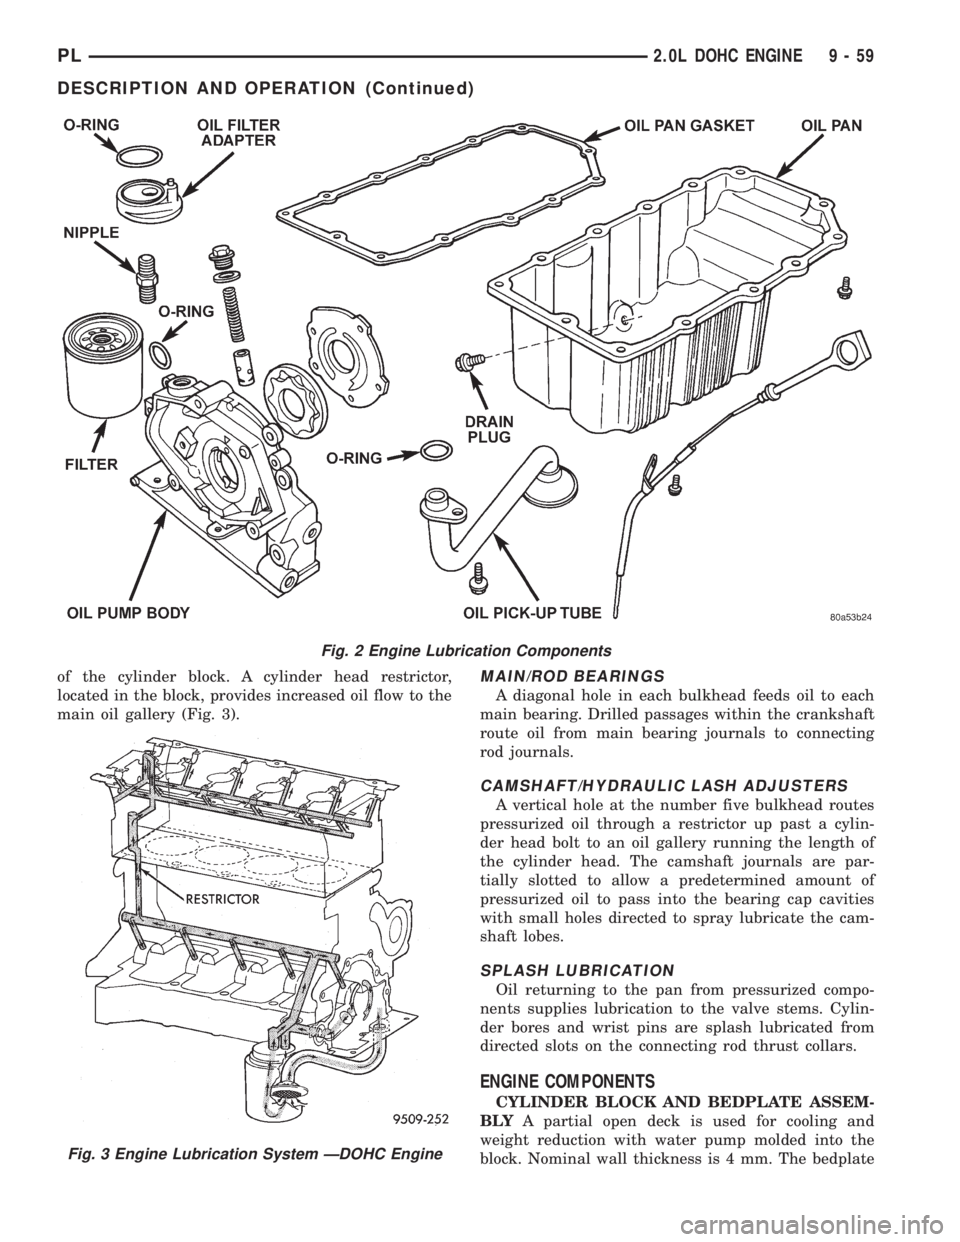
of the cylinder block. A cylinder head restrictor,
located in the block, provides increased oil flow to the
main oil gallery (Fig. 3).MAIN/ROD BEARINGS
A diagonal hole in each bulkhead feeds oil to each
main bearing. Drilled passages within the crankshaft
route oil from main bearing journals to connecting
rod journals.
CAMSHAFT/HYDRAULIC LASH ADJUSTERS
A vertical hole at the number five bulkhead routes
pressurized oil through a restrictor up past a cylin-
der head bolt to an oil gallery running the length of
the cylinder head. The camshaft journals are par-
tially slotted to allow a predetermined amount of
pressurized oil to pass into the bearing cap cavities
with small holes directed to spray lubricate the cam-
shaft lobes.
SPLASH LUBRICATION
Oil returning to the pan from pressurized compo-
nents supplies lubrication to the valve stems. Cylin-
der bores and wrist pins are splash lubricated from
directed slots on the connecting rod thrust collars.
ENGINE COMPONENTS
CYLINDER BLOCK AND BEDPLATE ASSEM-
BLYA partial open deck is used for cooling and
weight reduction with water pump molded into the
block. Nominal wall thickness is 4 mm. The bedplate
Fig. 2 Engine Lubrication Components
Fig. 3 Engine Lubrication System ÐDOHC Engine
PL2.0L DOHC ENGINE 9 - 59
DESCRIPTION AND OPERATION (Continued)
Page 773 of 1200
incorporates main bearing caps. Rear seal retainer is
integral with the block.
CRANKSHAFTA nodular cast iron crankshaft is
used. The engine has 5 main bearings, with number
3 flanged to control thrust. The 52 mm diameter
main and 48 mm diameter crank pin journals (all)
have undercut fillet radiuses that are deep rolled for
added strength. To optimize bearing loading 8 coun-
terweights are used. Hydrodynamic seals provide end
sealing, where the crankshaft exits the block.
Anaerobic gasket material is used for parting line
sealing. A sintered iron timing belt sprocket is
mounted on the crankshaft nose. This sprocket pro-
vides motive power; via timing belt to the camshaft
sprocket providing timed valve actuation.
PISTONSThe DOHC EngineDO NOThave pro-
vision for a free wheeling valve train. Non free
wheeling valve train means, in the event of a broken
timing belt Pistons will contact the Valves. All
engines use pressed-in piston pins to attach forged
powdered metal connecting rods. The connecting rods
are a cracked cap design and are not repairable. Hex
head cap screw are used to provide alignment and
durability in the assembly.
PISTON RINGSThe piston rings include a
molybdenum faced top ring for reliable compression
sealing and a taper faced intermediate ring for addi-
tional cylinder pressure control. Oil Control Ring
Package contains of 2 steel rails and a expander
spacer.
CYLINDER HEADFeatures a Dual Over Head
Camshaft (DOHC), 4 valves per cylinder cross flow
design. The valves are arranged in two in-line banks,
with the ports of the bank of two intake valves per
cylinder facing toward the radiator side of engine
and ports of the bank of two exhaust valves per cyl-
inder facing toward the dash panel. Incorporates
powder metal valve guides and seats. Integral oil gal-
leys within the cylinder head supplies oil to the
hydraulic lash adjusters, camshaft and valve mecha-
nisms.
CAMSHAFTSThe nodular iron camshafts have
six bearing journals and 2 cam lobes per cylinder.
Flanges at the rear journals control camshaft end
play. Provision for cam position sensor is located on
the intake camshaft at the rear of cylinder head. A
hydrodynamic oil seal is used for oil control at the
front of the camshaft.
VA LV E SFour valves per cylinder are actuated by
roller cam followers which pivot on stationary
hydraulic lash adjusters. All valves have 6 mm diam-
eter chrome plated valve stems. The valve sizes are
34.8 mm (1.370 inch.) diameter intake valves and
30.5 mm (1.20 inch.) diameter exhaust valves. Viton
rubber valve stem seals are integral with the springseats. Valve springs, spring retainers, and locks are
conventional.
INTAKE MANIFOLDThe intake manifold is a
two piece aluminum casting, attached to the cylinder
head with ten fasteners. This long branch fan design
enhances low and mid-speed torque.
EXHAUST MANIFOLDThe exhaust manifold is
made of nodular cast iron for strength and high tem-
peratures. Exhaust gasses exit through a machined,
articulated joint connection to the exhaust pipe.
COMPONENT REPLACEMENT
If any of the following parts have been changed or
replaced:
²Camshaft
²Camshaft Position Sensor
²Camshaft Position Sensor Target Magnet
²Cylinder Block
²Cylinder Head
²Water Pump
²Powertrain Control Module (PCM)
²Timing Belt and Timing Belt Tensioner
The camshaft and crankshaft timing relearn proce-
dure must be performed. Refer to the component
Removal and Installation procedure outlined in this
Group.
DIAGNOSIS AND TESTING
CHECKING ENGINE OIL PRESSURE
(1) Remove oil pressure switch and install gauge
assembly C-3292 with adaptor.
(2) Run engine until thermostat opens.
CAUTION: If oil pressure is 0 at idle, Do Not per-
form the 3000 RPM test in the next step.
(3) Oil Pressure:Curb Idle25 kPa (4 psi) mini-
mum3000 RPM170-550 kPa (25-80 psi).
(4) If oil pressure is 0 at idle. Shut off engine,
check for pressure relief valve stuck open, a clogged
oil pick-up screen or a damaged oil pick-up tube
O-ring.
SERVICE PROCEDURES
CYLINDER BORE AND PISTON SIZING
The cylinder walls should be checked for out-of-
round and taper with Tool C-119 (Fig. 4). The cylin-
der bore out-of-round is 0.050 mm (.002 inch)
maximum and cylinder bore taper is 0.051 mm (0.002
inch) maximum. If the cylinder walls are badly
scuffed or scored, the cylinder block should be
rebored and honed, and new pistons and rings fitted.
Whatever type of boring equipment is used, boring
and honing operation should be closely coordinated
9 - 60 2.0L DOHC ENGINEPL
DESCRIPTION AND OPERATION (Continued)
Page 774 of 1200
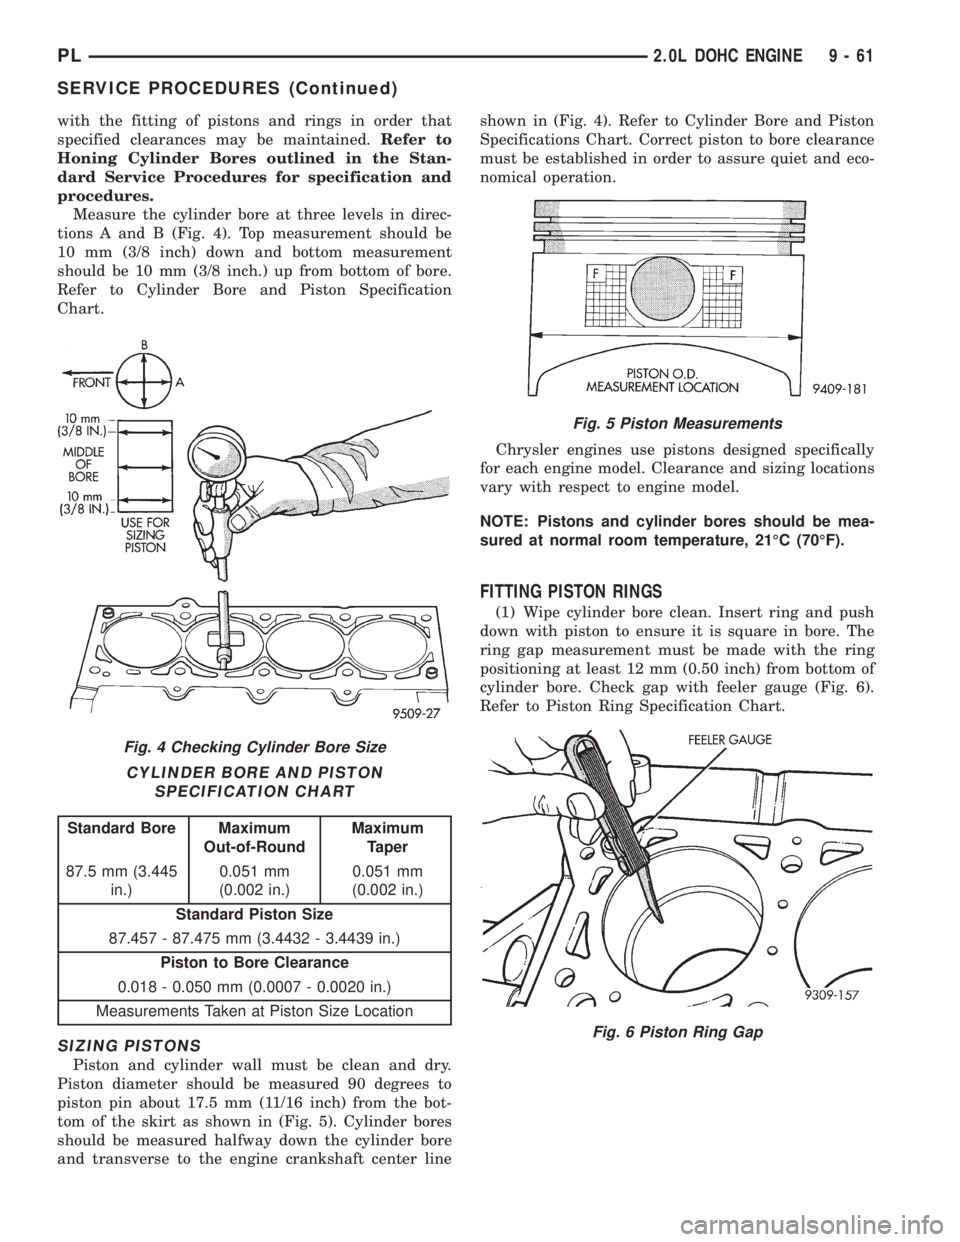
with the fitting of pistons and rings in order that
specified clearances may be maintained.Refer to
Honing Cylinder Bores outlined in the Stan-
dard Service Procedures for specification and
procedures.
Measure the cylinder bore at three levels in direc-
tions A and B (Fig. 4). Top measurement should be
10 mm (3/8 inch) down and bottom measurement
should be 10 mm (3/8 inch.) up from bottom of bore.
Refer to Cylinder Bore and Piston Specification
Chart.
SIZING PISTONS
Piston and cylinder wall must be clean and dry.
Piston diameter should be measured 90 degrees to
piston pin about 17.5 mm (11/16 inch) from the bot-
tom of the skirt as shown in (Fig. 5). Cylinder bores
should be measured halfway down the cylinder bore
and transverse to the engine crankshaft center lineshown in (Fig. 4). Refer to Cylinder Bore and Piston
Specifications Chart. Correct piston to bore clearance
must be established in order to assure quiet and eco-
nomical operation.
Chrysler engines use pistons designed specifically
for each engine model. Clearance and sizing locations
vary with respect to engine model.
NOTE: Pistons and cylinder bores should be mea-
sured at normal room temperature, 21ÉC (70ÉF).
FITTING PISTON RINGS
(1) Wipe cylinder bore clean. Insert ring and push
down with piston to ensure it is square in bore. The
ring gap measurement must be made with the ring
positioning at least 12 mm (0.50 inch) from bottom of
cylinder bore. Check gap with feeler gauge (Fig. 6).
Refer to Piston Ring Specification Chart.
Fig. 4 Checking Cylinder Bore Size
CYLINDER BORE AND PISTON
SPECIFICATION CHART
Standard Bore Maximum
Out-of-RoundMaximum
Taper
87.5 mm (3.445
in.)0.051 mm
(0.002 in.)0.051 mm
(0.002 in.)
Standard Piston Size
87.457 - 87.475 mm (3.4432 - 3.4439 in.)
Piston to Bore Clearance
0.018 - 0.050 mm (0.0007 - 0.0020 in.)
Measurements Taken at Piston Size Location
Fig. 5 Piston Measurements
Fig. 6 Piston Ring Gap
PL2.0L DOHC ENGINE 9 - 61
SERVICE PROCEDURES (Continued)
Page 775 of 1200
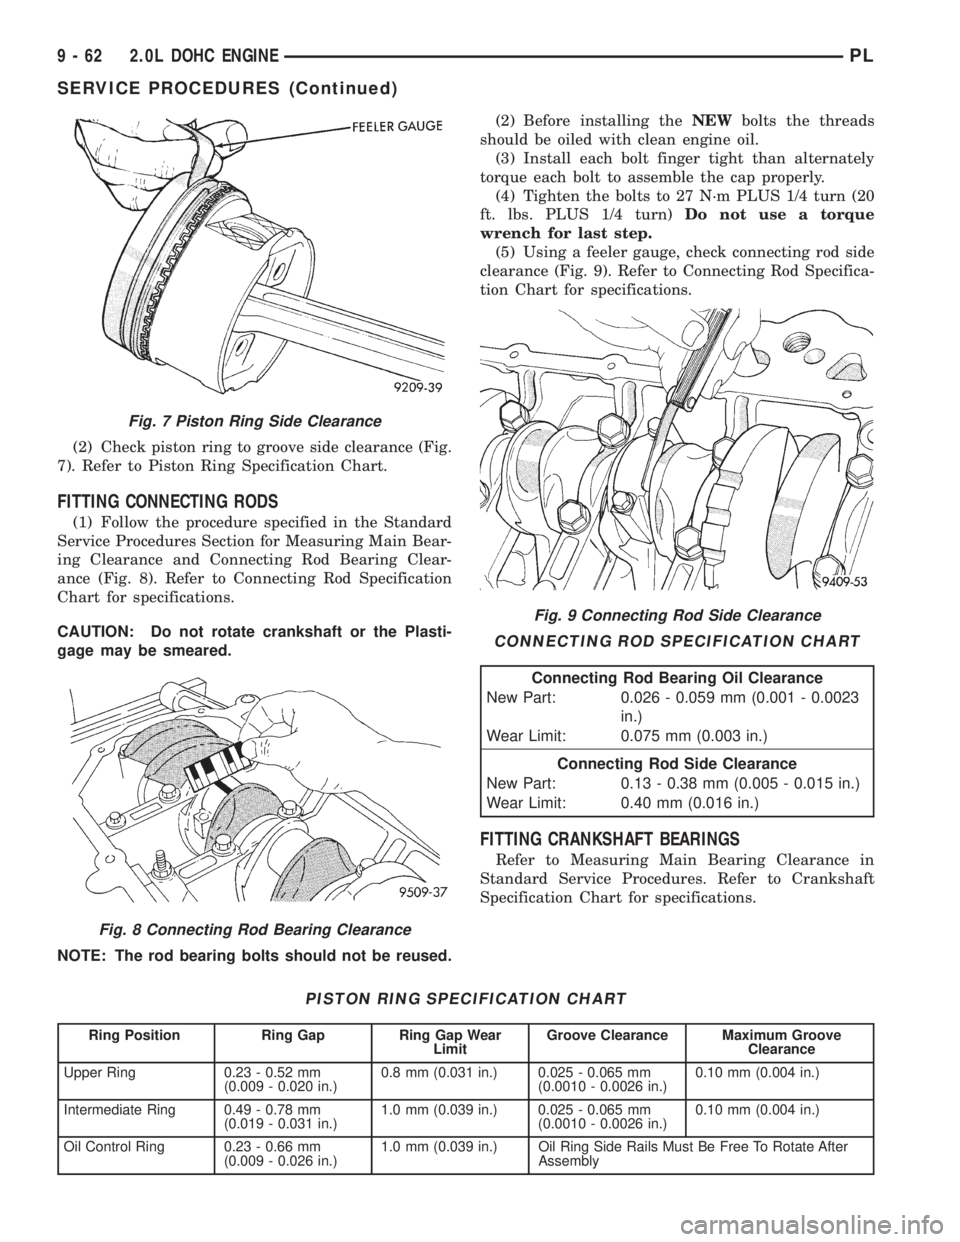
(2) Check piston ring to groove side clearance (Fig.
7). Refer to Piston Ring Specification Chart.
FITTING CONNECTING RODS
(1) Follow the procedure specified in the Standard
Service Procedures Section for Measuring Main Bear-
ing Clearance and Connecting Rod Bearing Clear-
ance (Fig. 8). Refer to Connecting Rod Specification
Chart for specifications.
CAUTION: Do not rotate crankshaft or the Plasti-
gage may be smeared.
NOTE: The rod bearing bolts should not be reused.(2) Before installing theNEWbolts the threads
should be oiled with clean engine oil.
(3) Install each bolt finger tight than alternately
torque each bolt to assemble the cap properly.
(4) Tighten the bolts to 27 N´m PLUS 1/4 turn (20
ft. lbs. PLUS 1/4 turn)Do not use a torque
wrench for last step.
(5) Using a feeler gauge, check connecting rod side
clearance (Fig. 9). Refer to Connecting Rod Specifica-
tion Chart for specifications.
FITTING CRANKSHAFT BEARINGS
Refer to Measuring Main Bearing Clearance in
Standard Service Procedures. Refer to Crankshaft
Specification Chart for specifications.
Fig. 7 Piston Ring Side Clearance
PISTON RING SPECIFICATION CHART
Ring Position Ring Gap Ring Gap Wear
LimitGroove Clearance Maximum Groove
Clearance
Upper Ring 0.23 - 0.52 mm
(0.009 - 0.020 in.)0.8 mm (0.031 in.) 0.025 - 0.065 mm
(0.0010 - 0.0026 in.)0.10 mm (0.004 in.)
Intermediate Ring 0.49 - 0.78 mm
(0.019 - 0.031 in.)1.0 mm (0.039 in.) 0.025 - 0.065 mm
(0.0010 - 0.0026 in.)0.10 mm (0.004 in.)
Oil Control Ring 0.23 - 0.66 mm
(0.009 - 0.026 in.)1.0 mm (0.039 in.) Oil Ring Side Rails Must Be Free To Rotate After
Assembly
Fig. 8 Connecting Rod Bearing Clearance
Fig. 9 Connecting Rod Side Clearance
CONNECTING ROD SPECIFICATION CHART
Connecting Rod Bearing Oil Clearance
New Part: 0.026 - 0.059 mm (0.001 - 0.0023
in.)
Wear Limit: 0.075 mm (0.003 in.)
Connecting Rod Side Clearance
New Part: 0.13 - 0.38 mm (0.005 - 0.015 in.)
Wear Limit: 0.40 mm (0.016 in.)
9 - 62 2.0L DOHC ENGINEPL
SERVICE PROCEDURES (Continued)