Page 91 of 261

91
Part 1
OPERATION OF
INSTRUMENTS
AND CONTROLS—
Chapter 1−4
Lights, Wipers and
Defogger
�Headlights and turn signals
�Emergency flashers
�Instrument panel light control
�Personal")
name. SIENNA (U)
91
Part 1
OPERATION OF
INSTRUMENTS
AND CONTROLS—
Chapter 1−4
Lights, Wipers and
Defogger
�Headlights and turn signals
�Emergency flashers
�Instrument panel light control
�Personal lights
�Interior light
�Ignition switch light
�Luggage compartment light
�Windshield wipers and washer
�Rear window wiper and washer
�Rear window and outside rear
view mirror defoggers
HEADLIGHTS
To turn on the following lights: Twist
the headlight/turn signal lever knob.
Position 1—Parking, tail, license plate,
side marker and instrument panel lights
Position 2—Headlights and all of the
above
Position 3 (”AUTO”)—Headlights and/or all
of the above
They automatically turn on or off depend-
ing on the darkness of the surroundings.
Manually twist the knob to the position 2
to turn on the headlights if they are need-
ed immediately when entering a dark tun-
nel, parking structure, etc.The automatic light control sensor is on
the top of the driver’s side instrument
panel.
Do not place anything on the instrument
panel, and/or do not affix anything on the
windshield to block this sensor.
If you feel that the automatic light control
comes into operation too early or too late,
have the sensor adjusted by your Toyota
dealer.
Headlights and turn signals
(with automatic light control
system)
ProCarManuals.com
Page 92 of 261

92
The lights automatically turn off when the
driver ’s door is opened with the ignition
key in the ”ACC” or ”LOCK” position. To
turn them on again, turn the key to the
”")
name. SIENNA (U)
92
The lights automatically turn off when the
driver ’s door is opened with the ignition
key in the ”ACC” or ”LOCK” position. To
turn them on again, turn the key to the
”ON” position or actuate the headlight
switch. If you are going to park for over
one week, make sure the headlight switch
is off.
NOTICE
To prevent the battery from being dis-
charged, do not leave the lights on
for a long period when the engine is
not running.
Daytime running light system (Canada
only)
The headlights turn on at reduced intensi-
ty when the parking brake is released with
the engine started, even with the light
switch in the ”OFF” position. They will not
go off until the ignition switch is turned
off.
To turn on the other exterior lights and
instrument panel lights, twist the knob to
the position 1.
Twist the knob to the position 2 to turn
the headlights to full intensity for driving
at night.
High−Low beams—For high beams, turn
the headlights on and push the lever away
from you (position 1). Pull the lever to-
ward you (position 2) for low beams.
The headlight high beam indicator light
(blue light) on the instrument panel will
tell you that the high beams are on.
Flashing the high beam headlights
(position 3)—Pull the lever all the way
back. The high beam headlights turn off
when you release the lever.
You can flash the high beam headlights
with the knob turned to ”OFF”.TURN SIGNALS
To signal a turn, push the headlight/
turn signal lever up or down to position
1.
The key must be in the ”ON” position.
The lever automatically returns after you
make a turn, but you may have to return
it by hand after you change lanes.
To signal a lane change, move the lever
up or down to the pressure point (position
2) and hold it.
If the turn signal indicator lights (green
lights) on the instrument panel flash faster
than normal, a front or rear turn signal
bulb is burned out.
ProCarManuals.com
Page 93 of 261

93
HEADLIGHTS
To turn on the following lights: Twist
the headlight/turn signal lever knob.
Position 1—Parking, tail, license plate,
side marker and instrument panel lights
Position")
name. SIENNA (U)
93
HEADLIGHTS
To turn on the following lights: Twist
the headlight/turn signal lever knob.
Position 1—Parking, tail, license plate,
side marker and instrument panel lights
Position 2—Headlights and all of the
above
The lights automatically turn off when the
driver ’s door is opened with the ignition
turned off. To turn them on again, turn the
key to the ”ON” position or actuate the
headlight switch. If you are going to park
for over one week, make sure the head-
light switch is off.
NOTICE
To prevent the battery from being dis-
charged, do not leave the lights on
for a long period when the engine is
not running.
Daytime running light system (Canada
only)
The headlights turn on at reduced intensi-
ty when the parking brake is released with
the engine started, even with the light
switch in the ”OFF” position. They will not
go off until the ignition switch is turned
off.
To turn on the other exterior lights and
instrument panel lights, twist the knob to
the position 1.
Twist the knob to the position 2 to turn
the headlights to full intensity for driving
at night.
High−Low beams—For high beams, turn
the headlights on and push the lever away
from you (position 1). Pull the lever to-
ward you (position 2) for low beams.
The headlight high beam indicator light
(blue light) on the instrument panel will
tell you that the high beams are on.
Flashing the high beam headlights
(position 3)—Pull the lever all the way
back. The high beam headlights turn off
when you release the lever.
You can flash the high beam headlights
with the knob turned to ”OFF”.
Headlights and turn signals
(without automatic light
control system)
ProCarManuals.com
Page 94 of 261

94
TURN SIGNALS
To signal a turn, push the headlight/
turn signal lever up or down to position
1.
The key must be in the ”ON” position.
The lever automatically returns after you
m")
name. SIENNA (U)
94
TURN SIGNALS
To signal a turn, push the headlight/
turn signal lever up or down to position
1.
The key must be in the ”ON” position.
The lever automatically returns after you
make a turn, but you may have to return
it by hand after you change lanes.
To signal a lane change, move the lever
up or down to the pressure point (position
2) and hold it.
If the turn signal indicator lights (green
lights) on the instrument panel flash faster
than normal, a front or rear turn signal
bulb is burned out.
Emergency flashers
To turn on the emergency flashers,
push the switch.
All the turn signal lights will flash. To turn
them off, push the switch once again.
Turn on the emergency flashers to warn
other drivers if your vehicle must be
stopped where it might be a traffic hazard.
Always pull as far off the road as pos-
sible.
The turn signal light switch will not work
when the emergency flashers are operat-
ing.
NOTICE
To prevent the battery from being dis-
charged, do not leave the switch on
longer than necessary when the en-
gine is not running.
ProCarManuals.com
Page 95 of 261
name. SIENNA (U)
95
Instrument panel light control
To adjust the brightness of the instru-
ment panel lights, turn the dial.
Personal lights
Front (with moon roof)
The front personal lights operate sepa-
rately with each lens.
To turn on the light, push the lens on your
side. To turn the light off, push the lens
once again.Front (without moon roof)
The front personal lights operate sepa-
rately with each lens.
To turn on the light, push the lens on your
side. To turn the light off, push the lens
once again.
To turn on the front personal lights,
push the switch.
The front personal light switch has the
following positions:
”OFF”—Turns the light off.
”DOOR”—Turns the light on when any of
the front or sliding door is opened.
ProCarManuals.com
Page 116 of 261

11 6
When parking, firmly apply the parking
brake to avoid inadvertent creeping.
To set: Fully depress the pedal. For better
holding power, first depress the brake
pedal and hold it w")
name. SIENNA (U)
11 6
When parking, firmly apply the parking
brake to avoid inadvertent creeping.
To set: Fully depress the pedal. For better
holding power, first depress the brake
pedal and hold it while setting the brake.
To release: Depress the parking brake
pedal once again.
To remind you that the parking brake is
set, the parking brake reminder light in
the instrument panel remains on until you
release the parking brake.
CAUTION
Before driving, be sure the parking
brake is fully released and the park-
ing brake reminder light is off.
Cruise control
The cruise control allows you to cruise
the vehicle at a desired speed over 40
km/h (25 mph) even with your foot off
the accelerator pedal.
Your cruising speed can be maintained up
or down grades within the limits of engine
performance, although a slight speed
change may occur when driving up or
down the grades. On steeper hills, a
greater speed change will occur so it is
better to drive without the cruise control.
CAUTION
�To help maintain maximum control
of your vehicle, do not use the
cruise control when driving in
heavy or varying traffic, or on slip-
pery (rainy, icy or snow−covered) or
winding roads.
�Avoid vehicle speed increases when
driving downhill. If the vehicle
speed is too fast in relation to the
cruise control set speed, cancel the
cruise control then downshift the
transmission to use engine braking
to slow down.
TURNING ON THE SYSTEM
To operate the cruise control, press the
”CRUISE ON−OFF” button. This turns the
system on. The indicator light in the
instrument panel shows that you can now
set the vehicle at a desired cruising
speed. Another press will turn the system
completely off.
CAUTION
To avoid accidental cruise control en-
gagement, keep the ”CRUISE ON−
OFF” switch off when not using the
cruise control.
ProCarManuals.com
Page 119 of 261
name. SIENNA (U)
11 9
Part 1
OPERATION OF
INSTRUMENTS
AND CONTROLS—
Chapter 1−7
Car audio system
and Air conditioning
system
Car audio system
�Reference
�Using your audio system:
some basics
�Using your audio system:
controls and features
�Car audio system operating hints
Air conditioning system
�Controls
�Air flow selector settings
�Operating tips
�Instrument panel ventsRear air conditioning system
�Controls
�Air flow selector settings
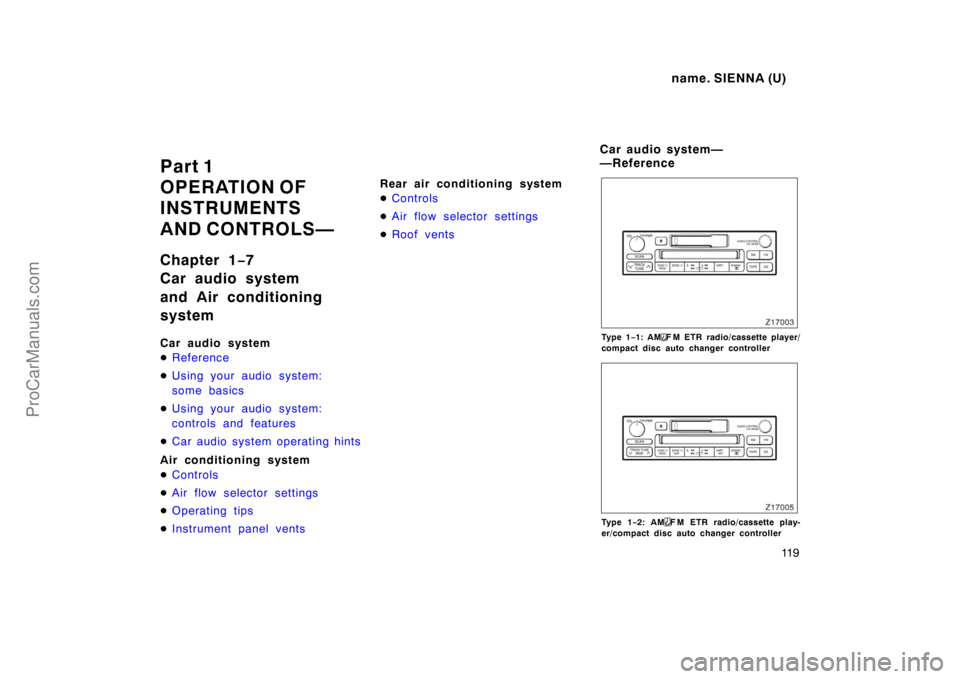
�Roof ventsTy p e 1−1: AMF M ETR radio/cassette player/
compact disc auto changer controller
Ty p e 1−2: AMF M ETR radio/cassette play-
er/compact disc auto changer controller
Car audio system—
—Reference
ProCarManuals.com
Page 145 of 261

145
Fan speed selector
Turn the knob to adjust the fan speed—to
the right to increase, to the left to de-
crease.
Temperature selector
Turn the knob to adjust the temperature—
to")
name. SIENNA (U)
145
Fan speed selector
Turn the knob to adjust the fan speed—to
the right to increase, to the left to de-
crease.
Temperature selector
Turn the knob to adjust the temperature—
to the right to warm, to the left to cool.
Air flow selector
Turn the knob to select the vents used for
air flow.
1. Panel—Air flows mainly from the
instrument panel vents.
2. Bi−level—Air flows from both the floor
vents and the instrument panel vents.
3. Floor—Air flows mainly from the floor
vents.
4. Floor/Windshield—Air flows mainly
from the floor vents and windshield
vents.
5. Windshield—Air flows mainly from the
windshield vents.For details about air flow selector settings,
see the illustration after ”A/C” button.
Turning the air flow control knob to wind-
shield position turns on the defroster−
linked air conditioning.
At this time, the ”A/C” button indicator
comes on regardless of whether or not the
”A/C” button is pressed in. This is to
clean up the front view more quickly.
When the ”A/C” button is not pressed in,
turning the air flow control knob to anoth-
er position turns off the air conditioning.
ProCarManuals.com

95
Instrument panel light control
To adjust the brightness of the instru-
ment panel lights, turn the dial.
Personal lights
Front (with moon roof)
The front personal lights operate se")