1998 PONTIAC GRAND PRIX light
[x] Cancel search: lightPage 110 of 402

firn Signal and Lane Change Indicator
The turn signal has two upward (for right) and two
downward (for left) positions. These positions allow you
to signal a turn or a lane change.
To signal a turn, move the lever all the way up or
down. When the turn is finished, the lever will
return automatically.
An arrow
on the instrument
panel will flash in the
direction of the turn or
lane change.
7 I
A
To signal a lane change, just raise or lower the lever
until the arrow starts to flash. Hold it there until you
complete your lane change. The lever will return by
itself when you release it.
As you signal a turn or a lane change, if the arrow
flashes faster than normal,
a signal bulb may be burned
out and other drivers won’t see your turn signal. If
a bulb is burned out, replace it to help avoid an
accident.
If the arrows don’t go on at all when you
signal a turn, check for burned-out bulbs and then check
the fuse (see “Fuses and Circuit Breakers” in the Index).
A chime will sound if you leave your turn
signal on for
more than
3/4 mile (1.2 km).
Headlamp High/Low Beam Changer
To change your headlamps
from low
beam to high
beam, or high to low, pull the multifunction lever
all
the way toward you. Then
release it.
When the high beams are on, a light on the instrument
panel also will be on.
Flash-to-Pass Feature
When your headlamps are off, pull the lever toward you
to momentarily switch on the high beams (to signal
that
you are going to pass). When you release the lever, they
will turn
off.
2-35
Page 111 of 402

Windshield Wipers
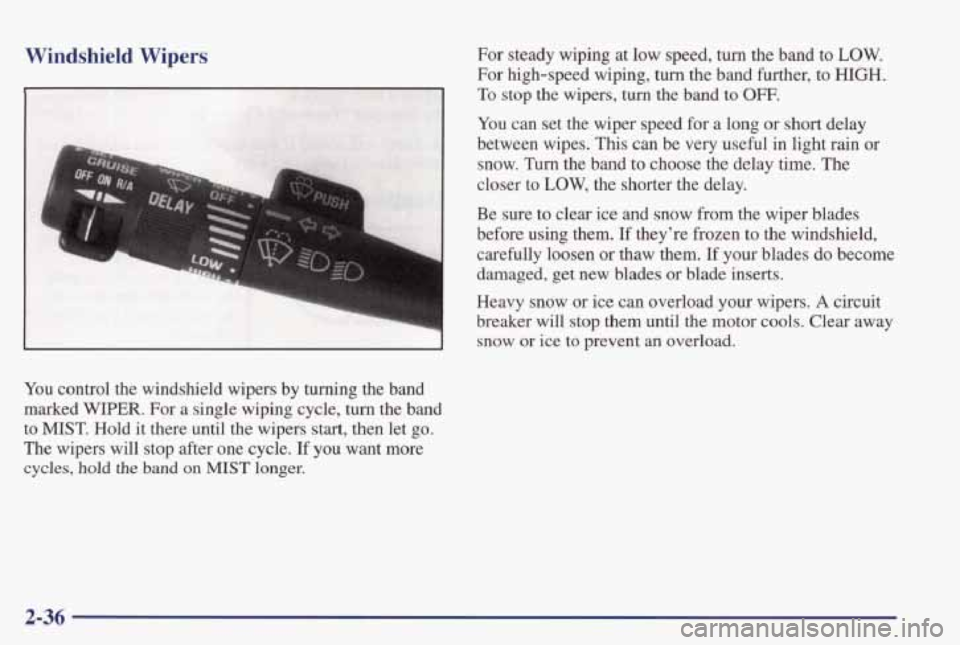
You control the windshield wipers by turning the band
marked WIPER. For a single wiping cycle, turn the band
to MIST. Hold it there until the wipers start, then let go.
The wipers will stop after one cycle. If you want more
cycles, hold the band on MIST longer.
For steady wiping at low speed, turn the band to LOW.
For high-speed wiping, turn the band further, to HIGH.
To stop the wipers, turn the band to OFF.
You can set the wiper speed for a long or short delay
between wipes.
This can be very useful in light rain or
snow.
Turn the band to choose the delay time. The
closer to
LOW, the shorter the delay.
Be sure to clear ice and snow from the wiper blades
before using them. If they’re frozen
to the windshield,
carefully loosen or thaw them. If
your blades do become
damaged, get new blades
or blade inserts.
Heavy snow or ice can overload your wipers.
A circuit
breaker will stop them until
the motor cools. Clear away
snow or ice
to prevent an overload.
2-36
Page 115 of 402

Ending Cruise Control
There are two ways to turn off the cruise control:
Step lightly on the brake pedal; OR
0 Move the cruise switch to OW.
Erasing Cruise Speed Memory
When you turn off the cruise control or the ignition, or
shift into PARK (P) or NEUTRAL (N), your cruise
control set speed memory is erased.
Exterior Lamps
The lamp controls are located on the lower, left side of
the instrument panel, to the left of the steering wheel.
They control these systems:
Headlamps
Taillamps
Parking Lamps
License Lamps
Sidemarker Lamps
0 Instrument Panel Lights
0 Courtesy Lamps
0 Fog Lamps
- - =c) : Turn the knob to this symbol to turn on the
headlamps and other operating lamps.
pf : Turn the knob to this symbol to turn on
the parking and other operating lamps without
the headlamps.
Turn the knob to OFF to turn off the lamps.
Page 116 of 402

Daytime Running Lamps
Daytime Running Lamps (DRL) can make it easier for
others to see the front
of your vehicle during the day.
DRL can be helpful in many different driving
conditions, but they can be especially helpful in the
short periods after dawn and before sunset.
A light sensor on top of the instrument panel makes the
DRL work, so be sure it isn’t covered.
The DRL system will make your low-beam headlamps
come on at a reduced brightness when:
0 The ignition is on,
The headlamp switch is off and
0 The parking brake is released.
When the DRL are on, only your low-beam headlamps
will be on. The taillamps, sidemarker and other
lamps won’t be on. Your instrument panel won’t be lit up either.
When it’s dark enough outside, your headlamps will
change to full brightness. The other lamps that come
on
with your headlamps will also come on.
When it’s bright enough outside,
the regular lamps will
go out, and your low-beam headlamps change to the
reduced brightness of DRL.
To idle your vehicle with the DRL off, set the parking
brake while the ignition is
in OFF or LOCK. Then start
your vehicle. The DRL will stay off until you release the
parking brake.
As with any vehicle, you should turn on the regular
headlamp system when you need it.
Fog Lamps
The fog lamps switch is located in the upper, left comer
of the instrument panel, to the left of the instrument
panel cluster.
Page 117 of 402

To turn the fog lamps on, press the right side of the fog lamps
switch.
A light will glow on the switch to let you know that
they are on. (Your parking lamps must be on, or your fog
lamps won’t come
on.) Press the left side of the switch to turn
the fog lamps off.
The fog lamps will go off whenever you change to
high-beam headlamps. When you return
to low beams, the
fog lamps will come on again.
Interior Lamps
Instrument Panel Intensity Control
You can brighten or dim
the instrument panel lights
by turning the interior
lamps
dial.
Turn the dial to the right to increase the brightness of the
instrument panel lights, to the left to decrease the
brightness.
Turn the control all the way to the left to turn
them off.
Courtesy Lamps
When any door is opened, several lamps come on. These
lamps are courtesy lamps. They make it easy for you
to
enter and leave your vehicle at night. You can also turn
these lamps on by turning the interior lamps dial all the
way to the right.
Illuminated Entry
The Illuminated Entry feature will illuminate the interior so
that you can see the inside of your vehicle before you enter at
night. The interior lamps will come on for
40 seconds when
you unlock
your doors using the remote keyless entry
transmitter
(ifequipped) and the ignition is in LOCK or OFF.
After 40 seconds have elapsed, the interior lamps will slowly
fade out. The lamps
will fade out before 40 seconds have
elapsed
if you:
0 Lock all doors using your remote keyless
0 Lock the doors using the power door lock switch.
When any door is opened, illuminated entry is canceled.
The interior lamps will stay on while any
door is opened
and slowly fade out when all doors are closed. The
interior lamps may stay
on for up to 25 seconds after all
doors have been closed if they have not been locked.
See “Delayed Illumination” later
in this section.
entry transmitter.
Page 118 of 402

Delayed Illumination
The Delayed Illumination feature will continue to illuminate the interior for
25 seconds after all the doors
have been closed
so that you can find the ignition and
buckle your seat belt at night. Delayed Illumination will not occur while the ignition is in RUN or ACCESSORY.
After
25 seconds have elapsed, the interior lamps will
slowly fade out. The lamps will fade out before the
25 seconds have elapsed if you:
Turn the ignition to RUN or ACCESSORY.
Lock all doors using your remote keyless entry
Lock the doors using the power door lock switch.
To turn Delayed Illumination feature
off or on, see
“Locks and Lighting Choices” in the Index.
Exit Lighting
transmitter (if equipped).
For exiting your vehicle at night, your vehicle is
equipped with the Exit Lighting feature. The interior
lamps will illuminate for up to
25 seconds when you
remove your key from the ignition. After
25 seconds
have elapsed, the interior lamps will slowly fade out.
The lamps will fade out before the
25 seconds have
elapsed if you:
0 Turn the ignition to RUN or ACCESSORY.
0 Lock all doors using your remote keyless entry
0 Lock the doors using the power door lock switch.
When any door is opened, exit lighting is canceled. The
interior lamps will stay on while any door is opened and
will slowly fade out when all the doors are closed. The
interior lamps may stay on for up to
25 seconds after all
the doors have been closed if they have not been locked.
See “Delayed Illumination” earlier
in this section.
To turn the Exit Lighting feature
off or on, see “Locks
and Lighting Choices” in the Index.
Battery Saver
Your vehicle has a feature to help prevent you from
draining the battery in case you accidentally leave the
interior, trunk or underhood lamps on. If you leave any
of these lamps on while the ignition is in LOCK or
OFF,
they will automatically turn off after 10 minutes. The
lamps won’t come back on again until you do one of
the following:
Turn the ignition to RUN or ACCESSORY.
0 Turn the interior lamp dial all the way to the right,
Open (or close and reopen) a door that is closed.
transmitter (if equipped).
then back slightly to
the left.
2-43
Page 120 of 402

Locks and Lighting Choices
Your vehicle’s locks and lighting systems can be programmed with several different f\
eatures. The features you can
program depend on the options that came with your vehicle. The following chart shows the features that can be
programmed
and which options you need to have to program them.
I
~
Feature
Door
Driver’s Remote
Locking/ Door
Lockout
Unlock
Deterrent Control
I 2 I X I x I X I
3
X X X X 4
X X X X
Remote
Lock/
Unlock
Confirma -
tion Content
Theft Content
Theft
Arming/
Disarming
X X X
2-45
Page 122 of 402

Delayed IlluminatiodExit Lighting
Your vehicle comes with this feature set in mode 4. To
change the factory setting while in the programming
mode do the following:
1. Turn the interior lamps dial all the way to the right
and then back slightly to the left.
2. Count the number of chimes you hear. The number
of chimes tells you which mode your vehicle is set
for. You change the mode by turning the interior
lamps dial all the way to the right and then back
slightly to the left.
3. Repeat Step 2 until you hear the number of chimes
that matches the mode you want.
Mode 1: Both Off (The interior lamps will turn on or off
at the same instant that a door is opened or closed.)
Mode 2: Delayed Illumination Only (The interior lamps
will stay on for about 25 seconds after all the doors
are
closed, or until you lock the doors.)
Mode 3: Exit Lighting Only (The interior lamps will
come on whenever you remove the
key from the ignition
and stay on for about 25 seconds, or until you lock
the
doors.)
Mode 4: Both On (This combines modes 2 and 3.)
Automatic Door Locks
Your vehicle comes with this feature set in mode 3. To
change the factory setting, while in the programming
mode do the following:
1. Press LOCK on the power lock switch.
2. Count the number of chimes you hear. The number
of chimes tells you which mode your vehicle is set
for. You change the mode by pressing LOCK again.
3. Repeat Step 2 until you hear the number of chimes
that matches the mode you want.
Mode 1: Off (Automatic door locking and unlocking are
disabled.) You will always need to lock your door
manually while driving to increase occupant safety.
0 To lock: All doors will lock when you press the
power door lock switch or when you lock the vehicle
using
the remote keyless entry transmitter.
To unlock: All doors will unlock when you press the
power door lock switch again or when you press
UNLOCK on the remote keyless entry transmitter.
2-47