Page 292 of 406
t
I
3. Remove the headlamp plate that holds the bulb to the
housing, by removing the two screws on top
of the
bulb with a torx screwdriver.
'7
I
4. Pull out the bulb and disconnect the electrical connector.
5. Reverse the steps with a new bulb.
Front limn Signal
1. Using a screwdriver, remove the screws from the
access panel under the vehicle. Move the access
panel out
of the way.
2. Turn the bulb and socket counterclockwise and
gently pull out.
3. Pull out the bulb.
4. Reverse the steps with a new bulb.
6-39
Page 293 of 406
Center High-Mounted Stoplamp
To replace the bulb:
1. Remove the two screws in the stoplamp lens.
2. Gently pull the assembly out, turn the bulb
counterclockwise
and remove from the back of
the assembly.
3. Reverse the steps with a new bulb.
6-40
Page 295 of 406
Rear Sidemarker
To replace a rear sidemarker bulb:
1. Remove the screw from the sidemarker assembly.
2. To pull out the bulb housing, tilt the housing to
remove the end with the tab.
3. Turn the bulb and socket counterclockwise and
4. Reverse the steps with a new bulb.
Windshield Wiper Blade Replacement
Replacement blades come in different types and are
removed in different ways.
To remove the wiper blade assembly:
gently pull out.
1. Lift the wiper ann until it
locks into an upright position.
2. Press the locking clip in while sliding the blade
assembly down.
6-42
Page 317 of 406

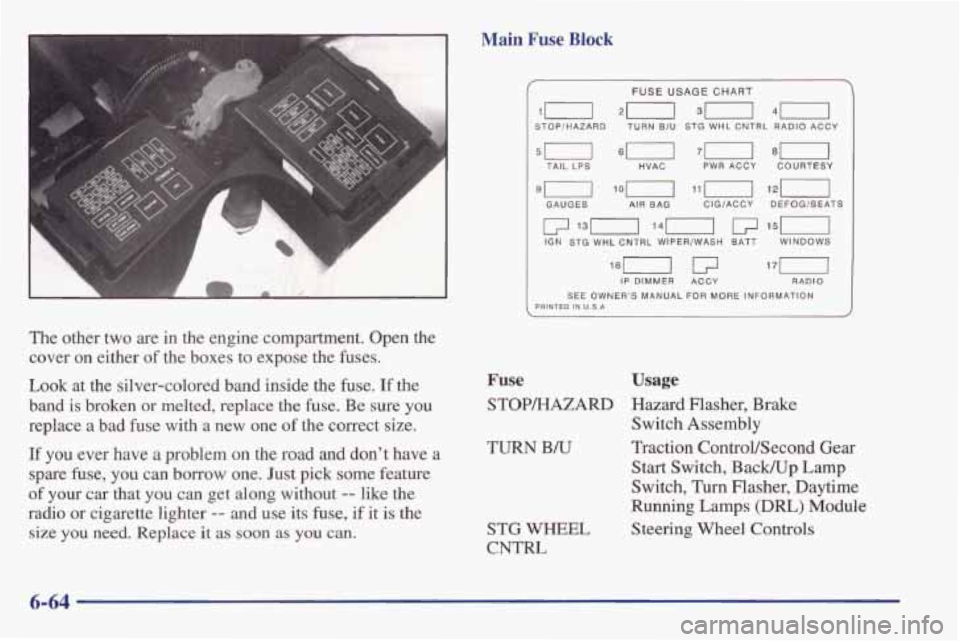
The other two are in the engine compartment. Open the
cover on either
of the boxes to expose the fuses.
Look at the silver-colored band inside the fuse. If the
band is broken or melted, replace
the fuse. Be sure you
replace a bad fuse with a new one of the correct size.
If you ever have a problem on the road and don't have a
spare fuse, you can borrow one. Just pick some feature
of your car that you
can get along without -- like the
radio or cigarette lighter
-- and use its fuse, if it is the
size
you need. Replace it as soon as you can.
Main Fuse Block
III 20 30 40
FUSE USAGE CHART
STOPIHAZARD TURN BIU STG WHL CNTRL RADIO ACCY
--
5u 4--l 7u 8U TAIL LPS HVAC PWR ACCY COURTESY
9-1 lin 121-1
GAUGES AIR BAG CIGIACCY DEFOGISEATS
IP DIMMER ACCY RADIO
SEE OWNER'S MANUAL FOR MORE INFORMATION PRINTED IN U.S.A
Fuse Usage
STOP/HAZARD Hazard Flasher, Brake
Switch Assembly
TURN B/U Traction ControVSecond Gear
Start Switch, Back/Up Lamp
Switch, Turn Flasher, Daytime
Running Lamps
(DRL) Module
Steering Wheel Controls
STG WHEEL
CNTFU
6-64
Page 319 of 406
Underhood Electrical Center
PCM BAT FUEL PUMP AIR WMP
000 LnHDLPDR RH HDLPDR HORN
u-
4
11 r;
15305529 A
Fuse and Relay Center 1
Fuse Usage
ABS BAT SOL Anti-Lock Brake System
TCS
BAT Traction Control System
COOL FAN
PCM BAT
Cooling Fan Control
Powertrain Control Module
Fuse
FUEL PUMP
AIRPUMP
LH HDLP DR
RH HDLP DR
HORN
ABS BAT-1
WL DR HORN
ABS BAT-2
COOL FAN
Relay
FOG LAMP
HORN
FAN #3
FAN #2
FAN #1
Usage
Fuel Pump
AIR Pump Relay and Bleed Valve
Headlamp
Door Module
Headlamp
Door Module
Horn Relay
Anti-Lock Brake System Module
Horn and
Headlamp Doors
Anti-Lock Brake and Traction
Control System
Cooling
Fan Relays
6-66
Page 320 of 406
000
INJ INJ ENG SEN
STRTR ABS IGN PCM ION
000 ENG CTRL NC CRUISE
j 1:
15305530 A
Fuse
INJ
INJ
Fuse and Relay Center 2
Usage
Fuel Injectors (Not used for V6) (LH
injectors for V8 Ignition Module)
Fuel Injectors (All for
V6) (RH
injectors for V8 and Ignition Module)
ENG SEN Mass Air Flow, Heated Oxygen
Sensor,
Skip Shift Solenoid (V8
Only), Reverse Lockout Solenoid,
Brake Switch
STRTR
Powertrain Control Module and
Clutch Pedal Switch
Fuse
ABS IGN
PCM IGN
ENG CTRL
NC CRUISE
ENG CTRL
I/P- 1
IGN
m-2
Relay
AIR SOL
AIR PUMP
AIC COMP
FUELPUMP STARTER
IGN
Usage
Anti-Lock Brake System Module
Powertrain Control Module
Ignition Module
(V6 Only),
Automatic Transmission and
Charcoal
Canister Purge Solenoid
Air Conditioning Compressor Relay, Cruise Control Switches and Module
Engine Controls, Fuel
Pump, PCM,
A.I.R. and Cooling
Fans
HVAC Blower Control and Relay
Ignition Switch, Relay and Starter
Enable Relay
Instrument Panel
Fuse Center
6-67
Page 358 of 406

At Least Twice a Year Automatic Transmission Check
Restraint System Check
Make sure the safety belt reminder light and all your
belts, buckles, latch plates, retractors and anchorages are
working properly. Look for any other loose or damaged
safety belt system parts. If you see anything that might
keep a safety belt system from doing its job, have it
repaired. Have any torn or frayed safety belts replaced.
Also look for any opened or broken air bag coverings,
and have them repaired or replaced. (The air bag system
does not need regular maintenance.)
Wiper Blade Check
Inspect wiper blades for wear or cracking. Replace blade
inserts that appear worn or damaged or that streak or
miss areas of the windshield. Also see “Wiper Blades,
Cleaning” in the Index.
Manual Transmission Check
Check the transmission fluid level; add if needed. See
‘‘Manual Transmission” in the Index. Check for leaks. A
fluid loss may indicate a problem. Have the system
inspected and repaired if needed. Check the transmission
fluid level; add
if needed. See
“Automatic Transmission” in the Index. A fluid
loss
may indicate a problem. Check the system and repair
if needed.
Hydraulic Clutch System Check
Check the fluid level in the clutch reservoir. See
“Hydraulic Clutch Fluid” in the Index.
A fluid loss in
this system could indicate a problem. Have the system
inspected and repaired at once.
At Least Once a Year
Key Lock Cylinders Service
Lubricate the key lock cylinders with the lubricant
specified in
Part D.
Body Lubrication Service
Lubricate all body door hinges. Also lubricate all hinges
and latches, including those for the hood, headlamp door
assemblies, rear compartment, console doors and any
folding seat hardware.
Part D tells you what to use.
More frequent lubrication may
be required when
exposed to a corrosive environment.
7-33
Page 359 of 406

Starter Switch Check
r
Brake-Transmission Shift Interlock (BTSI) Check
(Automatic Transmission)
When you are doing this check, the vehicle could
move suddenly.
If it does, you or others could be
injured. Follow the steps below.
1. Before you start, be sure you have enough room around the vehicle.
2. Firmly apply both the parking brake (see “Parking
Brake,’
in the Index if necessary) and the regular brake.
NOTE: Do not use the accelerator pedal, and be
ready to turn
off the engine immediately if it starts.
3. On automatic transmission vehicles, try to start the
engine
in each gear. The starter should work only in
PARK (P) or NEUTRAL
(N). If the starter works in
any other position, your vehicle needs service.
On manual transmission vehicles, put the shift lever
in
NEUTRAL (N), push the clutch down halfway
and
try to start the engine. The starter should work
only when the clutch
is pushed down all the way to
the
floor. If the starter works when the clutch isn’t
pushed all the way down,
your vehicle needs service.
-
A CAUTION:
When you are doing this check, the vehicle could
move suddenly.
If it does, you or others could be
injured. Follow the steps below.
1
1. Before you start, be sure you have enough room
around the vehicle.
It should be parked on a
level surface.
2. Firmly apply the parking brake (see “Parking Brake”
in the Index if necessary).
NOTE: Be ready to apply the regular brake
immediately if
the vehicle begins to move.
3. With the engine off, turn the key to the RUN
position, but don’t start the engine. Without applying
the regular brake,
try to move the shift lever out of
PARK
(P) with normal effort. If the shift lever
moves out of PARK
(P), your vehicle’s BTSI
needs service.