1998 OPEL FRONTERA torque
[x] Cancel search: torquePage 4516 of 6000
6A–20
ENGINE MECHANICAL
5. Install auto tensioner assembly and tighten the fixing
bolts to the specified torque.
Torque :
Shorter Bolt : 20 Nꞏm (2.0 Kgꞏm/14 lb ft)
Longer Bolt : 39 Nꞏm (4.0 Kgꞏm/29 lb ft)
6. Install idle pulley and bracket assembly and tighten
the fixing bolt to the specified torque.
Torque : 52 Nꞏm (5.3 Kgꞏm/38 lb ft)
7. Install fan pulley and bracket assembly and tighten
the fixing bolts and nut to the specified torque.
Torque : 22 Nꞏm (2.2 Kgꞏm/16 lb ft)
8. Install power steering oil pump pulley and tighten the
fixing bolt to the specified torque.
Torque : 78 Nꞏm (8.0 Kgꞏm/58 lb ft)
9. Install drive belt by pushing down the auto tensioner
using spanner as shown in the removal step of drive
belt.
10. Install cooling fan and clutch assembly and tighten
the fixing bolts to the specified torque.
Torque : 10 Nꞏm (1.0 Kgꞏm/87 lb in)
11. Install upper fan guide and clip both side and tighten
the fixing bolts to the specified torque.
Torque : 4 Nꞏm (0.4 Kgꞏm/35 lb in)
12. Install engine harness and tighten the fixing bolts of
the retaining clip and bracket to the specified torque.
Torque : 4 Nꞏm (0.4 Kgꞏm/35 lb in)
13. Connect radiator upper and lower hoses and clip
them securely.
14. Connect vacuum hoses of those which were
disconnected in the removal step.
15. Connect wiring connectors and bonding cable of
those which were disconnected in the removal step.
16. Install air cleaner element and air cleaner duct
assembly, and clip the both end securely.
17. Connect MAF sensor connector, IAT sensor
connector and PCV hose.
18. Install engine cover mating with the dowels.
Page 4518 of 6000
6A–22
ENGINE MECHANICAL
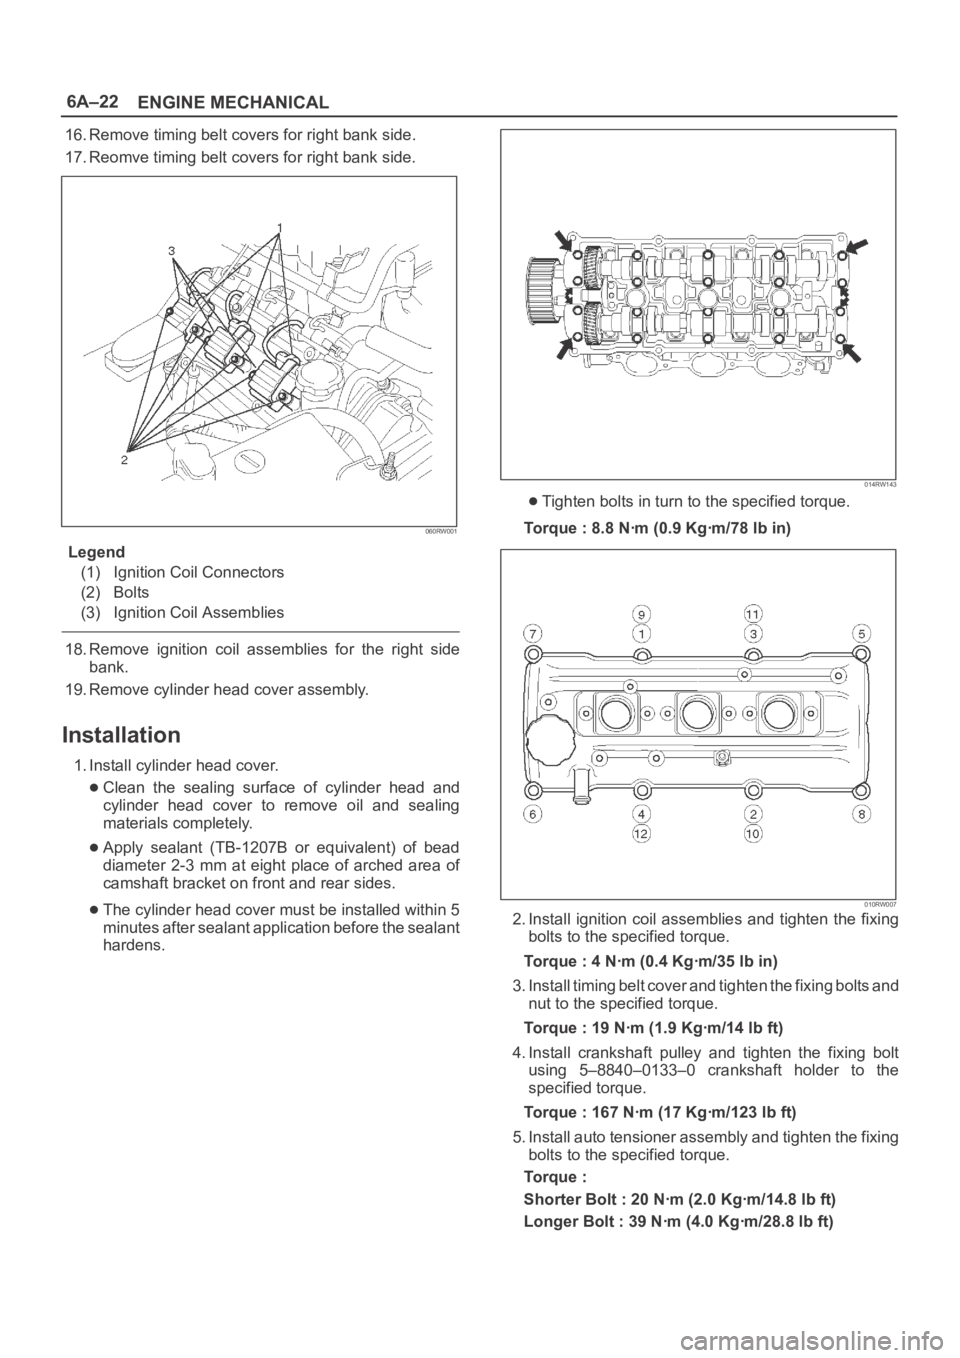
16. Remove timing belt covers for right bank side.
17. Reomve timing belt covers for right bank side.
060RW001
Legend
(1) Ignition Coil Connectors
(2) Bolts
(3) Ignition Coil Assemblies
18. Remove ignition coil assemblies for the right side
bank.
19. Remove cylinder head cover assembly.
Installation
1. Install cylinder head cover.
Clean the sealing surface of cylinder head and
cylinder head cover to remove oil and sealing
materials completely.
Apply sealant (TB-1207B or equivalent) of bead
diameter 2-3 mm at eight place of arched area of
camshaft bracket on front and rear sides.
The cylinder head cover must be installed within 5
minutes after sealant application before the sealant
hardens.
014RW143
Tighten bolts in turn to the specified torque.
Torque : 8.8 Nꞏm (0.9 Kgꞏm/78 lb in)
010RW007
2. Install ignition coil assemblies and tighten the fixing
bolts to the specified torque.
Torque : 4 Nꞏm (0.4 Kgꞏm/35 lb in)
3. Install timing belt cover and tighten the fixing bolts and
nut to the specified torque.
Torque : 19 Nꞏm (1.9 Kgꞏm/14 lb ft)
4. Install crankshaft pulley and tighten the fixing bolt
using 5–8840–0133–0 crankshaft holder to the
specified torque.
Torque : 167 Nꞏm (17 Kgꞏm/123 lb ft)
5. Install auto tensioner assembly and tighten the fixing
bolts to the specified torque.
Torque :
Shorter Bolt : 20 Nꞏm (2.0 Kgꞏm/14.8 lb ft)
Longer Bolt : 39 Nꞏm (4.0 Kgꞏm/28.8 lb ft)
Page 4519 of 6000
6A–23
ENGINE MECHANICAL
6. Install idle pulley assembly and tighten the fixing bolt
to the specified torque.
Torque : 52 Nꞏm (5.3 Kgꞏm/38.4 lb ft)
7. Install fan pulley and bracket assembly and tighten
the fixing bolts and nut to the specified torque.
Torque : 22 Nꞏm (2.2 Kgꞏm/16.2 lb ft)
8. Install drive belt by pushing down the auto tensioner
using spanner as shown in the removal step of drive
belt.
9. Install cooling fan clutch assembly and tighten the
fixing bolts to the specified torque.
Torque : 10 Nꞏm (1.0 Kgꞏm/88.5 lb in)
10. Install upper fan guide and clip both side and tighten
the fixing bolts to the specified torque.
Torque : 4 Nꞏm (0.4 Kgꞏm/35.4 lb in)
11. Install engine harness and tighten the fixing bolts of
the retaining clip and brackets to the specified torque.
Torque : 4 Nꞏm (0.4 Kgꞏm/35.4 lb in)
12. Connect radiator upper and lower hoses and clip
them securely.
13. Connect wiring connectors and bonding cable of
those which were disconnected in the removal step.
14. Install air cleaner element and air cleaner duct
assembly, and the clip both end securely.
15. Connect MAF sensor connector, IAT sensor
connector and PCV hose.
16. Install engine cover mating with the dowels.
Page 4520 of 6000
6A–24
ENGINE MECHANICAL
Common Chamber
Removal
1. Disconnect battery ground cable.
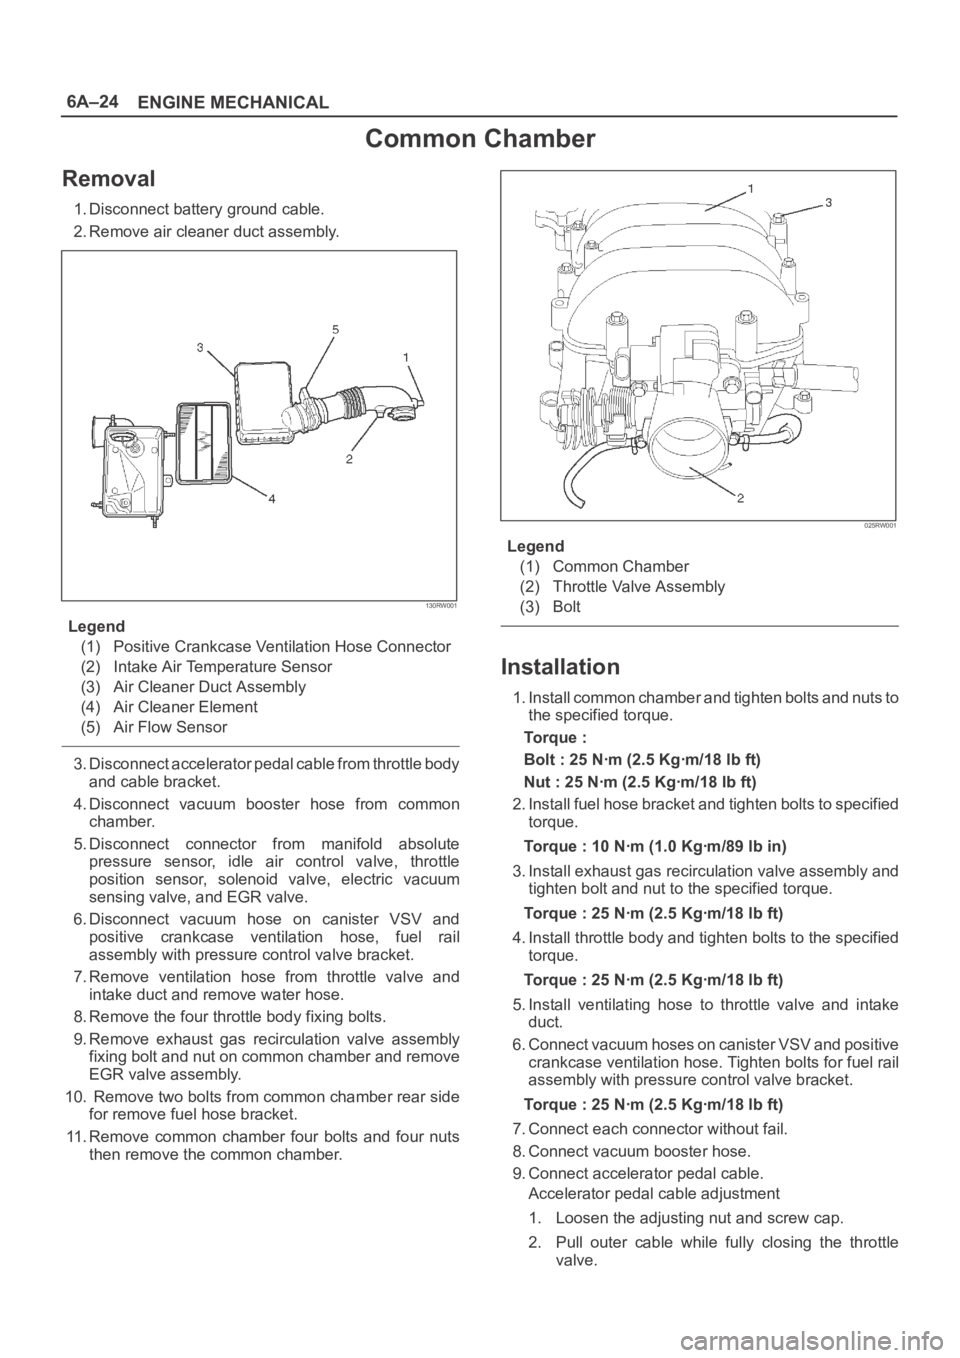
2. Remove air cleaner duct assembly.
130RW001
Legend
(1) Positive Crankcase Ventilation Hose Connector
(2) Intake Air Temperature Sensor
(3) Air Cleaner Duct Assembly
(4) Air Cleaner Element
(5) Air Flow Sensor
3. Disconnect accelerator pedal cable from throttle body
and cable bracket.
4. Disconnect vacuum booster hose from common
chamber.
5. Disconnect connector from manifold absolute
pressure sensor, idle air control valve, throttle
position sensor, solenoid valve, electric vacuum
sensing valve, and EGR valve.
6. Disconnect vacuum hose on canister VSV and
positive crankcase ventilation hose, fuel rail
assembly with pressure control valve bracket.
7. Remove ventilation hose from throttle valve and
intake duct and remove water hose.
8. Remove the four throttle body fixing bolts.
9. Remove exhaust gas recirculation valve assembly
fixing bolt and nut on common chamber and remove
EGR valve assembly.
10. Remove two bolts from common chamber rear side
for remove fuel hose bracket.
11. Remove common chamber four bolts and four nuts
then remove the common chamber.
025RW001
Legend
(1) Common Chamber
(2) Throttle Valve Assembly
(3) Bolt
Installation
1. Install common chamber and tighten bolts and nuts to
the specified torque.
To r q u e :
Bolt : 25 Nꞏm (2.5 Kgꞏm/18 lb ft)
Nut : 25 Nꞏm (2.5 Kgꞏm/18 lb ft)
2. Install fuel hose bracket and tighten bolts to specified
torque.
Torque : 10 Nꞏm (1.0 Kgꞏm/89 lb in)
3. Install exhaust gas recirculation valve assembly and
tighten bolt and nut to the specified torque.
Torque : 25 Nꞏm (2.5 Kgꞏm/18 lb ft)
4. Install throttle body and tighten bolts to the specified
torque.
Torque : 25 Nꞏm (2.5 Kgꞏm/18 lb ft)
5. Install ventilating hose to throttle valve and intake
duct.
6. Connect vacuum hoses on canister VSV and positive
crankcase ventilation hose. Tighten bolts for fuel rail
assembly with pressure control valve bracket.
Torque : 25 Nꞏm (2.5 Kgꞏm/18 lb ft)
7. Connect each connector without fail.
8. Connect vacuum booster hose.
9. Connect accelerator pedal cable.
Accelerator pedal cable adjustment
1. Loosen the adjusting nut and screw cap.
2. Pull outer cable while fully closing the throttle
valve.
Page 4522 of 6000
6A–26
ENGINE MECHANICAL
Exhaust Manifold LH
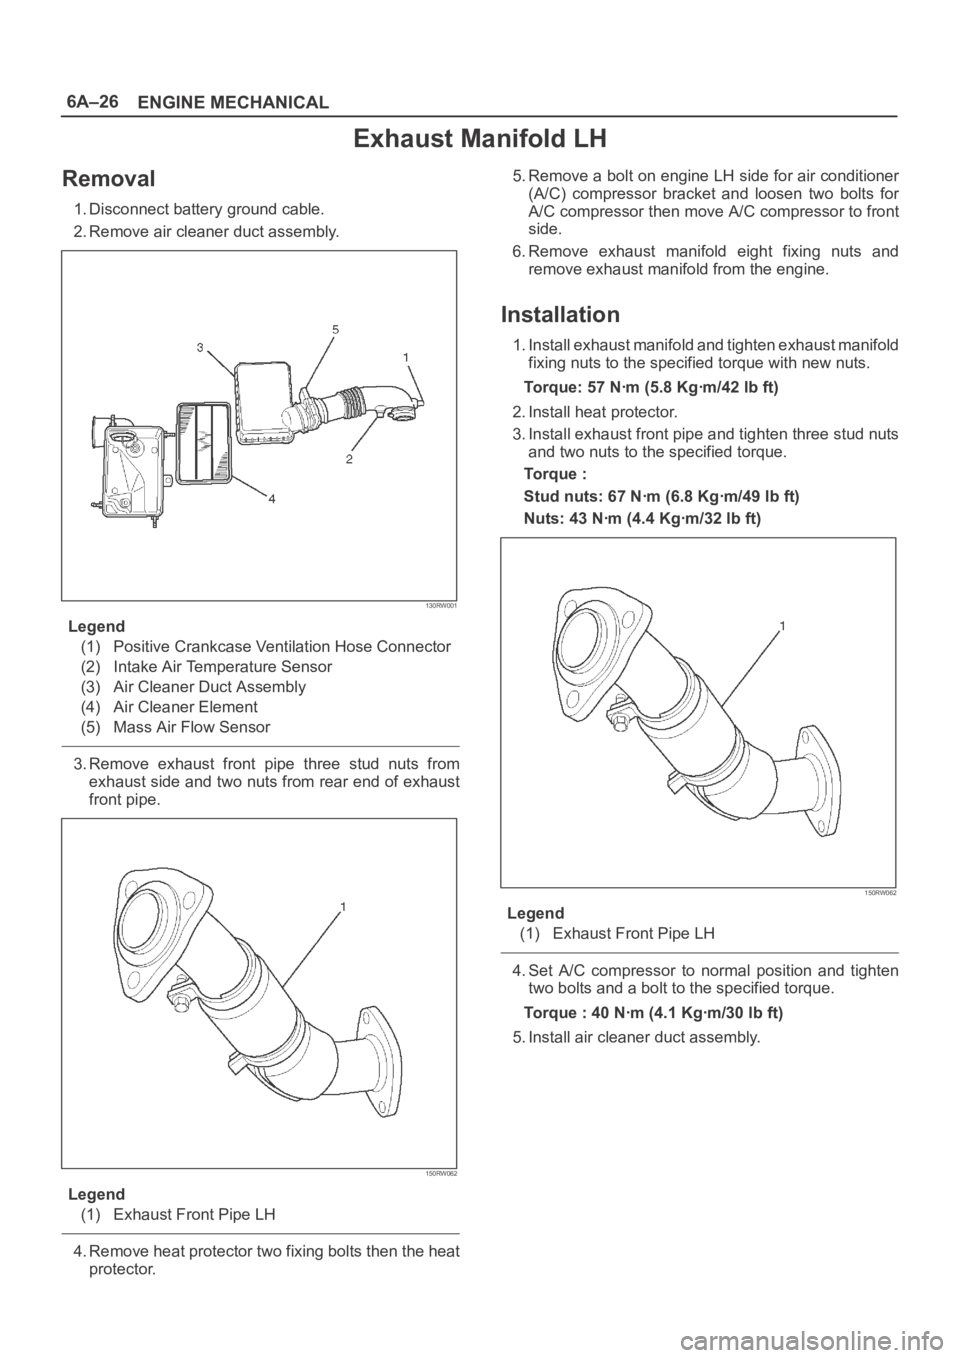
Removal
1. Disconnect battery ground cable.
2. Remove air cleaner duct assembly.
130RW001
Legend
(1) Positive Crankcase Ventilation Hose Connector
(2) Intake Air Temperature Sensor
(3) Air Cleaner Duct Assembly
(4) Air Cleaner Element
(5) Mass Air Flow Sensor
3. Remove exhaust front pipe three stud nuts from
exhaust side and two nuts from rear end of exhaust
front pipe.
150RW062
Legend
(1) Exhaust Front Pipe LH
4. Remove heat protector two fixing bolts then the heat
protector.5. Remove a bolt on engine LH side for air conditioner
(A/C) compressor bracket and loosen two bolts for
A/C compressor then move A/C compressor to front
side.
6. Remove exhaust manifold eight fixing nuts and
remove exhaust manifold from the engine.
Installation
1. Install exhaust manifold and tighten exhaust manifold
fixing nuts to the specified torque with new nuts.
Torque: 57 Nꞏm (5.8 Kgꞏm/42 lb ft)
2. Install heat protector.
3. Install exhaust front pipe and tighten three stud nuts
and two nuts to the specified torque.
To r q u e :
Stud nuts: 67 Nꞏm (6.8 Kgꞏm/49 lb ft)
Nuts: 43 Nꞏm (4.4 Kgꞏm/32 lb ft)
150RW062
Legend
(1) Exhaust Front Pipe LH
4. Set A/C compressor to normal position and tighten
two bolts and a bolt to the specified torque.
Torque : 40 Nꞏm (4.1 Kgꞏm/30 lb ft)
5. Install air cleaner duct assembly.
Page 4523 of 6000
6A–27
ENGINE MECHANICAL
Exhaust Manifold RH
Removal
1. Disconnect battery ground cable.
2. Remove torsion bar. Refer to removal procedure in
Front Suspension section.
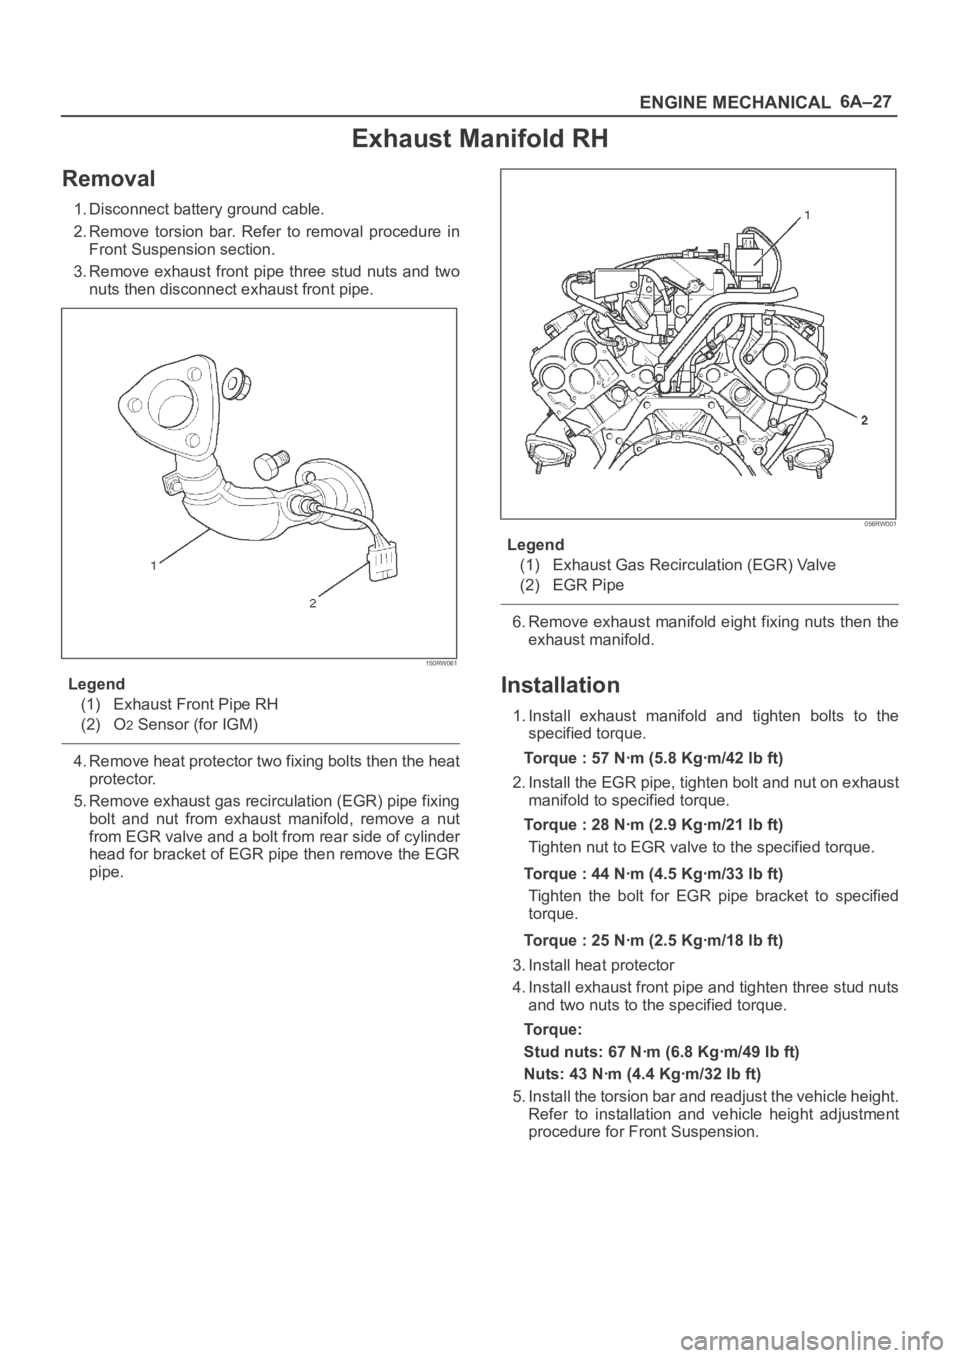
3. Remove exhaust front pipe three stud nuts and two
nuts then disconnect exhaust front pipe.
150RW061
Legend
(1) Exhaust Front Pipe RH
(2) O
2 Sensor (for IGM)
4. Remove heat protector two fixing bolts then the heat
protector.
5. Remove exhaust gas recirculation (EGR) pipe fixing
bolt and nut from exhaust manifold, remove a nut
from EGR valve and a bolt from rear side of cylinder
head for bracket of EGR pipe then remove the EGR
pipe.
056RW001
Legend
(1) Exhaust Gas Recirculation (EGR) Valve
(2) EGR Pipe
6. Remove exhaust manifold eight fixing nuts then the
exhaust manifold.
Installation
1. Install exhaust manifold and tighten bolts to the
specified torque.
Torque : 57 Nꞏm (5.8 Kgꞏm/42 lb ft)
2. Install the EGR pipe, tighten bolt and nut on exhaust
manifold to specified torque.
Torque : 28 Nꞏm (2.9 Kgꞏm/21 lb ft)
Tighten nut to EGR valve to the specified torque.
Torque : 44 Nꞏm (4.5 Kgꞏm/33 lb ft)
Tighten the bolt for EGR pipe bracket to specified
torque.
Torque : 25 Nꞏm (2.5 Kgꞏm/18 lb ft)
3. Install heat protector
4. Install exhaust front pipe and tighten three stud nuts
and two nuts to the specified torque.
To r q u e :
Stud nuts: 67 Nꞏm (6.8 Kgꞏm/49 lb ft)
Nuts: 43 Nꞏm (4.4 Kgꞏm/32 lb ft)
5. Install the torsion bar and readjust the vehicle height.
Refer to installation and vehicle height adjustment
procedure for Front Suspension.
Page 4524 of 6000
6A–28
ENGINE MECHANICAL
Crankshaft Pulley
Removal
1. Disconnect battery ground cable.
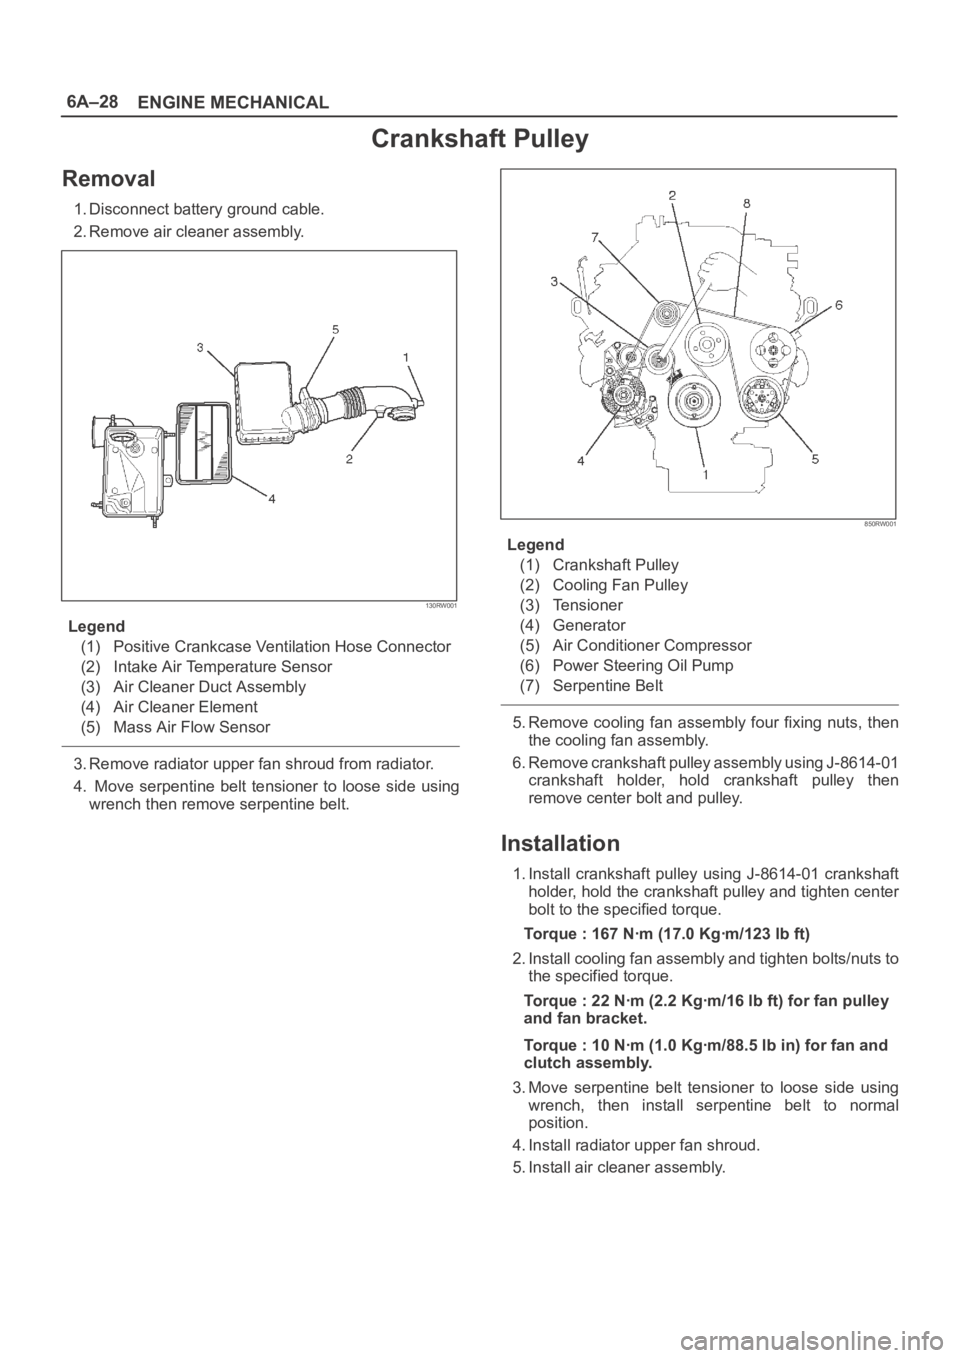
2. Remove air cleaner assembly.
130RW001
Legend
(1) Positive Crankcase Ventilation Hose Connector
(2) Intake Air Temperature Sensor
(3) Air Cleaner Duct Assembly
(4) Air Cleaner Element
(5) Mass Air Flow Sensor
3. Remove radiator upper fan shroud from radiator.
4. Move serpentine belt tensioner to loose side using
wrench then remove serpentine belt.
850RW001
Legend
(1) Crankshaft Pulley
(2) Cooling Fan Pulley
(3) Tensioner
(4) Generator
(5) Air Conditioner Compressor
(6) Power Steering Oil Pump
(7) Serpentine Belt
5. Remove cooling fan assembly four fixing nuts, then
the cooling fan assembly.
6. Remove crankshaft pulley assembly using J-8614-01
crankshaft holder, hold crankshaft pulley then
remove center bolt and pulley.
Installation
1. Install crankshaft pulley using J-8614-01 crankshaft
holder, hold the crankshaft pulley and tighten center
bolt to the specified torque.
Torque : 167 Nꞏm (17.0 Kgꞏm/123 lb ft)
2. Install cooling fan assembly and tighten bolts/nuts to
the specified torque.
Torque : 22 Nꞏm (2.2 Kgꞏm/16 lb ft) for fan pulley
and fan bracket.
Torque : 10 Nꞏm (1.0 Kgꞏm/88.5 lb in) for fan and
clutch assembly.
3. Move serpentine belt tensioner to loose side using
wrench, then install serpentine belt to normal
position.
4. Install radiator upper fan shroud.
5. Install air cleaner assembly.
Page 4527 of 6000
6A–31
ENGINE MECHANICAL
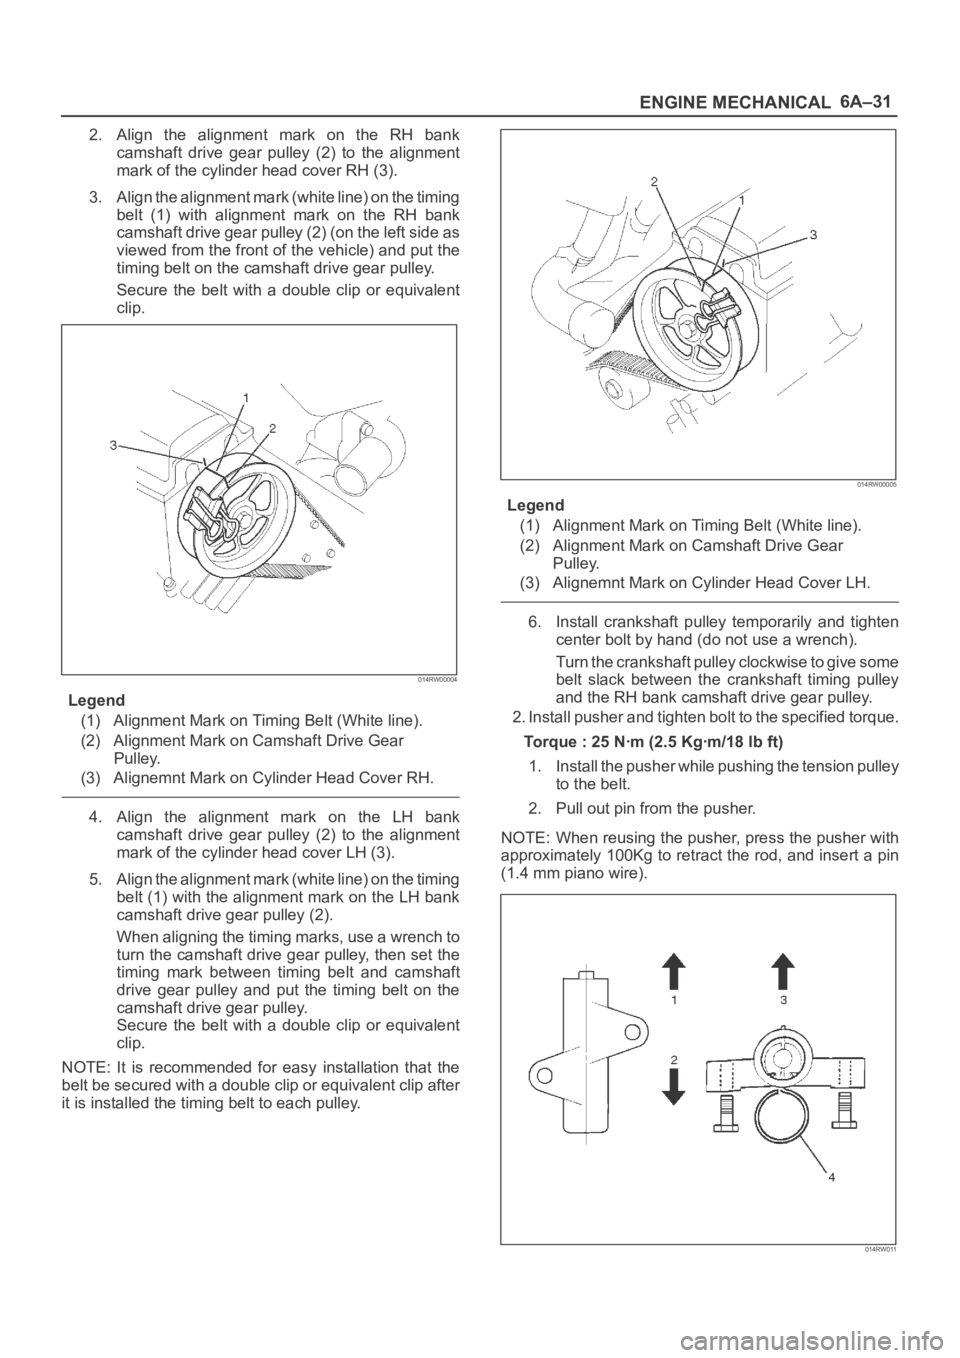
2. Align the alignment mark on the RH bank
camshaft drive gear pulley (2) to the alignment
mark of the cylinder head cover RH (3).
3. Align the alignment mark (white line) on the timing
belt (1) with alignment mark on the RH bank
camshaft drive gear pulley (2) (on the left side as
viewed from the front of the vehicle) and put the
timing belt on the camshaft drive gear pulley.
Secure the belt with a double clip or equivalent
clip.
014RW00004
Legend
(1) Alignment Mark on Timing Belt (White line).
(2) Alignment Mark on Camshaft Drive Gear
Pulley.
(3) Alignemnt Mark on Cylinder Head Cover RH.
4. Align the alignment mark on the LH bank
camshaft drive gear pulley (2) to the alignment
mark of the cylinder head cover LH (3).
5. Align the alignment mark (white line) on the timing
belt (1) with the alignment mark on the LH bank
camshaft drive gear pulley (2).
When aligning the timing marks, use a wrench to
turn the camshaft drive gear pulley, then set the
timing mark between timing belt and camshaft
drive gear pulley and put the timing belt on the
camshaft drive gear pulley.
Secure the belt with a double clip or equivalent
clip.
NOTE: It is recommended for easy installation that the
belt be secured with a double clip or equivalent clip after
it is installed the timing belt to each pulley.
014RW00005
Legend
(1) Alignment Mark on Timing Belt (White line).
(2) Alignment Mark on Camshaft Drive Gear
Pulley.
(3) Alignemnt Mark on Cylinder Head Cover LH.
6. Install crankshaft pulley temporarily and tighten
center bolt by hand (do not use a wrench).
Turn the crankshaft pulley clockwise to give some
belt slack between the crankshaft timing pulley
and the RH bank camshaft drive gear pulley.
2. Install pusher and tighten bolt to the specified torque.
Torque : 25 Nꞏm (2.5 Kgꞏm/18 lb ft)
1. Install the pusher while pushing the tension pulley
to the belt.
2. Pull out pin from the pusher.
NOTE: When reusing the pusher, press the pusher with
approximately 100Kg to retract the rod, and insert a pin
(1.4 mm piano wire).
014RW011