1998 OPEL FRONTERA battery
[x] Cancel search: batteryPage 3462 of 6000
SUPPLEMENTAL RESTRAINT SYSTEM9J–25
TO ANY POWER SOURCE BEFORE CONNECTING
DEPLOYMENT WIRES TO THE PRETENSIONER
SEAT BELT ASSEMBLY LEADS. DEPLOYMENT
WIRES SHALL REMAIN SHORTED AND NOT BE
CONNECTED TO A POWER SOURCE UNTIL THE
PRETENSIONER SEAT BELT IS TO BE DEPLOYED.
THE PRETENSIONER SEAT BELT ASSEMBLY WILL
IMMEDIATELY DEPLOY THE PRETENSIONER SEAT
BELT WHEN A POWER SOURCE IS CONNECTED TO
IT. WEAR SAFETY GLASSES THROUGHOUT THIS
ENTIRE DEPLOYMENT AND DISPOSAL
PROCEDURE.
1. Turn ignition switch to “LOCK,” remove key and put
on safety glasses.
2. Remove all loose objects from front seats.
3. Disconnect pretensioner seat belt assembly, yellow
2–pin connector located at the base of the seat.
4. Prepare SRS deployment harness.
5. Short the two SRS deployment harness leads
together by fully seating one banana plug into the
other.
6. Deployment harness shall remain shorted and not be
connected to a power source until the pretensioner
seat belt is to be deployed.
7. Route deployment harness out the driver side of the
vehicle.
8. Verify that the inside of the vehicle and the area
surrounding the vehicle are clear of all people and
loose or flammable objects.
9. Stretch the SRS deployment harness to their full
length.
10. Connect the deployment harness to the pretensioner
seat belt assembly, yellow 2-pin connector at the
base of the seat.
WARNING: DEPLOYMENT WIRES SHALL REMAIN
SHORTED AND NOT BE CONNECTED TO A POWER
SOURCE UNTIL THE PRETENSIONER SEAT BELT IS
TO BE DEPLOYED. THE PRETENSIONER SEAT
BELT ASSEMBLY WILL IMMEDIATELY DEPLOY THE
PRETENSIONER SEAT BELT WHEN A POWER
SOURCE IS CONNECTED TO IT. CONNECTING THE
DEPLOYMENT WIRES TO THE POWER SOURCE
SHOULD ALWAYS BE THE FINAL STEP IN THE
PRETENSIONER SEAT BELT ASSEMBLY
DEPLOYMENT PROCEDURE. FAILURE TO FOLLOW
PROCEDURES IN THE ORDER LISTED COULD
RESULT IN PERSONAL INJURY.
11. Notify all people in the immediate area that you intend
to deploy the pretensioner seat belt. The deployment
will be accompanied by a substantial noise which may
startle the uninformed.
12. Separate the two banana plugs on the SRS
deployment harness.
NOTE: When the pretensioner seat belt deploys, the
rapid gas expansion will create a substantial noise. Notify
all people in the immediate area that you intend to deploy
the pretensioner seat belt.13. Connect the SRS deployment harness wires to a
power source to immediately deploy the pretensioner
seat belt assembly. Recommended application: 12
volts minimum, 2 amps minimum. A vehicle battery is
suggested.
WARNING: DEPLOYMENT WIRES SHALL REMAIN
SHORTED AND NOT BE CONNECTED TO A POWER
SOURCE UNTIL THE PRETENSIONER SEAT BELT IS
TO IS TO BE DEPLOYED. THE PRETENSIONER
SEAT BELT ASSEMBLY WILL IMMEDIATELY
DEPLOY THE PRETENSIONER SEAT BELT WHEN A
POWER SOURCE IS CONNECTED TO IT.
CONNECTING THE DEPLOYMENT WIRES SHOULD
ALWAYS BE THE FINAL STEP IN THE
PRETENSIONER SEAT BELT ASSEMBLY
DEPLOYMENT PROCEDURE. FAILURE TO FOLLOW
PROCEDURES IN THE ORDER LISTED COULD
RESULT IN PERSONAL INJURY.
14. Short the two SRS deployment harness leads
together by fully seating one banana plug into the
other.
15. Disconnect the deployment harness to the
pretensioner seat belt assembly, yellow 2-pin
connector at the base of the seat.
16. In the unlikely event that the pretensioner seat belt
assembly did not deploy after following these
procedures, proceed immediately with Steps 18
through 19. If the pretensioner seat belt assembly
deployed as intended, proceed with Steps 14 through
17.
17. With both air bags and pretensioner seat belt
deployed, the vehicle may be scrapped in the same
manner as a non–SRS equipped vehicle.
NOTE: The remaining steps are to be followed in the
unlikely event that the pretensioner seat belt assembly
did not deploy after following these procedures.
18. Remove the undeployed pretensioner seat belt
assembly (s) from the vehicle. For pretensioner seat
belt assembly refer to in the “Pretensioner Seat Belt
Assembly Removal” in this manual.
19.Temporarily store the pretensioner seat belt
assembly with the deployment device facing up, away
from the surface upon which it rests.
Page 3463 of 6000
SUPPLEMENTAL RESTRAINT SYSTEM 9J–26
Special Tools
WARNING: TO AVOID DEPLOYMENT WHEN
TROUBLESHOOTING THE SRS, DO NOT USE
ELECTRICAL TEST EQUIPMENT SUCH AS A
BATTERY–POWERED OR AC–POWERED
VOLTMETER, OHMMETER, ETC., OR ANY TYPE OF
ELECTRICAL EQUIPMENT OTHER THAN THAT
SPECIFIED IN THIS MANUAL. DO NOT USE A
NONPOWERED PROBE–TYPE TESTER.
INSTRUCTIONS IN THIS MANUAL MUST BE
FOLLOWED CAREFULLY, OTHERWISE PERSONAL
INJURY MAY RESULT.
5–8840–2421–0 SRS Driver/Passenger
Load Tool
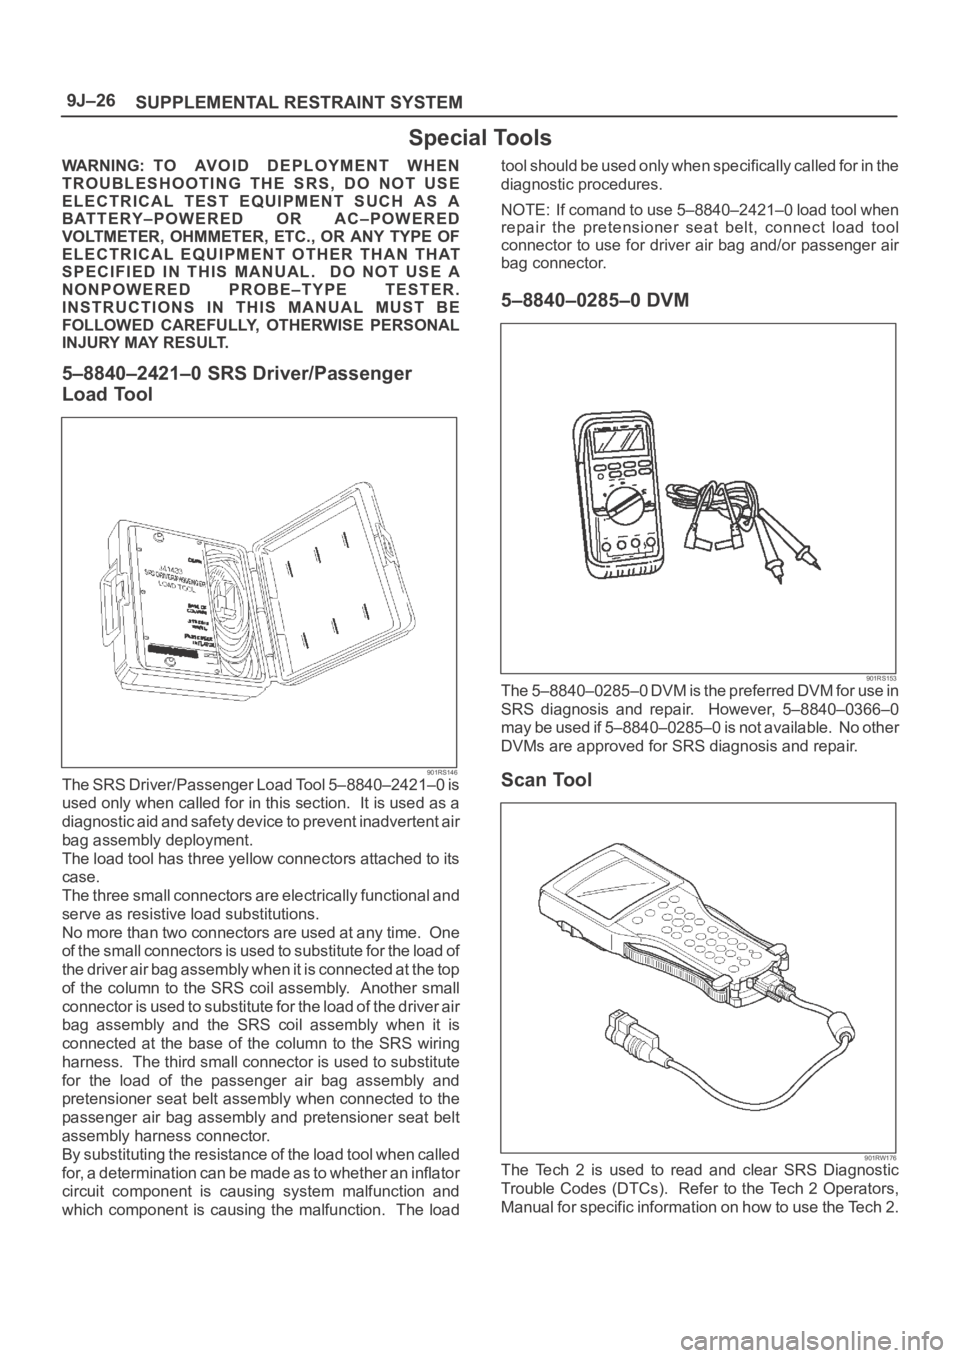
901RS146The SRS Driver/Passenger Load Tool 5–8840–2421–0 is
used only when called for in this section. It is used as a
diagnostic aid and safety device to prevent inadvertent air
bag assembly deployment.
The load tool has three yellow connectors attached to its
case.
The three small connectors are electrically functional and
serve as resistive load substitutions.
No more than two connectors are used at any time. One
of the small connectors is used to substitute for the load of
the driver air bag assembly when it is connected at the top
of the column to the SRS coil assembly. Another small
connector is used to substitute for the load of the driver air
bag assembly and the SRS coil assembly when it is
connected at the base of the column to the SRS wiring
harness. The third small connector is used to substitute
for the load of the passenger air bag assembly and
pretensioner seat belt assembly when connected to the
passenger air bag assembly and pretensioner seat belt
assembly harness connector.
By substituting the resistance of the load tool when called
for, a determination can be made as to whether an inflator
circuit component is causing system malfunction and
which component is causing the malfunction. The loadtool should be used only when specifically called for in the
diagnostic procedures.
NOTE: If comand to use 5–8840–2421–0 load tool when
repair the pretensioner seat belt, connect load tool
connector to use for driver air bag and/or passenger air
bag connector.
5–8840–0285–0 DVM
901RS153The 5–8840–0285–0 DVM is the preferred DVM for use in
SRS diagnosis and repair. However, 5–8840–0366–0
may be used if 5–8840–0285–0 is not available. No other
DVMs are approved for SRS diagnosis and repair.
Scan Tool
901RW176The Tech 2 is used to read and clear SRS Diagnostic
Trouble Codes (DTCs). Refer to the Tech 2 Operators,
Manual for specific information on how to use the Tech 2.
Page 3467 of 6000
SUPPLEMENTAL RESTRAINT SYSTEM 9J–30
Service Precautions for SRS
Component Service
CAUTION: When fasteners are removed, always
reinstall them at the same location from which they
were removed. If a fastener needs to be replaced, use
the correct part number fastener for that application.
If the correct part number fastener is not available, a
fastener of equal size and strength (or stronger) may
be used. fasteners that are not reused, and those
requiring thread locking compound will be called
out. The correct torque value must be used when
installing fasteners that require it. If the above
conditions are not followed, parts or system damage
could result.
WARNING: WHEN PERFORMING SERVICE ON OR
AROUND SRS COMPONENTS OR SRS WIRING,
FOLLOW THE PROCEDURES LISTED BELOW TO
TEMPORARILY DISABLE THE SRS. FAILURE TO
FOLLOW PROCEDURES COULD RESULT IN
POSSIBLE AIR BAG DEPLOYMENT, PERSONAL
INJURY OR OTHERWISE UNNEEDED SRS REPAIRS.
The SDM in Driver–Passenger SRS can maintain
sufficient voltage to cause a deployment for up to 15
seconds after the ignition switch is turned “OFF,” the
battery is disconnected, or the fuse powering the SDM is
removed.
Many of the service procedures require removal of the
“C–21” fuse, and disconnection of the air bag assembly
from the deployment loop to avoid an accidental
deployment. If the air bag assembly is disconnected from
the deployment loop as noted in the “Disabling the SRS”
procedure that follows, service can begin immediately
without waiting for the 15 second time period to expire.
Disabling The SRS
Removal
Turn the ignition switch to “OFF” and turn the steering
wheel so that the vehicle’s wheels are pointing straight
ahead.
1. Remove SRS fuse “C–21” from left dash side lower
fuse block or disconnect battery.
2. Disconnect yellow 2–pin connector at the base of
steering column.
3 . R e m o v e g l o v e b o x a s s e m b l y ; R e f e r t o “ P a s s e n g e r a i r
bag assembly replacement” in this section.
4. Disconnect passenger air bag assembly yellow 2–pin
connector behind the glove box assembly.
CAUTION: W i t h t h e “ C – 2 1 ” f u s e r e m o v e d a n d
ignition switch “ON,” the “AIR BAG” warning lamp
will be “ON.” This is normal operation and does not
indicate an SRS malfunction.
Enabling The SRS
Installation
Turn ignition switch to “LOCK” and remove key.
1. Connect yellow 2–pin connector passenger air bag
assembly.2. Install glove box assembly. Refer to “Passenger Air
Bag Assembly Replacement” in this section.
3. Connect yellow 2–pin connector at the base of the
steering column.
4. Install “AIR BAG” fuse “C–21” to left dash side lower
fuse block or connect battery.
Turn ignition switch to “ON” and verify that the “AIR BAG”
warning lamp turn on 3.5 seconds and then turns “OFF.” If
it does not operate as described, perform the “SRS
Diagnostic System Check” in this section.
Handling / Installation / Diagnosis
1. Air bag assembly should not be subjected to
temperatures above 93
C (200F).
2. Air bag assembly, and SDM should not be used if they
have been dropped from a height of 100 centimeters
(3.28 feet) or more.
3. When a SDM is replaced, it must be oriented with the
arrow on the SDM pointing toward the front of the
vehicle. It is very important for the SDM to be located
flat on the mounting surface, parallel to the vehicle
datum line. It is important that the SDM mounting
surface is free of any dirt or other foreign material.
4. Do not apply power to the SRS unless all components
are connected or a diagnostic chart requests it, as
this will set a diagnostic trouble code.
5. The “SRS Diagnostic System Check” must be the
starting point of any SRS diagnostics. The “SRS
Diagnostic System Check” will verify proper “AIR
BAG” warning lamp operation and will lead you to the
correct chart to diagnose any SRS malfunctions.
Bypassing these procedures may result in extended
diagnostic time, incorrect diagnosis, and incorrect
parts replacements.
Inspections Required After An Accident
CAUTION: C e r t a i n S R S c o m p o n e n t s m u s t b e
replaced after a frontal crash involving air bag
deployment.
In all types of accidents regardless of “Air Bag”
deployment, visually inspect all of the following
components and replace as required:
— Driver air bag assembly
— Passenger air bag assembly
— Driver pretensioner assembly
— Passenger pretensioner assembly
— Steering wheel
— SRS coil assembly
— Steering column
— Knee bolster and instrument panel mounting
attachments
— Driver seat and belt
— Passenger seat and belt
—SDM
SDM always should be checked according to “SDM
Replacement Guidelines.”
Page 3489 of 6000
RESTRAINT CONTROL SYSTEM 9J1–2
Diagnostic Information
CAUTION: When fasteners are removed, always
reinstall them at the same location from which they
were removed. if a fastener needs to be replaced, use
the correct part number fastener for that application.
if the correct part number fastener is not available, a
fastener of equal size and strength (or stronger) may
be used. fasteners that are not reused, and those
requiring thread locking compound will be called
out. the correct torque value must be used when
installing fasteners that require it. if the above
conditions are not followed, parts or system damage
could result.
Diagnostic Procedures
WARNING: TO AVOID DEPLOYMENT WHEN
TROUBLESHOOTING THE SRS, DO NOT USE
ELECTRICAL TEST EQUIPMENT SUCH AS A
BATTERY–POWERED OR AC–POWERED
VOLTMETER, OHMMETER, ETC., OR ANY TYPE OF
ELECTRICAL EQUIPMENT OTHER THAN THAT
SPECIFIED IN THIS MANUAL. DO NOT USE A NON
POWERED, PROBE–TYPE TESTER.
INSTRUCTIONS IN THIS MANUAL MUST BE
FOLLOWED CAREFULLY, OTHERWISE PERSONAL
INJURY MAY RESULT.
The diagnostic procedures used in this section are
designed to aid in finding and repairing SRS problems.
Outlined below are the steps to find and repair SRS
problems quickly and effectively. Failure to carefully
follow these procedures may result in extended
diagnostic time, incorrect diagnosis and incorrect parts
replacement.
1.Perform The “SRS Diagnostic System Check”.
The “SRS Diagnostic System Check” should always
be the starting point of any SRS diagnostics. The
“SRS Diagnostic System Check” checks for proper
“AIR BAG” warning lamp operation and checks for
SRS trouble codes using both “Flash Code” and
“Scan Tool” Methods.
2.Refer To The Proper Diagnostic Chart As Directed
By The “SRS Diagnostic System Check”.
The “SRS Diagnostic System Check” will lead you to
the correct chart to diagnose any SRS problems.
Bypassing these procedures may result in extended
diagnostic time, incorrect diagnosis and incorrect
parts replacement.
3.Repeat The “SRS Diagnostic System Check”
After Any Repair Or Diagnostic Procedures Have
Been Performed.
Preforming the “SRS Diagnostic System Check” after
all repair or diagnostic procedures will assure that the
repair has been made correctly and that no other
conditions exist.
Diagnostic Codes
The Sensing and Diagnostic Module (SDM) maintains a
history record of all diagnostic codes that have beendetected since the SRS codes were last cleared during
service.
1. Active Codes — Faults that are presently detected
this ignition cycle. Active codes are stored in RAM
(Random Access Memory).
2. History Codes — All faults detected since the last
time the history fault memory was cleared. History
codes are stored in EEPROM. (Electronically
Erasable Programmable Read only Memory)
How To Read Trouble Codes
All codes (Active and history) can be read (or cleared) by
using a scan tool or equivalent.
If a PDT is not available, have the vehicle serviced by
ISUZU dealer.
How To Clear Trouble Codes
Trouble codes can only be cleared by using a Scan Tool.
If a “scan tool” is not available then inform the owner of the
stored codes and suggest that the codes are cleared
upon the next visit to an Isuzu dealership.
Scan Tool Diagnostics
A scan tool can be used to read current and history codes
and to clear all history codes after a repair is complete.
The scan tool must be updated to communicate with the
SRS through a memory card or a manufacturer’s update
before it can be used for SRS diagnostics. To use the
scan tool, connect it to the DLC connector and turn the
ignition switch “ON”. Then follow the manufacturer’s
directions for communication with the SRS. The scan tool
reads serial data from the SDM “Serial Data” output
(terminal 24) to the DLC connector (terminal 9).
Basic Knowledge Required
Before using this section of the Service Manual, there is
some basic knowledge which will be required. Without
this knowledge, you will have trouble using the diagnostic
procedures in this section. Use care to prevent harm or
unwanted deployment. Read all cautions in the service
manual and on warning labels attached to SRS
components.
Basic Electrical Circuits
You should understand the basic theory of electricity
including series and parallel circuits, and understand the
voltage drops across series resistors. You should know
the meaning of voltage (volts), current (amps), and
resistance (ohms). You should understand what happens
in a circuit with an open or a shorted wire. You should be
able to read and understand a wiring diagram.
“Flash Code” Diagnostics
Flash code diagnostics can be used to read active codes
and to determine if history codes are present but cannot
be used to clear codes or read history codes. Flash code
diagnostics is enabled by grounding by terminal 4
shorting to terminal 13 of the DLC connector with the
ignition switch “ON”. Grounding terminal 4 of the DLC
connector pulls the “Diagnostics Request” input (Terminal
1) of the SDM low and signals the SDM to enter the flash
code diagnostic display mode.
Page 3526 of 6000
9J1–39
RESTRAINT CONTROL SYSTEM
DTC 61 Warning Lamp Circuit Failure
D09RW014
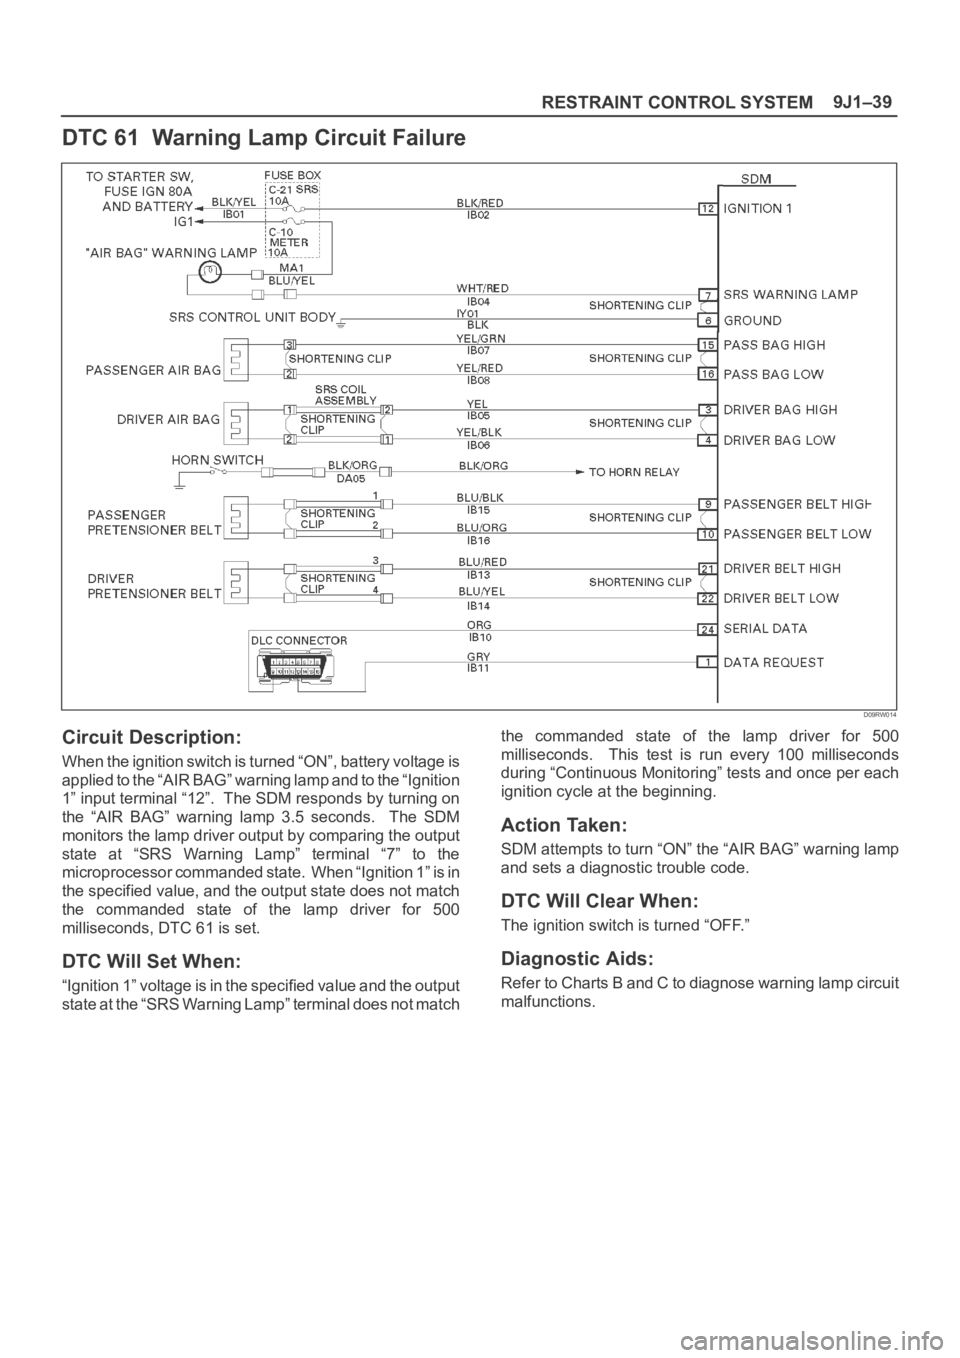
Circuit Description:
When the ignition switch is turned “ON”, battery voltage is
applied to the “AIR BAG” warning lamp and to the “Ignition
1” input terminal “12”. The SDM responds by turning on
the “AIR BAG” warning lamp 3.5 seconds. The SDM
monitors the lamp driver output by comparing the output
state at “SRS Warning Lamp” terminal “7” to the
microprocessor commanded state. When “Ignition 1” is in
the specified value, and the output state does not match
the commanded state of the lamp driver for 500
milliseconds, DTC 61 is set.
DTC Will Set When:
“Ignition 1” voltage is in the specified value and the output
state at the “SRS Warning Lamp” terminal does not matchthe commanded state of the lamp driver for 500
milliseconds. This test is run every 100 milliseconds
during “Continuous Monitoring” tests and once per each
ignition cycle at the beginning.
Action Taken:
SDM attempts to turn “ON” the “AIR BAG” warning lamp
and sets a diagnostic trouble code.
DTC Will Clear When:
The ignition switch is turned “OFF.”
Diagnostic Aids:
Refer to Charts B and C to diagnose warning lamp circuit
malfunctions.
Page 3552 of 6000
10A–1
CRUISE CONTROL SYSTEM
CONTROL SYSTEM
CRUISE CONTROL SYSTEM
CONTENTS
Service Precaution 10A–1. . . . . . . . . . . . . . . . . . . . . .
General Description 10A–1. . . . . . . . . . . . . . . . . . . . .
Diagnosis 10A–2. . . . . . . . . . . . . . . . . . . . . . . . . . . . . .
Brake Switch 10A–2. . . . . . . . . . . . . . . . . . . . . . . . . . .
Removal 10A–2. . . . . . . . . . . . . . . . . . . . . . . . . . . . .
Installation 10A–2. . . . . . . . . . . . . . . . . . . . . . . . . . . .
Adjustment 10A–3. . . . . . . . . . . . . . . . . . . . . . . . . . .
Clutch Switch 10A–3. . . . . . . . . . . . . . . . . . . . . . . . . . .
Removal and Installation 10A–3. . . . . . . . . . . . . . .
Adjustment 10A–3. . . . . . . . . . . . . . . . . . . . . . . . . . .
Starter Switch 10A–4. . . . . . . . . . . . . . . . . . . . . . . . . . .
Removal 10A–4. . . . . . . . . . . . . . . . . . . . . . . . . . . . .
Installation 10A–4. . . . . . . . . . . . . . . . . . . . . . . . . . . .
Cruise Control Main Switch 10A–5. . . . . . . . . . . . . . . Removal 10A–5. . . . . . . . . . . . . . . . . . . . . . . . . . . . .
Installation 10A–5. . . . . . . . . . . . . . . . . . . . . . . . . . . .
Cruise Control Switch (Combination Switch) 10A–5
Removal and Installation 10A–5. . . . . . . . . . . . . . .
Cruise Control Unit 10A–6. . . . . . . . . . . . . . . . . . . . . .
Removal 10A–6. . . . . . . . . . . . . . . . . . . . . . . . . . . . .
Installation 10A–6. . . . . . . . . . . . . . . . . . . . . . . . . . . .
Cruise Actuator 10A–7. . . . . . . . . . . . . . . . . . . . . . . . .
Actuator Cable Diagram (LHD) 10A–7. . . . . . . . . .
Actuator Cable Diagram (RHD) 10A–7. . . . . . . . . .
Removal 10A–8. . . . . . . . . . . . . . . . . . . . . . . . . . . . .
Installation 10A–8. . . . . . . . . . . . . . . . . . . . . . . . . . . .
Mode Switch 10A–8. . . . . . . . . . . . . . . . . . . . . . . . . . . .
Removal and Installation 10A–8. . . . . . . . . . . . . . .
Service Precaution
WARNING: IF SO EQUIPPED WITH A
SUPPLEMENTAL RESTRAINT SYSTEM (SRS),
REFER TO THE SRS COMPONENT AND WIRING
LOCATION VIEW IN ORDER TO DETERMINE
WHETHER YOU ARE PERFORMING SERVICE ON OR
NEAR THE SRS COMPONENTS OR THE SRS
WIRING. WHEN YOU ARE PERFORMING SERVICE
ON OR NEAR THE SRS COMPONENTS OR THE SRS
WIRING, REFER TO THE SRS SERVICE
INFORMATION. FAILURE TO FOLLOW WARNINGS
COULD RESULT IN POSSIBLE AIR BAG
DEPLOYMENT, PERSONAL INJURY, OR
OTHERWISE UNNEEDED SRS SYSTEM REPAIRS.
CAUTION: Always use the correct fastener in the
proper location. When you replace a fastener, use
ONLY the exact part number for that application.
ISUZU will call out those fasteners that require a
replacement after removal. ISUZU will also call out
the fasteners that require thread lockers or thread
sealant. UNLESS OTHERWISE SPECIFIED, do not
use supplemental coatings (Paints, greases, or other
corrosion inhibitors) on threaded fasteners or
fastener joint interfaces. Generally, such coatings
adversely affect the fastener torque and the joint
clamping force, and may damage the fastener. When
you install fasteners, use the correct tightening
sequence and specifications. Following these
instructions can help you avoid damage to parts and
systems.
General Description
The cruise control keeps the vehicle running at a fixed
speed until a signal canceling this fixed speed is received .
When the main switch “AUTO CRUISE” is turned on with
the vehicle in the running mode, the battery voltage is
applied to the control unit. When a signal from the control
switch is input to the control unit while the vehicle is in this
state, the cruise control actuator is activated to operate
the system. Also, while the system is operating, the
“AUTO CRUISE” indicator light in the meter assembly
lights up.
1. SET/COAST Switch Function
1.Set Function: When the SET/COAST switch is
pressed and released with the main switch on, the
speed at which the vehicle is running at that moment
is stored in the memory, and the vehicle automatically
runs at the stored speed.
2.Coast-down Function: When the SET/COAST
switch is kept on while the vehicle in running, the
vehicle decelerates during that time. The speed at
which vehicle is running when the control switch is
turned off is stored in the memory, and the vehicle
automatically returns to the stored speed.
3.Tap-down Function: When the SET/COAST switch
is turned on and off instantaneously while the vehicle
is running, the vehicle decelerates a mile for each
on/off operation. The vehicle speed at which the
vehicle was running when the SET/COAST was
turned off last is stored in the memory, and the vehicle
automatically returns to this stored speed.
Page 3553 of 6000
10A–2
CRUISE CONTROL SYSTEM
2. RESUME/ACCEL Switch Function
1.Resume Function: When the RESUME/ACCEL
switch is turned on/off after the system is temporarily
deactivated by pressing the brake or clutch pedal
while the vehicle is running, the vehicle resumes the
speed stored before the system was released, and
the vehicle automatically runs at the stored speed .
2.Accelerate Function: When the RESUME/ACCEL
switch is kept on after the system is released
completely, the vehicle accelerates its speed during
t h a t t i m e . T h e v e h i c l e s p e e d a t w h i c h t h e v e h i c l e w a s
running when the switch was turned off is stored in the
memory, and the vehicle automatically returns to this
speed.
3.Tap-up Function: When the RESUME/ACCEL
switch is turned on and off instantaneously while the
vehicle is running, the vehicle decelerates a mile for
each on/off operation. The vehicle speed at which the
vehicle was running when the switch was turned off
last is stored in the memory, and the vehicle
automatically returns to this stored speed.
3. CANCEL Function
1.Temporary Cancellation:
When the brake pedal is pressed.
When the clutch pedal is pressed. (M/T)
When the select lever is shifted to any position other
than “D”, “3”, “2” or “L”. (A/T)
When the cancel switch is operated.
When the vehicle speed exceeds about 20 km/h
over the vehicle speed stored in the memory.
Turning the RESUME/ACCEL switch will return the
vehicle to the speed stored in the cruise control
memory.
2.Complete Cancellation:
When the starter switch or the main switch is turned
off.
When the fail-safe function is activated.
When the vehicle speed is about 38.5 km/h.
Diagnosis
Refer to the Cruise Control System Diagnosis in Wiring
System section.
Brake Switch
Removal
1. Disconnect the battery ground cable.
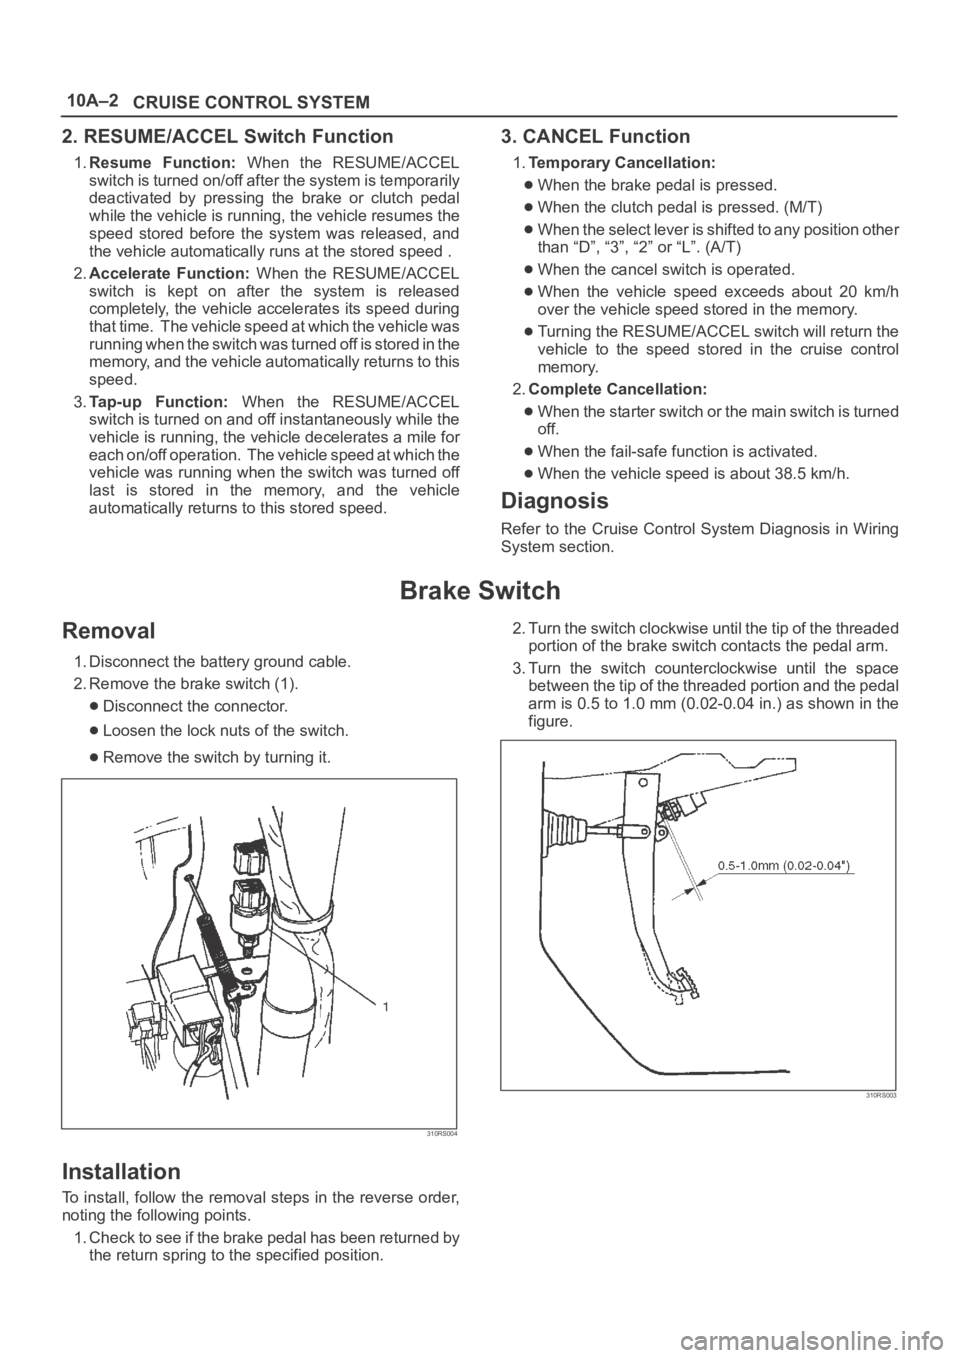
2. Remove the brake switch (1).
Disconnect the connector.
Loosen the lock nuts of the switch.
Remove the switch by turning it.
310RS004
Installation
To install, follow the removal steps in the reverse order,
noting the following points.
1. Check to see if the brake pedal has been returned by
the return spring to the specified position.2. Turn the switch clockwise until the tip of the threaded
portion of the brake switch contacts the pedal arm.
3. Turn the switch counterclockwise until the space
between the tip of the threaded portion and the pedal
arm is 0.5 to 1.0 mm (0.02-0.04 in.) as shown in the
figure.
310RS003
Page 3555 of 6000
10A–4
CRUISE CONTROL SYSTEM
Starter Switch
Removal
1. Disconnect the battery ground cable.
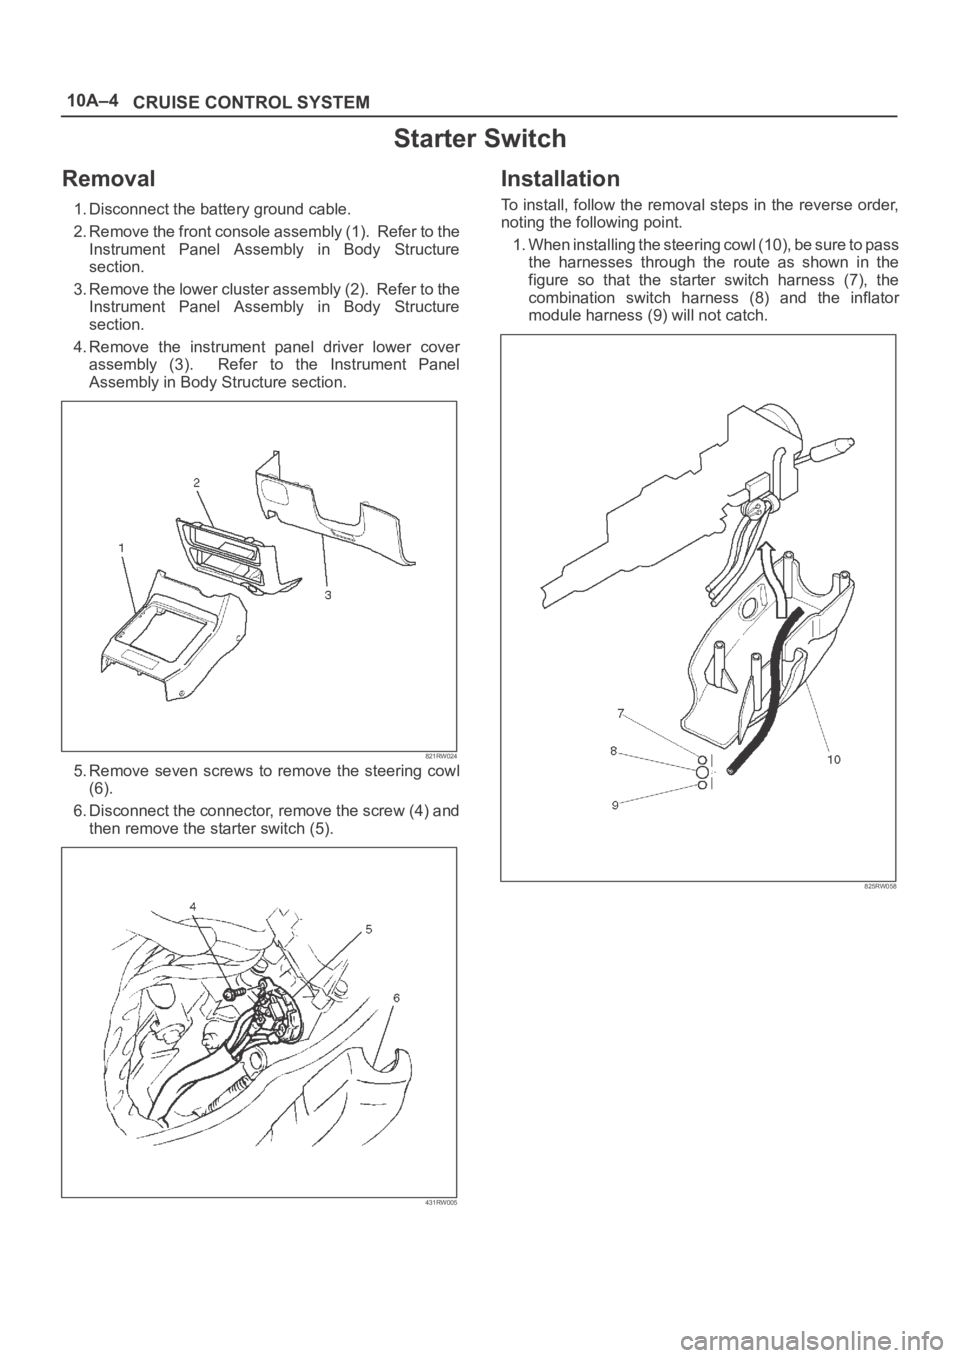
2. Remove the front console assembly (1). Refer to the
Instrument Panel Assembly in Body Structure
section.
3. Remove the lower cluster assembly (2). Refer to the
Instrument Panel Assembly in Body Structure
section.
4. Remove the instrument panel driver lower cover
assembly (3). Refer to the Instrument Panel
Assembly in Body Structure section.
821RW024
5. Remove seven screws to remove the steering cowl
(6).
6. Disconnect the connector, remove the screw (4) and
then remove the starter switch (5).
431RW005
Installation
To install, follow the removal steps in the reverse order,
noting the following point.
1. When installing the steering cowl (10), be sure to pass
the harnesses through the route as shown in the
figure so that the starter switch harness (7), the
combination switch harness (8) and the inflator
module harness (9) will not catch.
825RW058