1998 OPEL FRONTERA sensor
[x] Cancel search: sensorPage 2188 of 6000
7A–34
AUTOMATIC TRANSMISSION (4L30–E)
5. Install the flywheel under cover (3 pieces), and tighten
the bolts to the specified torque.
Torque: 8 N
m (0.8 kgꞏm/69 lb in)
6. Install the starter, and tighten the bolts to the specified
torque.
Torque: 40 N
m (4.1 kgꞏm/30 lb ft)7. Connect transmission harness connectors to
transmission, and transfer.
8. Connect fuel pipe bracket to transmission side.
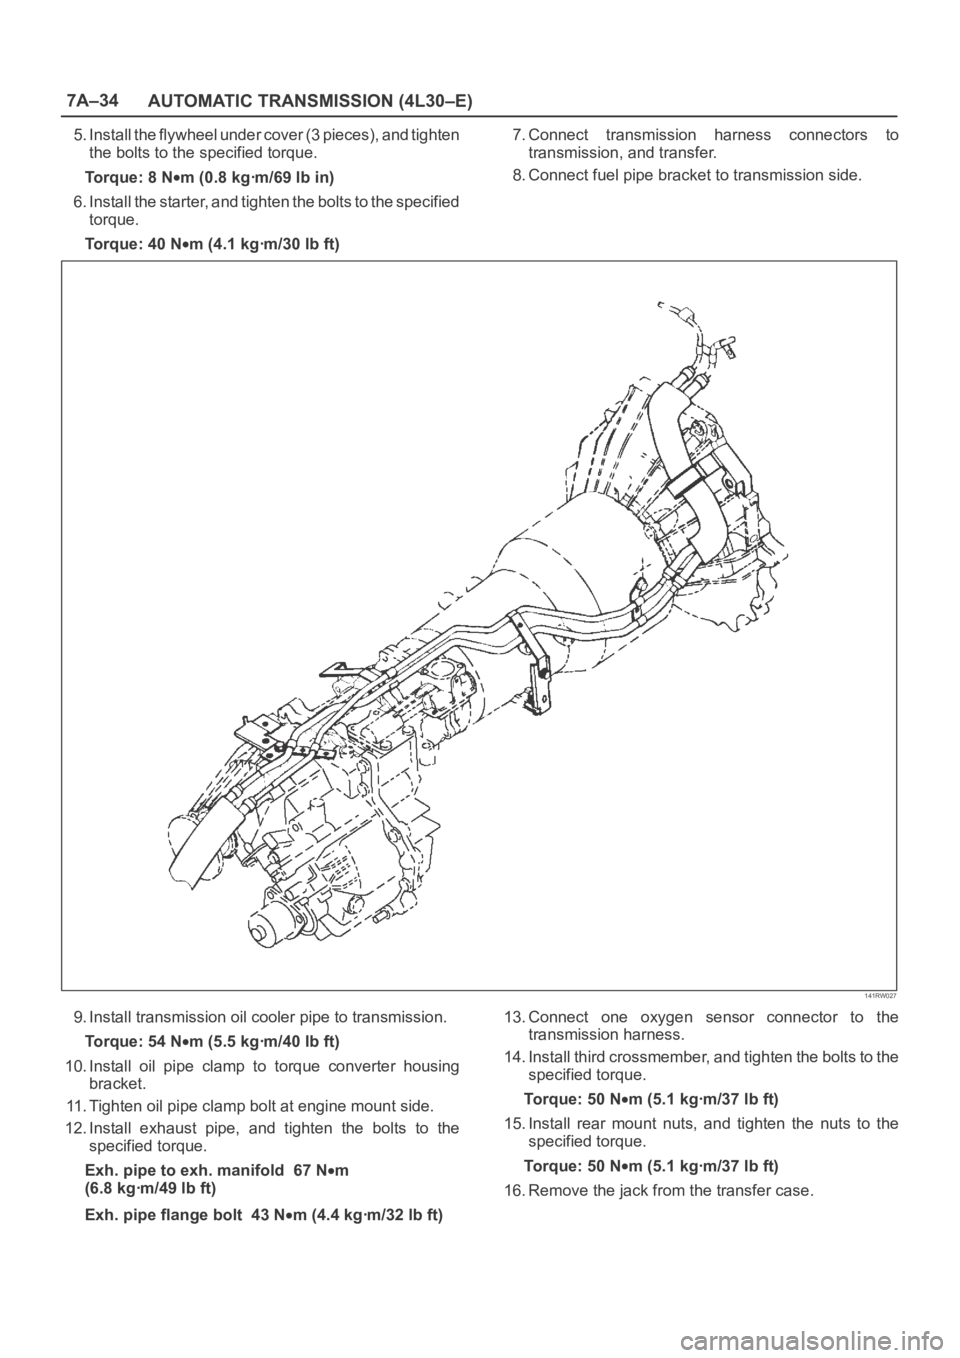
141RW027
9. Install transmission oil cooler pipe to transmission.
Torque: 54 N
m (5.5 kgꞏm/40 lb ft)
10. Install oil pipe clamp to torque converter housing
bracket.
11. Tighten oil pipe clamp bolt at engine mount side.
12. Install exhaust pipe, and tighten the bolts to the
specified torque.
Exh. pipe to exh. manifold 67 N
m
(6.8 kgꞏm/49 lb ft)
Exh. pipe flange bolt 43 N
m (4.4 kgꞏm/32 lb ft)13. Connect one oxygen sensor connector to the
transmission harness.
14. Install third crossmember, and tighten the bolts to the
specified torque.
To r q u e : 5 0 N
m (5.1 kgꞏm/37 lb ft)
15. Install rear mount nuts, and tighten the nuts to the
specified torque.
To r q u e : 5 0 N
m (5.1 kgꞏm/37 lb ft)
16. Remove the jack from the transfer case.
Page 2190 of 6000
7A–36
AUTOMATIC TRANSMISSION (4L30–E)
Solenoid (Main Case Valve Body)
Removal
1. Raise the vehicle and support it on jack stands.
2. Disconnect battery ground cable.
3. Remove transfer and exhaust protectors.
4. Drain fluid.
5. Remove exhaust pipe and disconnect oxygen sensor
connector.
6. Support transfer case with a jack and remove third
crossmember.
7. Remove sixteen 10 mm screws, main case oil pan,
magnet, and gasket.
8. Remove three 13 mm screws, oil filter.
9. Disconnect wiring harness from band control
solenoid and shift solenoids. Pull only on connectors,
not on wiring harness.
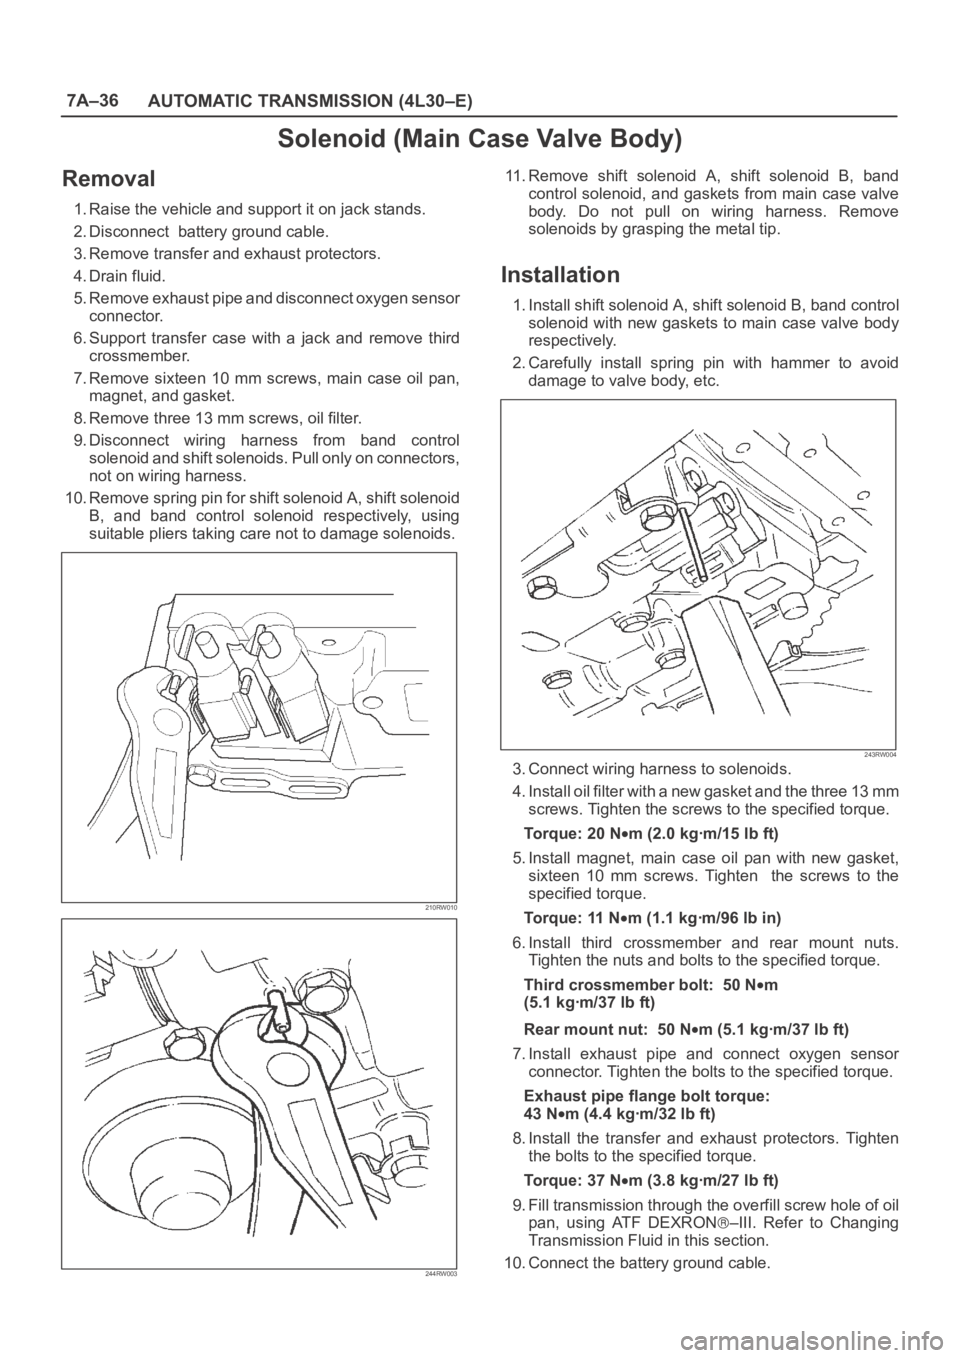
10. Remove spring pin for shift solenoid A, shift solenoid
B, and band control solenoid respectively, using
suitable pliers taking care not to damage solenoids.
210RW010
244RW003
11. Remove shift solenoid A, shift solenoid B, band
control solenoid, and gaskets from main case valve
body. Do not pull on wiring harness. Remove
solenoids by grasping the metal tip.
Installation
1. Install shift solenoid A, shift solenoid B, band control
solenoid with new gaskets to main case valve body
respectively.
2. Carefully install spring pin with hammer to avoid
damage to valve body, etc.
243RW004
3. Connect wiring harness to solenoids.
4. Install oil filter with a new gasket and the three 13 mm
screws. Tighten the screws to the specified torque.
To r q u e : 2 0 N
m (2.0 kgꞏm/15 lb ft)
5. Install magnet, main case oil pan with new gasket,
sixteen 10 mm screws. Tighten the screws to the
specified torque.
To r q u e : 11 N
m (1.1 kgꞏm/96 lb in)
6. Install third crossmember and rear mount nuts.
Tighten the nuts and bolts to the specified torque.
Third crossmember bolt: 50 N
m
(5.1 kgꞏm/37 lb ft)
Rear mount nut: 50 N
m (5.1 kgꞏm/37 lb ft)
7. Install exhaust pipe and connect oxygen sensor
connector. Tighten the bolts to the specified torque.
Exhaust pipe flange bolt torque:
43 N
m(4.4kgꞏm/32lbft)
8. Install the transfer and exhaust protectors. Tighten
the bolts to the specified torque.
Torque: 37 N
m (3.8 kgꞏm/27 lb ft)
9. Fill transmission through the overfill screw hole of oil
pan, using ATF DEXRON
–III. Refer to Changing
Transmission Fluid in this section.
10. Connect the battery ground cable.
Page 2191 of 6000
7A–37 AUTOMATIC TRANSMISSION (4L30–E)
Solenoid (Adapter Case Valve Body)
Removal
1. Raise the vehicle and support it on jack stands.
2. Disconnect battery ground cable.
3. Drain fluid.
4. Remove transfer and exhaust protectors.
5. Remove exhaust pipe and disconnect oxygen sesnor
connector.
6. Remove adapter case oil pan twelve fixing 10 mm
screws, adapter case oil pan, and gasket.
NOTE: Oil pan still contains transmission fluid. Place a
large drain container under the oil pan and drain the fluid
carefully.
7. Disconnect wiring harness from force motor solenoid
and converter clutch solenoid. Pull only on
connectors, not on wiring harness.
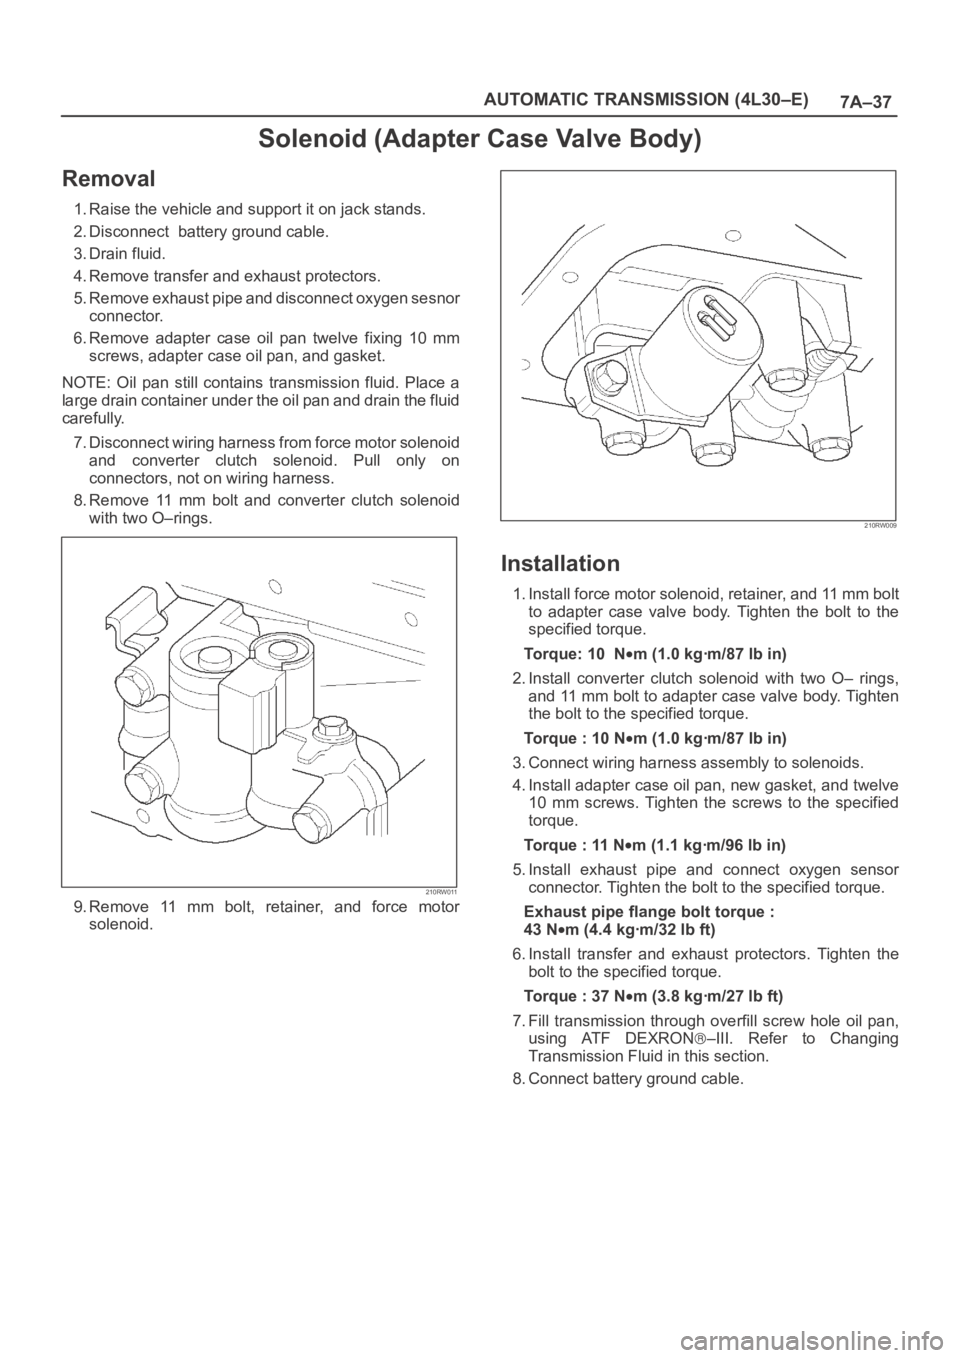
8. Remove 11 mm bolt and converter clutch solenoid
with two O–rings.
210RW011
9. Remove 11 mm bolt, retainer, and force motor
solenoid.
210RW009
Installation
1. Install force motor solenoid, retainer, and 11 mm bolt
to adapter case valve body. Tighten the bolt to the
specified torque.
To r q u e : 1 0 N
m (1.0 kgꞏm/87 lb in)
2. Install converter clutch solenoid with two O– rings,
and 11 mm bolt to adapter case valve body. Tighten
the bolt to the specified torque.
Torque : 10 N
m (1.0 kgꞏm/87 lb in)
3. Connect wiring harness assembly to solenoids.
4. Install adapter case oil pan, new gasket, and twelve
10 mm screws. Tighten the screws to the specified
torque.
Torque : 11 N
m (1.1 kgꞏm/96 lb in)
5. Install exhaust pipe and connect oxygen sensor
connector. Tighten the bolt to the specified torque.
Exhaust pipe flange bolt torque :
43 N
m(4.4kgꞏm/32lbft)
6. Install transfer and exhaust protectors. Tighten the
bolt to the specified torque.
Torque : 37 N
m(3.8kgꞏm/27lbft)
7. Fill transmission through overfill screw hole oil pan,
using ATF DEXRON
–III. Refer to Changing
Transmission Fluid in this section.
8. Connect battery ground cable.
Page 2192 of 6000
7A–38
AUTOMATIC TRANSMISSION (4L30–E)
Valve Body Assembly (Main Case)
Removal
1. Raise the vehicle and support it on jack stands.
2. Disconnect battery ground cable.
3. Remove transfer and exhaust protectors.
4. Drain fluid.
5. Remove exhaust pipe and disconnect oxygen sensor
connector.
6. Support transfer case with a jack and remove third
crossmember.
7. Remove sixteen 10 mm screws, main case oil pan,
magnet and gasket.
8. Remove three 13 mm oil filter fixing screws, then
remove oil filter.
9. Remove two 13 mm manual detent fixing screws,
then remove roller and spring assembly.
10. Disconnect wiring harness from band control
solenoid and shift solenoids. Pull only on connectors,
not on wiring harness.
11. Remove four 13 mm servo cover fixing screws, then
remove servo cover and gasket.
12. Remove seven 13 mm valve body fixing screws.
Disconnect the ground wire from the main case
valve body.
13. Remove main case valve body with manual valve link
and transfer plate. Note the position of the link (long
end into valve, short end into range selector lever).
14. Remove transfer plate gasket from main case.
15. Remove two check balls from main case.
Installation
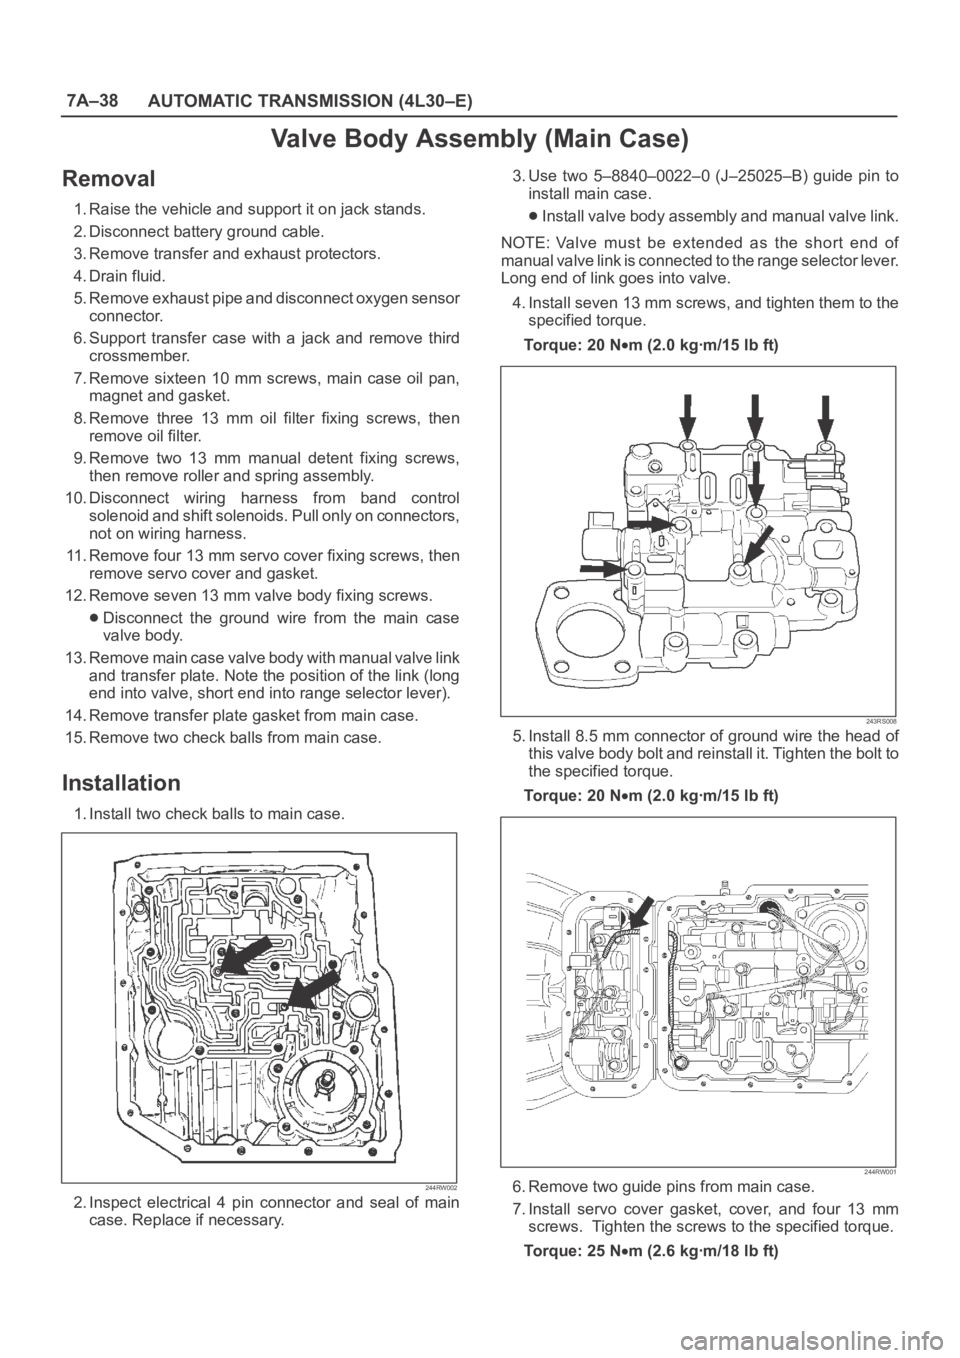
1. Install two check balls to main case.
244RW002
2. Inspect electrical 4 pin connector and seal of main
case. Replace if necessary.3. Use two 5–8840–0022–0 (J–25025–B) guide pin to
install main case.
Install valve body assembly and manual valve link.
NOTE: Valve must be extended as the short end of
manual valve link is connected to the range selector lever.
Long end of link goes into valve.
4. Install seven 13 mm screws, and tighten them to the
specified torque.
To r q u e : 2 0 N
m (2.0 kgꞏm/15 lb ft)
243RS008
5. Install 8.5 mm connector of ground wire the head of
this valve body bolt and reinstall it. Tighten the bolt to
the specified torque.
To r q u e : 2 0 N
m (2.0 kgꞏm/15 lb ft)
244RW001
6. Remove two guide pins from main case.
7. Install servo cover gasket, cover, and four 13 mm
screws. Tighten the screws to the specified torque.
To r q u e : 2 5 N
m (2.6 kgꞏm/18 lb ft)
Page 2193 of 6000
7A–39 AUTOMATIC TRANSMISSION (4L30–E)
8. Connect wiring harness to band control and shift
solenoids.
9. Install roller and spring assembly to manual detent.
Install two 13 mm screws, and tighten them to the
specified torque.
Torque: 20 N
m (2.0 kgꞏm/15 lb ft)
10. Install oil filter and three 13 mm screws. Tighten the
screws to the specified torque.
Torque : 20 N
m (2.0 kgꞏm/15 lb ft)
11. Install oil pan gasket, magnet, oil pan and sixteen 10
mm screws. Tighten the screws to the specified
torque.
Torque: 11 N
m (1.1 kgꞏm/96 lb in)
12. Install third crossmember and rear mount. Tighten the
bolts and nuts to the specified torque.
Torque
Third crossmember bolt:
50 N
m (5.1 kgꞏm/37 lb ft)
Rear mount nut: 50 N
m(5.1kgꞏm/37lbft)
13. Install exhaust pipe and connect oxygen sensor
connector. Tighten the bolts to the specified torque.
Exhaust pipe flange bolt torque:
43 N
m (4.4 kgꞏm/32 lb ft)
14. Install transfer and exhaust protectors. Tighten the
bolts to the specified torque.
Torque: 37 N
m (3.8 kgꞏm/27 lb ft)
15. Fill transmission through overfill screw hole of oil pan,
using ATF DEXRON
–III, refer to Changing
Transmission Fluid in this section.
16. Connect battery ground cable.
Page 2194 of 6000
7A–40
AUTOMATIC TRANSMISSION (4L30–E)
Valve Body Assembly (Adapter Case)
Removal
1. Raise the vehicle and support it on jack stands.
2. Disconnect battery ground cable.
3. Drain fluid.
4. Remove transfer and exhaust protectors.
5. Remove exhaust pipe and disconnect oxygen sensor
connector.
6. Remove twelve 10 mm adapter case oil pan fixing
screws, adapter case oil pan, and gasket.
NOTE: Oil pan still contains transmission fluid. Place a
large drain container under the oil pan.
Drain the fluid carefully.
7. Disconnect wiring harness from force motor solenoid
and converter clutch solenoid. Pull only on
connectors, not on wiring harness.
8. Remove seven 13 mm screws from adapter case
valve body assembly, then remove transfer plate, two
gaskets, and adapter case valve body.
Installation
1. Inspect electrical 5 pin connector and seal of adapter
case. Replace if necessary.2. Install gasket, transfer plate, and gasket.
3. Install adapter case valve body and seven 13 mm
screws. Tighten the screws to the specified torque.
To r q u e : 2 0 N
m (2.0 kgꞏm/15 lb ft)
4. Connect wiring harness assembly to converter clutch
solenoid and force motor.
5. Install oil pan gasket, oil pan, and twelve 10 mm
screws. Tighten the screws to the specified torque.
To r q u e : 11 N
m (1.1 kgꞏm/96 lb in)
6. Install exhaust pipe and connect oxygen sensor
connector. Tighten the bolts to the specified torque.
Exhaust pipe flange bolt torque:
43 N
m(4.4kgꞏm/32lbft)
7. Install transfer and exhaust protectors. Tighten the
bolts to the specified torque.
To r q u e : 3 7 N
m(3.8kgꞏm/27lbft)
8. Fill transmission through the overfill screw hole of oil
pan, using ATF DEXRON
–III. Refer to Changing
Transmission Fluid in this section.
9. Connect battery ground cable.
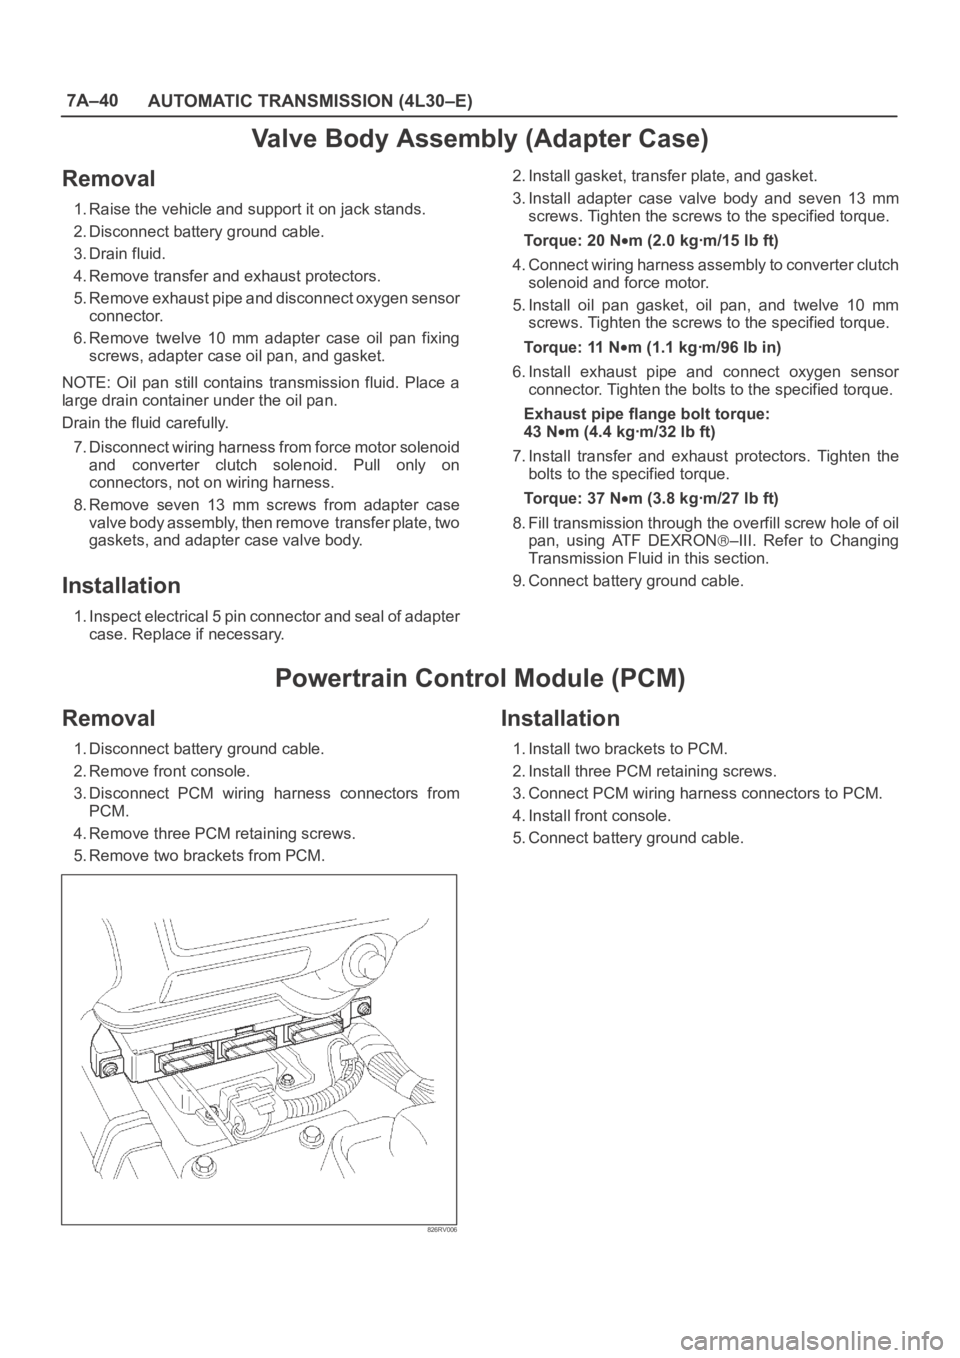
Powertrain Control Module (PCM)
Removal
1. Disconnect battery ground cable.
2. Remove front console.
3. Disconnect PCM wiring harness connectors from
PCM.
4. Remove three PCM retaining screws.
5. Remove two brackets from PCM.
826RV006
Installation
1. Install two brackets to PCM.
2. Install three PCM retaining screws.
3. Connect PCM wiring harness connectors to PCM.
4. Install front console.
5. Connect battery ground cable.
Page 2195 of 6000
7A–41 AUTOMATIC TRANSMISSION (4L30–E)
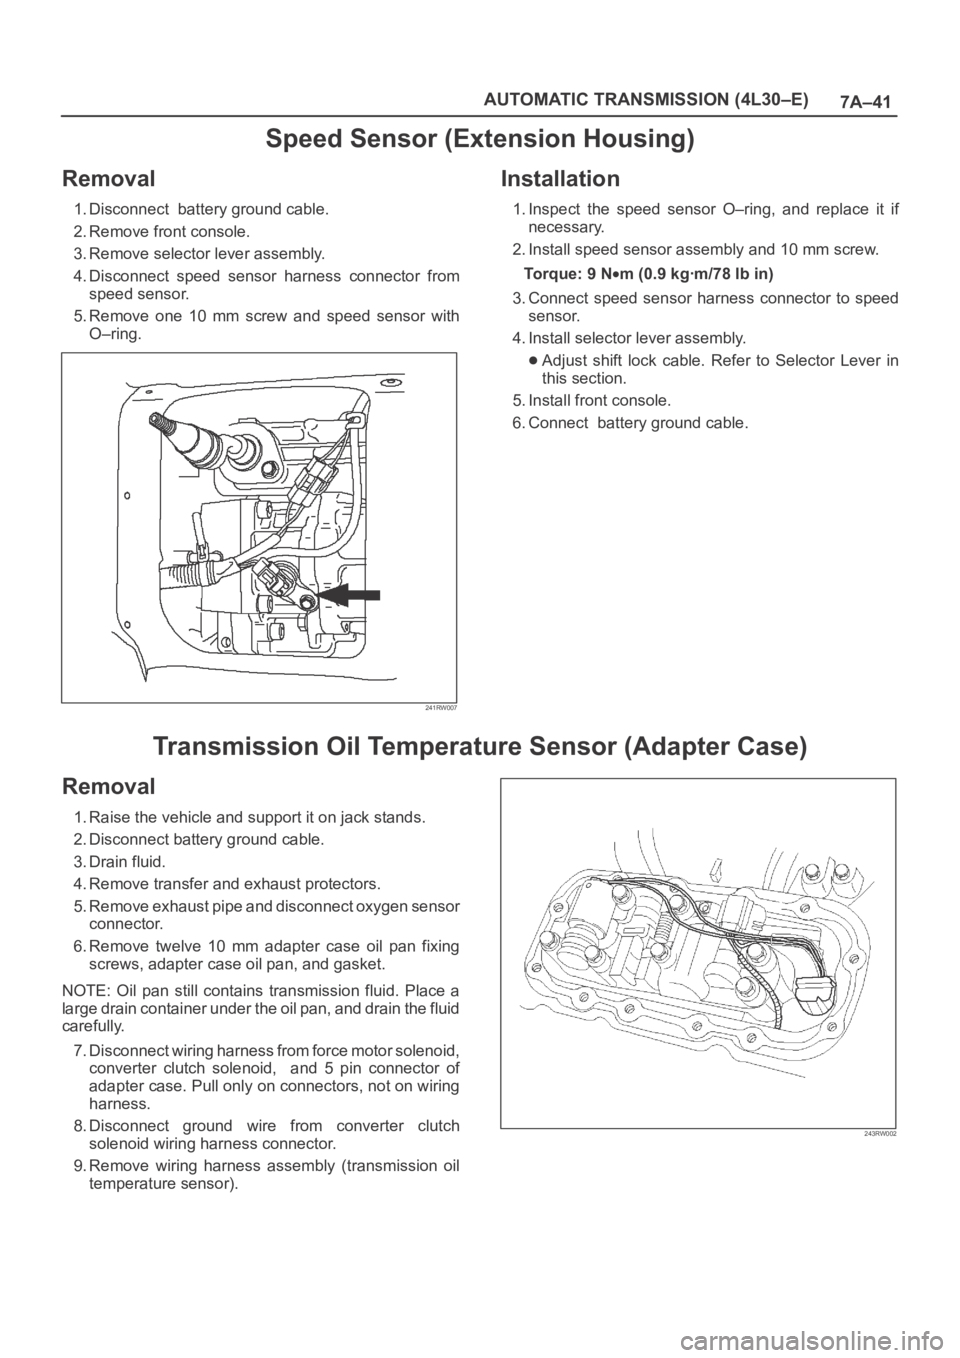
Speed Sensor (Extension Housing)
Removal
1. Disconnect battery ground cable.
2. Remove front console.
3. Remove selector lever assembly.
4. Disconnect speed sensor harness connector from
speed sensor.
5. Remove one 10 mm screw and speed sensor with
O–ring.
241RW007
Installation
1. Inspect the speed sensor O–ring, and replace it if
necessary.
2. Install speed sensor assembly and 10 mm screw.
To r q u e : 9 N
m (0.9 kgꞏm/78 lb in)
3. Connect speed sensor harness connector to speed
sensor.
4. Install selector lever assembly.
Adjust shift lock cable. Refer to Selector Lever in
this section.
5. Install front console.
6. Connect battery ground cable.
Transmission Oil Temperature Sensor (Adapter Case)
Removal
1. Raise the vehicle and support it on jack stands.
2. Disconnect battery ground cable.
3. Drain fluid.
4. Remove transfer and exhaust protectors.
5. Remove exhaust pipe and disconnect oxygen sensor
connector.
6. Remove twelve 10 mm adapter case oil pan fixing
screws, adapter case oil pan, and gasket.
NOTE: Oil pan still contains transmission fluid. Place a
large drain container under the oil pan, and drain the fluid
carefully.
7. Disconnect wiring harness from force motor solenoid,
converter clutch solenoid, and 5 pin connector of
adapter case. Pull only on connectors, not on wiring
harness.
8. Disconnect ground wire from converter clutch
solenoid wiring harness connector.
9. Remove wiring harness assembly (transmission oil
temperature sensor).
243RW002
Page 2196 of 6000
7A–42
AUTOMATIC TRANSMISSION (4L30–E)
Installation
1. Connect ground wire to converter clutch solenoid
wiring harness connector of the wiring harness
assembly.
2. Install wiring harness assembly to converter clutch
solenoid, force motor, and 5 pin connector of adapter
case.
3. Install oil pan gasket, oil pan, and twelve 10 mm fixing
screws. Tighten the screws to the specified torque.
Torque: 11 N
m (1.1 kgꞏm/96 lb in)4. Install exhaust pipe and connect oxygen sensor
connector. Tighten the bolts to the specified torque.
Exhaust pipe flange bolt torque:
43 N
m(4.4kgꞏm/32lbft)
5. Install transfer and exhaust protectors. Tighten the
bolts to the specified torque.
To r q u e : 3 7 N
m (3.8 kgꞏm/27 lb ft)
6. Fill transmission through the overfill screw hole of oil
pan, using ATF DEXRON
–III.
Refer to Changing Transmission Fluid in this section.
7. Connect battery ground cable.
Front Oil Seal (Converter Housing)
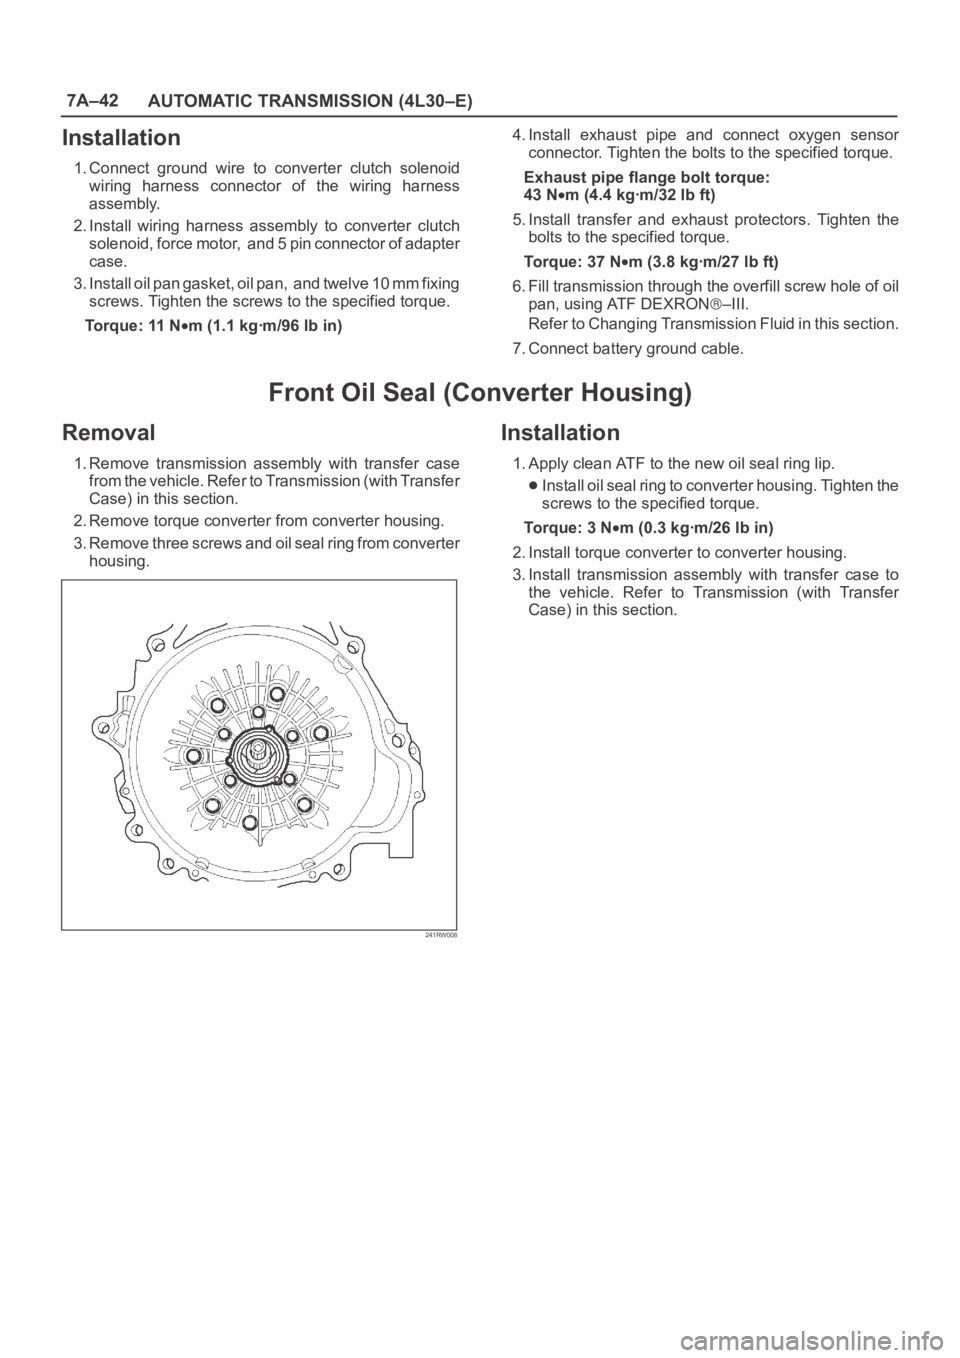
Removal
1. Remove transmission assembly with transfer case
from the vehicle. Refer to Transmission (with Transfer
Case) in this section.
2. Remove torque converter from converter housing.
3. Remove three screws and oil seal ring from converter
housing.
241RW008
Installation
1. Apply clean ATF to the new oil seal ring lip.
Install oil seal ring to converter housing. Tighten the
screws to the specified torque.
To r q u e : 3 N
m (0.3 kgꞏm/26 lb in)
2. Install torque converter to converter housing.
3. Install transmission assembly with transfer case to
the vehicle. Refer to Transmission (with Transfer
Case) in this section.