Page 2295 of 6000
7A1–50
TRANSMISSION CONTROL SYSTEM (4L30–E)
DTC P0723 Transmission Output Speed Sensor (OSS) Intermittent (Cont’d)
StepNo Ye s Action
15Repair the short to B+ in circuit RED.
Is the repair complete?
Go to Step 17—
16Replace the PCM. Refer to Powertrain Control Module (PCM) in
Automatic Transmission (4L30–E) section.
Is the replacement complete?
Go to Step 17—
171. After the repair is complete, use the scan tool to select “DTC”,
then “Clear Info” function and operate the vehicle under the
following conditions:
Transmission output speed is greater than 101 rpm for 3
seconds.
2. Review the scan tool “DTC Info”.
Has the last test failed or is the current DTC displayed?
Begin diagnosis
again
Go to Step 1
Repair verified
Exit DTC table
Page 2296 of 6000

TRANSMISSION CONTROL SYSTEM (4L30–E)7A1–51
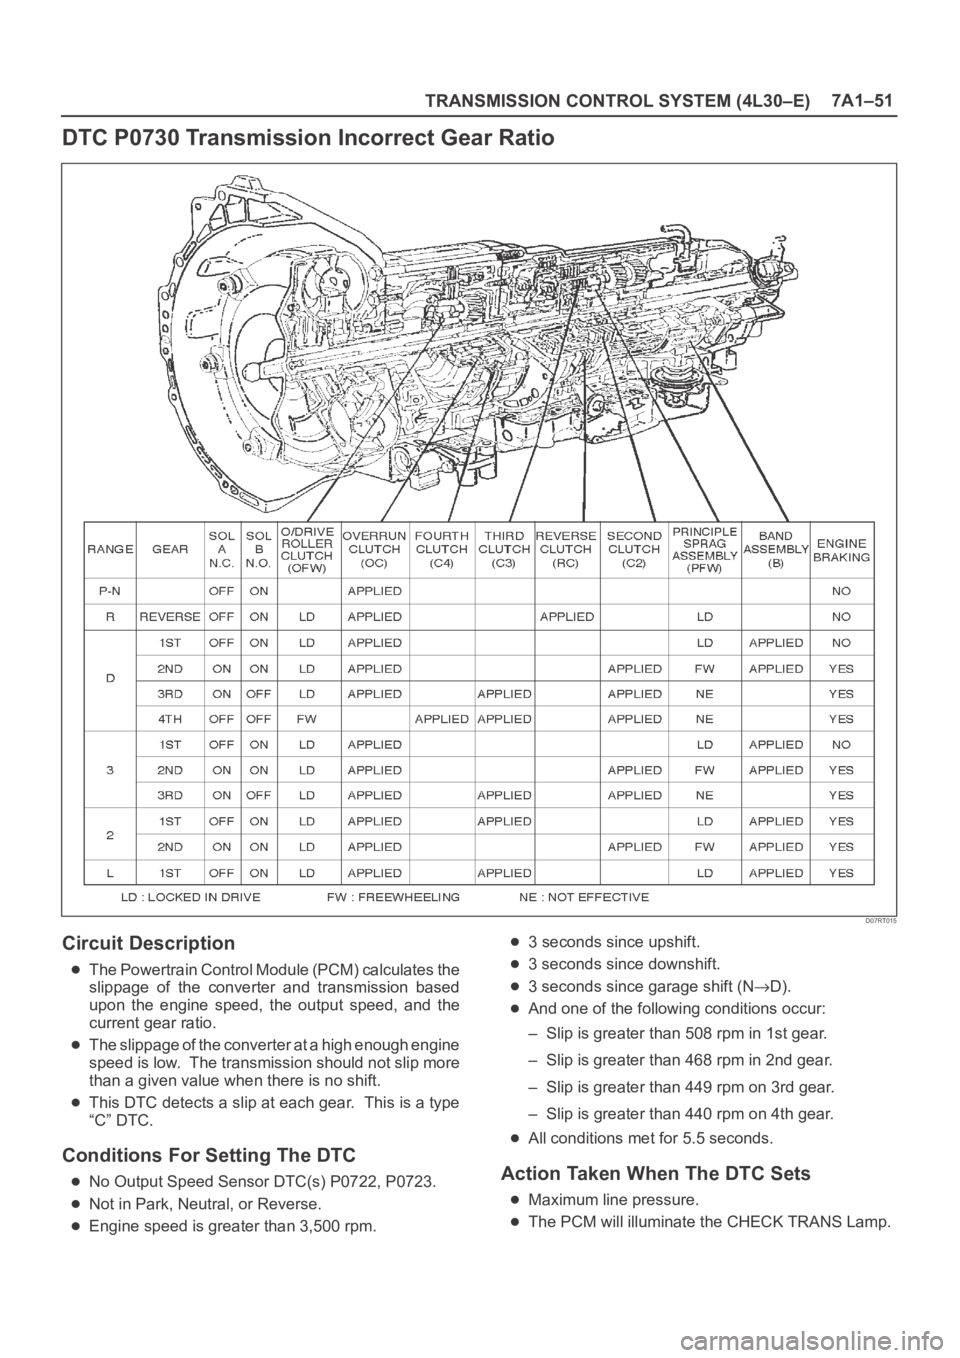
DTC P0730 Transmission Incorrect Gear Ratio
D07RT015
Circuit Description
The Powertrain Control Module (PCM) calculates the
slippage of the converter and transmission based
upon the engine speed, the output speed, and the
current gear ratio.
The slippage of the converter at a high enough engine
speed is low. The transmission should not slip more
than a given value when there is no shift.
This DTC detects a slip at each gear. This is a type
“C” DTC.
Conditions For Setting The DTC
No Output Speed Sensor DTC(s) P0722, P0723.
Not in Park, Neutral, or Reverse.
Engine speed is greater than 3,500 rpm.
3 seconds since upshift.
3 seconds since downshift.
3 seconds since garage shift (ND).
And one of the following conditions occur:
– Slip is greater than 508 rpm in 1st gear.
– Slip is greater than 468 rpm in 2nd gear.
– Slip is greater than 449 rpm on 3rd gear.
– Slip is greater than 440 rpm on 4th gear.
All conditions met for 5.5 seconds.
Action Taken When The DTC Sets
Maximum line pressure.
The PCM will illuminate the CHECK TRANS Lamp.
Page 2297 of 6000

7A1–52
TRANSMISSION CONTROL SYSTEM (4L30–E)
Conditions For Clearing The DTC/CHECK
TRANS Lamp
The PCM will turn “off” the CHECK TRANS Lamp
after three consecutive ignition cycles without a
failure reported.
The DTC can be cleared from PCM memory by using
a scan tool.
The DTC can also be cleared from memory when the
vehicle has made 40 warmup cycles without a failure
reported.
The PCM will cancel the DTC Actions Taken items
when the fault conditions no longer exist and the
ignition is cycles “off” long enough to power down the
PCM.
Diagnostic Aids
Check for intermittent output speed sensor circuit
problems.
Check for possible incorrect calibration. (PCM part
No., tire specification, and rear axle ratio)
Test Description
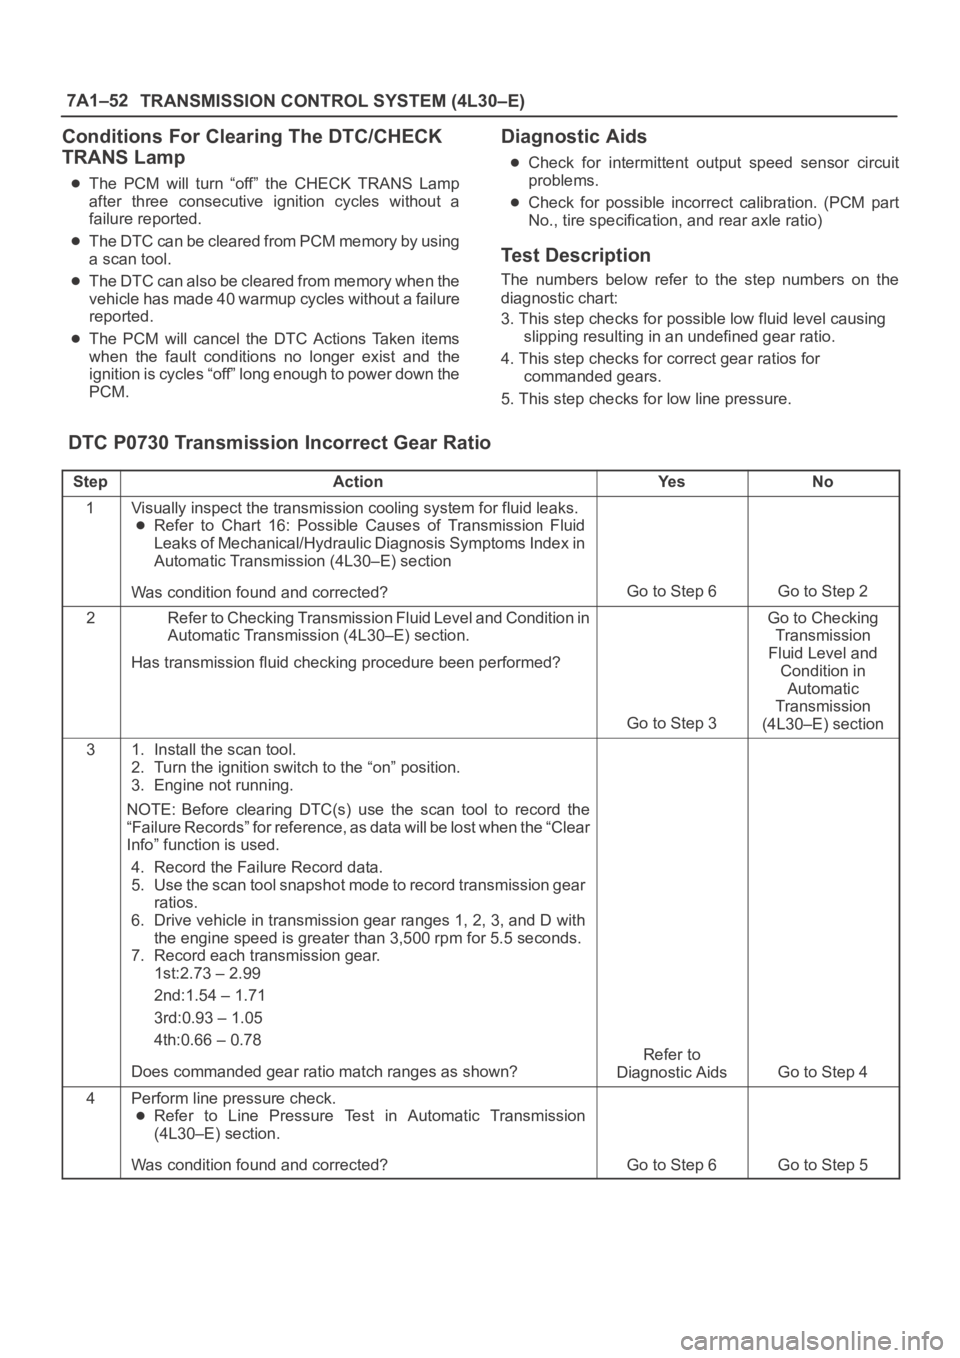
The numbers below refer to the step numbers on the
diagnostic chart:
3. This step checks for possible low fluid level causing
slipping resulting in an undefined gear ratio.
4. This step checks for correct gear ratios for
commanded gears.
5. This step checks for low line pressure.
DTC P0730 Transmission Incorrect Gear Ratio
StepActionYe sNo
1Visually inspect the transmission cooling system for fluid leaks.
Refer to Chart 16: Possible Causes of Transmission Fluid
Leaks of Mechanical/Hydraulic Diagnosis Symptoms Index in
Automatic Transmission (4L30–E) section
Was condition found and corrected?
Go to Step 6Go to Step 2
2Refer to Checking Transmission Fluid Level and Condition in
Automatic Transmission (4L30–E) section.
Has transmission fluid checking procedure been performed?
Go to Step 3
Go to Checking
Transmission
Fluid Level and
Condition in
Automatic
Transmission
(4L30–E) section
31. Install the scan tool.
2. Turn the ignition switch to the “on” position.
3. Engine not running.
NOTE: Before clearing DTC(s) use the scan tool to record the
“Failure Records” for reference, as data will be lost when the “Clear
Info” function is used.
4. Record the Failure Record data.
5. Use the scan tool snapshot mode to record transmission gear
ratios.
6. Drive vehicle in transmission gear ranges 1, 2, 3, and D with
the engine speed is greater than 3,500 rpm for 5.5 seconds.
7. Record each transmission gear.
1st:2.73 – 2.99
2nd:1.54 – 1.71
3rd:0.93 – 1.05
4th:0.66 – 0.78
Does commanded gear ratio match ranges as shown?
Refer to
Diagnostic Aids
Go to Step 4
4Perform line pressure check.
Refer to Line Pressure Test in Automatic Transmission
(4L30–E) section.
Was condition found and corrected?
Go to Step 6Go to Step 5
Page 2310 of 6000

TRANSMISSION CONTROL SYSTEM (4L30–E)7A1–65
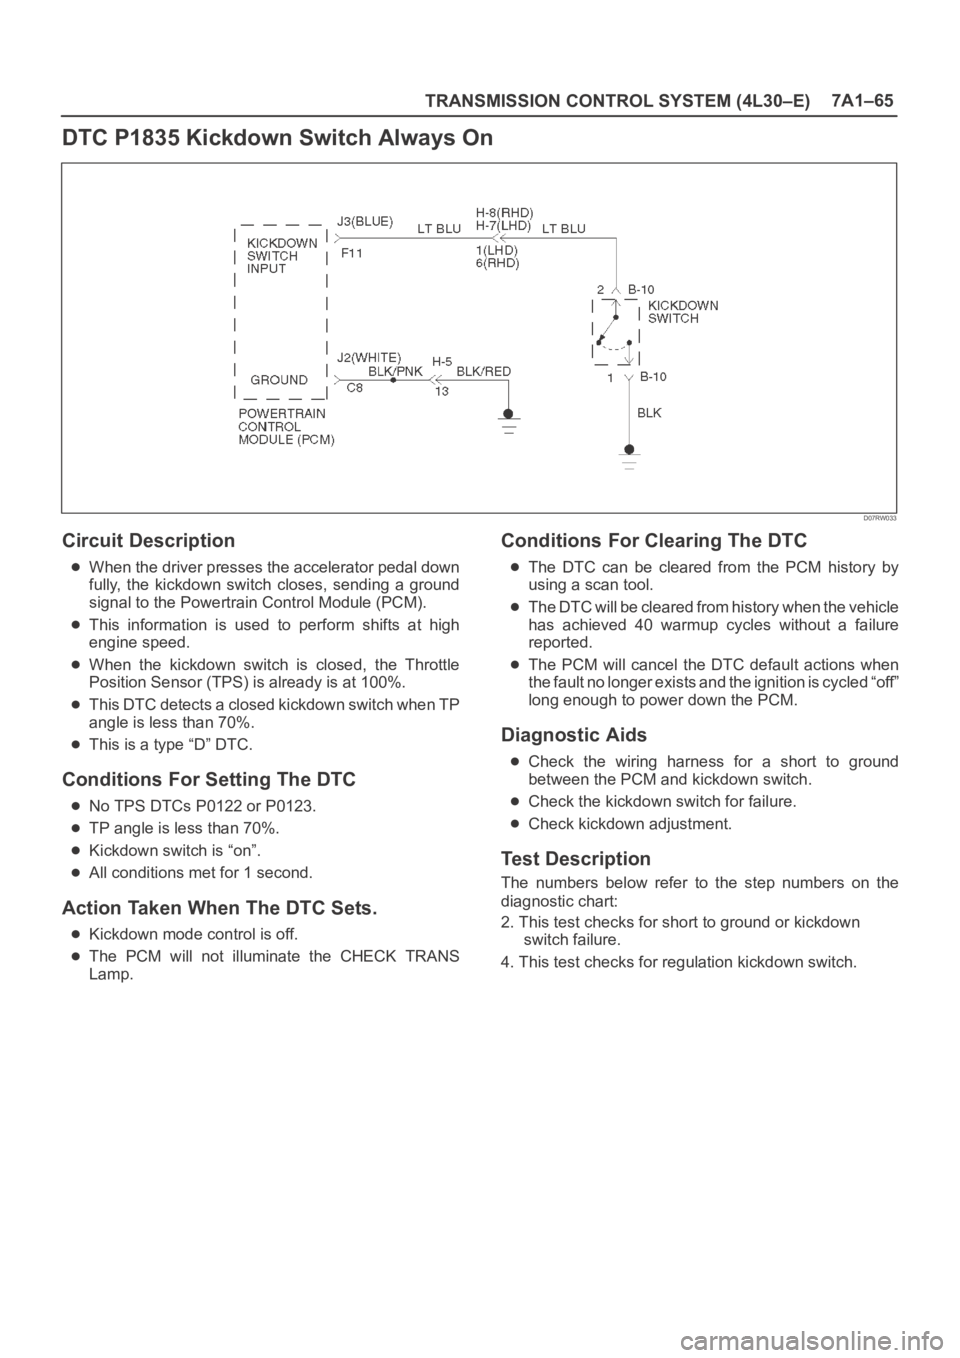
DTC P1835 Kickdown Switch Always On
D07RW033
Circuit Description
When the driver presses the accelerator pedal down
fully, the kickdown switch closes, sending a ground
signal to the Powertrain Control Module (PCM).
This information is used to perform shifts at high
engine speed.
When the kickdown switch is closed, the Throttle
Position Sensor (TPS) is already is at 100%.
This DTC detects a closed kickdown switch when TP
angle is less than 70%.
This is a type “D” DTC.
Conditions For Setting The DTC
No TPS DTCs P0122 or P0123.
TP angle is less than 70%.
Kickdown switch is “on”.
All conditions met for 1 second.
Action Taken When The DTC Sets.
Kickdown mode control is off.
The PCM will not illuminate the CHECK TRANS
Lamp.
Conditions For Clearing The DTC
The DTC can be cleared from the PCM history by
using a scan tool.
The DTC will be cleared from history when the vehicle
has achieved 40 warmup cycles without a failure
reported.
The PCM will cancel the DTC default actions when
the fault no longer exists and the ignition is cycled “off”
long enough to power down the PCM.
Diagnostic Aids
Check the wiring harness for a short to ground
between the PCM and kickdown switch.
Check the kickdown switch for failure.
Check kickdown adjustment.
Test Description
The numbers below refer to the step numbers on the
diagnostic chart:
2. This test checks for short to ground or kickdown
switch failure.
4. This test checks for regulation kickdown switch.
Page 2323 of 6000
MANUAL TRANSMISSION7B–5
Manual Transmission Assembly
Transmission and Associated Parts
220RW108
Legend
(1) Gear Control Lever and Knob
(2) Transfer Control Lever and Knob
(3) Front Console Assembly
(4) Grommet Assembly
(5) Transfer Protector
(6) Rear Propeller Shaft
(7) Front Propeller Shaft
(8) Exhaust Pipe
(9) Backup Lamp, 4WD Indicator, and 1–2
Indicator Switch Harness Connector
(10) Speedometer Sensor and 2WD–4WD Actuator
Harness Connector(11) Slave Cylinder Heat Protector
(12) Harness Heat Protector
(13) Slave Cylinder
(14) Dust Cover
(15) Engine Rear Mount Nut
(16) Engine Rear Mount Bolt
(17) Engine Rear Mount
(18) Third Crossmember
(19) Flywheel Under Cover
(20) Transmission Retaining Bolt
(21) Transmission Assembly with Transfer Case
Page 2324 of 6000
7B–6MANUAL TRANSMISSION
Removal
NOTE: Before remove the transmission and transfer
assembly from the vehicle, change the transfer mode to
2WD using push button on dash panel.
1. Remove engine hood.
2. Disconnect battery ground cable.
3. Remove the gear control lever knob.
4. Remove the front console assembly.
5. Remove the grommet assembly.
6. Remove the transmission control lever and transfer
control lever.
235RW014
7. Raise and support the vehicle with suitable jack
stand.
8. Remove transfer protector.
9. Remove the rear propeller shaft.
NOTE: Apply alignment marks on the flange at the both
front and rear side.
(4JX1)
401RW060
10. Remove the front propeller shaft.
NOTE: Apply alignment marks on the flange at both the
front and rear sides.
401RS003
11. Disconnect two oxygen sensor connectors from the
transmission harness (6VE1).
12.Remove the front and 3 way exhaust pipe (6VE1).
Remove the exhaust pipe with catalytic converter
(4JX1).
(4JX1)
150RW041
Page 2325 of 6000
MANUAL TRANSMISSION7B–7
13. Disconnect the backup lamp switch, 4WD indicator
switch and 1–2 indicator switch harness connectors.
826RW023
14. Disconnect the speedometer sensor and 2WD-4WD
actuator harness connectors.
826RW024
Page 2333 of 6000
MANUAL TRANSMISSION7B–15
141RW024
18. Connect the speedometer sensor and 2WD–4WD
actuator harness connector.
826RW024