Page 3545 of 6000
RESTRAINT CONTROL SYSTEM 9J1–58
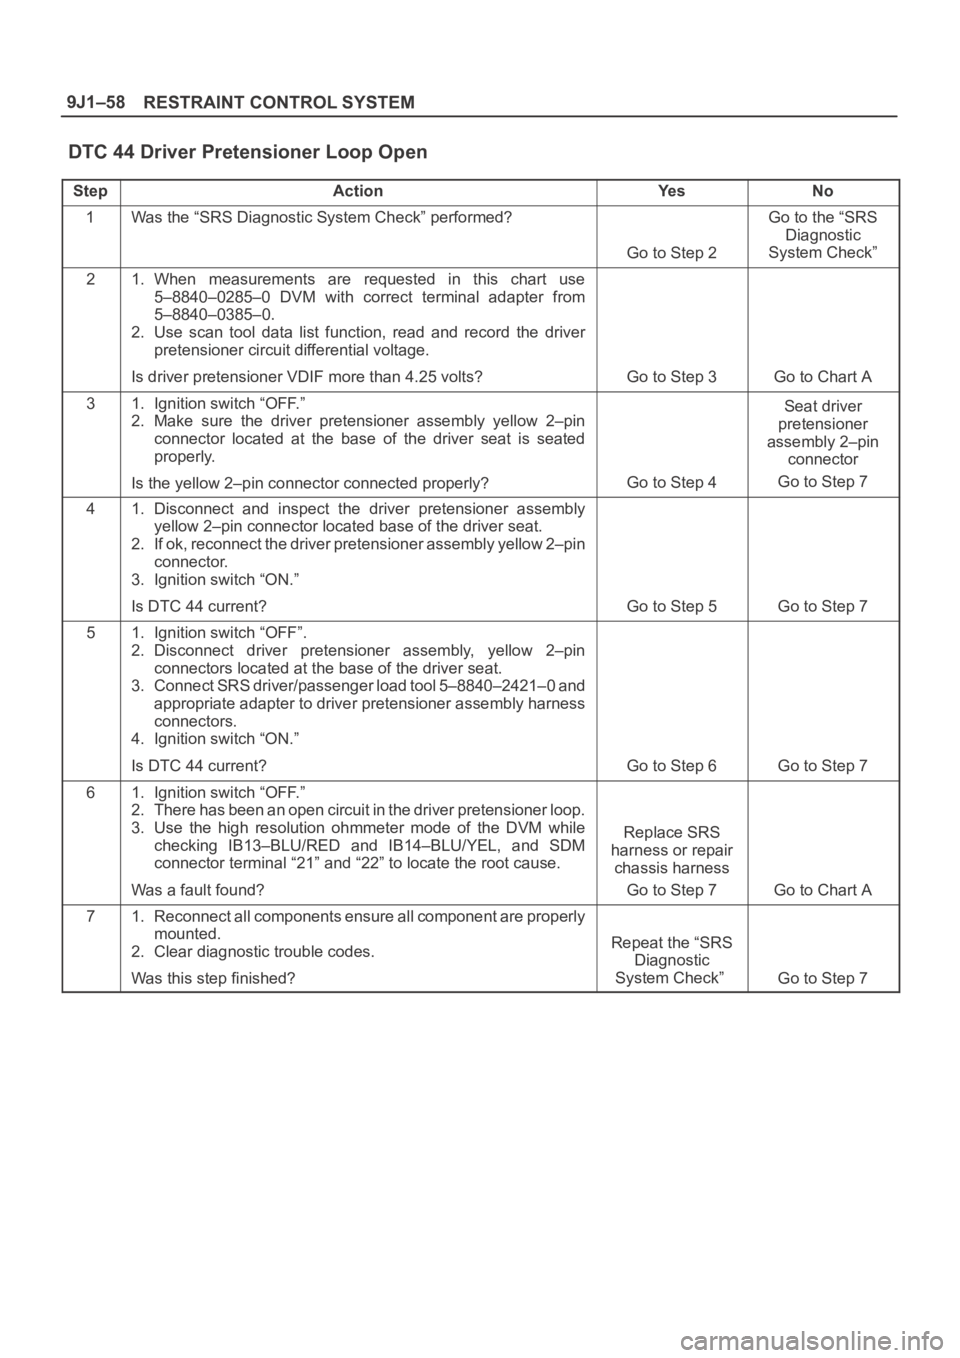
DTC 44 Driver Pretensioner Loop Open
StepActionYe sNo
1Was the “SRS Diagnostic System Check” performed?
Go to Step 2
Go to the “SRS
Diagnostic
System Check”
21. When measurements are requested in this chart use
5–8840–0285–0 DVM with correct terminal adapter from
5–8840–0385–0.
2. Use scan tool data list function, read and record the driver
pretensioner circuit differential voltage.
Is driver pretensioner VDIF more than 4.25 volts?
Go to Step 3Go to Chart A
31. Ignition switch “OFF.”
2. Make sure the driver pretensioner assembly yellow 2–pin
connector located at the base of the driver seat is seated
properly.
Is the yellow 2–pin connector connected properly?
Go to Step 4
Seat driver
pretensioner
assembly 2–pin
connector
Go to Step 7
41. Disconnect and inspect the driver pretensioner assembly
yellow 2–pin connector located base of the driver seat.
2. If ok, reconnect the driver pretensioner assembly yellow 2–pin
connector.
3. Ignition switch “ON.”
Is DTC 44 current?
Go to Step 5Go to Step 7
51. Ignition switch “OFF”.
2. Disconnect driver pretensioner assembly, yellow 2–pin
connectors located at the base of the driver seat.
3. Connect SRS driver/passenger load tool 5–8840–2421–0 and
appropriate adapter to driver pretensioner assembly harness
connectors.
4. Ignition switch “ON.”
Is DTC 44 current?
Go to Step 6Go to Step 7
61. Ignition switch “OFF.”
2. There has been an open circuit in the driver pretensioner loop.
3. Use the high resolution ohmmeter mode of the DVM while
checking IB13–BLU/RED and IB14–BLU/YEL, and SDM
connector terminal “21” and “22” to locate the root cause.
Was a fault found?
Replace SRS
harness or repair
chassis harness
Go to Step 7
Go to Chart A
71. Reconnect all components ensure all component are properly
mounted.
2. Clear diagnostic trouble codes.
Was this step finished?
Repeat the “SRS
Diagnostic
System Check”
Go to Step 7
Page 3546 of 6000
9J1–59
RESTRAINT CONTROL SYSTEM
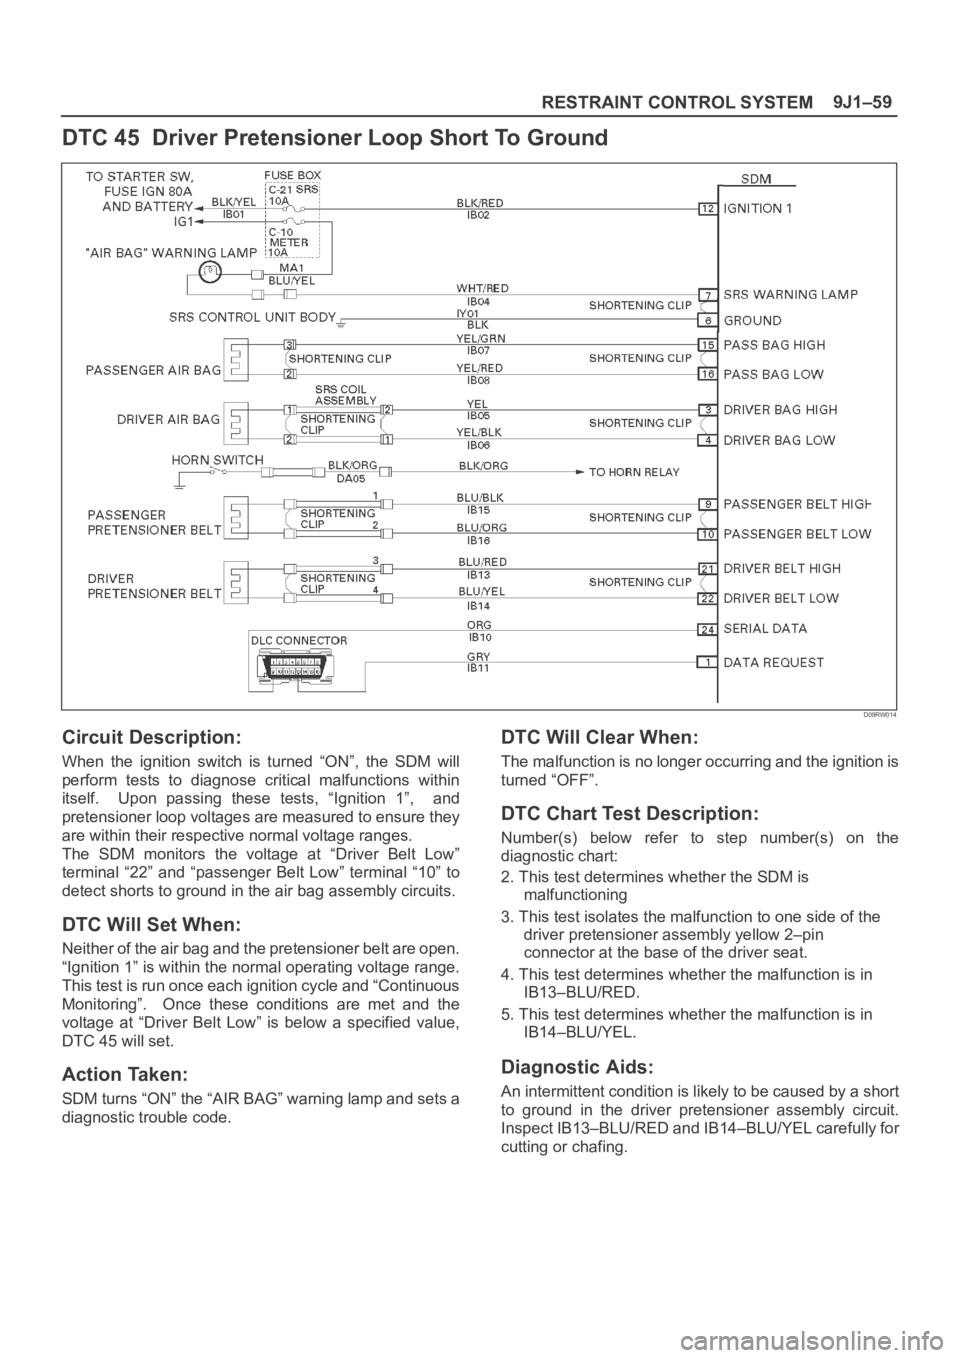
DTC 45 Driver Pretensioner Loop Short To Ground
D09RW014
Circuit Description:
When the ignition switch is turned “ON”, the SDM will
perform tests to diagnose critical malfunctions within
itself. Upon passing these tests, “Ignition 1”, and
pretensioner loop voltages are measured to ensure they
are within their respective normal voltage ranges.
The SDM monitors the voltage at “Driver Belt Low”
terminal “22” and “passenger Belt Low” terminal “10” to
detect shorts to ground in the air bag assembly circuits.
DTC Will Set When:
Neither of the air bag and the pretensioner belt are open.
“Ignition 1” is within the normal operating voltage range.
This test is run once each ignition cycle and “Continuous
Monitoring”. Once these conditions are met and the
voltage at “Driver Belt Low” is below a specified value,
DTC 45 will set.
Action Taken:
SDM turns “ON” the “AIR BAG” warning lamp and sets a
diagnostic trouble code.
DTC Will Clear When:
The malfunction is no longer occurring and the ignition is
turned “OFF”.
DTC Chart Test Description:
Number(s) below refer to step number(s) on the
diagnostic chart:
2. This test determines whether the SDM is
malfunctioning
3. This test isolates the malfunction to one side of the
driver pretensioner assembly yellow 2–pin
connector at the base of the driver seat.
4. This test determines whether the malfunction is in
IB13–BLU/RED.
5. This test determines whether the malfunction is in
IB14–BLU/YEL.
Diagnostic Aids:
An intermittent condition is likely to be caused by a short
to ground in the driver pretensioner assembly circuit.
Inspect IB13–BLU/RED and IB14–BLU/YEL carefully for
cutting or chafing.
Page 3547 of 6000

RESTRAINT CONTROL SYSTEM 9J1–60
DTC 45 Driver Pretensioner Loop Short To Ground
StepActionYe sNo
1Was the “SRS Diagnostic System Check” performed?
Go to Step 2
Go to the “SRS
Diagnostic
System Check”
21. When measurements are requested in this chart use
5–8840–0285–0 DVM with correct terminal adapter from
5–8840–0385–0.
2. Ignition switch “OFF.”
3. Connect scan tool data link connector. follow directions as
given in the scan tool operator’s manual.
4. Ignition switch “ON.”
5. Read driver belt sense LO.
Is driver belt sense LO less than 1.5 volts?
Go to Step 3Go to Chart A
31. Ignition switch “OFF.”
2. Disconnect driver pretensioner assembly yellow 2–pin
connector located at base of the driver seat, leave passenger
pretensioner assembly connected.
3. Connect SRS driver / passenger load tool 5–8840–2421–0
and appropriate adapter to driver pretensioner assembly
harness connector.
4. Ignition switch “ON.”
Is DTC 45 current?
Go to Step 4Go to Step 6
41. Ignition switch “OFF.”
2. Disconnect SDM.
3. Disconnect SRS driver / passenger load tool.
4. Measure resistance on SDM harness connector “21” to
terminal “6” (ground).
Does 5–8840–0285–0 display “OL” (infinite)?
Go to Step 5
Replace SRS
harness or repair
chassis harness
Go to Step 6
5Measure resistance on SDM harness connector from terminal
“22” to terminal “6” (ground).
Does 5–8840–0285–0 display “OL” (infinite)?
Go to Chart A
Replace SRS
harness or repair
chassis harness
Go to Step 6
61. Reconnect all components ensure all component are properly
mounted.
2. Clear diagnostic trouble codes.
Was this step finished?
Go to the “SRS
Diagnostic
System Check”
Go to Step 6
Page 3548 of 6000
9J1–61
RESTRAINT CONTROL SYSTEM
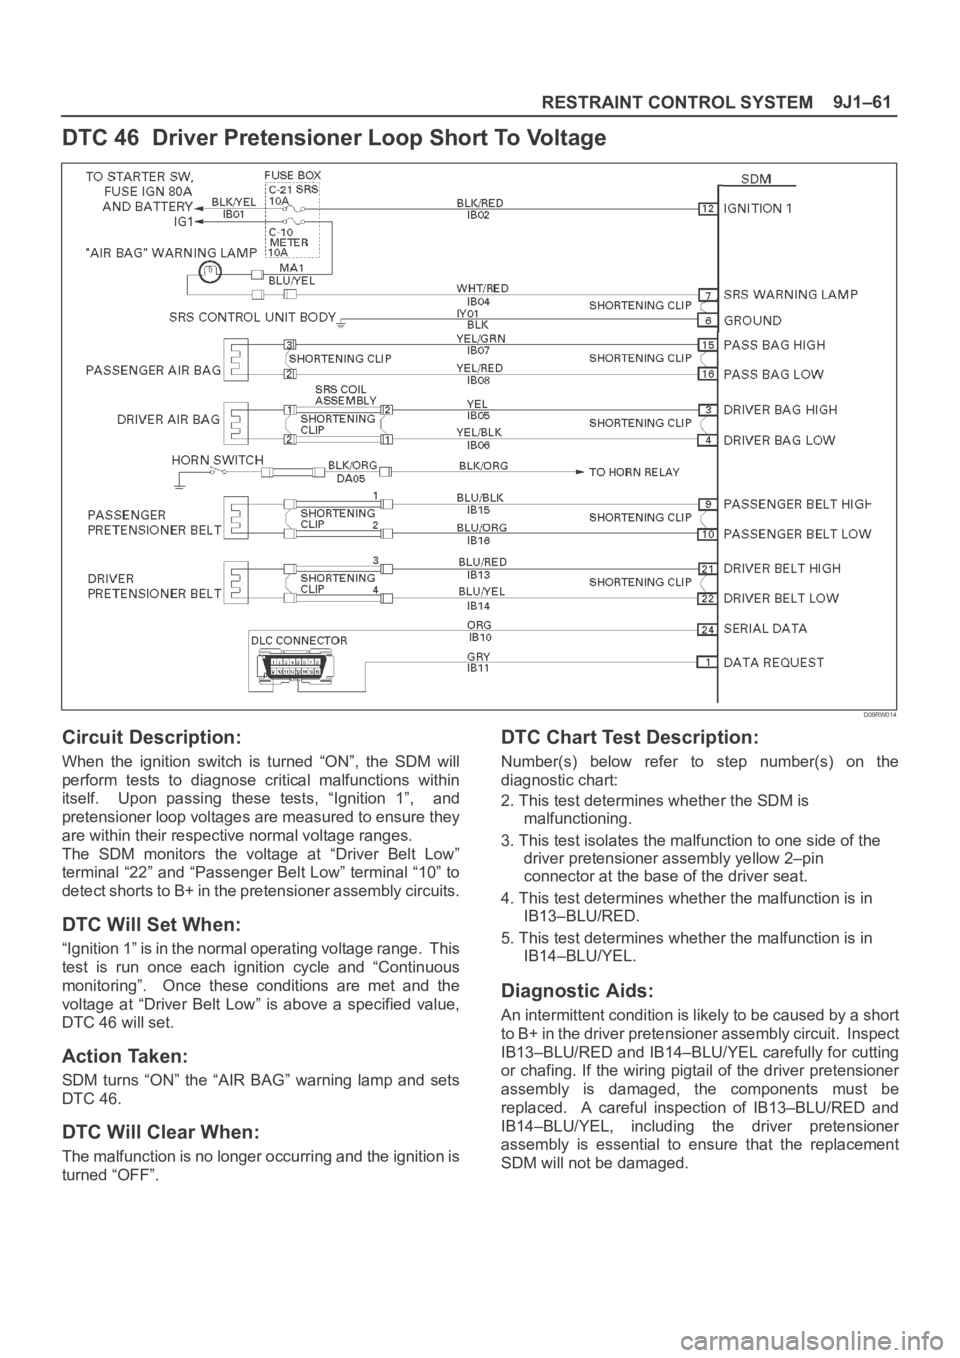
DTC 46 Driver Pretensioner Loop Short To Voltage
D09RW014
Circuit Description:
When the ignition switch is turned “ON”, the SDM will
perform tests to diagnose critical malfunctions within
itself. Upon passing these tests, “Ignition 1”, and
pretensioner loop voltages are measured to ensure they
are within their respective normal voltage ranges.
The SDM monitors the voltage at “Driver Belt Low”
terminal “22” and “Passenger Belt Low” terminal “10” to
detect shorts to B+ in the pretensioner assembly circuits.
DTC Will Set When:
“Ignition 1” is in the normal operating voltage range. This
test is run once each ignition cycle and “Continuous
monitoring”. Once these conditions are met and the
voltage at “Driver Belt Low” is above a specified value,
DTC 46 will set.
Action Taken:
SDM turns “ON” the “AIR BAG” warning lamp and sets
DTC 46.
DTC Will Clear When:
The malfunction is no longer occurring and the ignition is
turned “OFF”.
DTC Chart Test Description:
Number(s) below refer to step number(s) on the
diagnostic chart:
2. This test determines whether the SDM is
malfunctioning.
3. This test isolates the malfunction to one side of the
driver pretensioner assembly yellow 2–pin
connector at the base of the driver seat.
4. This test determines whether the malfunction is in
IB13–BLU/RED.
5. This test determines whether the malfunction is in
IB14–BLU/YEL.
Diagnostic Aids:
An intermittent condition is likely to be caused by a short
to B+ in the driver pretensioner assembly circuit. Inspect
IB13–BLU/RED and IB14–BLU/YEL carefully for cutting
or chafing. If the wiring pigtail of the driver pretensioner
assembly is damaged, the components must be
replaced. A careful inspection of IB13–BLU/RED and
IB14–BLU/YEL, including the driver pretensioner
assembly is essential to ensure that the replacement
SDM will not be damaged.
Page 3549 of 6000
RESTRAINT CONTROL SYSTEM 9J1–62
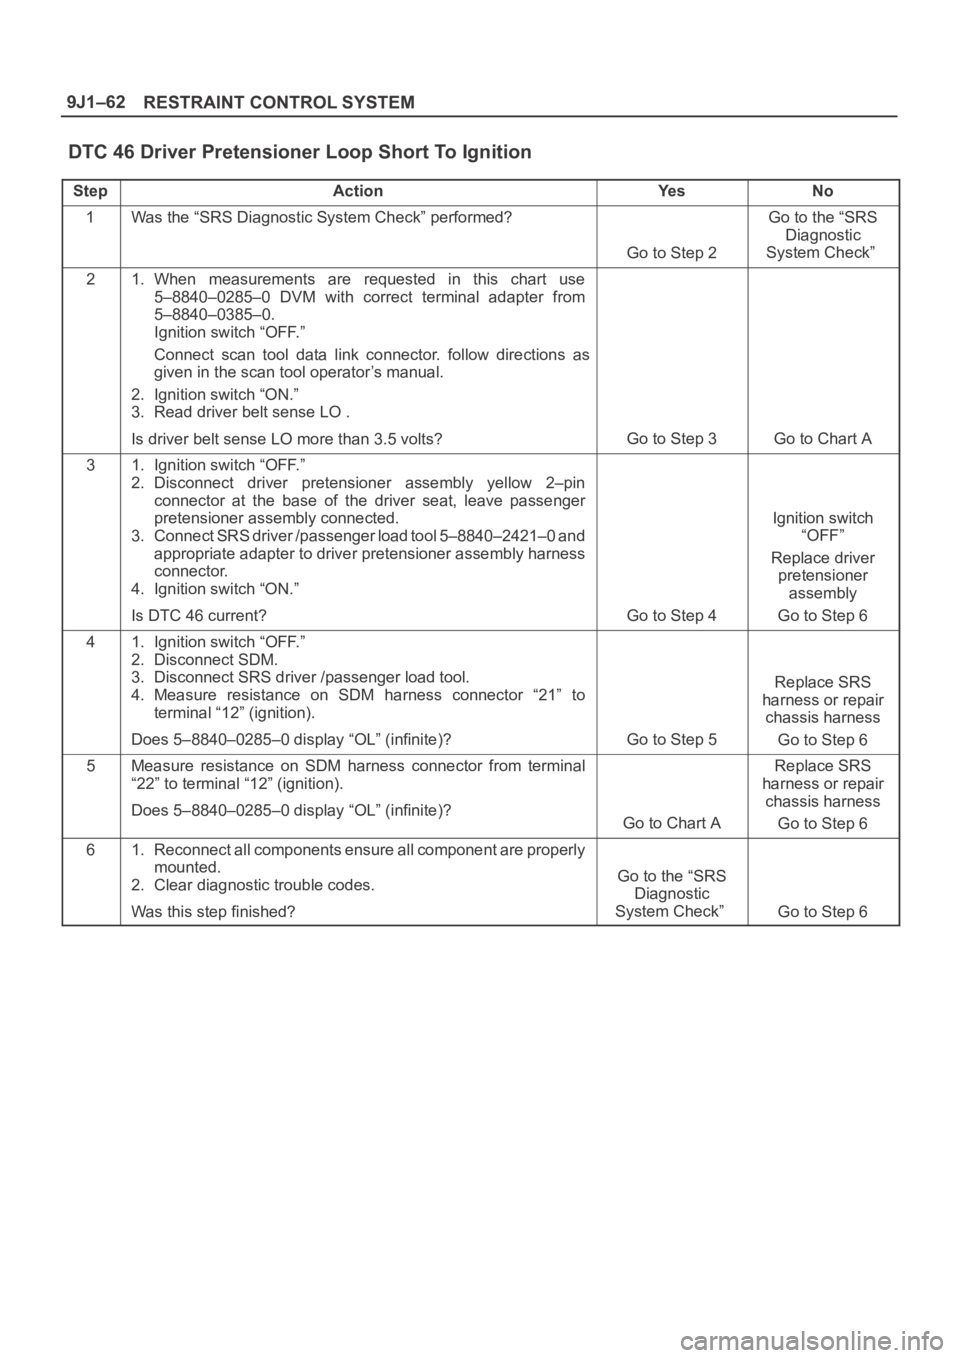
DTC 46 Driver Pretensioner Loop Short To Ignition
StepActionYe sNo
1Was the “SRS Diagnostic System Check” performed?
Go to Step 2
Go to the “SRS
Diagnostic
System Check”
21. When measurements are requested in this chart use
5–8840–0285–0 DVM with correct terminal adapter from
5–8840–0385–0.
Ignition switch “OFF.”
Connect scan tool data link connector. follow directions as
given in the scan tool operator’s manual.
2. Ignition switch “ON.”
3. Read driver belt sense LO .
Is driver belt sense LO more than 3.5 volts?
Go to Step 3Go to Chart A
31. Ignition switch “OFF.”
2. Disconnect driver pretensioner assembly yellow 2–pin
connector at the base of the driver seat, leave passenger
pretensioner assembly connected.
3. Connect SRS driver /passenger load tool 5–8840–2421–0 and
appropriate adapter to driver pretensioner assembly harness
connector.
4. Ignition switch “ON.”
Is DTC 46 current?
Go to Step 4
Ignition switch
“OFF”
Replace driver
pretensioner
assembly
Go to Step 6
41. Ignition switch “OFF.”
2. Disconnect SDM.
3. Disconnect SRS driver /passenger load tool.
4. Measure resistance on SDM harness connector “21” to
terminal “12” (ignition).
Does 5–8840–0285–0 display “OL” (infinite)?
Go to Step 5
Replace SRS
harness or repair
chassis harness
Go to Step 6
5Measure resistance on SDM harness connector from terminal
“22” to terminal “12” (ignition).
Does 5–8840–0285–0 display “OL” (infinite)?
Go to Chart A
Replace SRS
harness or repair
chassis harness
Go to Step 6
61. Reconnect all components ensure all component are properly
mounted.
2. Clear diagnostic trouble codes.
Was this step finished?
Go to the “SRS
Diagnostic
System Check”
Go to Step 6
Page 3551 of 6000
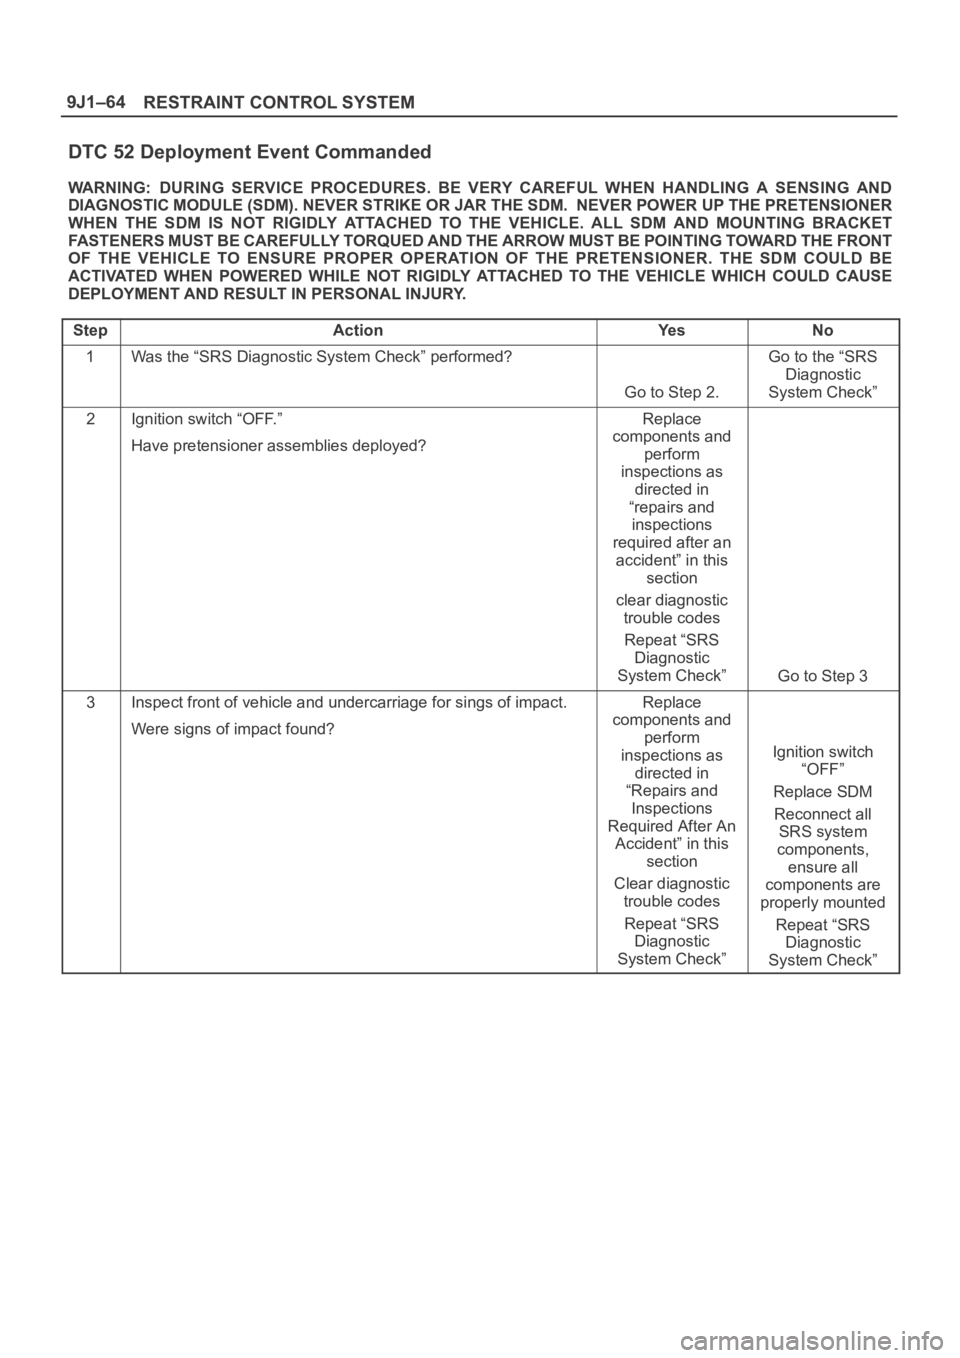
RESTRAINT CONTROL SYSTEM 9J1–64
DTC 52 Deployment Event Commanded
WARNING: DURING SERVICE PROCEDURES. BE VERY CAREFUL WHEN HANDLING A SENSING AND
DIAGNOSTIC MODULE (SDM). NEVER STRIKE OR JAR THE SDM. NEVER POWER UP THE PRETENSIONER
WHEN THE SDM IS NOT RIGIDLY ATTACHED TO THE VEHICLE. ALL SDM AND MOUNTING BRACKET
FASTENERS MUST BE CAREFULLY TORQUED AND THE ARROW MUST BE POINTING TOWARD THE FRONT
OF THE VEHICLE TO ENSURE PROPER OPERATION OF THE PRETENSIONER. THE SDM COULD BE
ACTIVATED WHEN POWERED WHILE NOT RIGIDLY ATTACHED TO THE VEHICLE WHICH COULD CAUSE
DEPLOYMENT AND RESULT IN PERSONAL INJURY.
Step
ActionYe sNo
1Was the “SRS Diagnostic System Check” performed?
Go to Step 2.
Go to the “SRS
Diagnostic
System Check”
2Ignition switch “OFF.”
Have pretensioner assemblies deployed?Replace
components and
perform
inspections as
directed in
“repairs and
inspections
required after an
accident” in this
section
clear diagnostic
trouble codes
Repeat “SRS
Diagnostic
System Check”
Go to Step 3
3Inspect front of vehicle and undercarriage for sings of impact.
Were signs of impact found?Replace
components and
perform
inspections as
directed in
“Repairs and
Inspections
Required After An
Accident” in this
section
Clear diagnostic
trouble codes
Repeat “SRS
Diagnostic
System Check”
Ignition switch
“OFF”
Replace SDM
Reconnect all
SRS system
components,
ensure all
components are
properly mounted
Repeat “SRS
Diagnostic
System Check”
Page 3566 of 6000
PAGE BACK PAGE NEXT
THIS MALUAL INCLUDES THE FOLLOWING SECTIONS:
6VD1/6VE1
SECTION No. CONTRNTS
6A ENGINE MECHANICAL
6B ENGINE COOLING
6C ENGINE FUEL
6D1 ENGINE ELECTRICAL
6D2 IGNITION SYSTEM
6D3 STARTING AND CHARGING SYSTEM
6E ENGINE DRIVEABILITY AND EMISSIONS
6F ENGINE EXHAUST
6G ENGINE LUBRICATION
6H ENGINE SPEED CONTROL SYSTEM
6J INDUCTION
HOME
6A
6B
6C
6D1
6D2
6D3
6E
6F
6G
6H
6J
Page 3720 of 6000
Ignition swich
"ON"
Time
Blower voltage to turn
on the cooling
7 SEC maximum3 SEC
100%
(MAX HI)
33.5%
(LO)5.32%/S
C06RY00001
33.5%
(LO)
2.63%/S
Mode
DEF
Auto
Mode
100%
(MAX HI)
Ignition
switch "ON"
Thermo Unit 58¡C(Gasoline)
52¡C(Diesel) Time
840RY00009