1998 OPEL FRONTERA display
[x] Cancel search: displayPage 3507 of 6000
RESTRAINT CONTROL SYSTEM 9J1–20
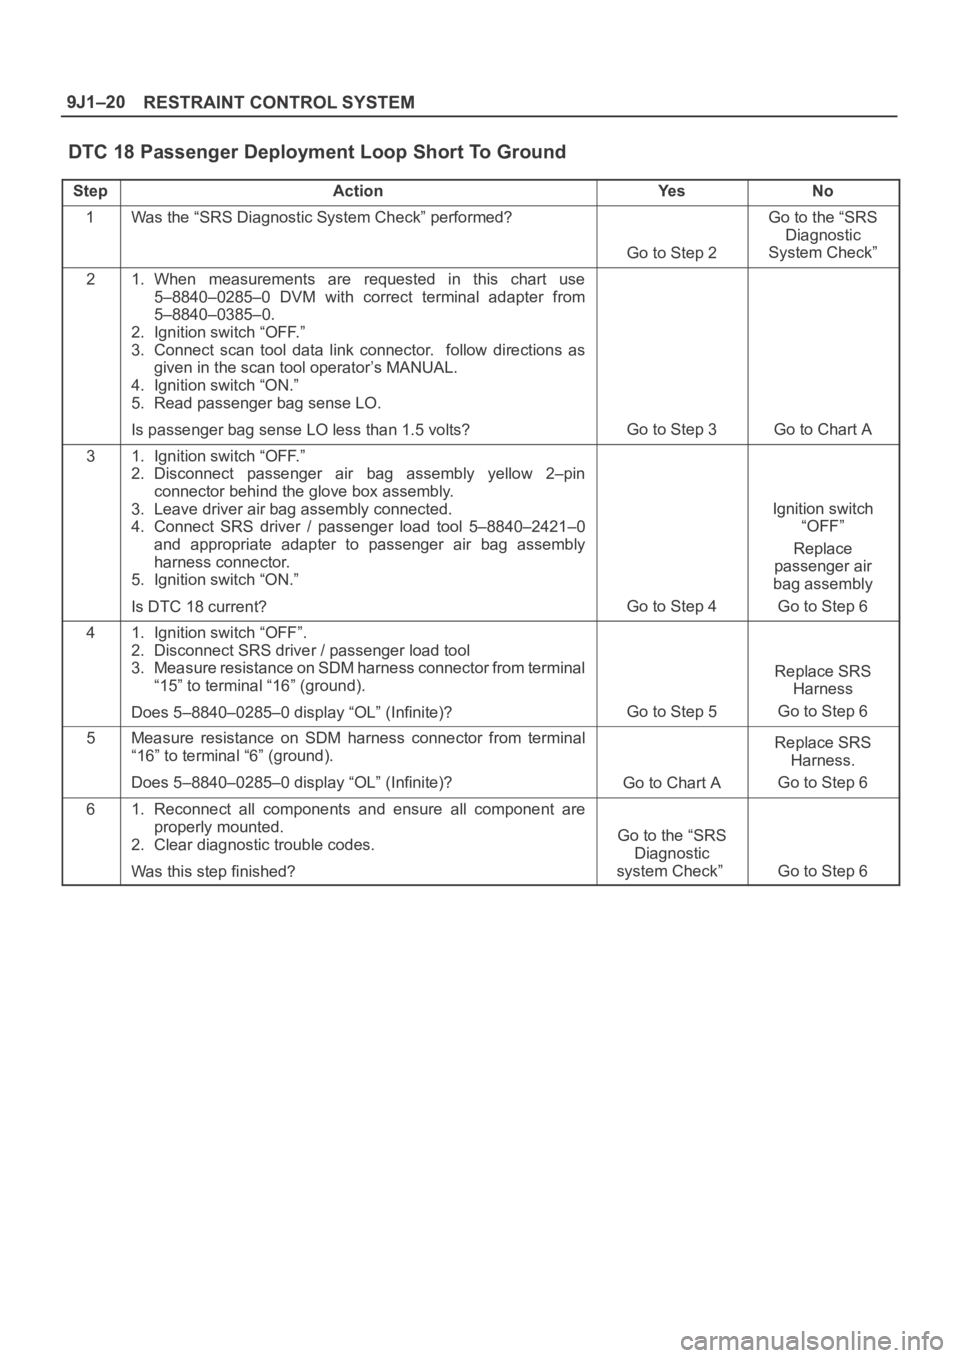
DTC 18 Passenger Deployment Loop Short To Ground
StepActionYe sNo
1Was the “SRS Diagnostic System Check” performed?
Go to Step 2
Go to the “SRS
Diagnostic
System Check”
21. When measurements are requested in this chart use
5–8840–0285–0 DVM with correct terminal adapter from
5–8840–0385–0.
2. Ignition switch “OFF.”
3. Connect scan tool data link connector. follow directions as
given in the scan tool operator’s MANUAL.
4. Ignition switch “ON.”
5. Read passenger bag sense LO.
Is passenger bag sense LO less than 1.5 volts?
Go to Step 3Go to Chart A
31. Ignition switch “OFF.”
2. Disconnect passenger air bag assembly yellow 2–pin
connector behind the glove box assembly.
3. Leave driver air bag assembly connected.
4. Connect SRS driver / passenger load tool 5–8840–2421–0
and appropriate adapter to passenger air bag assembly
harness connector.
5. Ignition switch “ON.”
Is DTC 18 current?
Go to Step 4
Ignition switch
“OFF”
Replace
passenger air
bag assembly
Go to Step 6
41. Ignition switch “OFF”.
2. Disconnect SRS driver / passenger load tool
3. Measure resistance on SDM harness connector from terminal
“15” to terminal “16” (ground).
Does 5–8840–0285–0 display “OL” (Infinite)?
Go to Step 5
Replace SRS
Harness
Go to Step 6
5Measure resistance on SDM harness connector from terminal
“16” to terminal “6” (ground).
Does 5–8840–0285–0 display “OL” (Infinite)?
Go to Chart A
Replace SRS
Harness.
Go to Step 6
61. Reconnect all components and ensure all component are
properly mounted.
2. Clear diagnostic trouble codes.
Was this step finished?
Go to the “SRS
Diagnostic
system Check”
Go to Step 6
Page 3509 of 6000
RESTRAINT CONTROL SYSTEM 9J1–22
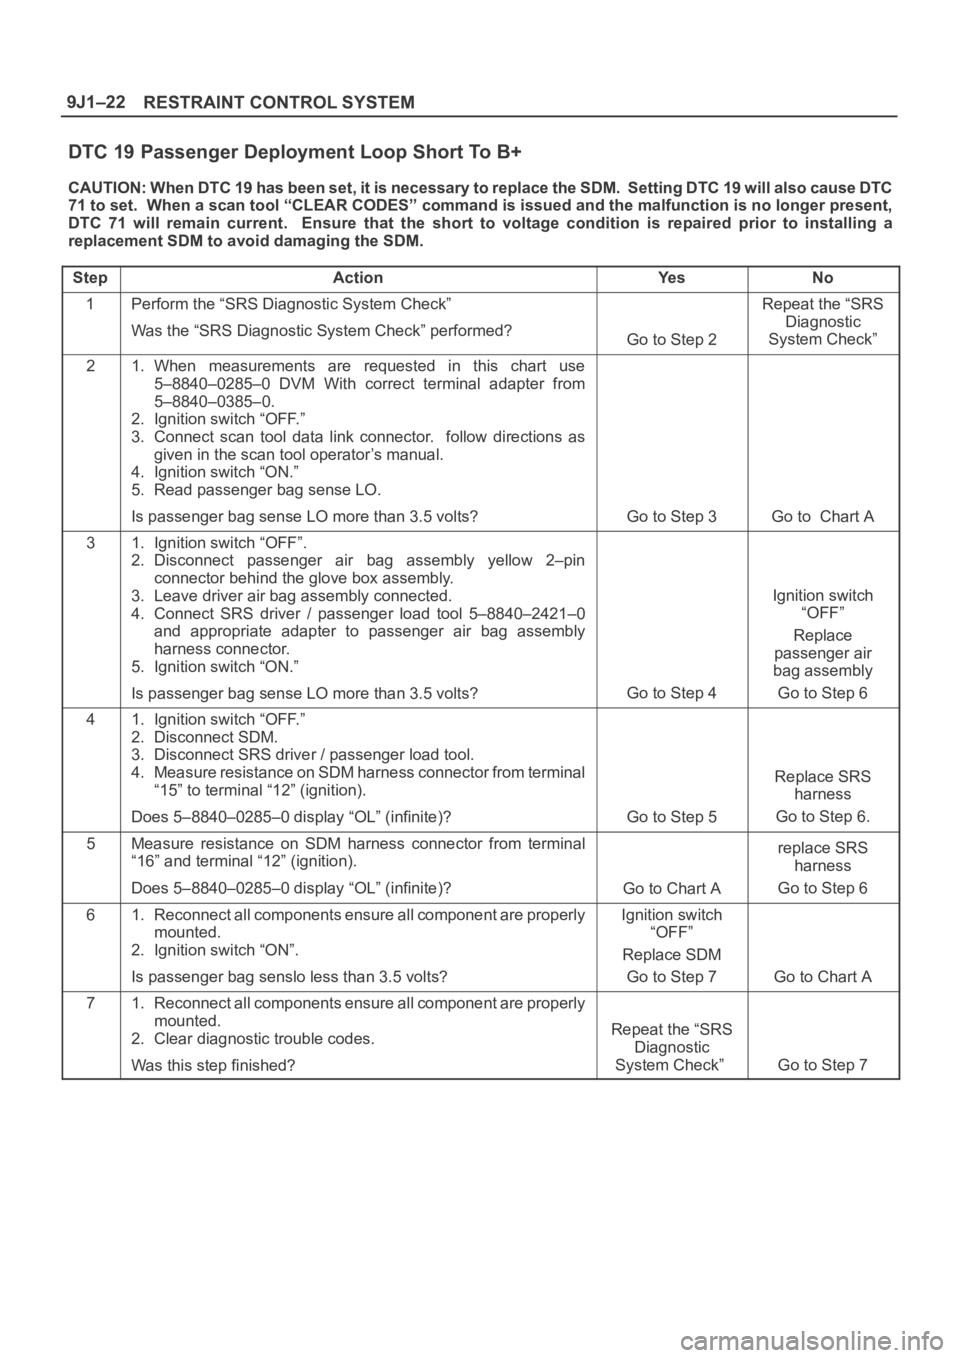
DTC 19 Passenger Deployment Loop Short To B+
CAUTION: When DTC 19 has been set, it is necessary to replace the SDM. Setting DTC 19 will also cause DTC
71 to set. When a scan tool “CLEAR CODES” command is issued and the malfunction is no longer present,
DTC 71 will remain current. Ensure that the short to voltage condition is repaired prior to installing a
replacement SDM to avoid damaging the SDM.
Step
ActionYe sNo
1Perform the “SRS Diagnostic System Check”
Was the “SRS Diagnostic System Check” performed?
Go to Step 2
Repeat the “SRS
Diagnostic
System Check”
21. When measurements are requested in this chart use
5–8840–0285–0 DVM With correct terminal adapter from
5–8840–0385–0.
2. Ignition switch “OFF.”
3. Connect scan tool data link connector. follow directions as
given in the scan tool operator’s manual.
4. Ignition switch “ON.”
5. Read passenger bag sense LO.
Is passenger bag sense LO more than 3.5 volts?
Go to Step 3Go to Chart A
31. Ignition switch “OFF”.
2. Disconnect passenger air bag assembly yellow 2–pin
connector behind the glove box assembly.
3. Leave driver air bag assembly connected.
4. Connect SRS driver / passenger load tool 5–8840–2421–0
and appropriate adapter to passenger air bag assembly
harness connector.
5. Ignition switch “ON.”
Is passenger bag sense LO more than 3.5 volts?
Go to Step 4
Ignition switch
“OFF”
Replace
passenger air
bag assembly
Go to Step 6
41. Ignition switch “OFF.”
2. Disconnect SDM.
3. Disconnect SRS driver / passenger load tool.
4. Measure resistance on SDM harness connector from terminal
“15” to terminal “12” (ignition).
Does 5–8840–0285–0 display “OL” (infinite)?
Go to Step 5
Replace SRS
harness
Go to Step 6.
5Measure resistance on SDM harness connector from terminal
“16” and terminal “12” (ignition).
Does 5–8840–0285–0 display “OL” (infinite)?
Go to Chart A
replace SRS
harness
Go to Step 6
61. Reconnect all components ensure all component are properly
mounted.
2. Ignition switch “ON”.
Is passenger bag senslo less than 3.5 volts?Ignition switch
“OFF”
Replace SDM
Go to Step 7
Go to Chart A
71. Reconnect all components ensure all component are properly
mounted.
2. Clear diagnostic trouble codes.
Was this step finished?
Repeat the “SRS
Diagnostic
System Check”
Go to Step 7
Page 3517 of 6000
RESTRAINT CONTROL SYSTEM 9J1–30
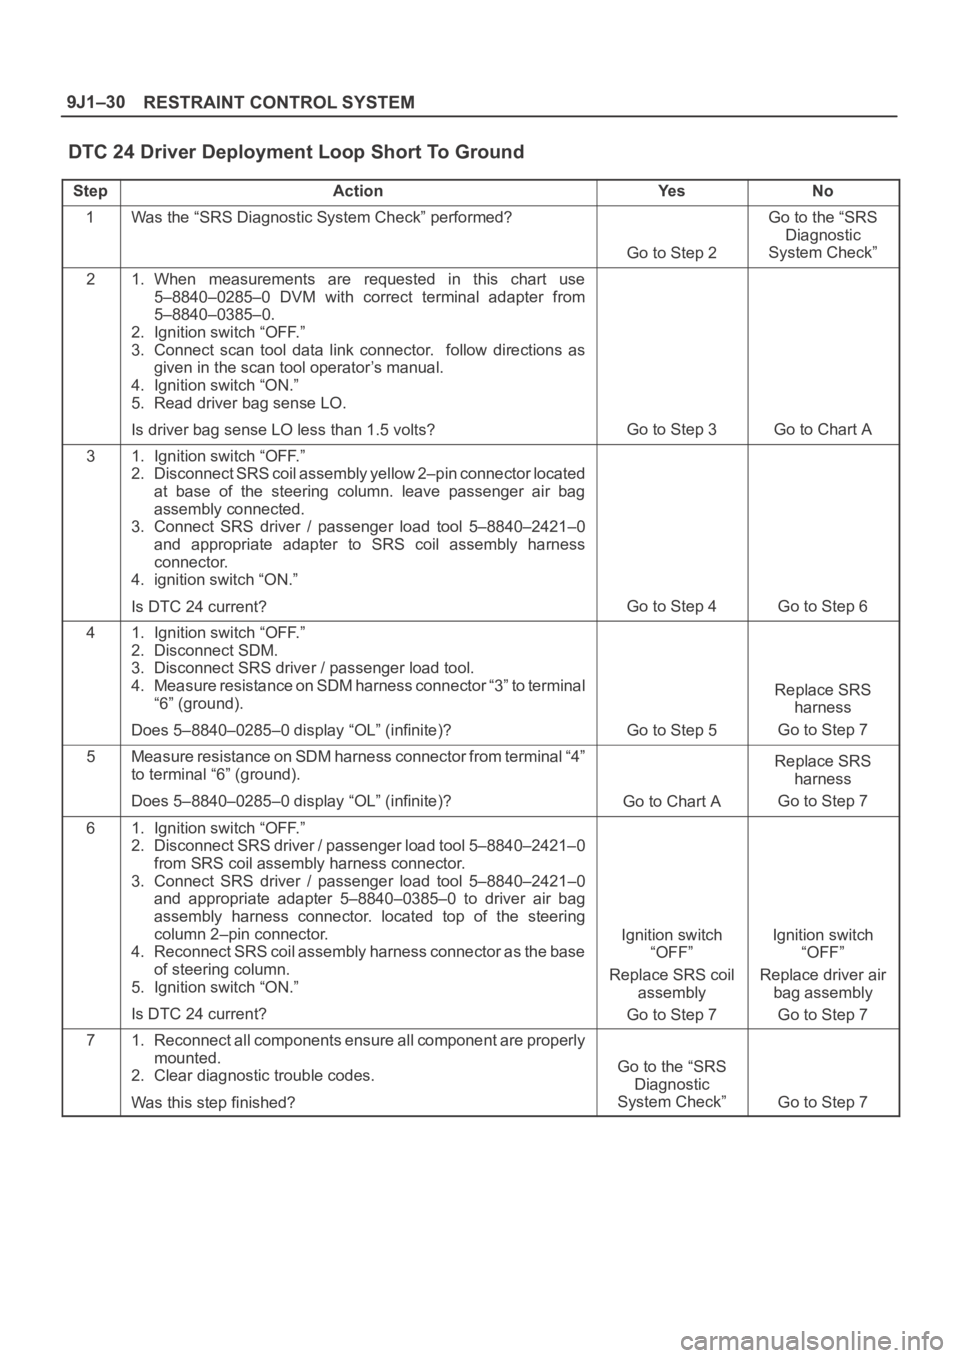
DTC 24 Driver Deployment Loop Short To Ground
StepActionYe sNo
1Was the “SRS Diagnostic System Check” performed?
Go to Step 2
Go to the “SRS
Diagnostic
System Check”
21. When measurements are requested in this chart use
5–8840–0285–0 DVM with correct terminal adapter from
5–8840–0385–0.
2. Ignition switch “OFF.”
3. Connect scan tool data link connector. follow directions as
given in the scan tool operator’s manual.
4. Ignition switch “ON.”
5. Read driver bag sense LO.
Is driver bag sense LO less than 1.5 volts?
Go to Step 3Go to Chart A
31. Ignition switch “OFF.”
2. Disconnect SRS coil assembly yellow 2–pin connector located
at base of the steering column. leave passenger air bag
assembly connected.
3. Connect SRS driver / passenger load tool 5–8840–2421–0
and appropriate adapter to SRS coil assembly harness
connector.
4. ignition switch “ON.”
Is DTC 24 current?
Go to Step 4Go to Step 6
41. Ignition switch “OFF.”
2. Disconnect SDM.
3. Disconnect SRS driver / passenger load tool.
4. Measure resistance on SDM harness connector “3” to terminal
“6” (ground).
Does 5–8840–0285–0 display “OL” (infinite)?
Go to Step 5
Replace SRS
harness
Go to Step 7
5Measure resistance on SDM harness connector from terminal “4”
to terminal “6” (ground).
Does 5–8840–0285–0 display “OL” (infinite)?
Go to Chart A
Replace SRS
harness
Go to Step 7
61. Ignition switch “OFF.”
2. Disconnect SRS driver / passenger load tool 5–8840–2421–0
from SRS coil assembly harness connector.
3. Connect SRS driver / passenger load tool 5–8840–2421–0
and appropriate adapter 5–8840–0385–0 to driver air bag
assembly harness connector. located top of the steering
column 2–pin connector.
4. Reconnect SRS coil assembly harness connector as the base
of steering column.
5. Ignition switch “ON.”
Is DTC 24 current?
Ignition switch
“OFF”
Replace SRS coil
assembly
Go to Step 7Ignition switch
“OFF”
Replace driver air
bag assembly
Go to Step 7
71. Reconnect all components ensure all component are properly
mounted.
2. Clear diagnostic trouble codes.
Was this step finished?
Go to the “SRS
Diagnostic
System Check”
Go to Step 7
Page 3519 of 6000
RESTRAINT CONTROL SYSTEM 9J1–32
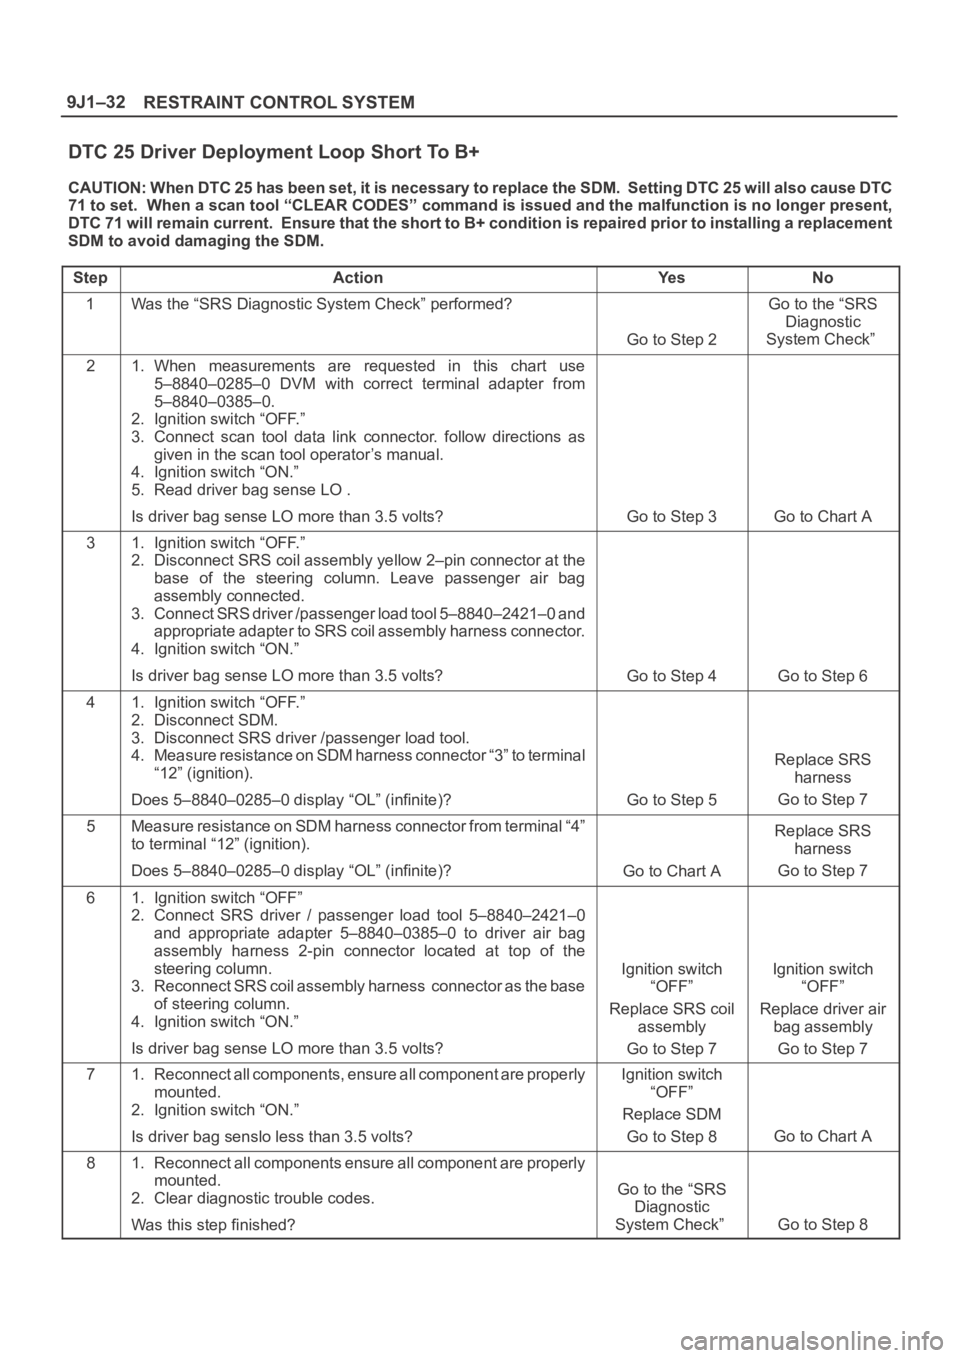
DTC 25 Driver Deployment Loop Short To B+
CAUTION: When DTC 25 has been set, it is necessary to replace the SDM. Setting DTC 25 will also cause DTC
71 to set. When a scan tool “CLEAR CODES” command is issued and the malfunction is no longer present,
DTC 71 will remain current. Ensure that the short to B+ condition is repaired prior to installing a replacement
SDM to avoid damaging the SDM.
Step
ActionYe sNo
1Was the “SRS Diagnostic System Check” performed?
Go to Step 2
Go to the “SRS
Diagnostic
System Check”
21. When measurements are requested in this chart use
5–8840–0285–0 DVM with correct terminal adapter from
5–8840–0385–0.
2. Ignition switch “OFF.”
3. Connect scan tool data link connector. follow directions as
given in the scan tool operator’s manual.
4. Ignition switch “ON.”
5. Read driver bag sense LO .
Is driver bag sense LO more than 3.5 volts?
Go to Step 3Go to Chart A
31. Ignition switch “OFF.”
2. Disconnect SRS coil assembly yellow 2–pin connector at the
base of the steering column. Leave passenger air bag
assembly connected.
3. Connect SRS driver /passenger load tool 5–8840–2421–0 and
appropriate adapter to SRS coil assembly harness connector.
4. Ignition switch “ON.”
Is driver bag sense LO more than 3.5 volts?
Go to Step 4Go to Step 6
41. Ignition switch “OFF.”
2. Disconnect SDM.
3. Disconnect SRS driver /passenger load tool.
4. Measure resistance on SDM harness connector “3” to terminal
“12” (ignition).
Does 5–8840–0285–0 display “OL” (infinite)?
Go to Step 5
Replace SRS
harness
Go to Step 7
5Measure resistance on SDM harness connector from terminal “4”
to terminal “12” (ignition).
Does 5–8840–0285–0 display “OL” (infinite)?
Go to Chart A
Replace SRS
harness
Go to Step 7
61. Ignition switch “OFF”
2. Connect SRS driver / passenger load tool 5–8840–2421–0
and appropriate adapter 5–8840–0385–0 to driver air bag
assembly harness 2-pin connector located at top of the
steering column.
3. Reconnect SRS coil assembly harness connector as the base
of steering column.
4. Ignition switch “ON.”
Is driver bag sense LO more than 3.5 volts?
Ignition switch
“OFF”
Replace SRS coil
assembly
Go to Step 7Ignition switch
“OFF”
Replace driver air
bag assembly
Go to Step 7
71. Reconnect all components, ensure all component are properly
mounted.
2. Ignition switch “ON.”
Is driver bag senslo less than 3.5 volts?Ignition switch
“OFF”
Replace SDM
Go to Step 8
Go to Chart A
81. Reconnect all components ensure all component are properly
mounted.
2. Clear diagnostic trouble codes.
Was this step finished?
Go to the “SRS
Diagnostic
System Check”
Go to Step 8
Page 3531 of 6000
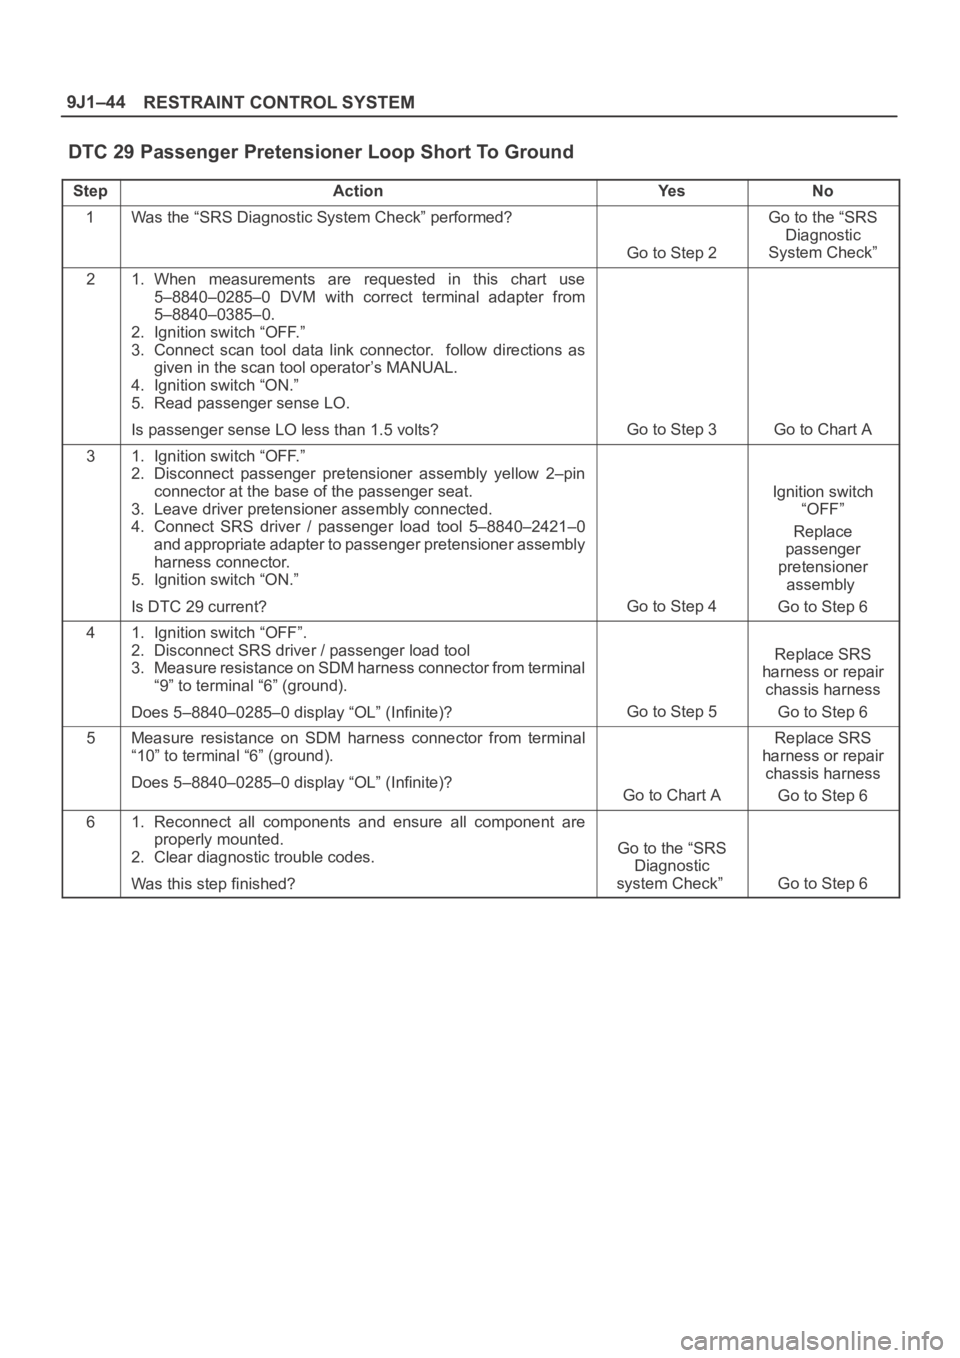
RESTRAINT CONTROL SYSTEM 9J1–44
DTC 29 Passenger Pretensioner Loop Short To Ground
StepActionYe sNo
1Was the “SRS Diagnostic System Check” performed?
Go to Step 2
Go to the “SRS
Diagnostic
System Check”
21. When measurements are requested in this chart use
5–8840–0285–0 DVM with correct terminal adapter from
5–8840–0385–0.
2. Ignition switch “OFF.”
3. Connect scan tool data link connector. follow directions as
given in the scan tool operator’s MANUAL.
4. Ignition switch “ON.”
5. Read passenger sense LO.
Is passenger sense LO less than 1.5 volts?
Go to Step 3Go to Chart A
31. Ignition switch “OFF.”
2. Disconnect passenger pretensioner assembly yellow 2–pin
connector at the base of the passenger seat.
3. Leave driver pretensioner assembly connected.
4. Connect SRS driver / passenger load tool 5–8840–2421–0
and appropriate adapter to passenger pretensioner assembly
harness connector.
5. Ignition switch “ON.”
Is DTC 29 current?
Go to Step 4
Ignition switch
“OFF”
Replace
passenger
pretensioner
assembly
Go to Step 6
41. Ignition switch “OFF”.
2. Disconnect SRS driver / passenger load tool
3. Measure resistance on SDM harness connector from terminal
“9” to terminal “6” (ground).
Does 5–8840–0285–0 display “OL” (Infinite)?
Go to Step 5
Replace SRS
harness or repair
chassis harness
Go to Step 6
5Measure resistance on SDM harness connector from terminal
“10” to terminal “6” (ground).
Does 5–8840–0285–0 display “OL” (Infinite)?
Go to Chart A
Replace SRS
harness or repair
chassis harness
Go to Step 6
61. Reconnect all components and ensure all component are
properly mounted.
2. Clear diagnostic trouble codes.
Was this step finished?
Go to the “SRS
Diagnostic
system Check”
Go to Step 6
Page 3537 of 6000
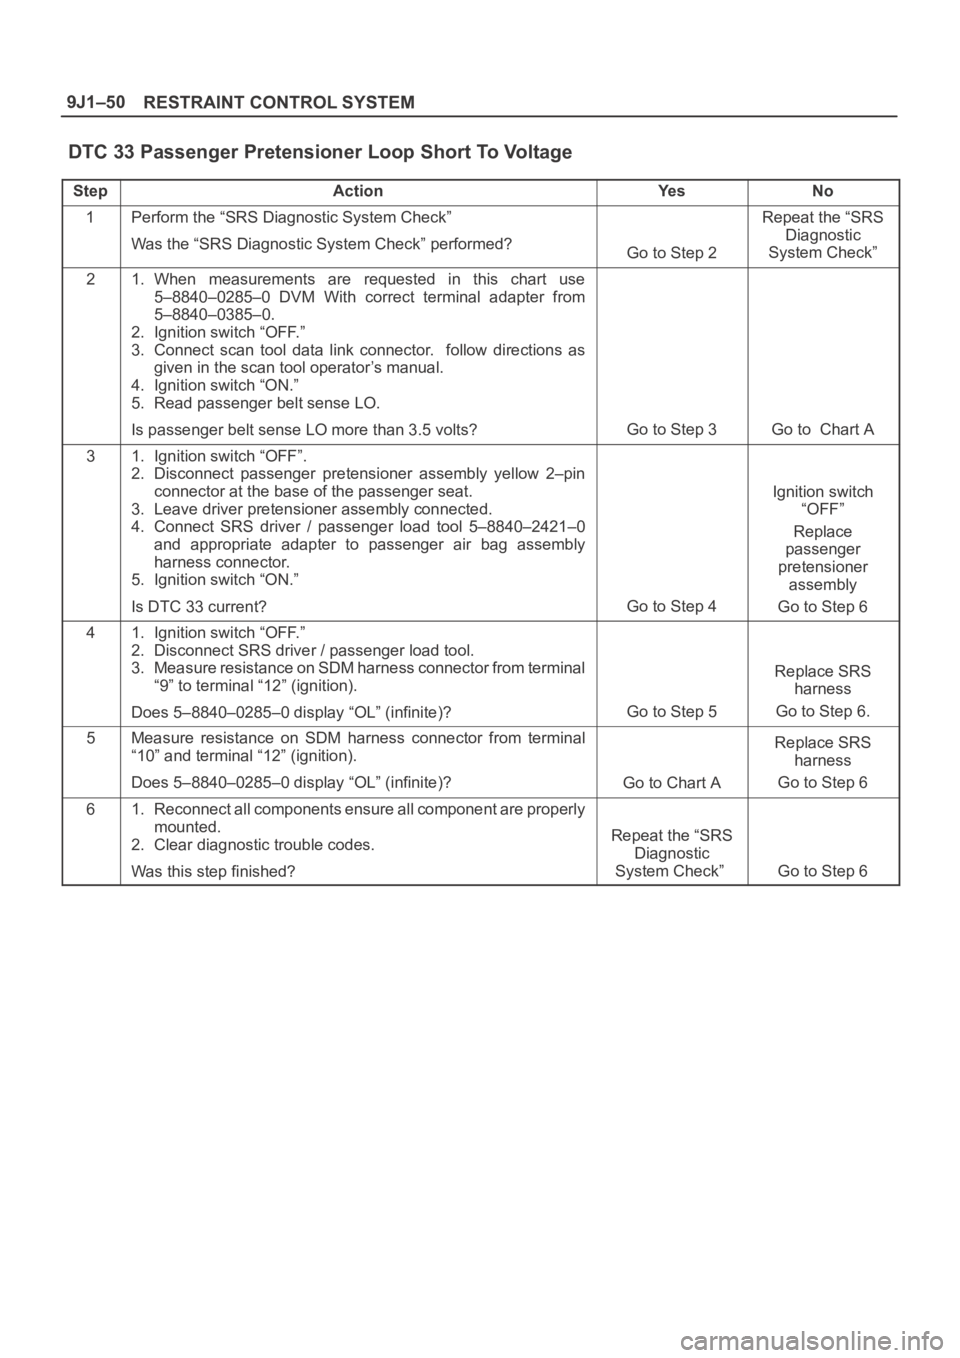
RESTRAINT CONTROL SYSTEM 9J1–50
DTC 33 Passenger Pretensioner Loop Short To Voltage
StepActionYe sNo
1Perform the “SRS Diagnostic System Check”
Was the “SRS Diagnostic System Check” performed?
Go to Step 2
Repeat the “SRS
Diagnostic
System Check”
21. When measurements are requested in this chart use
5–8840–0285–0 DVM With correct terminal adapter from
5–8840–0385–0.
2. Ignition switch “OFF.”
3. Connect scan tool data link connector. follow directions as
given in the scan tool operator’s manual.
4. Ignition switch “ON.”
5. Read passenger belt sense LO.
Is passenger belt sense LO more than 3.5 volts?
Go to Step 3Go to Chart A
31. Ignition switch “OFF”.
2. Disconnect passenger pretensioner assembly yellow 2–pin
connector at the base of the passenger seat.
3. Leave driver pretensioner assembly connected.
4. Connect SRS driver / passenger load tool 5–8840–2421–0
and appropriate adapter to passenger air bag assembly
harness connector.
5. Ignition switch “ON.”
Is DTC 33 current?
Go to Step 4
Ignition switch
“OFF”
Replace
passenger
pretensioner
assembly
Go to Step 6
41. Ignition switch “OFF.”
2. Disconnect SRS driver / passenger load tool.
3. Measure resistance on SDM harness connector from terminal
“9” to terminal “12” (ignition).
Does 5–8840–0285–0 display “OL” (infinite)?
Go to Step 5
Replace SRS
harness
Go to Step 6.
5Measure resistance on SDM harness connector from terminal
“10” and terminal “12” (ignition).
Does 5–8840–0285–0 display “OL” (infinite)?
Go to Chart A
Replace SRS
harness
Go to Step 6
61. Reconnect all components ensure all component are properly
mounted.
2. Clear diagnostic trouble codes.
Was this step finished?
Repeat the “SRS
Diagnostic
System Check”
Go to Step 6
Page 3547 of 6000

RESTRAINT CONTROL SYSTEM 9J1–60
DTC 45 Driver Pretensioner Loop Short To Ground
StepActionYe sNo
1Was the “SRS Diagnostic System Check” performed?
Go to Step 2
Go to the “SRS
Diagnostic
System Check”
21. When measurements are requested in this chart use
5–8840–0285–0 DVM with correct terminal adapter from
5–8840–0385–0.
2. Ignition switch “OFF.”
3. Connect scan tool data link connector. follow directions as
given in the scan tool operator’s manual.
4. Ignition switch “ON.”
5. Read driver belt sense LO.
Is driver belt sense LO less than 1.5 volts?
Go to Step 3Go to Chart A
31. Ignition switch “OFF.”
2. Disconnect driver pretensioner assembly yellow 2–pin
connector located at base of the driver seat, leave passenger
pretensioner assembly connected.
3. Connect SRS driver / passenger load tool 5–8840–2421–0
and appropriate adapter to driver pretensioner assembly
harness connector.
4. Ignition switch “ON.”
Is DTC 45 current?
Go to Step 4Go to Step 6
41. Ignition switch “OFF.”
2. Disconnect SDM.
3. Disconnect SRS driver / passenger load tool.
4. Measure resistance on SDM harness connector “21” to
terminal “6” (ground).
Does 5–8840–0285–0 display “OL” (infinite)?
Go to Step 5
Replace SRS
harness or repair
chassis harness
Go to Step 6
5Measure resistance on SDM harness connector from terminal
“22” to terminal “6” (ground).
Does 5–8840–0285–0 display “OL” (infinite)?
Go to Chart A
Replace SRS
harness or repair
chassis harness
Go to Step 6
61. Reconnect all components ensure all component are properly
mounted.
2. Clear diagnostic trouble codes.
Was this step finished?
Go to the “SRS
Diagnostic
System Check”
Go to Step 6
Page 3549 of 6000
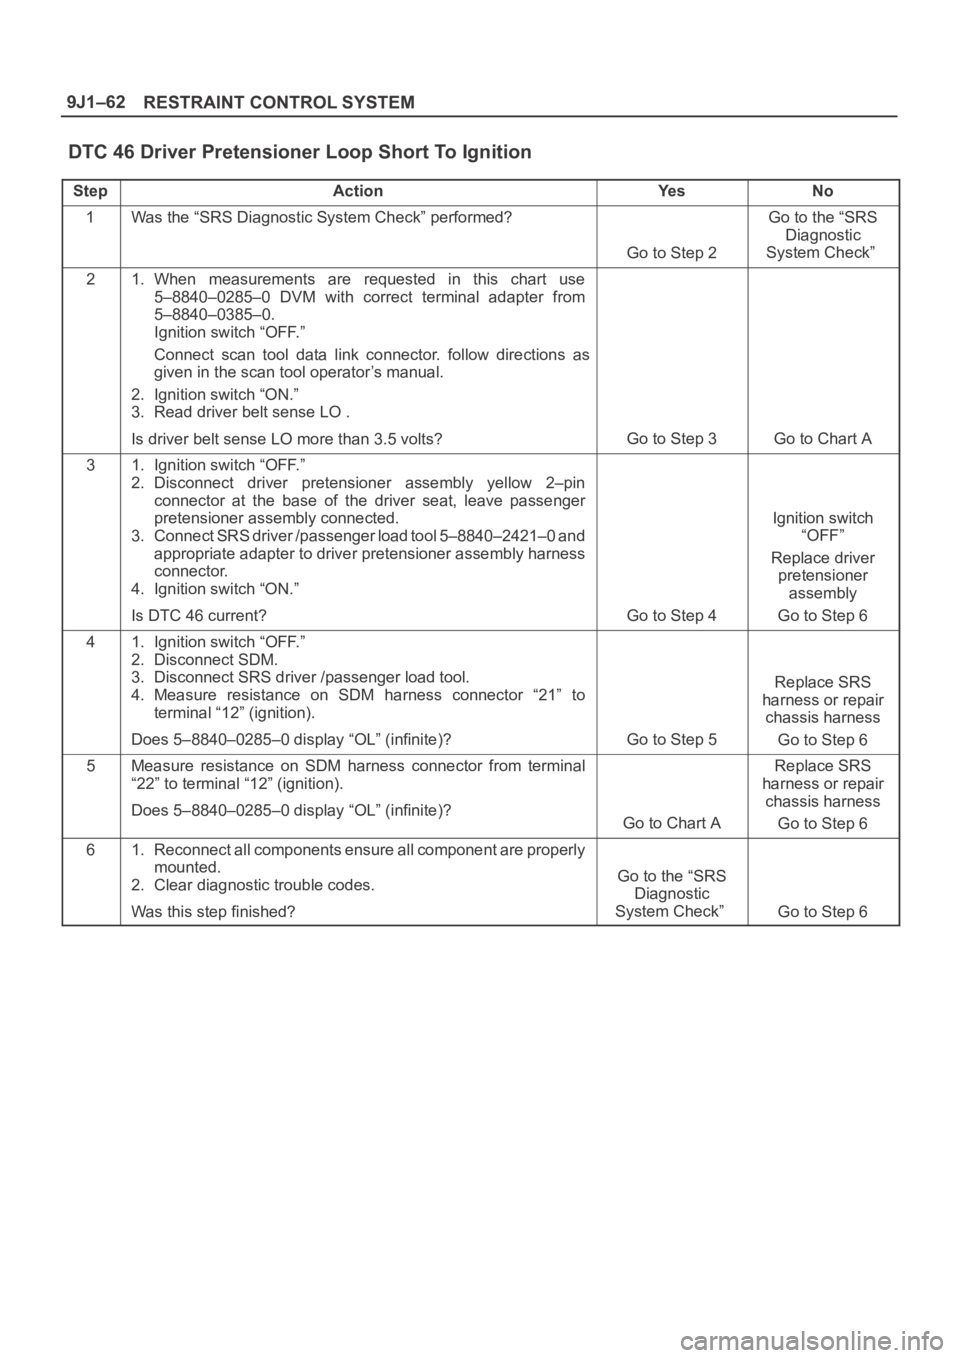
RESTRAINT CONTROL SYSTEM 9J1–62
DTC 46 Driver Pretensioner Loop Short To Ignition
StepActionYe sNo
1Was the “SRS Diagnostic System Check” performed?
Go to Step 2
Go to the “SRS
Diagnostic
System Check”
21. When measurements are requested in this chart use
5–8840–0285–0 DVM with correct terminal adapter from
5–8840–0385–0.
Ignition switch “OFF.”
Connect scan tool data link connector. follow directions as
given in the scan tool operator’s manual.
2. Ignition switch “ON.”
3. Read driver belt sense LO .
Is driver belt sense LO more than 3.5 volts?
Go to Step 3Go to Chart A
31. Ignition switch “OFF.”
2. Disconnect driver pretensioner assembly yellow 2–pin
connector at the base of the driver seat, leave passenger
pretensioner assembly connected.
3. Connect SRS driver /passenger load tool 5–8840–2421–0 and
appropriate adapter to driver pretensioner assembly harness
connector.
4. Ignition switch “ON.”
Is DTC 46 current?
Go to Step 4
Ignition switch
“OFF”
Replace driver
pretensioner
assembly
Go to Step 6
41. Ignition switch “OFF.”
2. Disconnect SDM.
3. Disconnect SRS driver /passenger load tool.
4. Measure resistance on SDM harness connector “21” to
terminal “12” (ignition).
Does 5–8840–0285–0 display “OL” (infinite)?
Go to Step 5
Replace SRS
harness or repair
chassis harness
Go to Step 6
5Measure resistance on SDM harness connector from terminal
“22” to terminal “12” (ignition).
Does 5–8840–0285–0 display “OL” (infinite)?
Go to Chart A
Replace SRS
harness or repair
chassis harness
Go to Step 6
61. Reconnect all components ensure all component are properly
mounted.
2. Clear diagnostic trouble codes.
Was this step finished?
Go to the “SRS
Diagnostic
System Check”
Go to Step 6