Page 1213 of 6000

6E–96
ENGINE DRIVEABILITY AND EMISSIONS
Knock Sensor (KS) System Check
(Engine Knock, Poor Performance, or Poor Economy)
StepActionVa l u e ( s )Ye sNo
1Is DTC P0325 or P0327 set?
—
Go to DTC
P0325 or
DTC P0327
Go to Step 2
2Run the engine at 1500 RPM.
Is there an internal engine knock?
—Go to Step 3Go to Step 4
3Repair the mechanical problem.
Is the action complete?
—Verify repair—
41. Install Tech 2.
2. Turn the ignition “ON.”
3. Cycle through the list until “Knock Retard” is
displayed.
Is knock retard at the specified value?
0Go to Step 6Go to Step 7
5Replace the PCM.
IMPORTANT:The replacement PCM must be
programmed. Refer to
UBS 98model year Immobilizer
Workshop Manual.
Is the action complete?—Verify repair—
61. Start the engine.
2. Monitor the knock retard display on Tech 2 while
changing the throttle setting to place different loads
on the engine.
Is knock retard at the specified value? (Turn the ignition
“OFF.”)
0Go to Step 9Go to Step 7
71. At the rear of the engine, behind the rear fuel
injector on the lift side, disconnect the 2-wire knock
sensor harness connector.
2. Attach the positive lead of DVM to B+.
3. On the m ain harness side of the connector, use th e
negative lead of the DVM to probe the connector pin
that is connected to the black wire.
Dose the DVM indicate the specified value?
(Reconnect the knock sensor harness.)
B+Go to Step 9Go to Step 8
8Repair the open black wire ground for the shield which
prevents stray electromagnetic pulses from affecting
the knock signal.
Is the action complete?
—Verify repair—
91. Reconnect the wire harness.
2. Set a DVM to AC voltage.
3. With the DVM, backprobe the PCM connector at
A2.
4. Tap the engine lift brackprobe with a socket
extension.
Did the DVM show an increase in AC voltage while
tapping on the lift bracket?
—System OKGo to Step 10
10Replace the knock sensor.
Is the action complete?
—Verify repair—
Page 1226 of 6000

6E–109 ENGINE DRIVEABILITY AND EMISSIONS
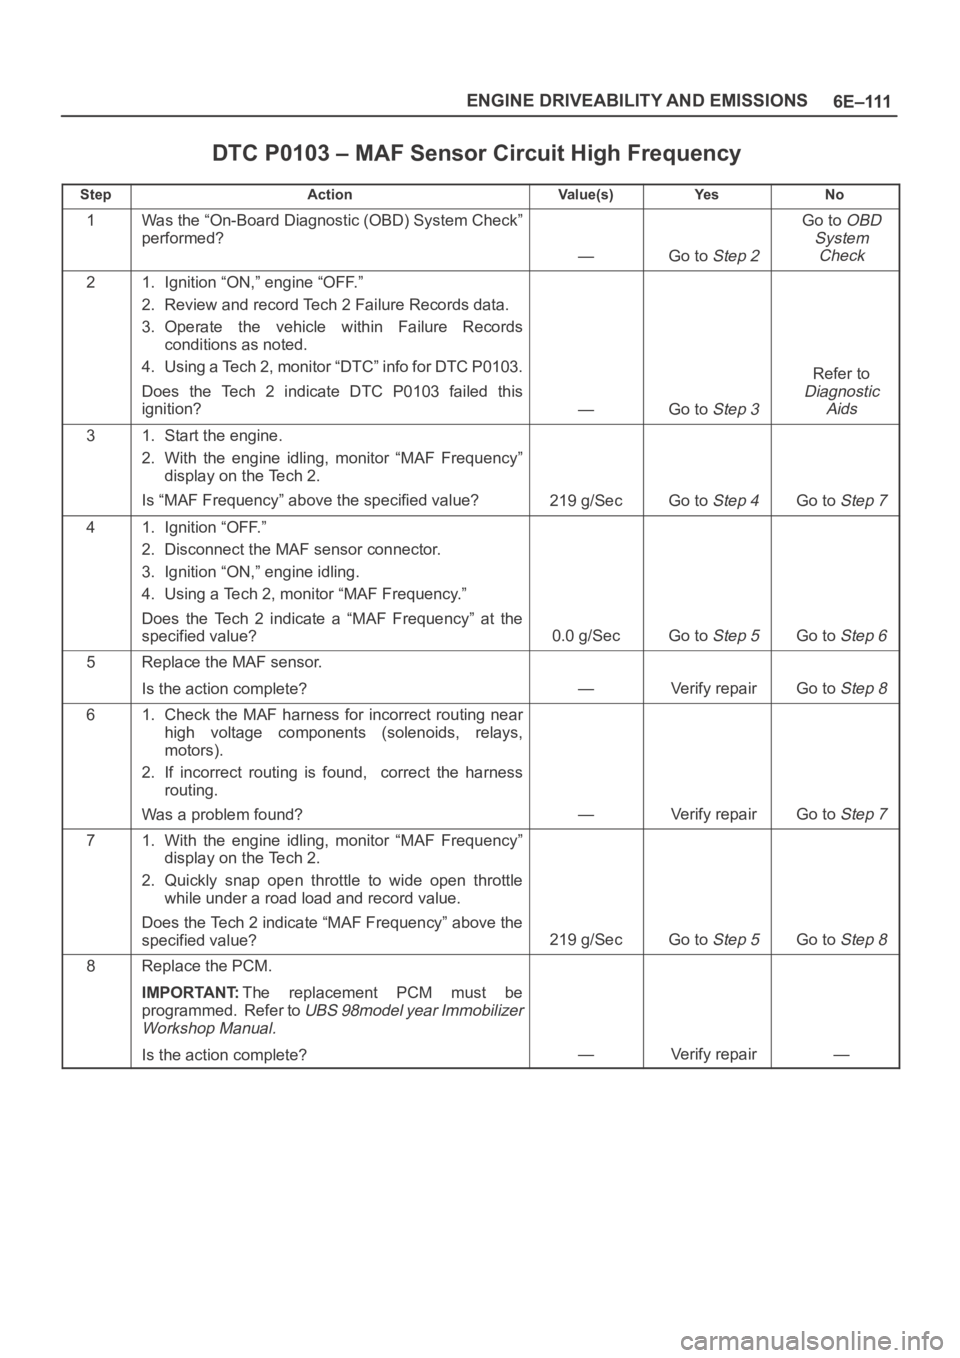
DTC P0102 – MAF Sensor Circuit Low Frequency
StepNo Ye s Va l u e ( s ) Action
91. Ignition “OFF.”
2. Disconnect the PCM white connector.
3. Ignition “ON.”
4. Check the MAF sensor signal circuit for a short to 5
volts.
Is the action complete?
—Verify repair—
101. Ignition “OFF.”
2. Disconnect the PCM white connector.
3. Ignition “ON.”
4. Check the MAF sensor signal circuit between the
PCM and the MAF sensor for an open, short to
ground, or short to the MAF ground circuit.
Is the action complete?
—Verify repairGo to Step 13
11Locate and repair the open in the ground circuit to the
MAF sensor.
Is the action complete?
—Verify repair—
12Locate and repair the open in the ignition feed circuit to
the MAF sensor.
Is the action complete?
—Verify repair—
13Replace the MAF sensor.
Is the action complete?
—Verify repairGo to Step 14
14Replace the PCM.
IMPORTANT:The replacement PCM must be
programmed. Refer to
UBS 98model year Immobilizer
Workshop Manual.
Is the action complete?—Verify repair—
Page 1228 of 6000

6E–111 ENGINE DRIVEABILITY AND EMISSIONS
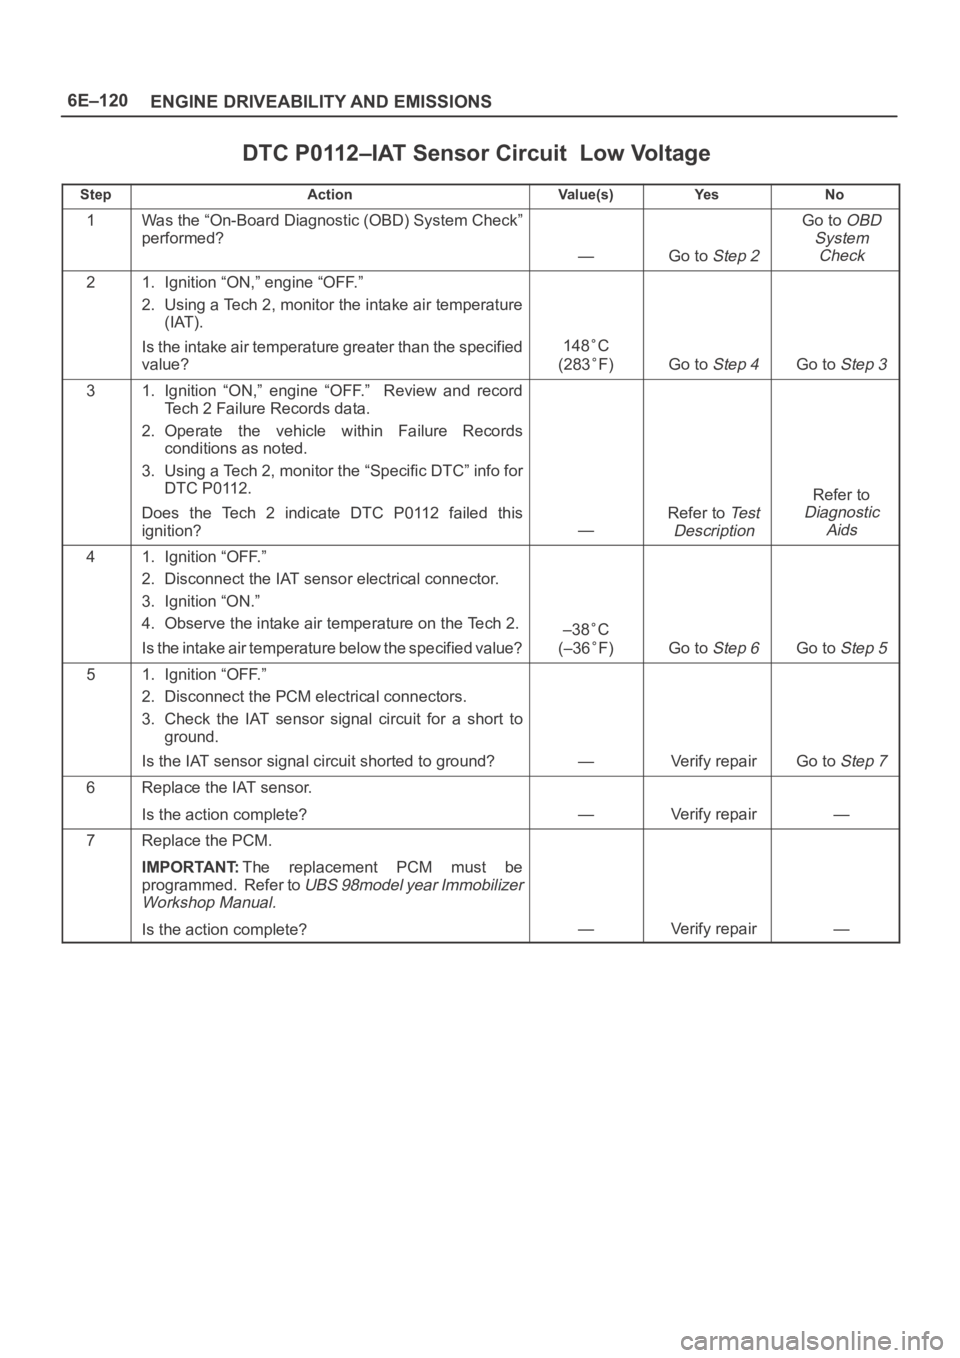
DTC P0103 – MAF Sensor Circuit High Frequency
StepActionVa l u e ( s )Ye sNo
1Was the “On-Board Diagnostic (OBD) System Check”
performed?
—Go to Step 2
Go to OBD
System
Check
21. Ignition “ON,” engine “OFF.”
2. Review and record Tech 2 Failure Records data.
3. Operate the vehicle within Failure Records
conditions as noted.
4. Using a Tech 2, monitor “DTC” info for DTC P0103.
Does the Tech 2 indicate DTC P0103 failed this
ignition?
—Go to Step 3
Refer to
Diagnostic
Aids
31. Start the engine.
2. With the engine idling, monitor “MAF Frequency”
display on the Tech 2.
Is “MAF Frequency” above the specified value?
219 g/SecGo to Step 4Go to Step 7
41. Ignition “OFF.”
2. Disconnect the MAF sensor connector.
3. Ignition “ON,” engine idling.
4. Using a Tech 2, monitor “MAF Frequency.”
Does the Tech 2 indicate a “MAF Frequency” at the
specified value?
0.0 g/SecGo to Step 5Go to Step 6
5Replace the MAF sensor.
Is the action complete?
—Verify repairGo to Step 8
61. Check the MAF harness for incorrect routing near
high voltage components (solenoids, relays,
motors).
2. If incorrect routing is found, correct the harness
routing.
Was a problem found?
—Verify repairGo to Step 7
71. With the engine idling, monitor “MAF Frequency”
display on the Tech 2.
2. Quickly snap open throttle to wide open throttle
while under a road load and record value.
Does the Tech 2 indicate “MAF Frequency” above the
specified value?
219 g/SecGo to Step 5Go to Step 8
8Replace the PCM.
IMPORTANT:The replacement PCM must be
programmed. Refer to
UBS 98model year Immobilizer
Workshop Manual.
Is the action complete?—Verify repair—
Page 1231 of 6000
6E–114
ENGINE DRIVEABILITY AND EMISSIONS
DTC P0107 – MAP Sensor Circuit Low Voltage
StepNo Ye s Va l u e ( s ) Action
9Check the MAP sensor signal circuit for a poor
connection at the PCM and the MAP sensor; replace
the terminal if necessary.
Did the terminal require replacement?
—Verify repairGo to Step 11
10Replace the MAP sensor.
Is the action complete?
—Verify repair—
11Replace the PCM.
IMPORTANT:The replacement PCM must be
programmed. Refer to
UBS 98model year Immobilizer
Workshop Manual.
Is the action complete?—Verify repair—
Page 1234 of 6000
6E–117 ENGINE DRIVEABILITY AND EMISSIONS
DTC P0108 – MAP Sensor Circuit High Voltage
StepNo Ye s Va l u e ( s ) Action
11Replace the PCM.
IMPORTANT:The replacement PCM must be
programmed. Refer to
UBS 98model year Immobilizer
Workshop Manual.
Is the action complete?—Verify Repair—
12Replace the MAP sensor.
Is the action complete?
—Verify repair—
Page 1237 of 6000

6E–120
ENGINE DRIVEABILITY AND EMISSIONS
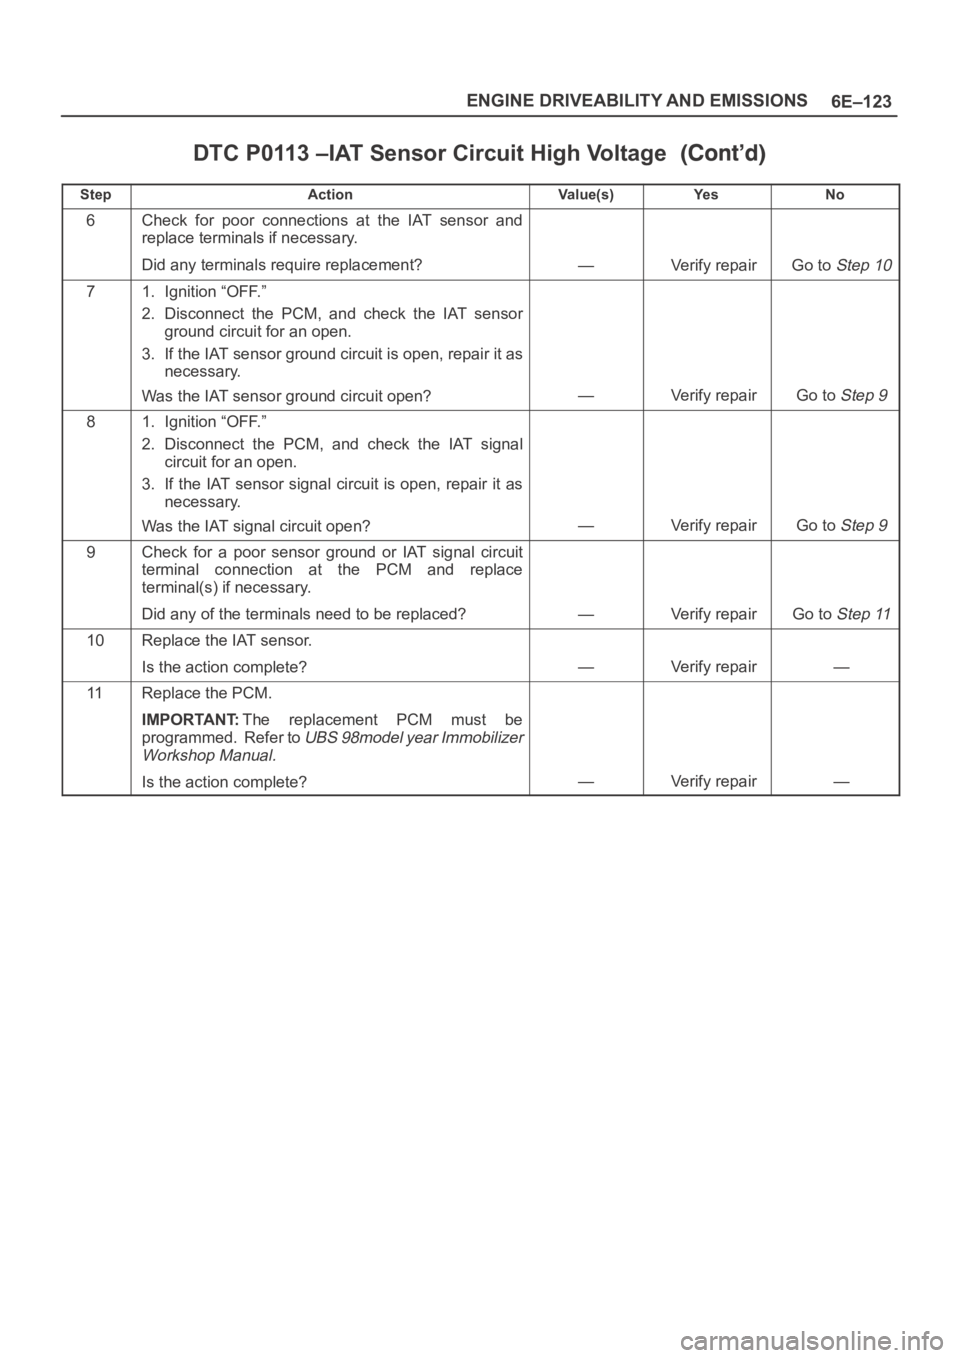
DTC P0112–IAT Sensor Circuit Low Voltage
StepActionVa l u e ( s )Ye sNo
1Was the “On-Board Diagnostic (OBD) System Check”
performed?
—Go to Step 2
Go to OBD
System
Check
21. Ignition “ON,” engine “OFF.”
2. Using a Tech 2, monitor the intake air temperature
(IAT).
Is the intake air temperature greater than the specified
value?
148C
(283
F)Go to Step 4Go to Step 3
31. Ignition “ON,” engine “OFF.” Review and record
Tech 2 Failure Records data.
2. Operate the vehicle within Failure Records
conditions as noted.
3. Using a Tech 2, monitor the “Specific DTC” info for
DTC P0112.
Does the Tech 2 indicate DTC P0112 failed this
ignition?
—
Refer to Te s t
Description
Refer to
Diagnostic
Aids
41. Ignition “OFF.”
2. Disconnect the IAT sensor electrical connector.
3. Ignition “ON.”
4. Observe the intake air temperature on the Tech 2.
Is the intake air temperature below the specified value?
–38C
(–36
F)Go to Step 6Go to Step 5
51. Ignition “OFF.”
2. Disconnect the PCM electrical connectors.
3. Check the IAT sensor signal circuit for a short to
ground.
Is the IAT sensor signal circuit shorted to ground?
—Verify repairGo to Step 7
6Replace the IAT sensor.
Is the action complete?
—Verify repair—
7Replace the PCM.
IMPORTANT:The replacement PCM must be
programmed. Refer to
UBS 98model year Immobilizer
Workshop Manual.
Is the action complete?—Verify repair—
Page 1240 of 6000

6E–123 ENGINE DRIVEABILITY AND EMISSIONS
DTC P0113 –IAT Sensor Circuit High Voltage
StepNo Ye s Va l u e ( s ) Action
6Check for poor connections at the IAT sensor and
replace terminals if necessary.
Did any terminals require replacement?
—Verify repairGo to Step 10
71. Ignition “OFF.”
2. Disconnect the PCM, and check the IAT sensor
ground circuit for an open.
3. If the IAT sensor ground circuit is open, repair it as
necessary.
Was the IAT sensor ground circuit open?
—Verify repairGo to Step 9
81. Ignition “OFF.”
2. Disconnect the PCM, and check the IAT signal
circuit for an open.
3. If the IAT sensor signal circuit is open, repair it as
necessary.
Was the IAT signal circuit open?
—Verify repairGo to Step 9
9Check for a poor sensor ground or IAT signal circuit
terminal connection at the PCM and replace
terminal(s) if necessary.
Did any of the terminals need to be replaced?
—Verify repairGo to Step 11
10Replace the IAT sensor.
Is the action complete?
—Verify repair—
11Replace the PCM.
IMPORTANT:The replacement PCM must be
programmed. Refer to
UBS 98model year Immobilizer
Workshop Manual.
Is the action complete?—Verify repair—
Page 1243 of 6000

6E–126
ENGINE DRIVEABILITY AND EMISSIONS
DTC P0117 – ECT Sensor Low Voltage
StepActionVa l u e ( s )Ye sNo
1Was the “On-Board Diagnostic (OBD) System Check”
performed?
—Go to Step 2
Go to OBD
System
Check
21. Ignition “ON,” engine “OFF.”
2. Observe the “Eng Cool Temp” display on the Tech 2.
Is the “Eng Cool Temp” below the specified value?
139C
(282
F)Go to Step 4Go to Step 3
31. Ignition “ON,” engine “OFF.”
2. Review and record Tech 2 Failure Records data.
3. Operate the vehicle within Failure Records
conditions as noted.
4. Using a Tech 2, monitor “Specific DTC” info for DTC
P0117.
Does the Tech 2 indicate DTC P0117 failed this
ignition?
—Go to Step 4
Refer to
Diagnostic
Aids
41. Disconnect the ECT sensor electrical connector.
2. Observe the “Eng Cool Temp” display on the Tech 2.
Is the “Eng Cool Temp” at the specified value?
–39C
(–38
F)Go to Step 6Go to Step 5
51. Ignition “OFF.”
2. Disconnect the PCM and check the ECT signal
circuit for a short to ground or a short to the sensor
ground circuit.
3. If the ECT signal circuit is shorted. repair it as
necessary.
Was the ECT signal circuit shorted to ground?
—Verify repairGo to Step 7
6Replace the ECT sensor.
Is the action complete?
—Verify repair—
7Replace the PCM.
IMPORTANT:The replacement PCM must be
programmed. Refer to
UBS 98model year Immobilizer
Workshop Manual.
Is the action complete?—Verify repair—