1998 OPEL FRONTERA transmission fluid
[x] Cancel search: transmission fluidPage 5748 of 6000
7A–59 AUTOMATIC TRANSMISSION (4L30–E)
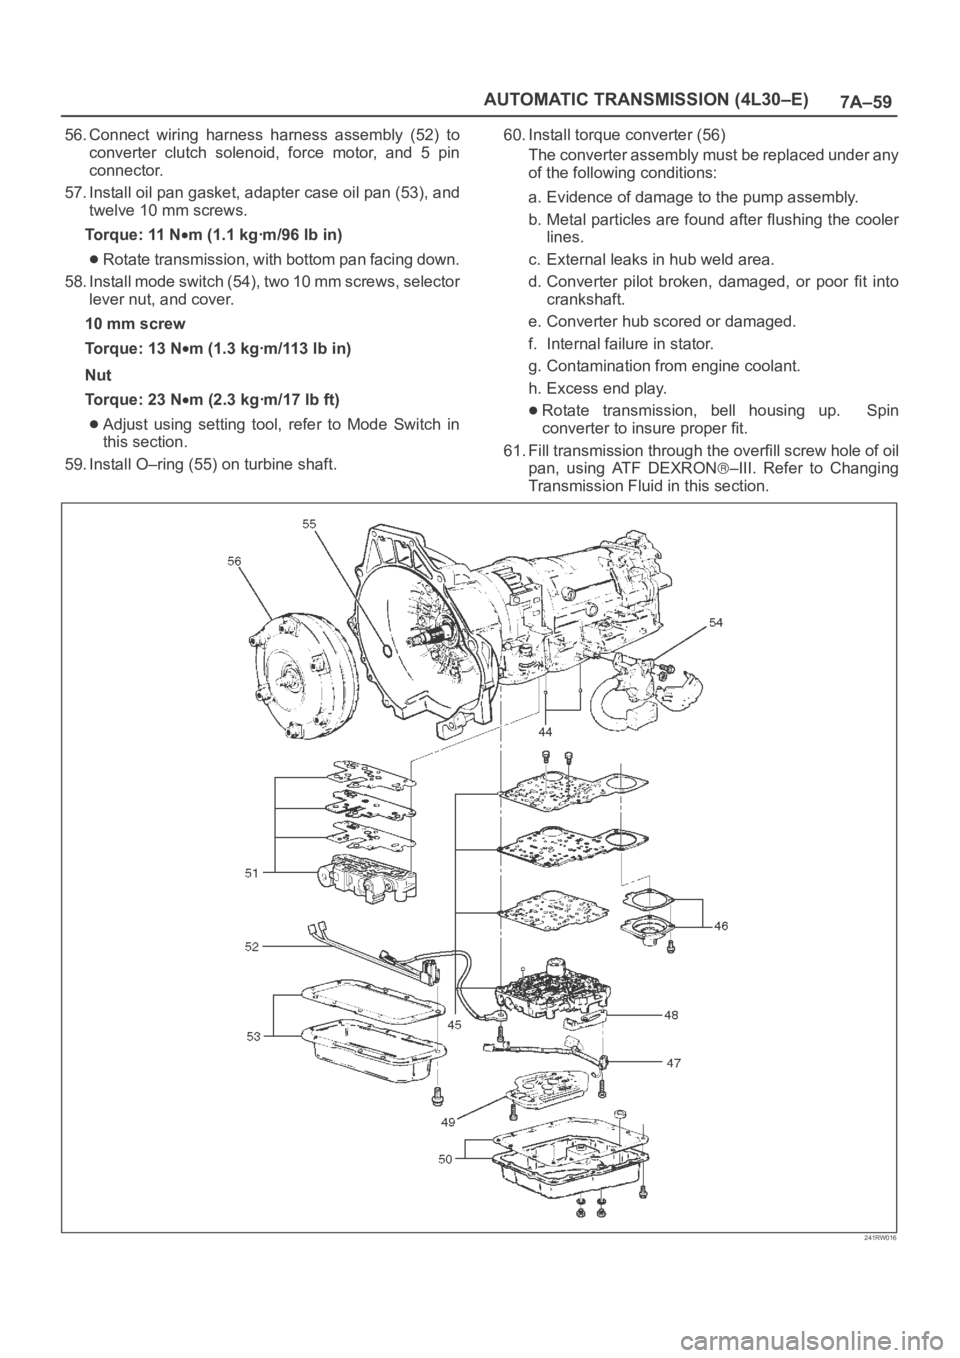
56. Connect wiring harness harness assembly (52) to
converter clutch solenoid, force motor, and 5 pin
connector.
57. Install oil pan gasket, adapter case oil pan (53), and
twelve 10 mm screws.
Torque: 11 N
m (1.1 kgꞏm/96 lb in)
Rotate transmission, with bottom pan facing down.
58. Install mode switch (54), two 10 mm screws, selector
lever nut, and cover.
10 mm screw
Torque: 13 N
m (1.3 kgꞏm/113 lb in)
Nut
Torque: 23 N
m (2.3 kgꞏm/17 lb ft)
Adjust using setting tool, refer to Mode Switch in
this section.
59. Install O–ring (55) on turbine shaft.60. Install torque converter (56)
The converter assembly must be replaced under any
of the following conditions:
a. Evidence of damage to the pump assembly.
b. Metal particles are found after flushing the cooler
lines.
c. External leaks in hub weld area.
d. Converter pilot broken, damaged, or poor fit into
crankshaft.
e. Converter hub scored or damaged.
f. Internal failure in stator.
g. Contamination from engine coolant.
h. Excess end play.Rotate transmission, bell housing up. Spin
converter to insure proper fit.
61. Fill transmission through the overfill screw hole of oil
pan, using ATF DEXRON
–III. Refer to Changing
Transmission Fluid in this section.
241RW016
Page 5756 of 6000
7A–67 AUTOMATIC TRANSMISSION (4L30–E)
Third Clutch
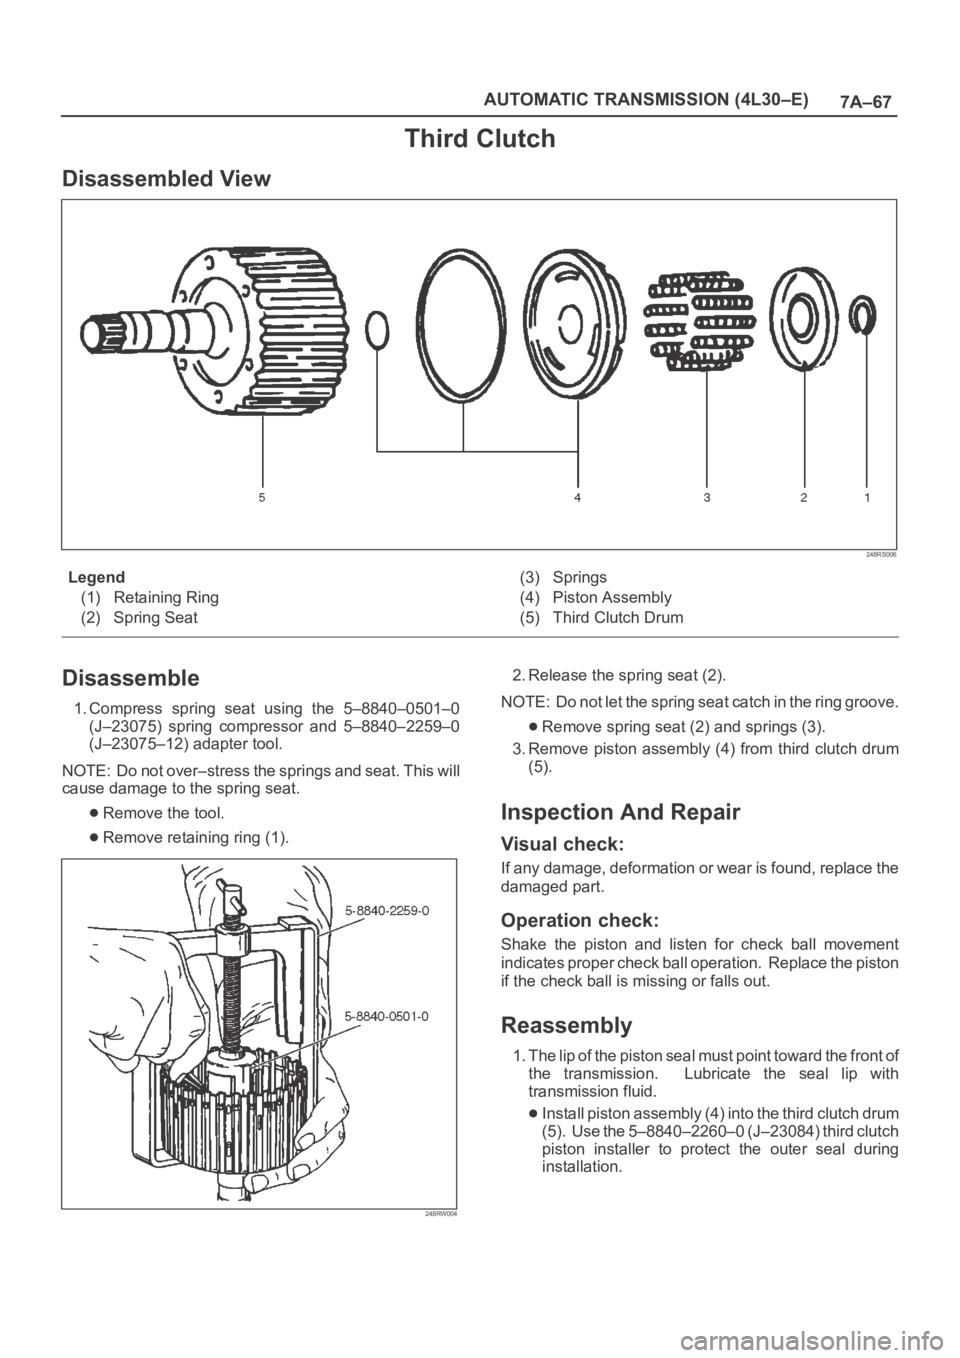
Disassembled View
248RS006
Legend
(1) Retaining Ring
(2) Spring Seat(3) Springs
(4) Piston Assembly
(5) Third Clutch Drum
Disassemble
1. Compress spring seat using the 5–8840–0501–0
(J–23075) spring compressor and 5–8840–2259–0
(J–23075–12) adapter tool.
NOTE: Do not over–stress the springs and seat. This will
cause damage to the spring seat.
Remove the tool.
Remove retaining ring (1).
248RW004
2. Release the spring seat (2).
NOTE: Do not let the spring seat catch in the ring groove.
Remove spring seat (2) and springs (3).
3. Remove piston assembly (4) from third clutch drum
(5).
Inspection And Repair
Visual check:
If any damage, deformation or wear is found, replace the
damaged part.
Operation check:
Shake the piston and listen for check ball movement
indicates proper check ball operation. Replace the piston
if the check ball is missing or falls out.
Reassembly
1. The lip of the piston seal must point toward the front of
the transmission. Lubricate the seal lip with
transmission fluid.
Install piston assembly (4) into the third clutch drum
(5). Use the 5–8840–2260–0 (J–23084) third clutch
piston installer to protect the outer seal during
installation.
Page 5760 of 6000
7A–71 AUTOMATIC TRANSMISSION (4L30–E)
Inspection And Repair
Visual Check:
If any damage, deformation or wear is found, replace the
damaged part.
Operation Check:
Shake the piston and listen for check ball movement.
Movement indicates proper check ball operation.
Replace the piston if the check ball is missing or falls out.
Reassembly
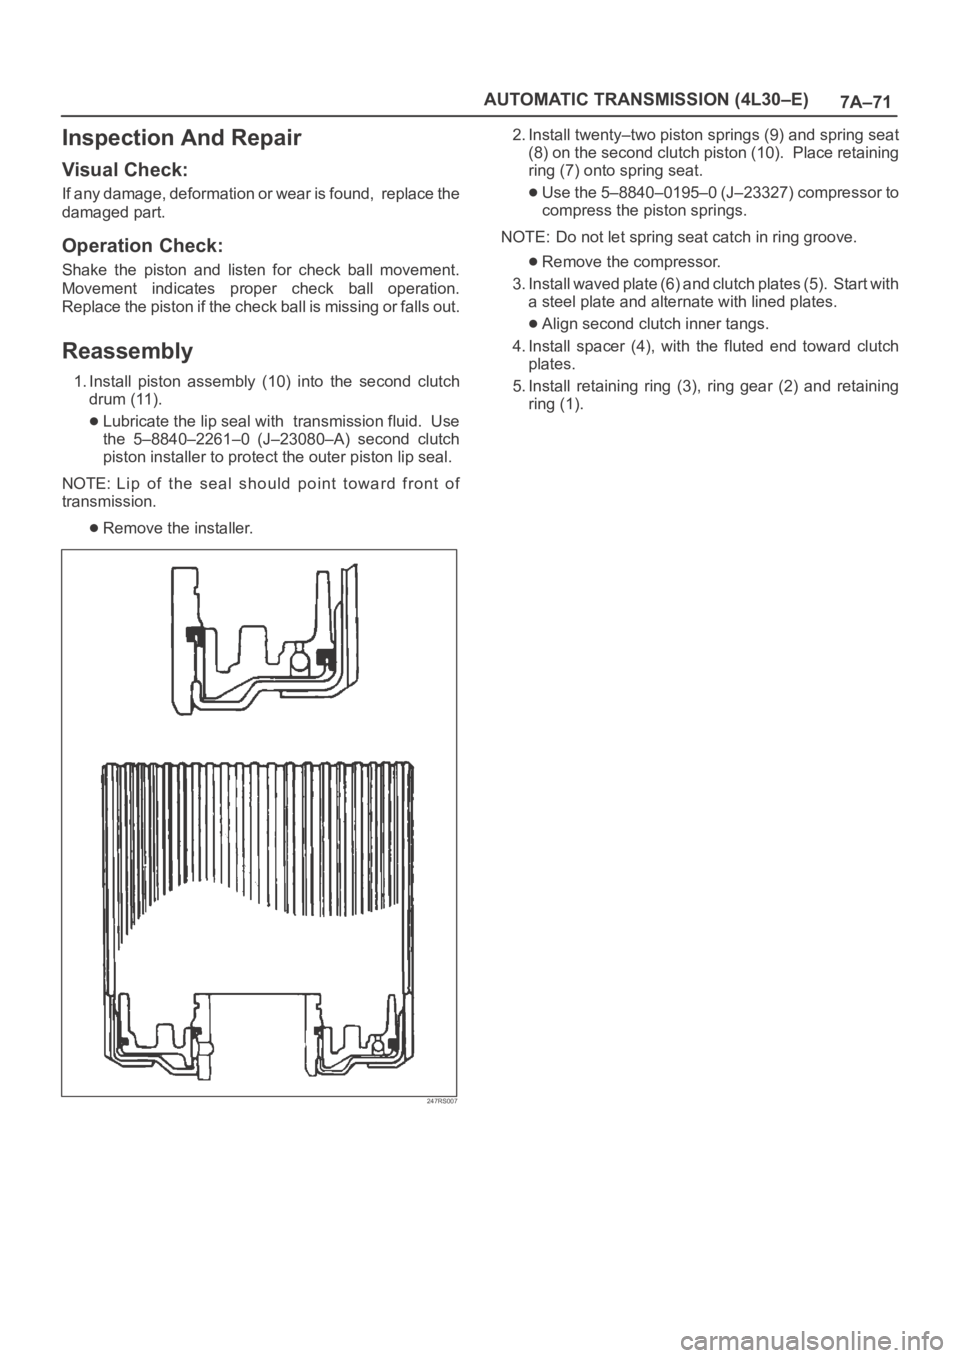
1. Install piston assembly (10) into the second clutch
drum (11).
Lubricate the lip seal with transmission fluid. Use
the 5–8840–2261–0 (J–23080–A) second clutch
piston installer to protect the outer piston lip seal.
NOTE: Lip of the seal should point toward front of
transmission.
Remove the installer.
247RS007
2. Install twenty–two piston springs (9) and spring seat
(8) on the second clutch piston (10). Place retaining
ring (7) onto spring seat.
Use the 5–8840–0195–0 (J–23327) compressor to
compress the piston springs.
NOTE: Do not let spring seat catch in ring groove.
Remove the compressor.
3. Install waved plate (6) and clutch plates (5). Start with
a steel plate and alternate with lined plates.
Align second clutch inner tangs.
4. Install spacer (4), with the fluted end toward clutch
plates.
5. Install retaining ring (3), ring gear (2) and retaining
ring (1).
Page 5782 of 6000

AUTOMATIC TRANSMISSION (AW30-40LE) 7A–1
SECTION 7A
CONTENTS
AUTOMATIC TRANSMISSION (AW30-40LE)
GENERAL DESCRIPTION . . . . . . . . . . . . . . . . . . . . . . . . . . . . . . . . . . . . . . . . . . . . . . . . . . . . . . . . . . . . . 7A–3
CONSTRUCTION . . . . . . . . . . . . . . . . . . . . . . . . . . . . . . . . . . . . . . . . . . . . . . . . . . . . . . . . . . . . . . . . . . . 7A–3
ELECTRONIC CONTROL COMPONENTS . . . . . . . . . . . . . . . . . . . . . . . . . . . . . . . . . . . . . . . . . . . . . . . 7A–4
TRANSMISSION CONTROL MODULE (TCM) . . . . . . . . . . . . . . . . . . . . . . . . . . . . . . . . . . . . . . . . . . . . 7A–5
CONTROL SYSTEM DIAGRAM. . . . . . . . . . . . . . . . . . . . . . . . . . . . . . . . . . . . . . . . . . . . . . . . . . . . . . . . 7A–6
CONTROL AND FUNCTIONS . . . . . . . . . . . . . . . . . . . . . . . . . . . . . . . . . . . . . . . . . . . . . . . . . . . . . . . . . 7A–7
MAJOR INPUT/OUTPUT COMPONENTS . . . . . . . . . . . . . . . . . . . . . . . . . . . . . . . . . . . . . . . . . . . . . . . . 7A–9
LOCATION OF CLUTCH, BRAKE ONE-WAY CLUTCH AND SOLENOID . . . . . . . . . . . . . . . . . . . . . . . 7A–10
OPERATION OF CLUTCH, BRAKE AND ONE-WAY CLUTCH . . . . . . . . . . . . . . . . . . . . . . . . . . . . . . . 7A–11
SPEED CHANGE AND LOCK-UP PATTERN . . . . . . . . . . . . . . . . . . . . . . . . . . . . . . . . . . . . . . . . . . . . . . 7A–11
OVERDRIVE AND LOCK-UP OPERATING CONDITIONS . . . . . . . . . . . . . . . . . . . . . . . . . . . . . . . . . . . 7A–12
DIAGNOSIS . . . . . . . . . . . . . . . . . . . . . . . . . . . . . . . . . . . . . . . . . . . . . . . . . . . . . . . . . . . . . . . . . . . . . . . . . 7A–13
BASIC TROUBLESHOOTING
. . . . . . . . . . . . . . . . . . . . . . . . . . . . . . . . . . . . . . . . . . . . . . . . 7A–13
SELF-DIAGNOSIS . . . . . . . . . . . . . . . . . . . . . . . . . . . . . . . . . . . . . . . . . . . . . . . . . . . . . . . . . . . . . . . . . . 7A–14
DIAGNOSIS WITH TECH2 . . . . . . . . . . . . . . . . . . . . . . . . . . . . . . . . . . . . . . . . . . . . . . . . . . . . . . . . . . . . 7A–17
TECH2 CONNECTION . . . . . . . . . . . . . . . . . . . . . . . . . . . . . . . . . . . . . . . . . . . . . . . . . . . . . . . . . . . . . . . 7A–18
TECH2 OPERATING FLOW CHART (START UP) . . . . . . . . . . . . . . . . . . . . . . . . . . . . . . . . . . . . . . . . . 7A–19
TRANSMISSION DATA . . . . . . . . . . . . . . . . . . . . . . . . . . . . . . . . . . . . . . . . . . . . . . . . . . . . . . . . . . . . . . 7A–21
TCC DATA . . . . . . . . . . . . . . . . . . . . . . . . . . . . . . . . . . . . . . . . . . . . . . . . . . . . . . . . . . . . . . . . . . . . . . . . 7A–22
INTERMITTENT CONDITIONS . . . . . . . . . . . . . . . . . . . . . . . . . . . . . . . . . . . . . . . . . . . . . . . . . . . . . . . . 7A–23
IDENTIFICATION OF TRANSMISSION CONTROL MODULE (TCM) . . . . . . . . . . . . . . . . . . . . . . . . . . . 7A–24
DIAGNOSTIC TROUBLE CODES (DTC) CHECK . . . . . . . . . . . . . . . . . . . . . . . . . . . . . . . . . . . . . . . . . . 7A–25
WIRING DIAGRAM . . . . . . . . . . . . . . . . . . . . . . . . . . . . . . . . . . . . . . . . . . . . . . . . . . . . . . . . . . . . . . . . . 7A–52
CONNECTOR LIST . . . . . . . . . . . . . . . . . . . . . . . . . . . . . . . . . . . . . . . . . . . . . . . . . . . . . . . . . . . . . . . . . 7A–54
TROUBLESHOOTING CHART . . . . . . . . . . . . . . . . . . . . . . . . . . . . . . . . . . . . . . . . . . . . . . . . . . . . . . . . 7A–56
MANUAL SHIFTING TEST . . . . . . . . . . . . . . . . . . . . . . . . . . . . . . . . . . . . . . . . . . . . . . . . . . . . . . . . . . . . 7A–62
STALL TEST . . . . . . . . . . . . . . . . . . . . . . . . . . . . . . . . . . . . . . . . . . . . . . . . . . . . . . . . . . . . . . . . . . . . . . . 7A–63
TIME LAG TEST . . . . . . . . . . . . . . . . . . . . . . . . . . . . . . . . . . . . . . . . . . . . . . . . . . . . . . . . . . . . . . . . . . . . 7A–64
HYDRAULIC TEST . . . . . . . . . . . . . . . . . . . . . . . . . . . . . . . . . . . . . . . . . . . . . . . . . . . . . . . . . . . . . . . . . . 7A–65
ROAD TEST . . . . . . . . . . . . . . . . . . . . . . . . . . . . . . . . . . . . . . . . . . . . . . . . . . . . . . . . . . . . . . . . . . . . . . . 7A–66
SHIFT POINT CHART AND LOCK-UP POINT CHART . . . . . . . . . . . . . . . . . . . . . . . . . . . . . . . . . . . . . . 7A–69
TCM VOLTAGE CHECK . . . . . . . . . . . . . . . . . . . . . . . . . . . . . . . . . . . . . . . . . . . . . . . . . . . . . . . . . . . . . . 7A–71
TCM STANDARD VOLTAGE . . . . . . . . . . . . . . . . . . . . . . . . . . . . . . . . . . . . . . . . . . . . . . . . . . . . . . . . . . 7A–72
ON-VEHICLE SERVICE . . . . . . . . . . . . . . . . . . . . . . . . . . . . . . . . . . . . . . . . . . . . . . . . . . . . . . . . . . . . . . . 7A–75
TRANSIMISSION FLUID LEVEL AND CONDITION . . . . . . . . . . . . . . . . . . . . . . . . . . . . . . . . . . . . . . . . 7A–75
ATF REPLACEMENT . . . . . . . . . . . . . . . . . . . . . . . . . . . . . . . . . . . . . . . . . . . . . . . . . . . . . . . . . . . . . . . . 7A–75
NEUTRAL START SWITCH INSPECTION. . . . . . . . . . . . . . . . . . . . . . . . . . . . . . . . . . . . . . . . . . . . . . . . 7A–76
BRAKE SIGNAL INSPECTION . . . . . . . . . . . . . . . . . . . . . . . . . . . . . . . . . . . . . . . . . . . . . . . . . . . . . . . . 7A–77
VEHICLE SPEED SENSOR INSPECTION . . . . . . . . . . . . . . . . . . . . . . . . . . . . . . . . . . . . . . . . . . . . . . . 7A–77
INPUT AND OUTPUT REVOLUTION SENSOR INSPECTION . . . . . . . . . . . . . . . . . . . . . . . . . . . . . . . . 7A–77
PATTERN SELECT SWITCH INSPECTION . . . . . . . . . . . . . . . . . . . . . . . . . . . . . . . . . . . . . . . . . . . . . . . 7A–78
OVERDRIVE OFF SWITCH INSPECTION . . . . . . . . . . . . . . . . . . . . . . . . . . . . . . . . . . . . . . . . . . . . . . . 7A–78
SOLENOID INSPECTION . . . . . . . . . . . . . . . . . . . . . . . . . . . . . . . . . . . . . . . . . . . . . . . . . . . . . . . . . . . . 7A–78
THROTTLE POSITION SENSOR INSPECTION . . . . . . . . . . . . . . . . . . . . . . . . . . . . . . . . . . . . . . . . . . . 7A–79
ATF TEMPERATURE SENSOR INSPECTION. . . . . . . . . . . . . . . . . . . . . . . . . . . . . . . . . . . . . . . . . . . . . 7A–79
SELECTOR LEVER . . . . . . . . . . . . . . . . . . . . . . . . . . . . . . . . . . . . . . . . . . . . . . . . . . . . . . . . . . . . . . . . . 7A–80
TRANSMISSION CONTROL MODULE (TCM) . . . . . . . . . . . . . . . . . . . . . . . . . . . . . . . . . . . . . . . . . . . . 7A–81
SHIFT SOLENOID AND LOCK-UP SOLENOID. . . . . . . . . . . . . . . . . . . . . . . . . . . . . . . . . . . . . . . . . . . . 7A–83
Page 5844 of 6000
AUTOMATIC TRANSMISSION (AW30-40LE) 7A–63
F07RY00002
STALL TEST
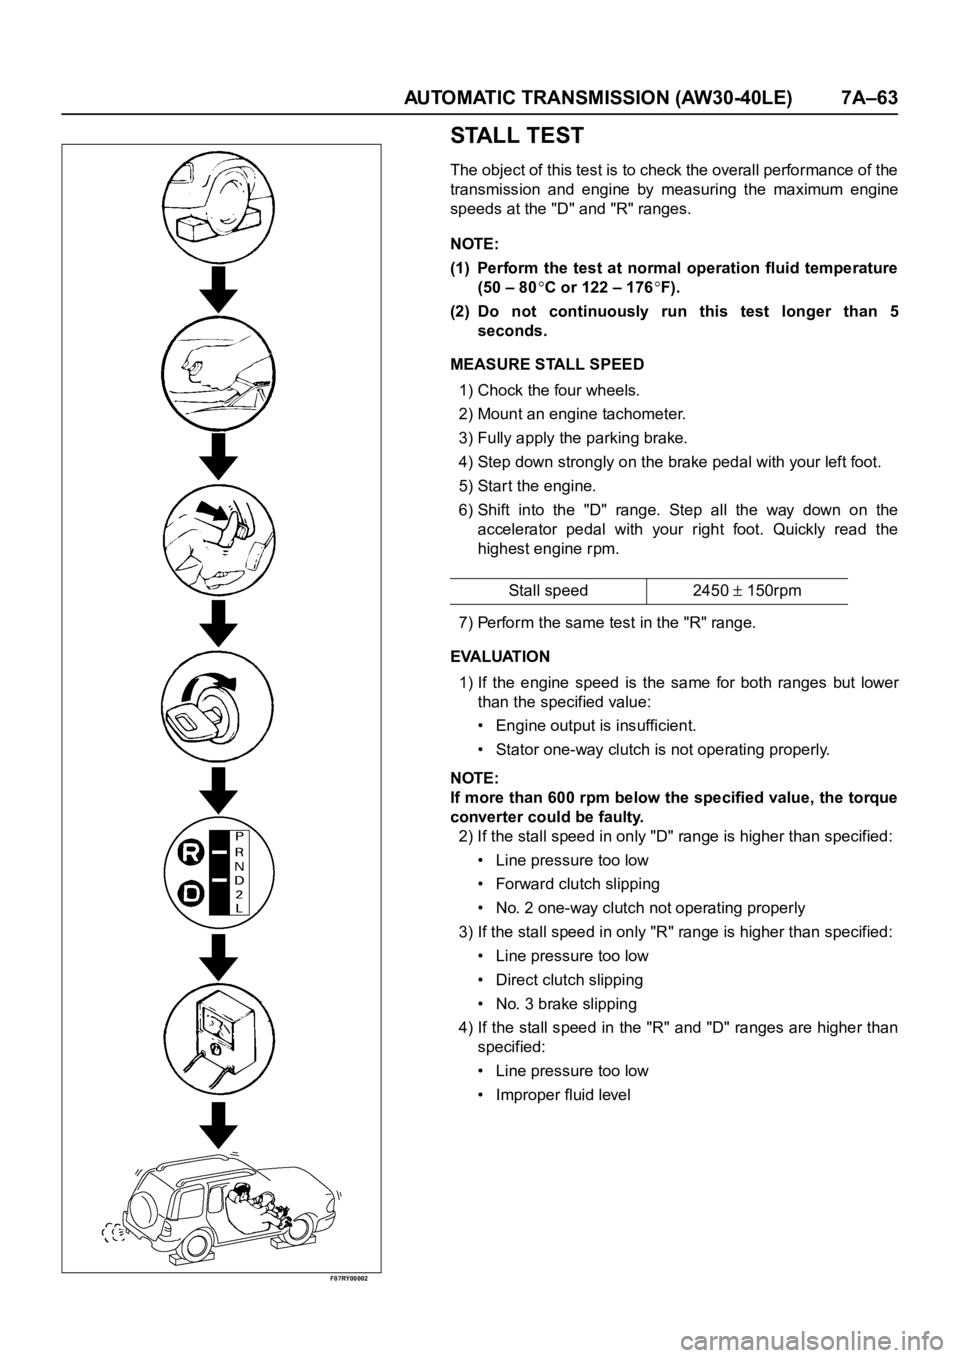
The object of this test is to check the overall performance of the
transmission and engine by measuring the maximum engine
speeds at the "D" and "R" ranges.
NOTE:
(1) Perform the test at normal operation fluid temperature
(50 – 80
C or 122 – 176F).
(2) Do not continuously run this test longer than 5
seconds.
MEASURE STALL SPEED
1) Chock the four wheels.
2) Mount an engine tachometer.
3) Fully apply the parking brake.
4) Step down strongly on the brake pedal with your left foot.
5) Star t the engine.
6) Shift into the "D" range. Step all the way down on the
accelerator pedal with your right foot. Quickly read the
highest engine rpm.
7) Perform the same test in the "R" range.
EVALUATION
1) If the engine speed is the same for both ranges but lower
than the specified value:
• Engine output is insufficient.
• Stator one-way clutch is not operating properly.
NOTE:
If more than 600 rpm below the specified value, the torque
converter could be faulty.
2) If the stall speed in only "D" range is higher than specified:
• Line pressure too low
• Forward clutch slipping
• No. 2 one-way clutch not operating properly
3) If the stall speed in only "R" range is higher than specified:
• Line pressure too low
• Direct clutch slipping
• No. 3 brake slipping
4) If the stall speed in the "R" and "D" ranges are higher than
specified:
• Line pressure too low
• Improper fluid levelStall speed 2450
150rpm
Page 5845 of 6000
7A–64 AUTOMATIC TRANSMISSION (AW30-40LE)
F07RY00003
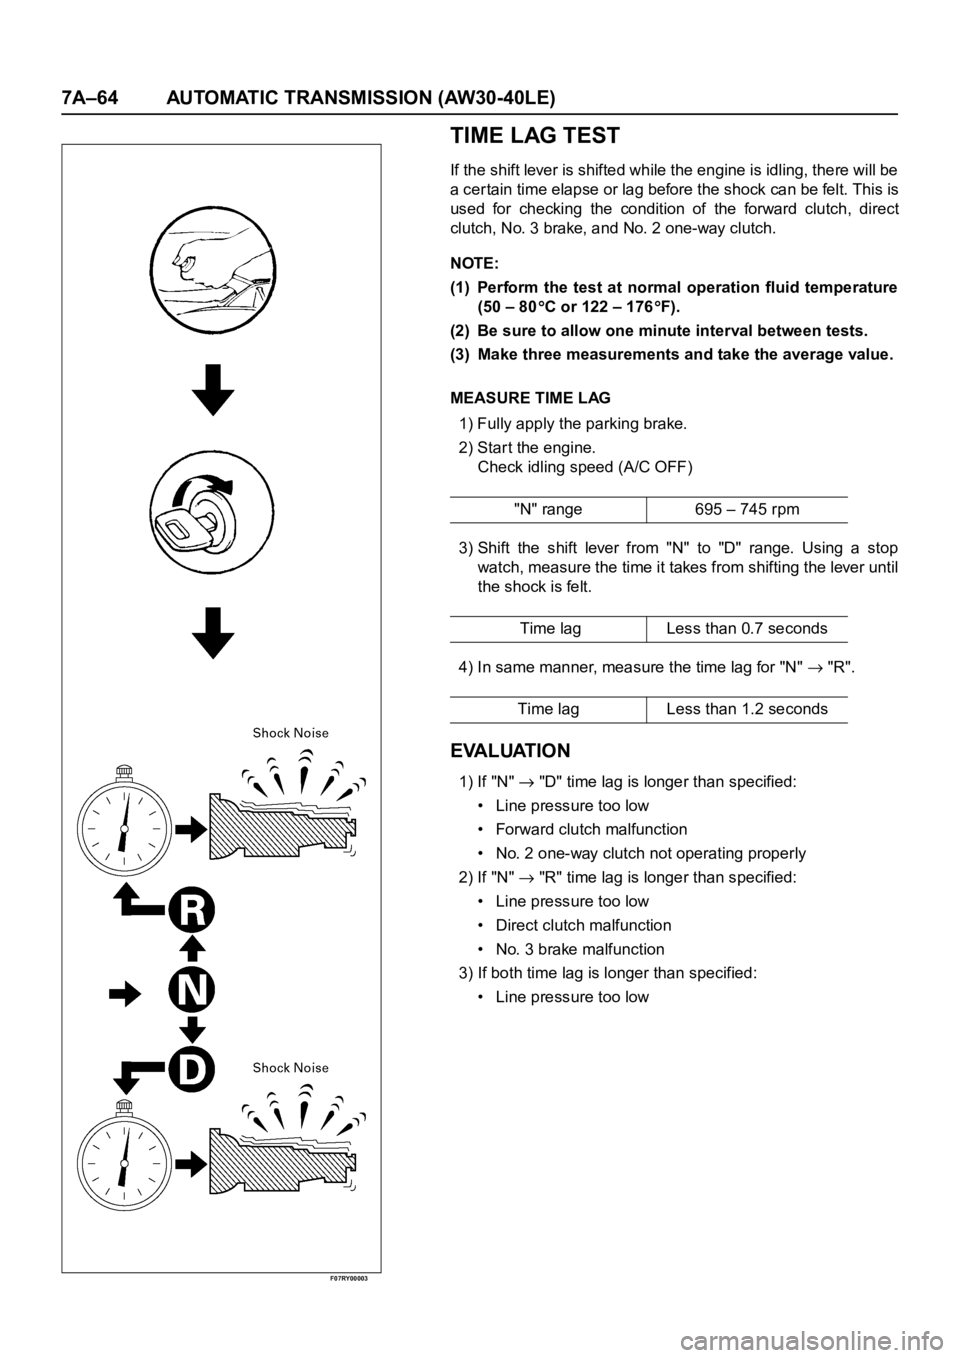
TIME LAG TEST
If the shift lever is shifted while the engine is idling, there will be
a cer tain time elapse or lag before the shock can be felt. This is
used for checking the condition of the forward clutch, direct
clutch, No. 3 brake, and No. 2 one-way clutch.
NOTE:
(1) Perform the test at normal operation fluid temperature
(50 – 80
C or 122 – 176F).
(2) Be sure to allow one minute interval between tests.
(3) Make three measurements and take the average value.
MEASURE TIME LAG
1) Fully apply the parking brake.
2) Start the engine.
Check idling speed (A/C OFF)
3) Shift the shift lever from "N" to "D" range. Using a stop
watch, measure the time it takes from shifting the lever until
the shock is felt.
4) In same manner, measure the time lag for "N"
"R".
EVALUATION
1) If "N" "D" time lag is longer than specified:
• Line pressure too low
• Forward clutch malfunction
• No. 2 one-way clutch not operating properly
2) If "N"
"R" time lag is longer than specified:
• Line pressure too low
• Direct clutch malfunction
• No. 3 brake malfunction
3) If both time lag is longer than specified:
• Line pressure too low"N" range 695 – 745 rpm
Time lag Less than 0.7 seconds
Time lag Less than 1.2 seconds
Page 5846 of 6000
AUTOMATIC TRANSMISSION (AW30-40LE) 7A–65
F07RY00004
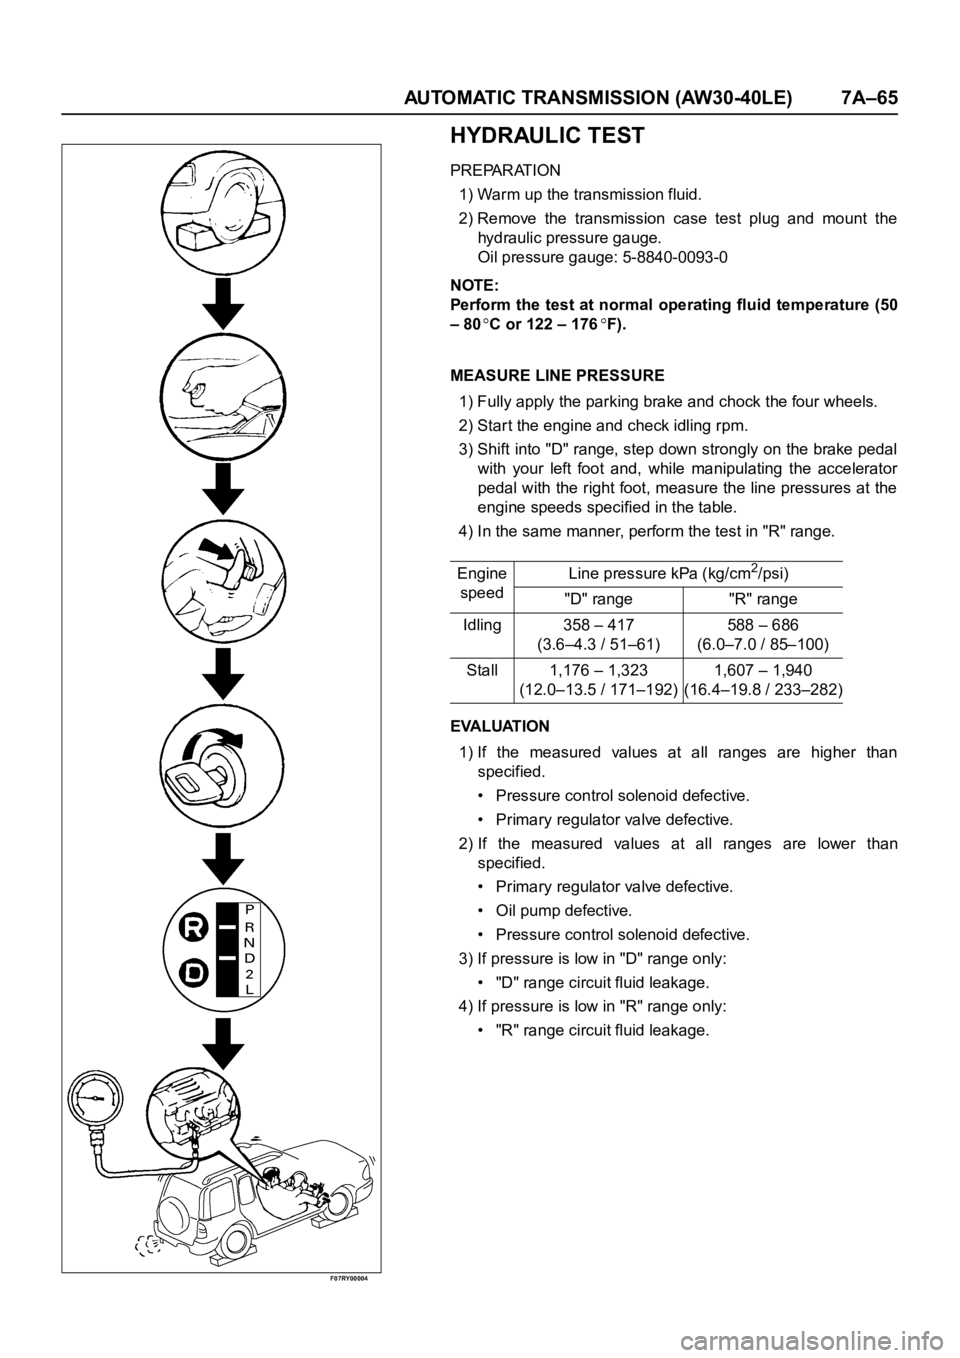
HYDRAULIC TEST
PREPARATION
1) Warm up the transmission fluid.
2) Remove the transmission case test plug and mount the
hydraulic pressure gauge.
Oil pressure gauge: 5-8840-0093-0
NOTE:
Perform the test at normal operating fluid temperature (50
– 80
C or 122 – 176F).
MEASURE LINE PRESSURE
1) Fully apply the parking brake and chock the four wheels.
2) Start the engine and check idling rpm.
3) Shift into "D" range, step down strongly on the brake pedal
with your left foot and, while manipulating the accelerator
pedal with the right foot, measure the line pressures at the
engine speeds specified in the table.
4) In the same manner, perform the test in "R" range.
EVALUATION
1) If the measured values at all ranges are higher than
specified.
• Pressure control solenoid defective.
• Primary regulator valve defective.
2) If the measured values at all ranges are lower than
specified.
• Primary regulator valve defective.
• Oil pump defective.
• Pressure control solenoid defective.
3) If pressure is low in "D" range only:
• "D" range circuit fluid leakage.
4) If pressure is low in "R" range only:
• "R" range circuit fluid leakage. Engine
speedLine pressure kPa (kg/cm
2/psi)
"D" range "R" range
Idling 358 – 417
(3.6–4.3 / 51–61)588 – 686
(6.0–7.0 / 85–100)
Stall 1,176 – 1,323
(12.0–13.5 / 171–192)1,607 – 1,940
(16.4–19.8 / 233–282)
Page 5847 of 6000
7A–66 AUTOMATIC TRANSMISSION (AW30-40LE)
255RT004
F07RY00005
F07RY00006
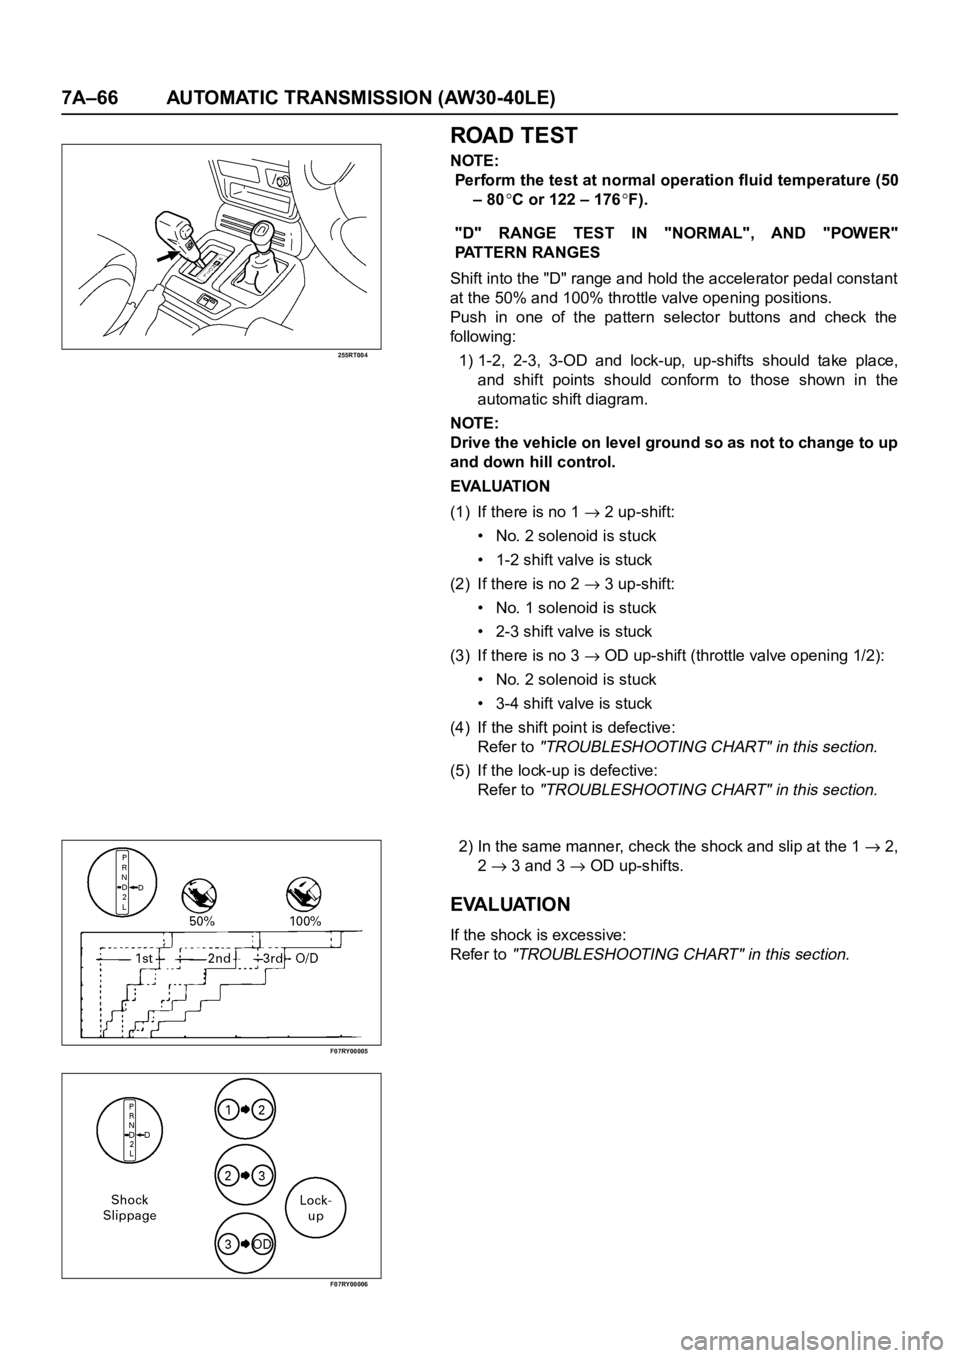
ROAD TEST
NOTE:
Perform the test at normal operation fluid temperature (50
– 80
C or 122 – 176F).
"D" RANGE TEST IN "NORMAL", AND "POWER"
PATTERN RANGES
Shift into the "D" range and hold the accelerator pedal constant
at the 50% and 100% throttle valve opening positions.
Push in one of the pattern selector buttons and check the
fol lowing:
1) 1-2, 2-3, 3-OD and lock-up, up-shifts should take place,
and shift points should conform to those shown in the
automatic shift diagram.
NOTE:
Drive the vehicle on level ground so as not to change to up
and down hill control.
EVALUATION
(1) If there is no 1
2 up-shift:
• No. 2 solenoid is stuck
• 1-2 shift valve is stuck
(2) If there is no 2
3 up-shift:
• No. 1 solenoid is stuck
• 2-3 shift valve is stuck
(3) If there is no 3
OD up-shift (throttle valve opening 1/2):
• No. 2 solenoid is stuck
• 3-4 shift valve is stuck
(4) If the shift point is defective:
Refer to
"TROUBLESHOOTING CHART" in this section.
(5) If the lock-up is defective:
Refer to
"TROUBLESHOOTING CHART" in this section.
2) In the same manner, check the shock and slip at the 1 2,
2
3 and 3 OD up-shifts.
EVALUATION
If the shock is excessive:
Refer to
"TROUBLESHOOTING CHART" in this section.