1998 NISSAN QUEST key battery
[x] Cancel search: key batteryPage 105 of 260
approximately ten seconds before changing
back to the clock mode.
How to set the clock
1. Turn the radio on. (Time is displayed
while the radio is off.)
2. Push and hold the CLK button; then,
press the SEEK button either
orto adjust the hours, and press the
TUNE button eitherorto
adjust the minutes.
NOTE: The clock displays 12-hour time with
no A.M./P.M. indications.
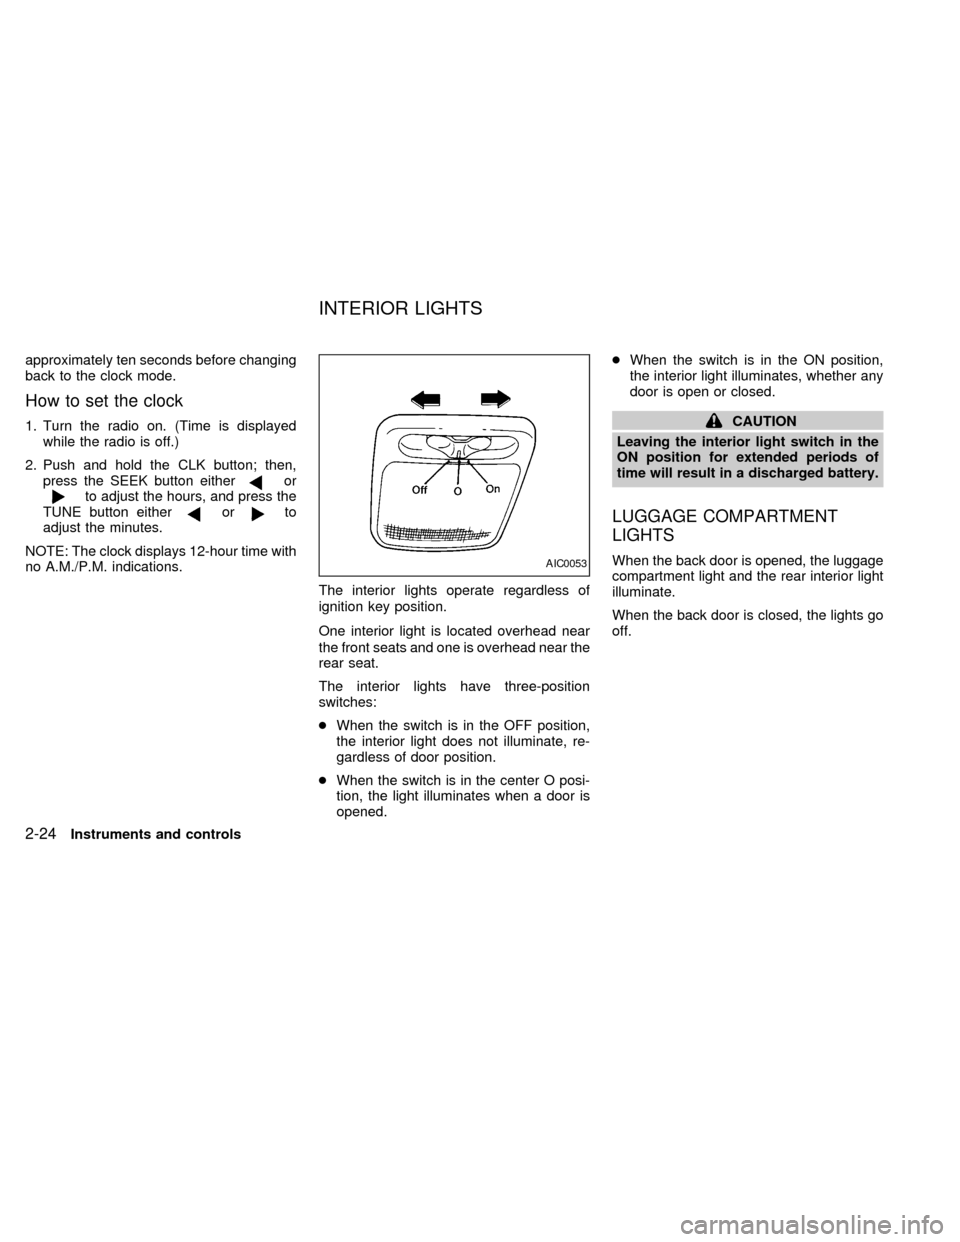
The interior lights operate regardless of
ignition key position.
One interior light is located overhead near
the front seats and one is overhead near the
rear seat.
The interior lights have three-position
switches:
cWhen the switch is in the OFF position,
the interior light does not illuminate, re-
gardless of door position.
cWhen the switch is in the center O posi-
tion, the light illuminates when a door is
opened.cWhen the switch is in the ON position,
the interior light illuminates, whether any
door is open or closed.
CAUTION
Leaving the interior light switch in the
ON position for extended periods of
time will result in a discharged battery.
LUGGAGE COMPARTMENT
LIGHTS
When the back door is opened, the luggage
compartment light and the rear interior light
illuminate.
When the back door is closed, the lights go
off.AIC0053
INTERIOR LIGHTS
2-24Instruments and controls
ZX
Page 108 of 260

3 Pre-driving checks and adjustments
Key .........................................................................3-2
Door locks ..............................................................3-2
Manual door lock ....................................................3-3
Child safety sliding door lock .................................3-5
Power door lock (if so equipped) ...........................3-6
Multi-remote control system (if so equipped).........3-8
Battery replacement ...............................................3-9
Illuminated entry system ......................................3-10
Hood release ........................................................3-11Rear door lock ......................................................3-12
Cargo net (if so equipped) ...................................3-14
Luggage rack (if so equipped) .............................3-15
Fuel filler lid and cap ............................................3-16
Tilting steering wheel ...........................................3-17
Outside mirror control...........................................3-17
Outside mirrors .....................................................3-18
Inside mirror .........................................................3-18
Vanity mirror .........................................................3-19
ZX
Page 117 of 260

The interior lights, the cargo light, the glove
box light, the stepwell lights near the sliding
door and on the front doors, and the footwell
lights near the driver's and front passen-
ger's feet illuminate when the front and
sliding doors are opened. These lights
gradually dim to off within 30 seconds or
turn off immediately when the key is turned
to ON.
Battery saver
If the vehicle doors are not fully closed and
the interior lights remain illuminated, they
eventually turn off automatically to prevent
the battery from becoming discharged.
Lights that illuminate when the front doors
and/or the sliding door are open turn off
after approximately 30 minutes. Lights that
illuminate when the back door is open turn
off after approximately 60 minutes.
If the personal reading lamp is left on when
the key is removed from the ignition, it turns
off automatically in 30 minutes.
ILLUMINATED ENTRY
SYSTEM
3-10Pre-driving checks and adjustments
ZX
Page 159 of 260

If the battery charge is low, the shift lever
can be moved if the ignition switch is in
the ACC position.
1. Keep the foot brake pedal depressed and
shift into a driving gear.
2. Release the parking brake and foot
brake, then gradually start the vehicle in
motion.
Shifting with automatic transmission
P (Park):
Use this selector position when the vehicle
is parked or when starting the engine. Al-
ways be sure the vehicle is at a complete
stop. For maximum safety, depress the
brake pedal, pull the lever toward you, and
move the lever to the P (Park) position.
Apply the parking brake. When parking on a
hill, apply the parking brake first, then shift
the lever into the P (Park) position.
Shifting from P (Park)
If the ignition switch is in the ON position
and the foot brake pedal is depressed, but
the shift lever still cannot be moved out of P
(Park), follow these instructions:
1. Shut the engine off and remove the key.
2. Apply the parking brake.
3. Reinsert the ignition key and turn it clock-
wise to the first position (ACC).
4. Depress the brake pedal, move the gear-
shift lever to N (Neutral).
5. Start the engine.
R (Reverse):
Use this position to back up. Always be sure
the vehicle is completely stopped. Depress
the brake pedal, then pull the shift lever
toward you and move it to the R (Reverse)
position.
ASD0552
5-6Starting and driving
ZX
Page 169 of 260
cWhen installing a spare tire, make
sure it is the proper size and type as
specified on the tire placard. For tire
placard location information, refer to
``Tire placard'' in the Owner's
Manual index.
cRefer to ``Wheels and tires'' in the
``Do-it-yourself'' section of this
manual.Freeing a frozen door lock
To prevent a door lock from freezing, apply
de-icer or glycerin through the key hole. If
the lock becomes frozen, heat the key be-
fore inserting it in the key hole.
Anti-freeze
In the winter, when it is anticipated that the
temperature will drop below 32ÉF (0ÉC),
check the anti-freeze (ethylene glycol base)
to assure proper winter protection. For de-
tails, see ``Engine cooling system'' in the
``Do-it-yourself'' section of this manual.
Battery
If the battery is not fully charged during
extremely cold weather conditions, the bat-
tery fluid may freeze and damage the bat-
tery. To maintain maximum efficiency, the
battery should be checked regularly. For
details, see ``Battery'' in the ``Do-it-yourself''
section of this manual.
Draining of coolant water
If the vehicle is to be left outside without
anti-freeze, drain the cooling system by
opening the drain valves located under the
radiator and on the engine block. Refillbefore operating the vehicle. See ``Chang-
ing engine coolant'' in the ``Do-it-yourself''
section of this manual.
Tire equipment
1. SUMMER tires are of a tread design to
provide superior performance on dry
pavement. However, the performance of
these tires is substantially reduced in
snowy and icy conditions. If you operate
your vehicle on snowy or icy roads, NIS-
SAN recommends using MUD & SNOW
or ALL SEASON tires on all four wheels.
Please consult your NISSAN dealer for
the tire type, size, speed rating and avail-
ability information.
2.
For additional traction on icy roads, stud-
ded tires may be used. However, some
Canadian provinces and U.S. states pro-
hibit their use. Check local, state and pro-
vincial laws before installing studded tires.
Skid and traction capabilities of studded
snow tires, on wet or dry surfaces, may
be poorer than that of non-studded snow
tires.
3. Tire chains may be used. Make sure they
are of proper size for the tires on your
vehicle and are installed according to the
COLD WEATHER DRIVING
5-16Starting and driving
ZX
Page 180 of 260
Always follow the instructions below.
Failure to do so could result in damage
to the charging system and cause per-
sonal injury.
1. If the booster battery is in another ve-
hicle, position the two vehicles to bring
their batteries close to each other.
Do not allow the two vehicles to touch.
2. Apply the parking brake. Move the gear-
shift lever to the P (Park) position. Switch
off all unnecessary electrical systems
(lights, heater, air conditioner, etc.).3. Remove vent caps on the battery (if so
equipped). Cover the battery with an old
cloth to reduce explosion hazard.
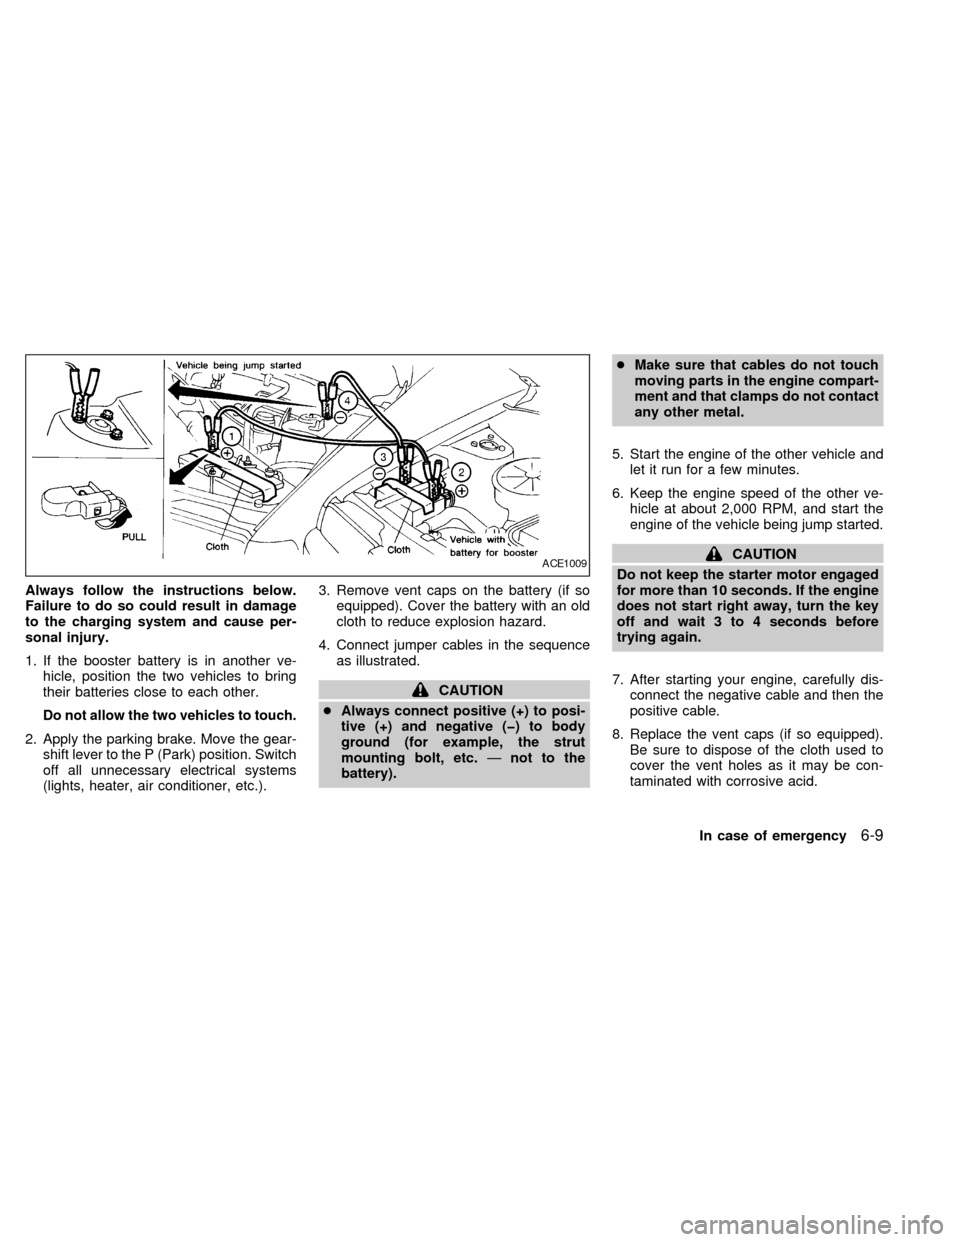
4. Connect jumper cables in the sequence
as illustrated.
CAUTION
cAlways connect positive (+) to posi-
tive (+) and negative (þ) to body
ground (for example, the strut
mounting bolt, etc.Ðnot to the
battery).cMake sure that cables do not touch
moving parts in the engine compart-
ment and that clamps do not contact
any other metal.
5. Start the engine of the other vehicle and
let it run for a few minutes.
6. Keep the engine speed of the other ve-
hicle at about 2,000 RPM, and start the
engine of the vehicle being jump started.
CAUTION
Do not keep the starter motor engaged
for more than 10 seconds. If the engine
does not start right away, turn the key
off and wait 3 to 4 seconds before
trying again.
7. After starting your engine, carefully dis-
connect the negative cable and then the
positive cable.
8. Replace the vent caps (if so equipped).
Be sure to dispose of the cloth used to
cover the vent holes as it may be con-
taminated with corrosive acid.ACE1009
In case of emergency6-9
ZX
Page 193 of 260
When performing any inspection or mainte-
nance work on your vehicle, always take
care to prevent serious accidental injury to
yourself or damage to the vehicle. The
following are general precautions which
should be closely observed.
WARNING
cPark the vehicle on a level surface,
apply the parking brake securely and
block the wheels to prevent the ve-
hicle from moving. Move the gear-
shift lever to N (neutral).
cBe sure the ignition key is OFF when
performing any replacement or re-
pair.
c
Be sure to turn the ignition key to the
OFF or LOCK position. When the igni-
tion key is in the ON or ACC position,
the cooling fan may start to operate
suddenly even when the engine is not
running. To avoid injury always dis-
connect the negative battery cable
before working near the fan.
cIf you must work with the engine run-
ning, keep your hands, clothing, hair
and tools away from moving fans,
belts and any other moving parts.
cIt is advisable to remove ties and any
jewelry, such as rings, watches, etc.
before working on your vehicle.
cAlways wear eye protection when-
ever you work on your vehicle.
cIf you must run the engine in an
enclosed space such as a garage, be
sure there is proper ventilation for
exhaust gases.
cNever get under the vehicle while it
is supported only by a jack. If it is
necessary to work under the vehicle,
support it with safety stands.
cKeep smoking materials, flame and
sparks away from fuel and the bat-
tery.
cOn gasoline engine models with the
multiport fuel injection (MFI) system,
the fuel filter or fuel lines should be
serviced by an authorized NISSAN
dealer because the fuel lines are
under high pressure even when the
engine is off.CAUTION
cDo not work under the hood while
the engine is hot. Turn off the engine
and wait until it cools down.
cNever connect or disconnect either
the battery or any transistorized
component connector while the igni-
tion is ON.
cAvoid contact with used engine oil.
Improperly disposed motor oil and/
or other vehicle fluids can hurt the
environment. Always conform to lo-
cal regulations for disposal of ve-
hicle fluid.
This ``Do-it-yourself'' section gives instruc-
tions regarding only those items which are
relatively easy for an owner to perform.
You should be aware that incomplete or
improper servicing may result in operating
difficulties or excessive emissions, and
could affect your warranty coverage.If in
doubt about any servicing, have it done
by an authorized NISSAN dealer.
MAINTENANCE
PRECAUTIONS
8-2Do-it-yourself
ZX
Page 203 of 260
JUMP STARTING
If jump starting is necessary, see the ``In
case of emergency'' section. If the engine
does not start by jump starting, the battery
may have to be replaced. Contact an autho-
rized NISSAN dealer.
WARNING
Be sure the ignition key is OFF. The
engine could rotate unexpectedly.
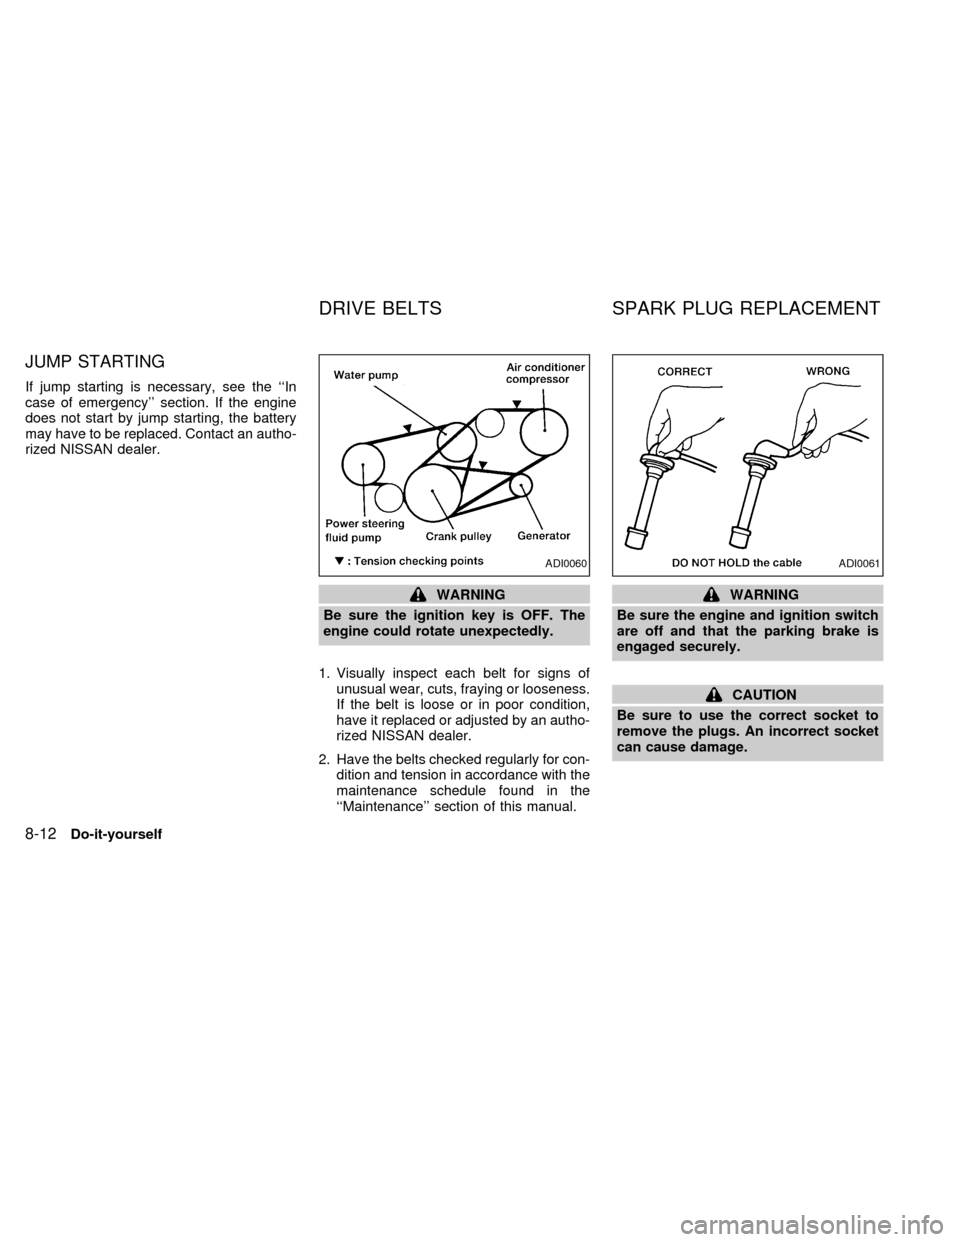
1. Visually inspect each belt for signs of
unusual wear, cuts, fraying or looseness.
If the belt is loose or in poor condition,
have it replaced or adjusted by an autho-
rized NISSAN dealer.
2. Have the belts checked regularly for con-
dition and tension in accordance with the
maintenance schedule found in the
``Maintenance'' section of this manual.WARNING
Be sure the engine and ignition switch
are off and that the parking brake is
engaged securely.
CAUTION
Be sure to use the correct socket to
remove the plugs. An incorrect socket
can cause damage.
ADI0060ADI0061
DRIVE BELTS SPARK PLUG REPLACEMENT
8-12Do-it-yourself
ZX