Page 36 of 260

3. Position the lap belt portionlow and
snug on the hipsas shown.
4. Pull the shoulder belt portion toward the
retractor to take up extra slack.
The front seat passenger side seat belt and
rear three-point seat belts have a cinching
mechanism for child restraint installation. It is
referred to as the automatic locking mode.
When the automatic locking mode is acti-
vated, the seat belt cannot be withdrawn
again until the seat belt tongue is detached
from the buckle and fully retracted. Refer to``Child restraints'' later in this section for
more information.
The automatic locking mode should be
used only for child restraint installation.
During normal seat belt use by a passen-
ger, the locking mode should not be
activated. If it is activated, it may cause
uncomfortable seat belt tension.
Unfastening the belts
To unfasten the belt, press the button on the
buckle. The seat belt automatically retracts.
Checking seat belt operation
(Three-point type seat belt with
retractor)
Seat belt retractors are designed to lock
seat belt movement:
1) when the belt is pulled quickly from the
retractor, and
2) when the vehicle slows down rapidly.
ARS1077ARS1054
Seats, restraints and supplemental air bag systems1-29
ZX
Page 50 of 260

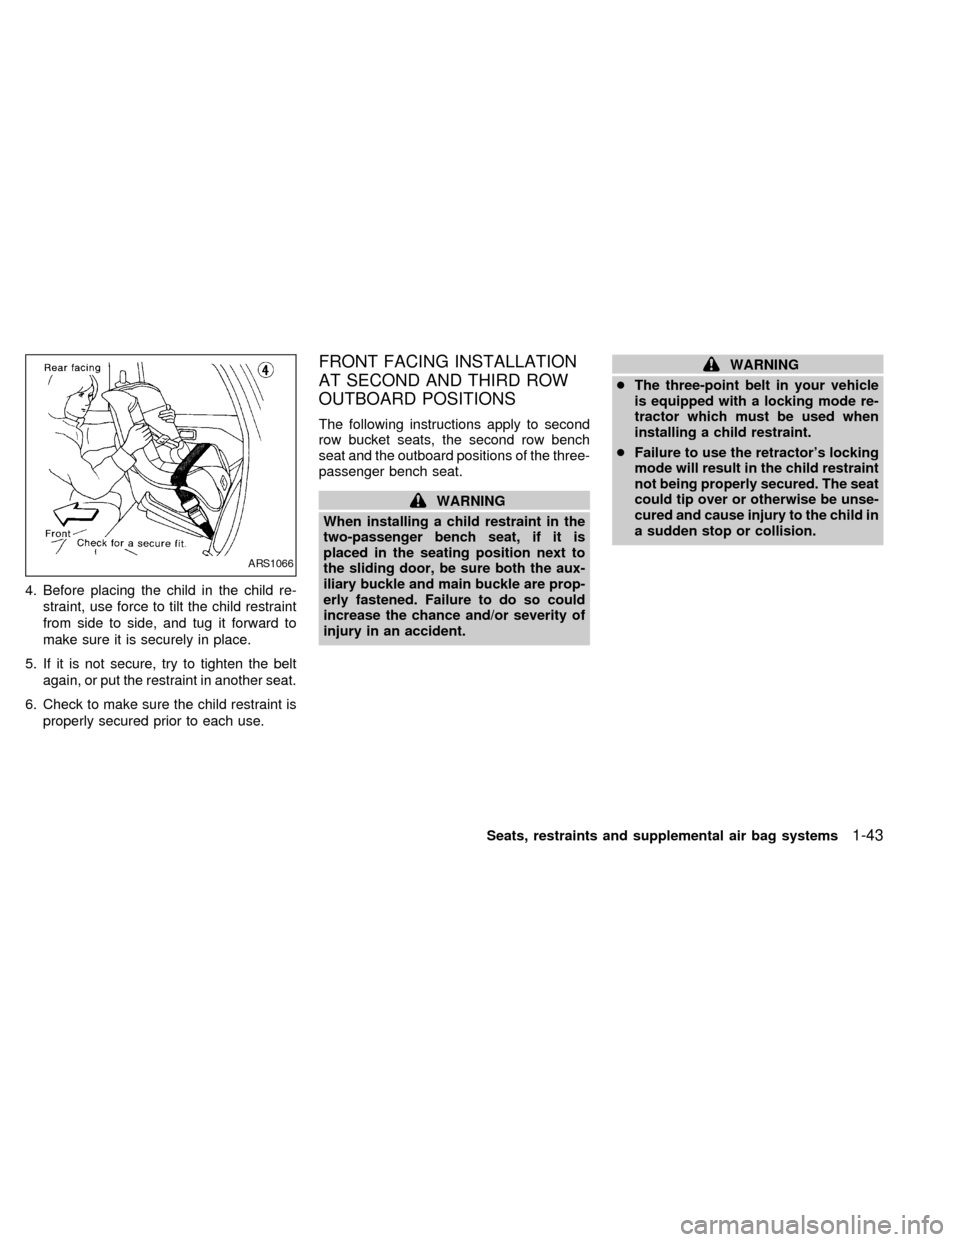
4. Before placing the child in the child re-
straint, use force to tilt the child restraint
from side to side, and tug it forward to
make sure it is securely in place.
5. If it is not secure, try to tighten the belt
again, or put the restraint in another seat.
6. Check to make sure the child restraint is
properly secured prior to each use.
FRONT FACING INSTALLATION
AT SECOND AND THIRD ROW
OUTBOARD POSITIONS
The following instructions apply to second
row bucket seats, the second row bench
seat and the outboard positions of the three-
passenger bench seat.
WARNING
When installing a child restraint in the
two-passenger bench seat, if it is
placed in the seating position next to
the sliding door, be sure both the aux-
iliary buckle and main buckle are prop-
erly fastened. Failure to do so could
increase the chance and/or severity of
injury in an accident.
WARNING
cThe three-point belt in your vehicle
is equipped with a locking mode re-
tractor which must be used when
installing a child restraint.
cFailure to use the retractor's locking
mode will result in the child restraint
not being properly secured. The seat
could tip over or otherwise be unse-
cured and cause injury to the child in
a sudden stop or collision.
ARS1066
Seats, restraints and supplemental air bag systems1-43
ZX
Page 51 of 260
When you install a child restraint in a rear
outboard seat, follow these steps:
1. Position the child restraint on the seat.
Always follow the restraint manufactur-
er's instructions.2. Route the seat belt tongue through the
child restraint and insert it into the buckle
until you hear and feel the latch engage.
Be sure to follow the child restraint manu-
facturer's instructions for belt routing.3. Pull on the shoulder belt until all of the
belt is fully extended. At this time, the belt
retractor is in the automatic locking mode
(child restraint mode). It reverts back to
emergency locking mode when the belt is
fully retracted.
ARS1032ARS1068ARS1031
1-44Seats, restraints and supplemental air bag systems
ZX
Page 52 of 260

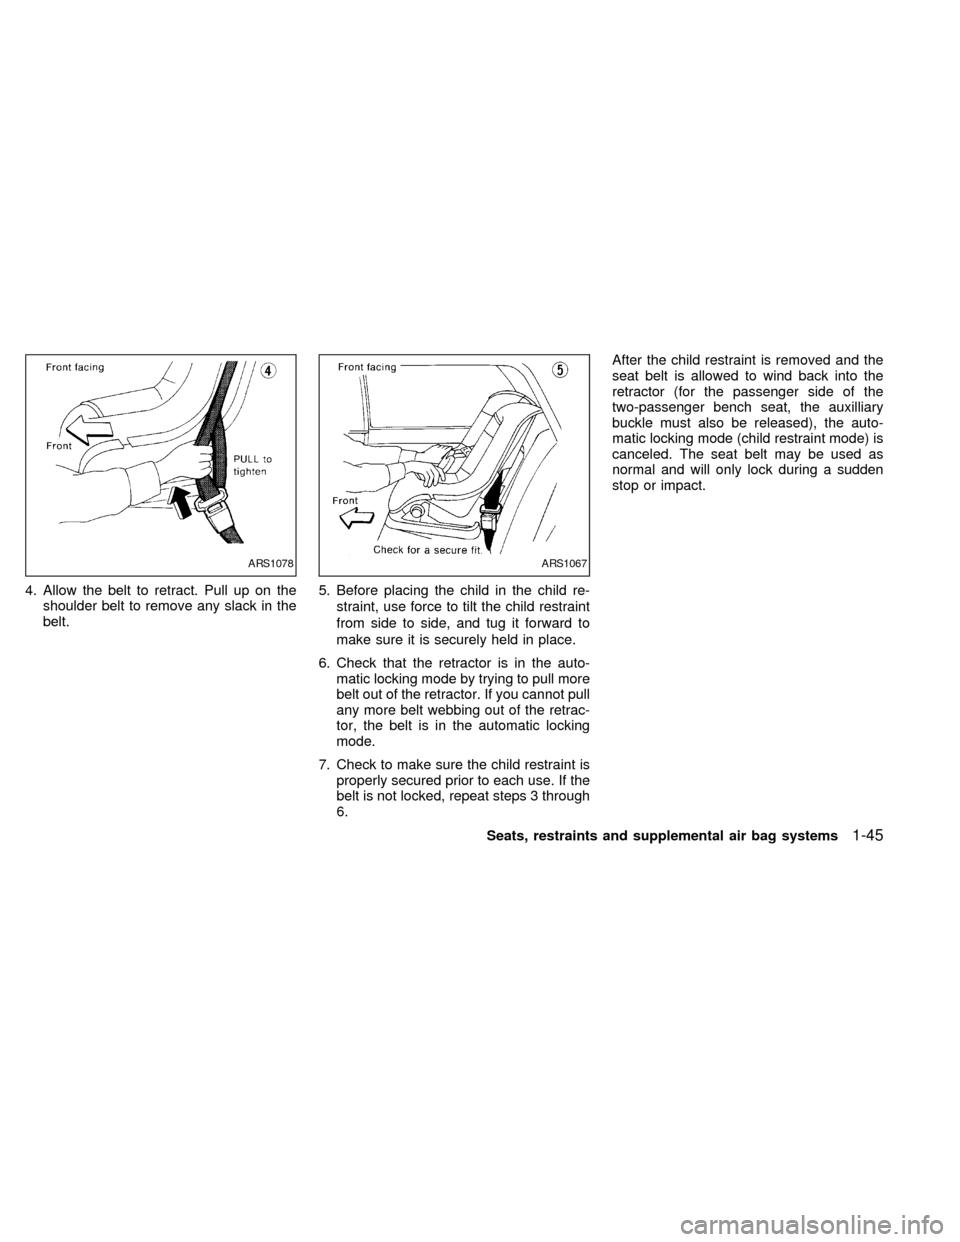
4. Allow the belt to retract. Pull up on the
shoulder belt to remove any slack in the
belt.5. Before placing the child in the child re-
straint, use force to tilt the child restraint
from side to side, and tug it forward to
make sure it is securely held in place.
6. Check that the retractor is in the auto-
matic locking mode by trying to pull more
belt out of the retractor. If you cannot pull
any more belt webbing out of the retrac-
tor, the belt is in the automatic locking
mode.
7. Check to make sure the child restraint is
properly secured prior to each use. If the
belt is not locked, repeat steps 3 through
6.After the child restraint is removed and the
seat belt is allowed to wind back into the
retractor (for the passenger side of the
two-passenger bench seat, the auxilliary
buckle must also be released), the auto-
matic locking mode (child restraint mode) is
canceled. The seat belt may be used as
normal and will only lock during a sudden
stop or impact.
ARS1078ARS1067
Seats, restraints and supplemental air bag systems1-45
ZX
Page 53 of 260

REAR FACING INSTALLATION
AT SECOND AND THIRD ROW
OUTBOARD POSITIONS
The following instructions apply to second
row bucket seats, the second row bench
seat and the outboard positions of the three-
passenger bench seat.
WARNING
When installing a child restraint in the
two-passenger bench seat, if it is
placed in the seating position next to
the sliding door, be sure both the aux-
iliary buckle and main buckle are prop-
erly fastened. Failure to do so could
increase the chance and/or severity of
injury in an accident.
WARNING
cThe three-point belt in your vehicle
is equipped with a locking mode re-
tractor which must be used when
installing a child restraint.cFailure to use the retractor's locking
mode will result in the child restraint
not being properly secured. The seat
could tip over or otherwise be unse-
cured and cause injury to the child in
a sudden stop or collision.
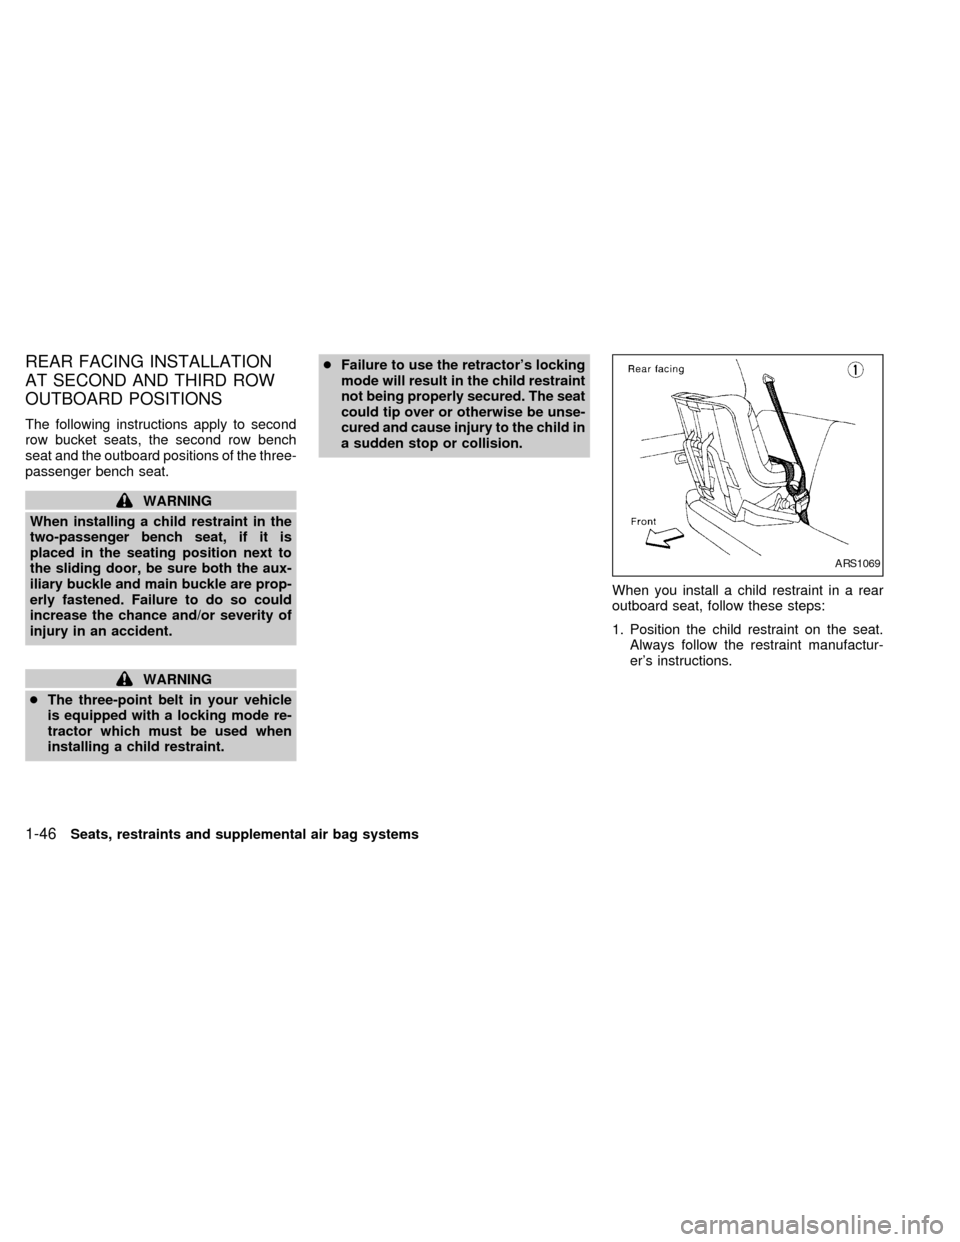
When you install a child restraint in a rear
outboard seat, follow these steps:
1. Position the child restraint on the seat.
Always follow the restraint manufactur-
er's instructions.
ARS1069
1-46Seats, restraints and supplemental air bag systems
ZX
Page 54 of 260
2. Route the seat belt tongue through the
child restraint and insert it into the buckle
until you hear and feel the latch engage.
Be sure to follow the child restraint manu-
facturer's instructions for belt routing.3. Pull on the shoulder belt until all of the
belt is fully extended. At this time, the belt
retractor is in the automatic locking mode
(child restraint mode). It reverts back to
emergency locking mode when the belt is
fully retracted.4. Allow the belt to retract. Pull up on the
shoulder belt to remove any slack in the
belt.
ARS1070ARS1033ARS1071
Seats, restraints and supplemental air bag systems1-47
ZX
Page 55 of 260
5. Before placing the child in the child re-
straint, use force to tilt the child restraint
from side to side, and tug it forward to
make sure it is securely held in place.
6. Check that the retractor is in the auto-
matic locking mode by trying to pull more
belt out of the retractor. If you cannot pull
any more belt webbing out of the retrac-
tor, the belt is in the automatic locking
mode.
7. Check to make sure the child restraint is
properly secured prior to each use. If the
belt is not locked, repeat steps 3 through
6.After the child restraint is removed and the
seat belt is allowed to wind back into the
retractor (for the passenger side of the
two-passenger bench seat, the auxilliary
buckle must also be released), the auto-
matic locking mode (child restraint mode) is
canceled. The seat belt may be used as
normal and will only lock during a sudden
stop or impact.
ARS1072
1-48Seats, restraints and supplemental air bag systems
ZX
Page 57 of 260

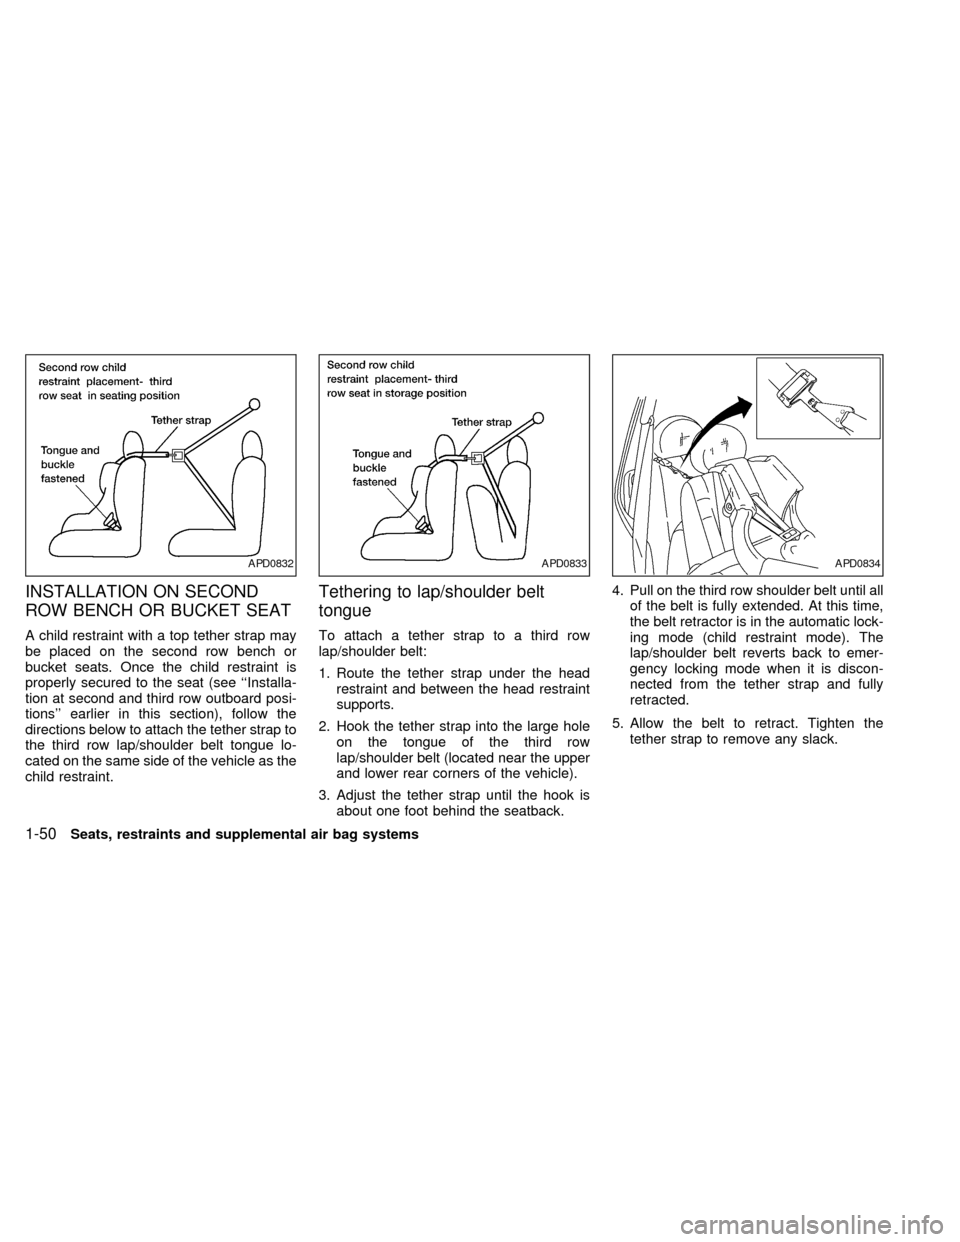
INSTALLATION ON SECOND
ROW BENCH OR BUCKET SEAT
A child restraint with a top tether strap may
be placed on the second row bench or
bucket seats. Once the child restraint is
properly secured to the seat (see ``Installa-
tion at second and third row outboard posi-
tions'' earlier in this section), follow the
directions below to attach the tether strap to
the third row lap/shoulder belt tongue lo-
cated on the same side of the vehicle as the
child restraint.
Tethering to lap/shoulder belt
tongue
To attach a tether strap to a third row
lap/shoulder belt:
1. Route the tether strap under the head
restraint and between the head restraint
supports.
2. Hook the tether strap into the large hole
on the tongue of the third row
lap/shoulder belt (located near the upper
and lower rear corners of the vehicle).
3. Adjust the tether strap until the hook is
about one foot behind the seatback.4. Pull on the third row shoulder belt until all
of the belt is fully extended. At this time,
the belt retractor is in the automatic lock-
ing mode (child restraint mode). The
lap/shoulder belt reverts back to emer-
gency locking mode when it is discon-
nected from the tether strap and fully
retracted.
5. Allow the belt to retract. Tighten the
tether strap to remove any slack.
APD0832APD0833APD0834
1-50Seats, restraints and supplemental air bag systems
ZX