1998 NISSAN QUEST ECU
[x] Cancel search: ECUPage 71 of 260
SEATING ARRANGEMENTS
Many different arrangements for passenger
seating or cargo hauling are available as
you will see in the following illustrations. The
second row seats may be removed and the
third row seat may be moved forward to the
second row seating position. The second
and third row seats have an optional fold-
down table-top feature. This offers a variety
of uses for the vehicle when moving or
stopped.
The illustrations shown reflect the different
seating positions available.
Before you begin to arrange the seats in
your vehicle, read all of the cautions and
warnings in this chapter, including the
following section on the removable floor
mats. Also observe any labels that are in
the vehicle.
WARNING
cWhile the vehicle is in motion, pas-
sengers should always be seated in
a forward facing direction in a seat
which is properly secured and ad-
justed. Seat belts should always be
used. Sitting without a seat belt in a
seat that is not properly secured in
one of the locations shown in this
chapter, or in a place without a seat
and seat belt can result in personal
injury in a sudden stop or collision.
cDo not ride in a moving vehicle when
the seatback is reclined. This can be
dangerous. The shoulder belt will
not be against your body. In an acci-
dent, you could be thrown into it and
receive neck or other serious inju-
ries. You could also slide under the
lap belt and receive serious internal
injuries.
cFor the most effective protection
when the vehicle is in motion, the
seat should be upright. Always sit
well back in the seat and adjust the
seat belt properly.cIt is extremely dangerous to ride in a
cargo area inside of a vehicle. In a
collision, people riding in these ar-
eas are more likely to be seriously
injured or killed.
cDo not allow people to ride in any
area of your vehicle that is not
equipped with seats and seat belts.
cBe sure everyone in your vehicle is
in a seat and using a seat belt prop-
erly.
cDo not place hard items such as
coffee mugs or drinking glasses on
the tabletop seats when the vehicle
is moving. Any item can become a
projectile inside a vehicle involved in
a collision. To help prevent personal
injury, never leave loose items on
the fold-down tabletop seats when
the vehicle is moving.
SEATS/FLOOR MATS
1-64Seats, restraints and supplemental air bag systems
ZX
Page 75 of 260
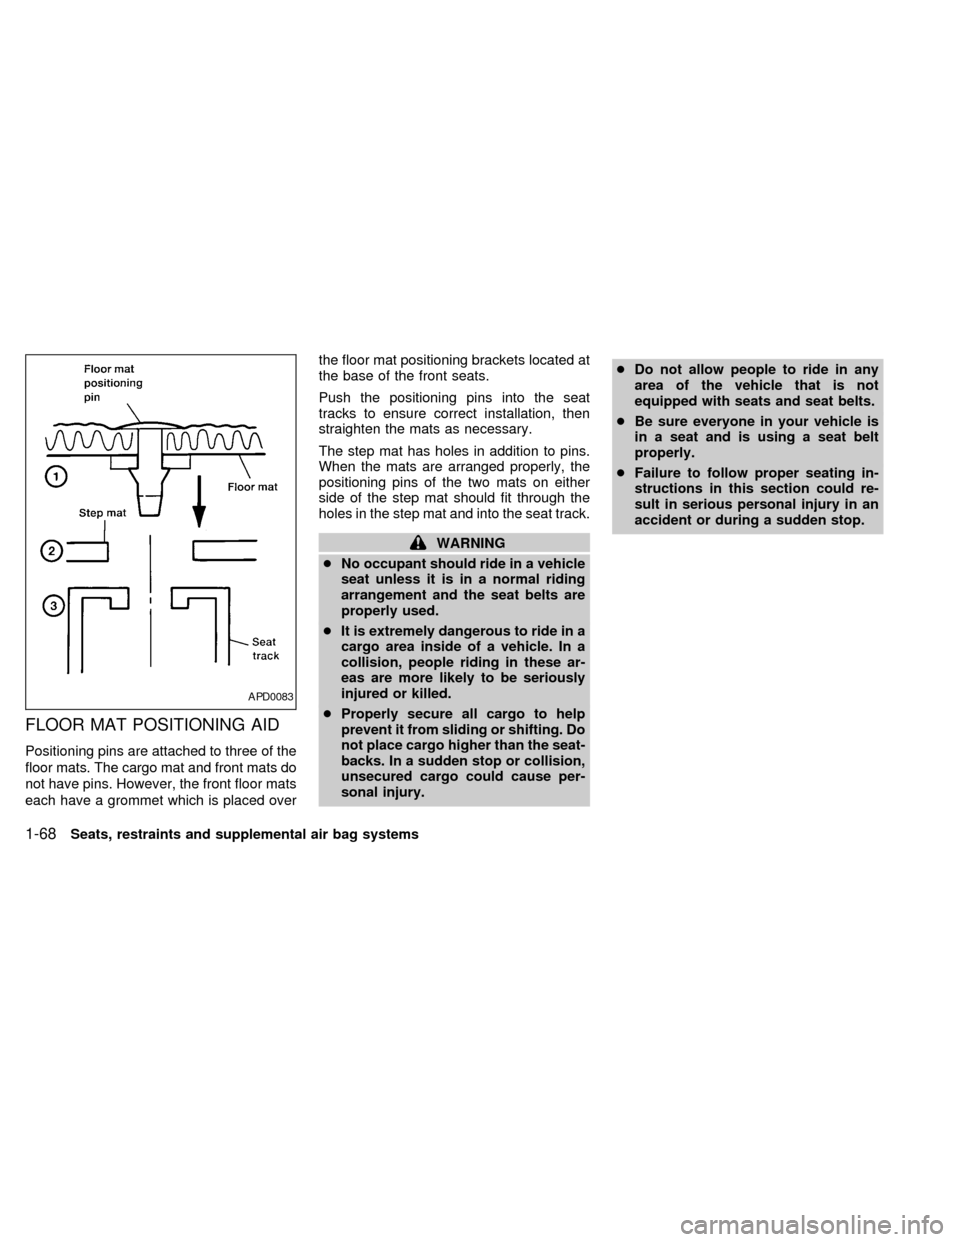
FLOOR MAT POSITIONING AID
Positioning pins are attached to three of the
floor mats. The cargo mat and front mats do
not have pins. However, the front floor mats
each have a grommet which is placed overthe floor mat positioning brackets located at
the base of the front seats.
Push the positioning pins into the seat
tracks to ensure correct installation, then
straighten the mats as necessary.
The step mat has holes in addition to pins.
When the mats are arranged properly, the
positioning pins of the two mats on either
side of the step mat should fit through the
holes in the step mat and into the seat track.
WARNING
cNo occupant should ride in a vehicle
seat unless it is in a normal riding
arrangement and the seat belts are
properly used.
cIt is extremely dangerous to ride in a
cargo area inside of a vehicle. In a
collision, people riding in these ar-
eas are more likely to be seriously
injured or killed.
cProperly secure all cargo to help
prevent it from sliding or shifting. Do
not place cargo higher than the seat-
backs. In a sudden stop or collision,
unsecured cargo could cause per-
sonal injury.cDo not allow people to ride in any
area of the vehicle that is not
equipped with seats and seat belts.
cBe sure everyone in your vehicle is
in a seat and is using a seat belt
properly.
cFailure to follow proper seating in-
structions in this section could re-
sult in serious personal injury in an
accident or during a sudden stop.
APD0083
1-68Seats, restraints and supplemental air bag systems
ZX
Page 88 of 260
mains on, see an authorized NISSAN
dealer immediately.
CAUTION
Do not continue driving if the belt is
loose, broken or missing.
Low fuel warning light
This light comes on when the fuel level in
the fuel tank is getting low. Refuel as soon
as it is convenient, preferably before the fuel
gauge reaches E (Empty). There will be a
small reserve of fuel in the tank when the
fuel gauge needle reaches E (Empty).
Door ajar warning light
This light comes on when any of the doors
are not closed securely while the ignition
key is ON.
Seat belt warning light and
chime
The light and chime remind you to fasten
your seat belts. If the driver's seat belt is
NOT securely fastened when the ignition
key is turned to ON or START, the chime
sounds four times and the light illuminates.Refer to ``Seat belts'' in the ``Seats, re-
straints and supplemental air bag systems''
section of this manual for precautions on
seat belt usage.
Supplemental air bag
warning light
When the ignition key is in the ON or START
position, the supplemental air bag warning
light illuminates for about 7 seconds and
then turns off. This means the Air Bag
Supplemental Restraint System is opera-
tional.
If any of the following conditions occur, the
supplemental air bag system needs servic-
ing and your vehicle should be taken to an
authorized NISSAN dealer:
1. The supplemental air bag warning light
does not come on for 7 seconds and then
turn off as described above.
2. The supplemental air bag warning light
flashes intermittently or remains on.
3. The supplemental air bag warning light
does not come on at all.
Under these conditions, the Air Bag Supple-
mental restraint system may not function
properly. For additional details, see ``Supple-mental restraint system'' in the ``Seats, re-
straints and supplemental air bag systems''
section of this manual.
WARNING
If the supplemental air bag warning
light is on, it could mean that the
supplemental air bag will not operate in
an accident.
Low washer fluid warning
light
This light comes on when the washer fluid is
at a low level. Add washer fluid as neces-
sary. See the ``Do-it-yourself'' section of this
manual.
Brake warning light
This light functions for both the parking
brake and the foot brake systems.
When the ignition key is in the ON position,
the light comes on when the parking brake
is applied, and also warns of a low brake
fluid level. If the light comes on while the
engine is running with the parking brake not
applied, stop the vehicle and perform the
following:
Instruments and controls
2-7
ZX
Page 90 of 260
CRUISE indicator blinks, have the system
checked by an authorized NISSAN dealer.
Key reminder chime
The chime sounds if the driver's or passen-
ger's door is opened while the key is left in
the ignition switch. Remove the key and
take it with you when leaving the vehicle.
Light reminder chime
A chime sounds when the driver's or pas-
senger's door is opened if the headlight
control switch is turned on (ignition switch is
turned OFF).
The chime will not sound when the Auto-
lamp (if so equipped) shut-off delay is acti-
vated. Refer to the ``Autolamp Switch'' in-
structions later in this owner's manual.
Turn the headlight control switch to OFF
when you leave the vehicle.
Brake pad wear warning
The disc brake pads have audible wear
warnings. When a brake pad requires re-
placement, it makes a high pitched scraping
sound when the vehicle is in motion whether
or not the brake pedal is depressed. Have
the brakes checked as soon as possible if
the warning sound is heard.
orMalfunction indica-
tor light (MIL)
If the malfunction indicator light comes on
steady or blinks while the engine is running, it
may indicate a potential emission control
problem.
The malfunction indicator light may also
come on steady or blink if the fuel filler cap
has not been closed tightly or if the fuel tank
is nearly empty. Check to make sure the
fuel cap is secure and that you have at least
three gallons of fuel in the fuel tank.
After driving for a while, the light should
remain off if no other potential emission
control system problem exists.
Operation
The malfunction indicator light will come on
in one of two ways:
1. Malfunction indicator light on steady - An
emission control system malfunction has
been detected. Have the vehicle in-
spected by an authorized NISSAN
dealer. You do not need to have your
vehicle towed to the dealer.
2. Malfunction indicator light blinking - Anengine misfire has been detected which
may damage the emission control sys-
tem. To reduce or avoid emission control
system damage:
cdo not drive at speeds above 45 MPH
(72 km/h).
cavoid hard acceleration or decelera-
tion.
cavoid steep uphill grades.
cif possible, reduce the amount of cargo
being hauled or towed.
The malfunction indicator light may stop
blinking and come on steady. Have the
vehicle inspected by an authorized NISSAN
dealer. You do not need to have your ve-
hicle towed to the dealer.
CAUTION
Continued vehicle operation without
having the emission control system
checked and repaired as necessary
could lead to poor driveability, reduced
fuel economy, and possible damage to
the emission control system.
Some conditions may cause the malfunc-
tion indicator light to come on steady or
blink. Examples are as follows:
Instruments and controls
2-9
ZX
Page 91 of 260

cvehicle ran out of fuel, which caused
the engine to misfire.
cfuel filler cap was left off or improperly
installed, allowing fuel to evaporate
into the atmosphere.
If you suspect that you experienced such a
condition, drive the vehicle to an authorized
NISSAN dealer and have the vehicle in-
spected. Avoid any unnecessary diagnosis
during the service by informing the dealer of
the condition that may have occurred.
The theft warning system provides audio
and visual alarm signals if parts of the
vehicle are disturbed.
How to activate the theft warning
system
1. Close all windows.
2. Remove the key from the ignition switch.
3. Close all doors and the hood. Lock all
doors by pressing the
button on the
multi-remote controller. At this time, the
parking lights blink and the horn chirps to
indicate all doors are locked.The system can be activated even if the
windows are open.
4. Confirm that the SECURITY light, lo-
cated under the hazard warning switch,
illuminates. The SECURITY light illumi-
nates for about 30 seconds and then
begins to flash once every three sec-
onds. The system is now activated.
The theft warning system is NOT activated if
one of the following occurs:
cA door is unlocked or opened, the hood is
opened, or the ignition key is turned to
the ACC or ON position during the 30
seconds in which the SECURITY light
stays on.
cThe SECURITY light blinks at a steady
1/2 second on - 1/2 second off rate
because a door or the hood is open and
the key is not in the ACC or ON position.
When the ignition key is turned to the
ACC or ON position, the SECURITY light
turns off.
IC0005
THEFT WARNING
(if so equipped)
2-10Instruments and controls
ZX
Page 116 of 260

Replace the two batteries as follows:
1. Remove the screw and open the lid.
2. Replace the batteries with new ones.
Insert the batteries as illustrated above.
Recommended batteries: Sanyo CR2016
or equivalent.
3. Close the lid securely and install the
screw.
4. Press the
button, then thebutton
two or three times to check the multi-
remote controller operation.If the batteries are removed for any rea-
son other than replacement, perform
step 4.
c
An improperly disposed battery can
hurt the environment. Always conform
to local regulations for battery disposal.
cThe multi-remote controller is water-
resistant; however, if it does get wet,
immediately wipe completely dry.
cThe operational range of the multi-
remote controller extends to approxi-
mately 49 ft (15 m) from the vehicle.
This range may vary with conditions.
FCC Notice:
Changes or modifications not expressly
approved by the manufacturer for com-
pliance could void the user's authority to
operate the equipment.
This device complies with part 15 of the
FCC Rules and RSS-210 of Industry
Canada.
Operation is subject to the following two
conditions: (1) This device may not
cause harmful interference, and (2) this
device must accept any interference re-
ceived, including interference that may
cause undesired operation of the device.
APD1031
BATTERY REPLACEMENT
Pre-driving checks and adjustments3-9
ZX
Page 119 of 260
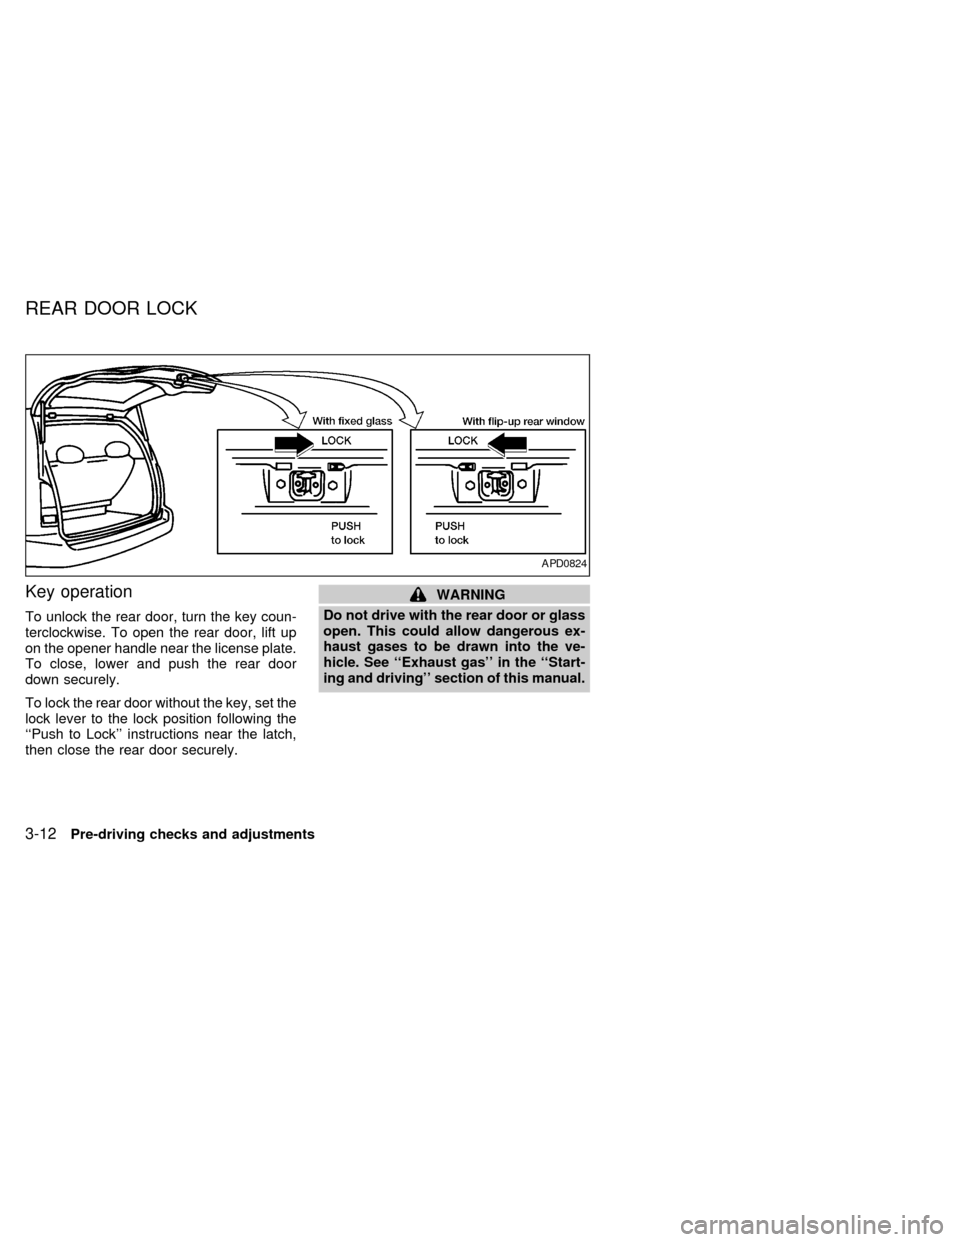
Key operation
To unlock the rear door, turn the key coun-
terclockwise. To open the rear door, lift up
on the opener handle near the license plate.
To close, lower and push the rear door
down securely.
To lock the rear door without the key, set the
lock lever to the lock position following the
``Push to Lock'' instructions near the latch,
then close the rear door securely.
WARNING
Do not drive with the rear door or glass
open. This could allow dangerous ex-
haust gases to be drawn into the ve-
hicle. See ``Exhaust gas'' in the ``Start-
ing and driving'' section of this manual.
APD0824
REAR DOOR LOCK
3-12Pre-driving checks and adjustments
ZX
Page 121 of 260
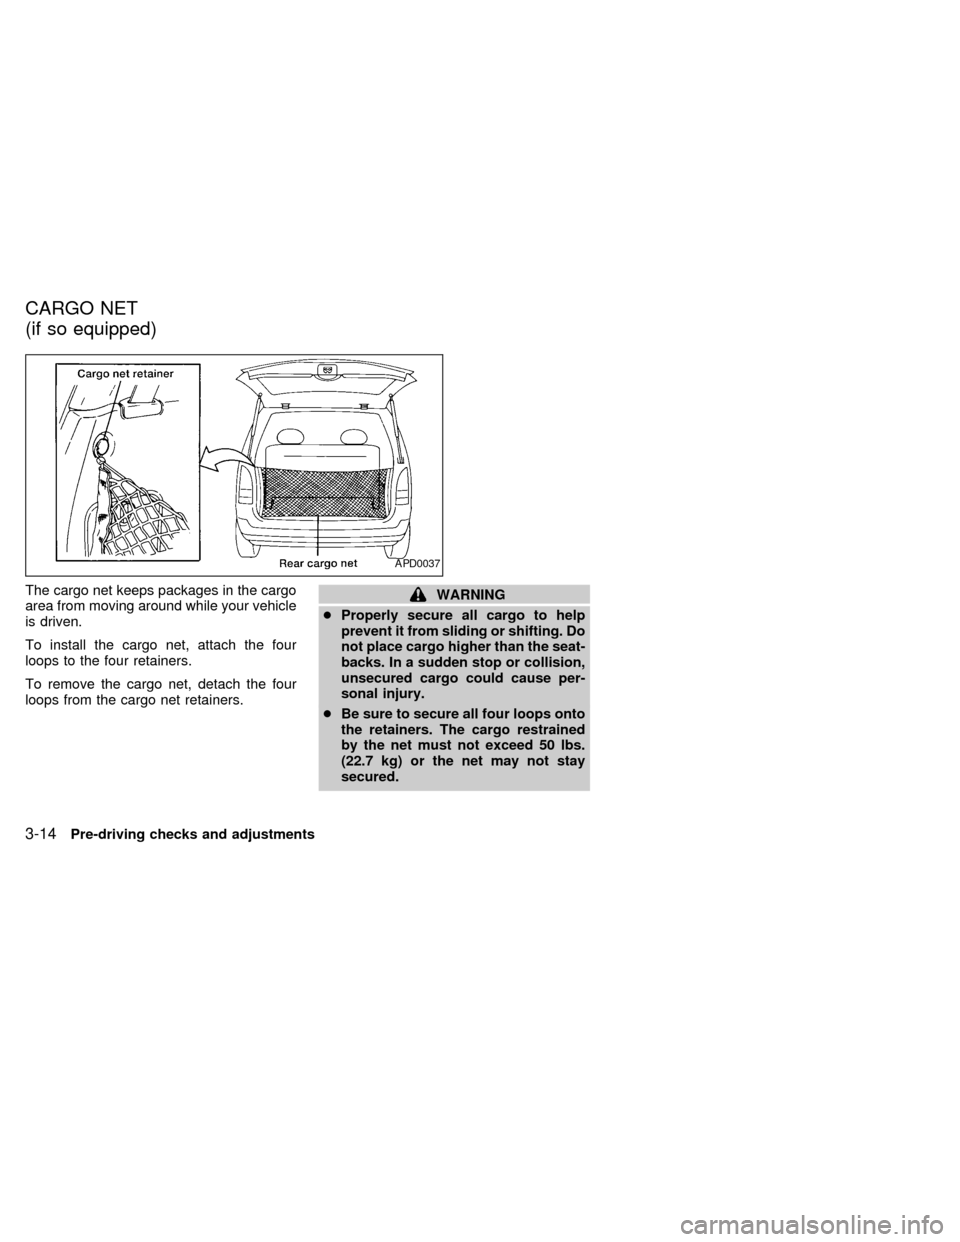
The cargo net keeps packages in the cargo
area from moving around while your vehicle
is driven.
To install the cargo net, attach the four
loops to the four retainers.
To remove the cargo net, detach the four
loops from the cargo net retainers.WARNING
cProperly secure all cargo to help
prevent it from sliding or shifting. Do
not place cargo higher than the seat-
backs. In a sudden stop or collision,
unsecured cargo could cause per-
sonal injury.
cBe sure to secure all four loops onto
the retainers. The cargo restrained
by the net must not exceed 50 lbs.
(22.7 kg) or the net may not stay
secured.
APD0037
CARGO NET
(if so equipped)
3-14Pre-driving checks and adjustments
ZX