Page 25 of 47
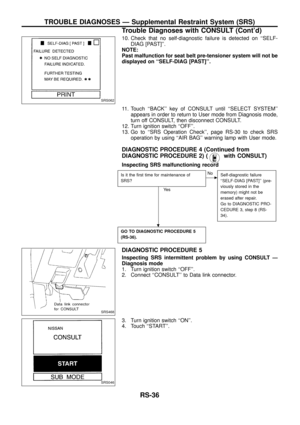
![NISSAN PATROL 1998 Y61 / 5.G Restraint System Workshop Manual HOW TO ERASE SELF-DIAGNOSIS RESULTS
With CONSULT
+``SELF-DIAG [CURRENT]
A current Self-diagnosis result is displayed on the CONSULT screen in real time. After the malfunction is
repaired completely,](/manual-img/5/627/w960_627-24.png "NISSAN PATROL 1998 Y61 / 5.G Restraint System Workshop Manual HOW TO ERASE SELF-DIAGNOSIS RESULTS
With CONSULT
+``SELF-DIAG [CURRENT]
A current Self-diagnosis result is displayed on the CONSULT screen in real time. After the malfunction is
repaired completely,")
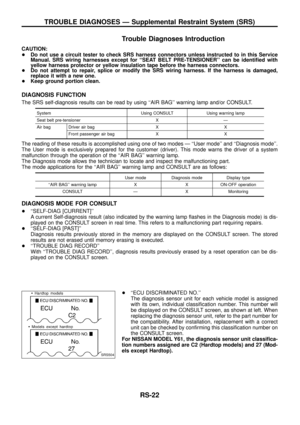
HOW TO ERASE SELF-DIAGNOSIS RESULTS
With CONSULT
+``SELF-DIAG [CURRENT]''
A current Self-diagnosis result is displayed on the CONSULT screen in real time. After the malfunction is
repaired completely, no malfunction is detected on ``SELF-DIAG [CURRENT]''.
+``SELF-DIAG [PAST]''
Return to the ``SELF-DIAG [CURRENT]'' CONSULT screen by
pushing ``BACK'' key of CONSULT and select ``SELF-DIAG
[CURRENT]'' in ``SELECT DIAG MODE''. Touch ``ERASE'' in
``SELF-DIAG [CURRENT]'' mode.
NOTE:
If the memory of the malfunction in ``SELF-DIAG [PAST]'' is not
erased, the User mode shows the system malfunction by the
operation of the warning lamp even if the malfunction is
repaired completely.
+``TROUBLE DIAG RECORD''
The memory of ``TROUBLE DIAG RECORD'' cannot be erased.
Without CONSULT
After a malfunction is repaired, return to User mode from Diagnosis mode by switching the ignition ``OFF'' for
at least 1 second, then back ``ON''. At that time, the problem code is cleared.
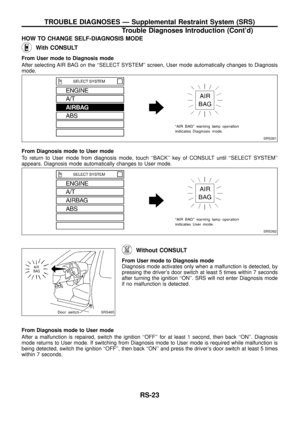
How to Perform Trouble Diagnoses for Quick
and Accurate Repair
A good understanding of the malfunction conditions can make troubleshooting faster and more accurate.
In general, each customer feels differently about a problem. It is important to fully understand the symptoms
or conditions for a customer complaint.
INFORMATION FROM CUSTOMER
WHAT ............ Vehicle model
WHEN ........... Date, Frequencies
WHERE ......... Road conditions
HOW .............. Operating conditions, Symptoms
PRELIMINARY CHECK
Check that the following parts are in good order.
+Battery [Refer to EL section (``BATTERY'').]
+Fuse [Refer to EL section (``Fuse'', ``POWER SUPPLY ROUTING'').]
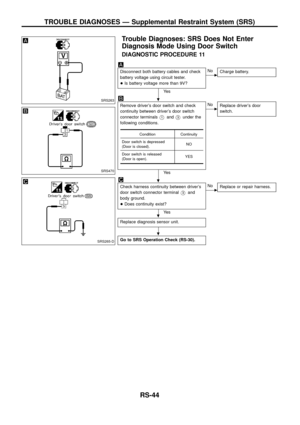
+System component-to-harness connections
SRS357
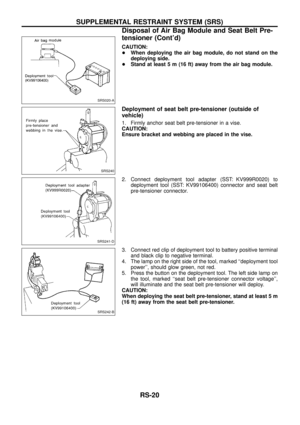
TROUBLE DIAGNOSES Ð Supplemental Restraint System (SRS)
Trouble Diagnoses Introduction (Cont'd)
RS-24
Page 26 of 47

Check for any Service Bulletin.
Check air bag system opera")
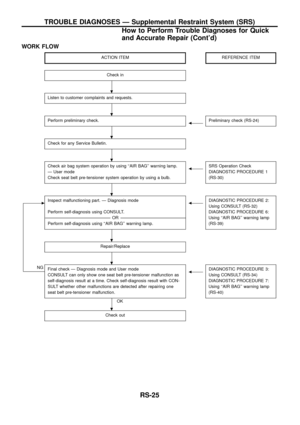
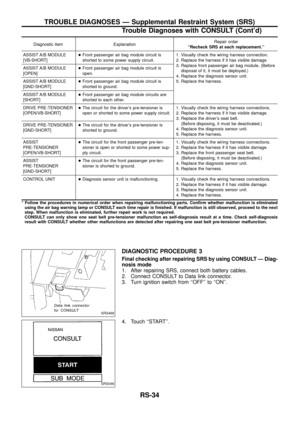
WORK FLOW
ACTION ITEMREFERENCE ITEM
Check in
Listen to customer complaints and requests.
Perform preliminary check.bPreliminary check (RS-24)
Check for any Service Bulletin.
Check air bag system operation by using ``AIR BAG'' warning lamp.
Ð User mode
Check seat belt pre-tensioner system operation by using a bulb.bSRS Operation Check
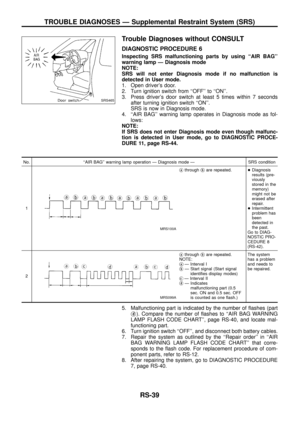
DIAGNOSTIC PROCEDURE 1
(RS-30)
cInspect malfunctioning part. Ð Diagnosis mode
Perform self-diagnosis using CONSULT.
----------------------------------------------------------------------------------------------------------------------------------------------------------------------------------------------------------------------------------OR ----------------------------------------------------------------------------------------------------------------------------------------------------------------------------------------------------------------------------------
Perform self-diagnosis using ``AIR BAG'' warning lamp.bDIAGNOSTIC PROCEDURE 2:
Using CONSULT (RS-32)
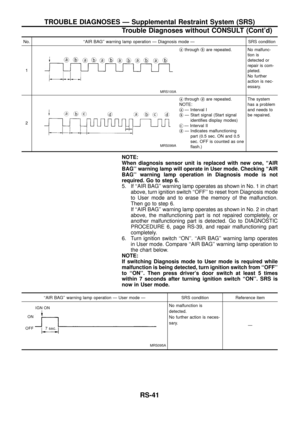
DIAGNOSTIC PROCEDURE 6:
Using ``AIR BAG'' warning lamp
(RS-39)
Repair/Replace
NGFinal check Ð Diagnosis mode and User mode
CONSULT can only show one seat belt pre-tensioner malfunction as
self-diagnosis result at a time. Check self-diagnosis result with CON-
SULT whether other malfunctions are detected after repairing one
seat belt pre-tensioner malfunction.
OK
bDIAGNOSTIC PROCEDURE 3:
Using CONSULT (RS-34)
DIAGNOSTIC PROCEDURE 7:
Using ``AIR BAG'' warning lamp
(RS-40)
Check out
.
.
.
.
.
.
.
.
TROUBLE DIAGNOSES Ð Supplemental Restraint System (SRS)
How to Perform Trouble Diagnoses for Quick
and Accurate Repair (Cont'd)
RS-25
Page 27 of 47
Schematic
TRS073
TROUBLE DIAGNOSES Ð Supplemental Restraint System (SRS)
RS-26
Page 28 of 47
Wiring Diagram Ð SRS Ð
TRS061
TROUBLE DIAGNOSES Ð Supplemental Restraint System (SRS)
RS-27
Page 29 of 47
TRS062
TROUBLE DIAGNOSES Ð Supplemental Restraint System (SRS)
Wiring Diagram Ð SRS Ð (Cont'd)
RS-28
Page 30 of 47
TRS063
TROUBLE DIAGNOSES Ð Supplemental Restraint System (SRS)
Wiring Diagram Ð SRS Ð (Cont'd)
RS-29
Page 31 of 47

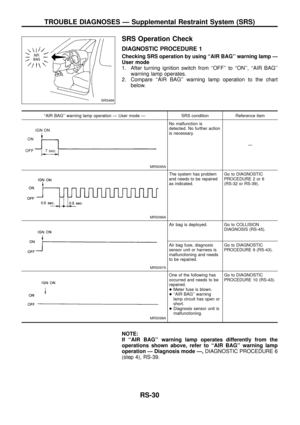
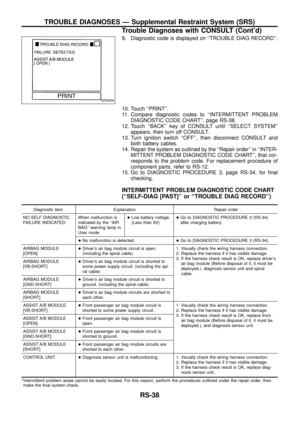
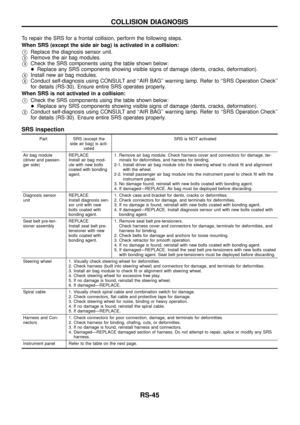
SRS Operation Check
DIAGNOSTIC PROCEDURE 1
Checking SRS operation by using ``AIR BAG'' warning lamp Ð
User mode
1. After turning ignition switch from ``OFF'' to ``ON'', ``AIR BAG''
warning lamp operates.
2. Compare ``AIR BAG'' warning lamp operation to the chart
below.
``AIR BAG'' warning lamp operation Ð User mode Ð SRS condition Reference item
MRS095A
No malfunction is
detected. No further action
is necessary.
Ð
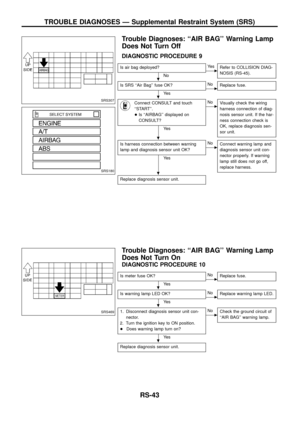
MRS096A
The system has problem
and needs to be repaired
as indicated.Go to DIAGNOSTIC
PROCEDURE 2 or 6
(RS-32 or RS-39).
MRS097A
Air bag is deployed. Go to COLLISION
DIAGNOSIS (RS-45).
Air bag fuse, diagnosis
sensor unit or harness is
malfunctioning and needs
to be repaired.Go to DIAGNOSTIC
PROCEDURE 9 (RS-43).
MRS098A
One of the following has
occurred and needs to be
repaired.
+Meter fuse is blown.
+``AIR BAG'' warning
lamp circuit has open or
short.
+Diagnosis sensor unit is
malfunctioning.Go to DIAGNOSTIC
PROCEDURE 10 (RS-43).
NOTE:
If ``AIR BAG'' warning lamp operates differently from the
operations shown above, refer to ``AIR BAG'' warning lamp
operation Ð Diagnosis mode Ð,DIAGNOSTIC PROCEDURE 6
(step 4), RS-39.
SRS466
TROUBLE DIAGNOSES Ð Supplemental Restraint System (SRS)
RS-30
Page 32 of 47

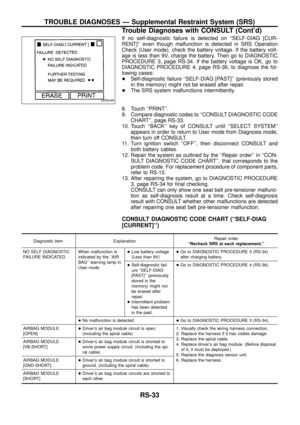
Checking seat belt pre-tensioner system operation
Check seat belt pre-tensioner system operation using a bulb as
follows:
1. Connect a bulb of less than 3.4W between data link connector
terminals
V7andV11.
2. After turning ignition switch from ``OFF'' to ``ON'', the bulb oper-
ates.
3. Compare the bulb operation to the chart below.
Lighting condition of the bulb SRS condition Reference item
MRS095A
No malfunction is
detected.
No further action is neces-
sary.
Ð
MRS096A
+Seat belt pre-tensioner
circuit is opened, or
+Seat belt pre-tensioner
power supply or ground
circuit is shorted.+If CONSULT is
available, go to DIAG-
NOSTIC PROCEDURE
2 (RS-32).
+If CONSULT is not
available, repair the sys-
tem as follows.*
1. Visually check the wir-
ing harness connec-
tions.
2. Replace the harness if it
has visible damage.
3. Replace driver's and
front passenger seat
belt assemblies.
(Before disposing, they
must be deactivated.)
4. Replace diagnosis sen-
sor unit.
MRS097A
Seat belt pre-tensioner
(and air bag) is deployed.Go to COLLISION DIAG-
NOSIS (RS-45).
* Follow the procedures in numerical order when repairing malfunctioning parts. Con®rm whether malfunction is eliminated
using a bulb or CONSULT each time repair is ®nished. If malfunction is still observed, proceed to the next step. When mal-
function is eliminated, further repair work is not required.
MRS054AB
TROUBLE DIAGNOSES Ð Supplemental Restraint System (SRS)
SRS Operation Check (Cont'd)
RS-31


RS-26")

RS-27")

Wiring Diagram Ð SRS Ð (Contd)
RS-28")

Wiring Diagram Ð SRS Ð (Contd)
RS-29")