1998 NISSAN FRONTIER remove seats
[x] Cancel search: remove seatsPage 10 of 224
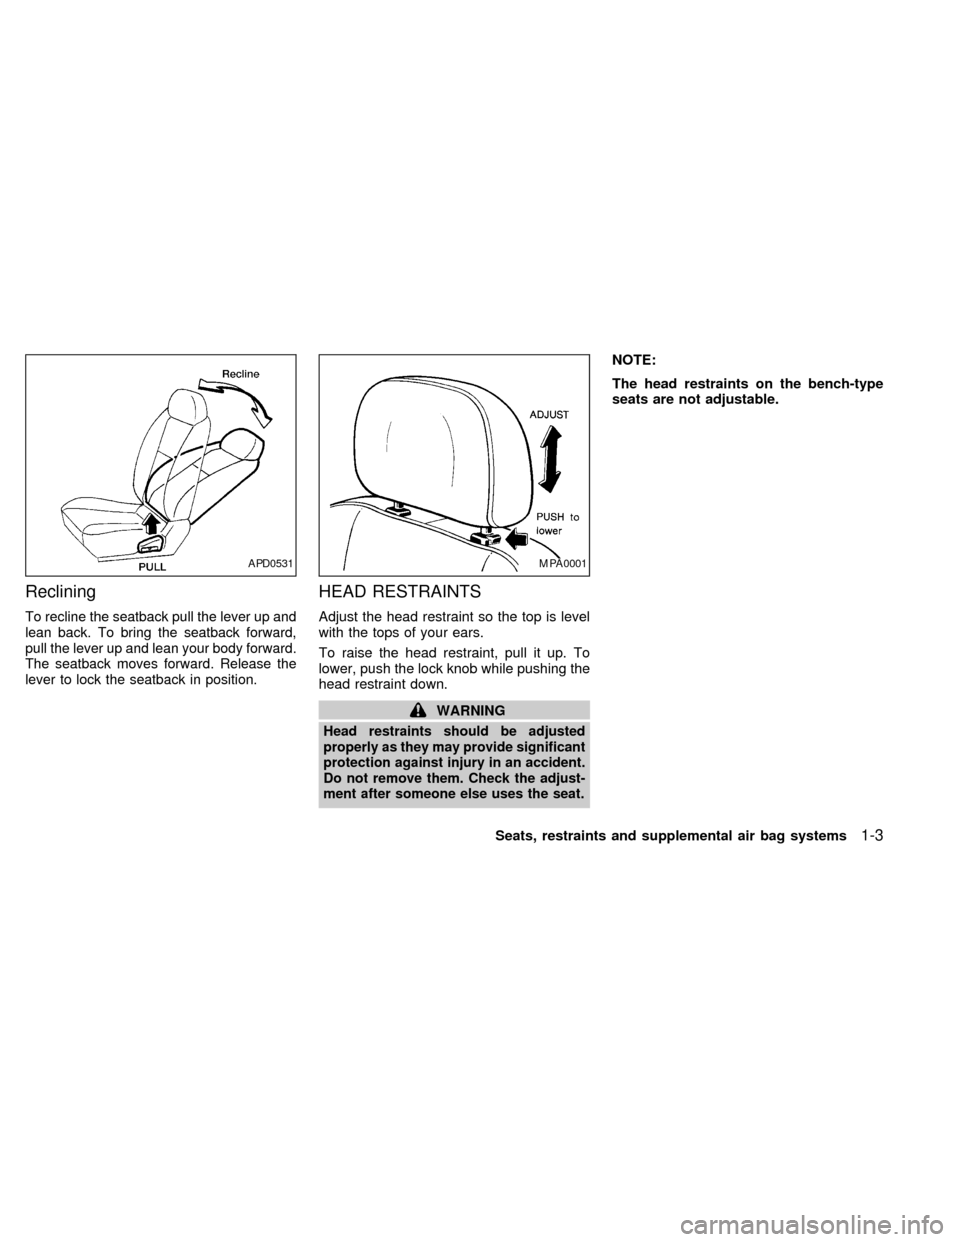
Reclining
To recline the seatback pull the lever up and
lean back. To bring the seatback forward,
pull the lever up and lean your body forward.
The seatback moves forward. Release the
lever to lock the seatback in position.
HEAD RESTRAINTS
Adjust the head restraint so the top is level
with the tops of your ears.
To raise the head restraint, pull it up. To
lower, push the lock knob while pushing the
head restraint down.
WARNING
Head restraints should be adjusted
properly as they may provide significant
protection against injury in an accident.
Do not remove them. Check the adjust-
ment after someone else uses the seat.
NOTE:
The head restraints on the bench-type
seats are not adjustable.
APD0531MPA0001
Seats, restraints and supplemental air bag systems1-3
ZX
Page 12 of 224
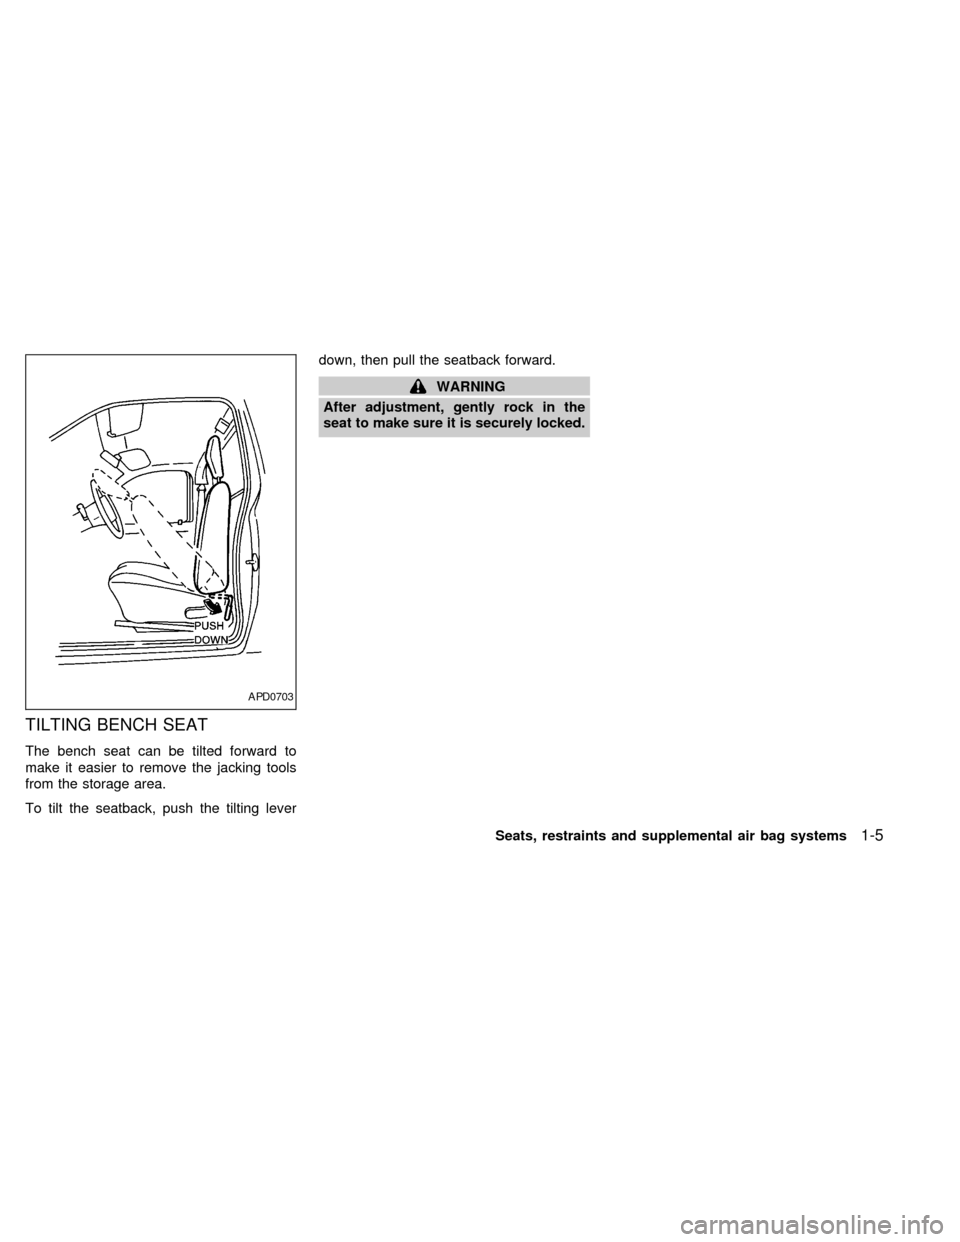
TILTING BENCH SEAT
The bench seat can be tilted forward to
make it easier to remove the jacking tools
from the storage area.
To tilt the seatback, push the tilting leverdown, then pull the seatback forward.
WARNING
After adjustment, gently rock in the
seat to make sure it is securely locked.
APD0703
Seats, restraints and supplemental air bag systems1-5
ZX
Page 20 of 224
The ON/OFF switch should ONLYbe used
to turn the passenger supplemental air bag
OFF when the following government criteria
exist:
cInfants (less than 1 year old) in rear
facing child restraints MUST
be placed
in the front passenger seat.
cChildren ages 1-12 years MUST
be
placed in the front passenger seat.
c
The passenger has a medical condition
which, according to a physician, causes
the air bag to pose a special risk and
makes the potential harm from the air
bag greater than the potential harm
from turning off the air bag.
Seat belts and child restraints should al-
ways be properly used. See ªPrecautions
on seat belt usageº and ªChild restraintsº
later in this section for details.
To turn the passenger supplemental air bag
OFF, insert the ignition key in the passenger
supplemental air bag ON/OFF switch and
turn the switch clockwise to the OFF posi-
tion. Then remove the key. When the igni-
tion is turned to the ON or START position
the passenger air bag OFF indicator light
will illuminate to indicate the air bag is OFF.To turn the passenger supplemental air bag
ON, insert the ignition key in the passenger
supplemental air bag ON/OFF switch and
turn the switch counter clockwise to the ON
position. Then remove the key. When the
ignition is turned to the ON or START
position the passenger air bag OFF indica-
tor light will illuminate for 7 seconds to
indicate the system is working properly and
then go out to indicate that the passenger
supplemental air bag is ON.
When the switch is turned to the ON posi-
tion, the passenger supplemental air bag is
enabled and could inflate in a frontal colli-
sion. When the switch is turned to the OFF
position, the passenger supplemental air
bag is disabled and will not inflate in a
frontal collision. The passenger supplemen-
tal air bag OFF indicator light on the instru-
ment panel illuminates when the passenger
supplemental air bag ON/OFF switch is
turned to the OFF position. The driver's side
supplemental air bag always remains en-
abled and is not affected by the passenger
supplemental air bag ON/OFF switch.
The passenger supplemental air bag light,
displaying OFF in the center of the instru-
ment panel, monitors the position of thepassenger supplemental air bag ON/OFF
switch. When the ignition key is in the ON or
START position, the light illuminates for
about 7 seconds and then turns off if the air
bag is ON, or stays on if the air bag is OFF.
WARNING
cDo not switch the air bag OFF unless
you meet the federal government cri-
teria outlined below. This vehicle is
equipped with seat belts with a ``load
limiter'' feature. The seat belts are
designed to work with the air bags to
reduce the risk of injury in a colli-
sion. The seat belts are designed to
release additional belt webbing dur-
ing some collisions to reduce the
concentration of force on the occu-
pant's chest area. In a collision with
the air bag turned OFF, the seat belt
may allow the occupant enough for-
ward movement to incur serious or
fatal injuries.
Seats, restraints and supplemental air bag systems
1-13
ZX
Page 36 of 224

3. Pull on the shoulder belt until all of the
belt is fully extended. At this time, the
retractor is in the automatic locking mode
(child restraint mode). It reverts back to
emergency locking mode when the belt is
fully retracted.4. Allow the belt to retract. Pull up on the
belt to remove any slack in the belt.5. Before placing the child in the child re-
straint, use force to tilt the child restraint
from side to side, and tug it forward to
make sure it is securely held in place.
6. Check that the retractor is in the auto-
matic locking mode by trying to pull more
belt out of the retractor. If you cannot pull
any more belt webbing out of the retrac-
tor, the belt is in the automatic locking
mode.
7. Check to make sure the child restraint is
properly secured prior to each use. If the
belt is not locked, repeat steps three
through six.
ARS1034ARS1074ARS1111
Seats, restraints and supplemental air bag systems1-29
ZX
Page 37 of 224
After the child restraint is removed and the
seat belt is allowed to wind back into the
retractor, the automatic locking mode (child
restraint mode) is canceled; The seat belt
only locks during a sudden stop or impact.REAR FACING INSTALLATION
ON FRONT PASSENGER SEAT
(Three-point type with retractor)
WARNING
cKeep the passenger supplemental
air bag ON/OFF switch turned ON
unless a rear-facing child restraint is
used in the front seat. If the switch is
OFF the air bag will not inflate in a
collision as designed.
c
Be sure to turn the passenger
supplemental air bag ON/OFF switch
OFF when using a rear facing child
restraint in the front passenger seat.
If it is not OFF, the air bag may inflate
in a collision. The force of the rapidly
inflating air bag could cause serious
injury or kill the child in the child
restraint. See ``Passenger supple-
mental air bag ON/OFF switch and
light'' earlier in this section.
cIf the supplemental air bag warning
light located in the instrument panel
next to the speedometer comes on
when the passenger supplemental airbag OFF indicator light is also illumi-
nated, something may be wrong with
the air bag system. Do not use a child
restraint in the front passenger seat
until the system is checked by your
NISSAN dealer.
cThe three-point belt in your vehicle
is equipped with a locking mode re-
tractor which must be used when
installing a child restraint.
cFailure to use the retractor's locking
mode will result in the child restraint
not being properly secured. The re-
straint could tip over or otherwise be
unsecured and cause injury to the
child in a sudden stop or collision.
1-30Seats, restraints and supplemental air bag systems
ZX
Page 39 of 224

4. Allow the belt to retract. Pull up on the
belt to remove any slack in the belt.5. Before placing the child in the child re-
straint, use force to tilt the child restraint
from side to side, and tug it forward to
make sure it is securly held in place.
6. Ensure the retractor is in the automatic
locking mode by trying to pull more belt
out of the retractor. If you cannot pull any
more belt webbing out of the retractor,
the belt is in the automatic locking mode.
7. Check to make sure the child restraint is
properly secured prior to each use. If the
lap belt is not locked, repeat steps three
through six.After the child restraint is removed and the
seat belt is allowed to wind back into the
retractor, the automatic locking mode (child
restraint mode) is canceled; the emergency
locking retractor may be used as normal
and will only lock during a sudden stop or
impact.
ARS1107ARS1108
1-32Seats, restraints and supplemental air bag systems
ZX
Page 76 of 224
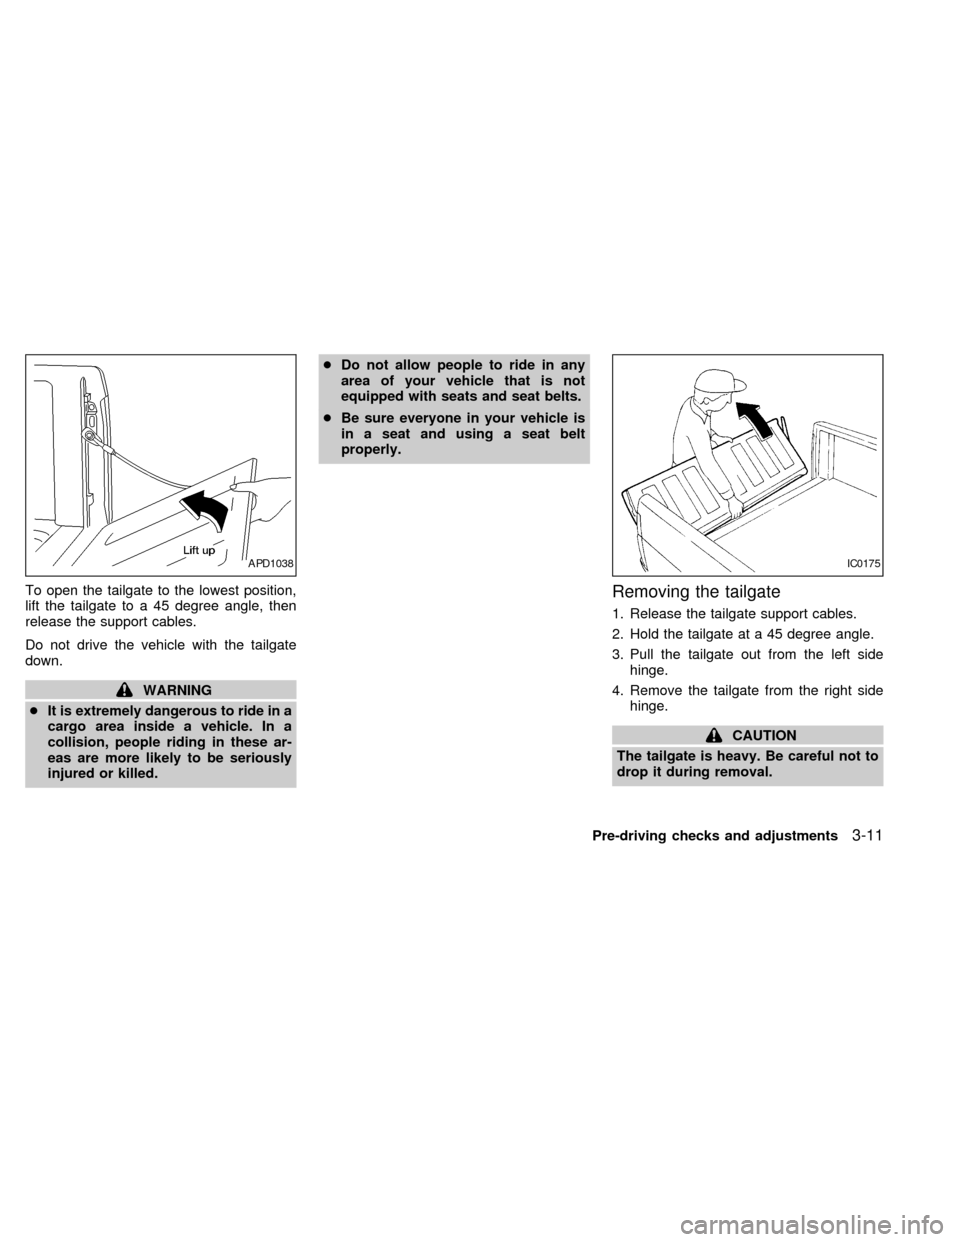
To open the tailgate to the lowest position,
lift the tailgate to a 45 degree angle, then
release the support cables.
Do not drive the vehicle with the tailgate
down.
WARNING
cIt is extremely dangerous to ride in a
cargo area inside a vehicle. In a
collision, people riding in these ar-
eas are more likely to be seriously
injured or killed.cDo not allow people to ride in any
area of your vehicle that is not
equipped with seats and seat belts.
cBe sure everyone in your vehicle is
in a seat and using a seat belt
properly.
Removing the tailgate
1. Release the tailgate support cables.
2. Hold the tailgate at a 45 degree angle.
3. Pull the tailgate out from the left side
hinge.
4. Remove the tailgate from the right side
hinge.
CAUTION
The tailgate is heavy. Be careful not to
drop it during removal.
APD1038IC0175
Pre-driving checks and adjustments3-11
ZX
Page 144 of 224
you in choosing the proper product.
cWax your vehicle only after a thorough
washing. Follow the instructions supplied
with the wax.
cDo not use a wax containing any abra-
sives, cutting compounds or cleaners
that may damage the vehicle finish.
cIf the surface does not polish easily, use
a ``road tar'' remover and wax again.
Machine compounding or aggressive pol-
ishing on a base coat/clear coat paint finish
may dull the finish or leave swirl marks.
Only apply black wax or black shoe polish to
the black urethane or polypropylene
bumper.
Removing spots
Remove tar and oil spots, industrial dust,
insects and tree sap as quickly as possible
from the surface of the paint to avoid per-
manent damage or staining. Special clean-
ing products are available at an authorized
NISSAN dealer or any automotive accesso-
ries store.
Underbody
In areas where road salt is used in winter, itis necessary to clean the underbody regu-
larly in order to prevent dirt and salt from
building up and causing corrosion on the
underbody and suspension. Before the win-
ter period and again in the spring, the
underseal must be checked and, if neces-
sary, retreated.
Cleaning glass
Use glass cleaner to remove smoke and
dust film from the glass surfaces. It is nor-
mal for glass to be coated with a film after
the vehicle is parked in the hot sun. Glass
cleaner and a soft cloth easily remove this
film.
CAUTION
When cleaning the inside of the win-
dow, do not use any sharp-edged tools
or abrasive cleaners or chlorine-based
disinfectant cleaners. They could dam-
age the electrical conductors, radio an-
tenna elements or rear window defog-
ger elements.
Cleaning aluminum alloy wheels
Wash regularly, especially during winter
months in areas where road salt is used.Salt could discolor the wheel if not removed.
Chrome parts
Clean all chrome parts regularly with a
non-abrasive chrome polish to maintain the
finish.
Cleaning interior
Occasionally remove loose dust from the
interior trim, plastic parts and seats using a
vacuum cleaner or soft brush. Wipe the
vinyl and leather surfaces with a clean, soft
cloth dampened in mild soap solution, then
wipe clean with a dry soft cloth. Before
using any fabric protector, read the manu-
facturer's recommendations. Some fabric
protectors contain chemicals that stain or
bleach the seat material.
CAUTION
cNever use benzine, thinner or any
similar material.
cNever use fabric protectors unless
recommended by the manufacturer.
Appearance and care
7-3
ZX