1998 NISSAN FRONTIER change wheel
[x] Cancel search: change wheelPage 2 of 224
ON-PAVEMENT AND OFF-ROAD DRIVING
This vehicle will handle and maneuver differently from an
ordinary passenger car because it has a higher center of
gravity for off-road use. As with other vehicles with features
of this type, failure to operate this vehicle correctly may result
in loss of control or an accident.
Be sure to read ªOn-pavement and off-road driving precau-
tionsº, and ``Avoiding collision and rollover'', and ªDriving
your four-wheel drive safelyº, in the ªStarting and drivingº
section of this manual.
MODIFICATION OF YOUR VEHICLE
This vehicle should not be modified. Modification could affect
its performance, safety or durability, and may even violate
governmental regulations. In addition, damage or perfor-
mance problems resulting from modification may not be
covered under NISSAN warranties.
All information, specifications and illustrations in this manual are
those in effect at the time of printing. NISSAN reserves the right to
change specifications or design without notice and without obligation.
1997 NISSAN NORTH AMERICA, INC.
U.S.A.
All rights reserved. No part of this Owner's Manual may be
reproduced or stored in a retrieval system, or transmitted in any
form, or by any means, electronic, mechanical, photocopying,
recording or otherwise, without the prior written permission of
Nissan North America, Inc., Torrance, California.
ZX
Page 18 of 224
It can help save lives and reduce serious
injuries. However, an inflating supplemental
air bag may cause facial abrasions or other
injuries. Supplemental air bags do not pro-
vide restraint to the lower body.
Seat belts should be correctly worn and the
driver and passenger seated upright as far
as practical away from the steering wheel or
dashboard. Since the supplemental air bags
inflate quickly in order to help protect the
front occupants, the force of the supplemen-
tal air bag inflating can increase the risk of
injury if the occupant is too close to or
against the supplemental air bag module
during inflation.
The supplemental air bags deflate quickly
after a collision.
The supplemental air bags operate only
when the ignition switch is in the ON or
START position.
WARNING
cDo not attach any objects to the
steering wheel pad or on the instru-
ment panel. Also, do not place any
objects between any occupant and
the steering wheel or on the instru-
ment panel. Such objects maybecome dangerous projectiles and
cause injury if the supplemental air
bag inflates.
cRight after inflation, several supple-
mental air bag system components
will be hot. Do not touch them; you
may severely burn yourself.
c
No unauthorized changes should be
made to any components or wiring of
the supplemental air bag system. This
is to prevent accidental inflation of
the supplemental air bag or damage
to the supplemental air bag system.
cDo not make unauthorized changes to
your vehicle's electrical system, sus-
pension system or front end structure.
This could affect proper operation of
the supplemental air bag system.
cTampering with the supplemental air
bag system may result in serious per-
sonal injury. Tampering includes
changes to the steering wheel and the
instrument panel assembly by placing
material over the steering wheel pad,
above the dashboard, or by installing
additional trim material around the
supplemental air bag system.cWork around and on the supplemen-
tal air bag system should be done by
an authorized NISSAN dealer. Installa-
tion of electrical equipment should
also be done by an authorized NIS-
SAN dealer. The yellow SRS wiring-
should not be modified or discon-
nected. Unauthorized electrical test
equipment and probing devices
should not be used on the supple-
mental air bag system.
cSRS wiring harnesses are covered
with yellow insulation either just be-
fore the harness connectors or over
the complete harness for easy iden-
tification.
When selling your vehicle, we request that
you inform the buyer about the supplemental
air bag system and guide the buyer to the
appropriate sections in this Owner's Manual.
Seats, restraints and supplemental air bag systems1-11
ZX
Page 110 of 224

Shifting with manual transmission
To change gears, fully depress the clutch
pedal, then move the gearshift lever. After
shifting, slowly release the clutch.
You cannot shift directly from 5th gear into
R (Reverse). First shift into the N (Neutral)
position, then into R (Reverse).
If it is difficult to move the shift lever into R
(Reverse) or 1st, shift into N (Neutral), then
release the clutch pedal. Depress the clutch
pedal and shift into R (Reverse) or 1st
again.
If your vehicle is equipped with 4-wheeldrive, see ``
Transfer case shifting pro-
cedures for four-wheel drive vehicles'' later
in this section.
Suggested shift-up speeds
The folllowing table provides suggested speed
ranges for shifting into a higher gear. These
suggestions relate to fuel economy and vehicle
performance. Actual shift ranges should be
adjusted for specific road conditions, weather
conditions and individual driving habits.
cTwo-wheel drive models and four-wheel
drive models (2H and 4H position):
Shift from MPH (km/h)
1st to 2nd 15 (24)
2nd to 3rd 25 (40)
3rd to 4th 40 (64)
4th to 5th 45 (72)
c4-wheel drive model (4L position):
Shift from MPH (km/h)
1st to 2nd 8 (13)
2nd to 3rd 12 (19)
3rd to 4th 20 (32)
4th to 5th 22 (35)
Suggested maximum speed in each
gear
Downshift to a lower gear if the engine is not
running smoothly, or if you need to accelerate.
Do not exceed the maximum suggested
speed (shown below) in any gear. For level
road driving, use the highest gear sug-
gested for that speed. Always observe
posted speed limits, and drive according to
the road conditions, which will ensure safe
operation.
SD1017M
Starting and driving5-9
ZX
Page 119 of 224

TO SHIFT
TRANSFER CASE:SHIFT PROCEDURE FOR AUTO-LOCK FREE-RUNNING HUBS
From 2H to 4HMove the transfer lever to 4H at speeds below 25 MPH (40 km/h). It is not necessary to depress the clutch pedal. Perform
this operation when driving straight.
From 4H to 2HMove the transfer lever to 2H. This can be done at any speed, and it is not necessary to depress the clutch pedal. Per-
form this operation when driving straight.
NOTE:
For two-wheel drive operation, set the free-running hubs in the disengaged position. AUTO-LOCK hubs will not dis-
engage until the vehicle is moved about 3 feet (1 m) in the opposite direction of travel:
cWhen driving forward, stop and move 3 feet (1 m) in reverse.
cWhen backing up, stop and move 3 feet (1 m) forward, then move the vehicle about 3 feet (1 m) in reverse.
This will allow for better fuel economy, quieter ride and less component wear.
From 4H to 4L or 4L to
4H1. Stop the vehicle.
2. Depress the clutch pedal.
3. Depress the transfer lever and move it to the desired 4L or 4H position.
From 2H to 4L1. Stop the vehicle.
2. Depress the clutch pedal.
3. Depress the transfer lever and move it to 4L. Change gears quickly and smoothly.
From 4L to 2H1. Stop the vehicle.
2. Depress the clutch pedal.
3. Depress the transfer lever and move it to 2H.
NOTE:
Follow the NOTE shown in shifting from 4H to 2H.
5-18Starting and driving
ZX
Page 121 of 224

TO SHIFT TRANSFER
CASE:SHIFT PROCEDURE FOR MANUAL-LOCK FREE-RUNNING HUBS
From 2H to 4H1. Stop the vehicle.
2. Set free-running hubs in the LOCK position.
3. Move the transfer lever to 4H. It is not necessary to depress the clutch pedal.
From 4H to 2HMove the transfer lever to 2H. This can be done at any speed, and it is not necessary to depress the clutch pedal. Per-
form this operation when driving straight.
NOTE:
For two-wheel drive operation, set the free-running hubs in the FREE position. This will allow for better fuel
economy, quieter ride and less component wear.
From 4H to 4L or 4L to
4H1. Stop the vehicle.
2. Depress the clutch pedal.
3. Depress the transfer lever and move it to the desired 4L or 4H position.
From 2H to 4L1. Stop the vehicle.
2. Set free-running hubs in the LOCK position.
3. Depress the clutch pedal.
4. Depress the transfer lever and move it to 4L. Change gears quickly and smoothly.
From 4L to 2H1. Stop the vehicle.
2. Depress the clutch pedal.
3. Depress the transfer lever and move it to 2H.
NOTE:
Follow the NOTE shown in shifting from 4H to 2H.
5-20Starting and driving
ZX
Page 124 of 224
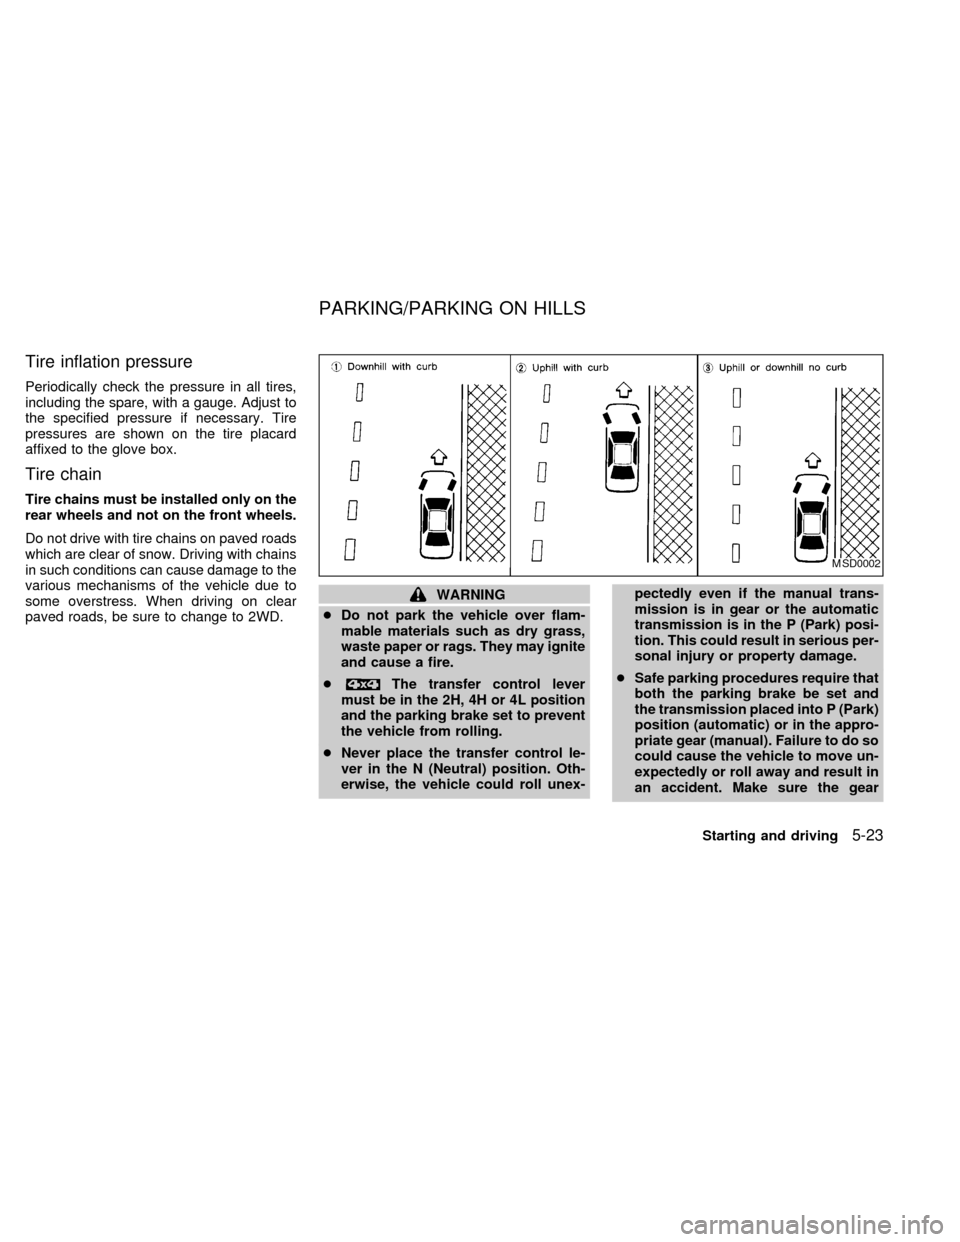
Tire inflation pressure
Periodically check the pressure in all tires,
including the spare, with a gauge. Adjust to
the specified pressure if necessary. Tire
pressures are shown on the tire placard
affixed to the glove box.
Tire chain
Tire chains must be installed only on the
rear wheels and not on the front wheels.
Do not drive with tire chains on paved roads
which are clear of snow. Driving with chains
in such conditions can cause damage to the
various mechanisms of the vehicle due to
some overstress. When driving on clear
paved roads, be sure to change to 2WD.
WARNING
cDo not park the vehicle over flam-
mable materials such as dry grass,
waste paper or rags. They may ignite
and cause a fire.
c
The transfer control lever
must be in the 2H, 4H or 4L position
and the parking brake set to prevent
the vehicle from rolling.
cNever place the transfer control le-
ver in the N (Neutral) position. Oth-
erwise, the vehicle could roll unex-pectedly even if the manual trans-
mission is in gear or the automatic
transmission is in the P (Park) posi-
tion. This could result in serious per-
sonal injury or property damage.
cSafe parking procedures require that
both the parking brake be set and
the transmission placed into P (Park)
position (automatic) or in the appro-
priate gear (manual). Failure to do so
could cause the vehicle to move un-
expectedly or roll away and result in
an accident. Make sure the gear
MSD0002
PARKING/PARKING ON HILLS
Starting and driving5-23
ZX
Page 131 of 224
If you have a flat tire, follow the instructions
below:
Stopping the vehicle
1. Safely move the vehicle off the road and
away from traffic.
2. Turn on the hazard warning flashers.
3. Park on a level surface and apply the
parking brake. Shift the manual transmis-
sion into R (Reverse), or the automatic
transmission into P (Park).
WARNING
c
The transfer control lever
must be in the 2H, 4H or 4L position.
c
Never place the transfer control lever
in the N (Neutral) position. Other-
wise, the vehicle could roll unexpect-
edly even if the manual transmission
is in gear or the automatic transmis-
sion is in the P (Park) position. This
could result in serious personal in-
jury or property damage.
4. Turn off the engine.
5. Raise the hood to warn other traffic and
to signal professional road assistancepersonnel that you require assistance.
6. Have all passengers get out of the ve-
hicle and stand in a safe place away from
traffic and clear of the vehicle.
WARNING
cMake sure that the parking brake is
securely applied and the manual
transmission is shifted into R (Re-
verse), or the automatic transmis-
sion into P (Park).
cNever change tires when the vehicle
is on a slope, ice or a slippery area.
This is hazardous.
cNever change tires if oncoming traf-
fic is close to your vehicle. Wait for
professional road assistance.
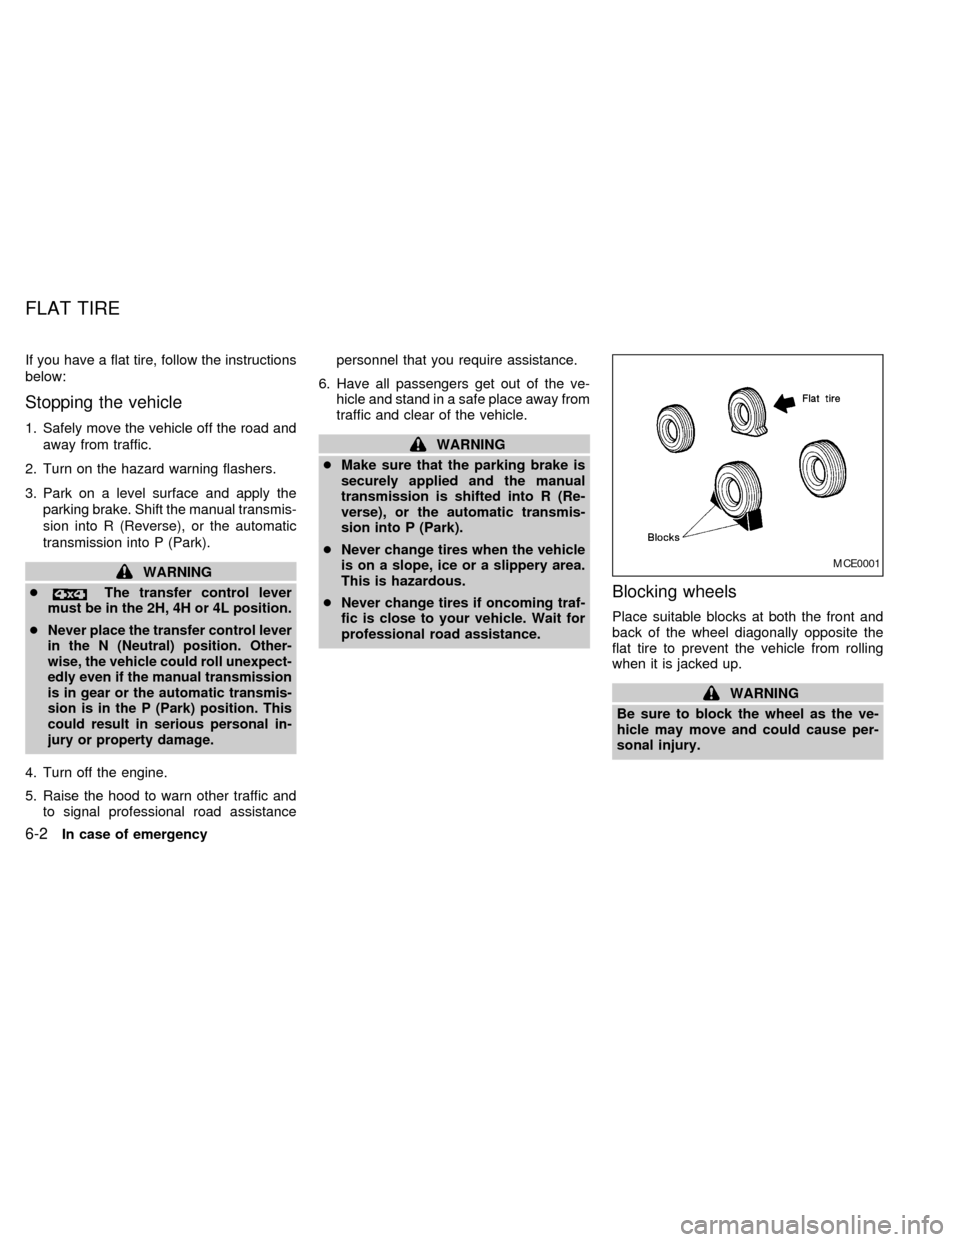
Blocking wheels
Place suitable blocks at both the front and
back of the wheel diagonally opposite the
flat tire to prevent the vehicle from rolling
when it is jacked up.
WARNING
Be sure to block the wheel as the ve-
hicle may move and could cause per-
sonal injury.
MCE0001
FLAT TIRE
6-2In case of emergency
ZX
Page 134 of 224
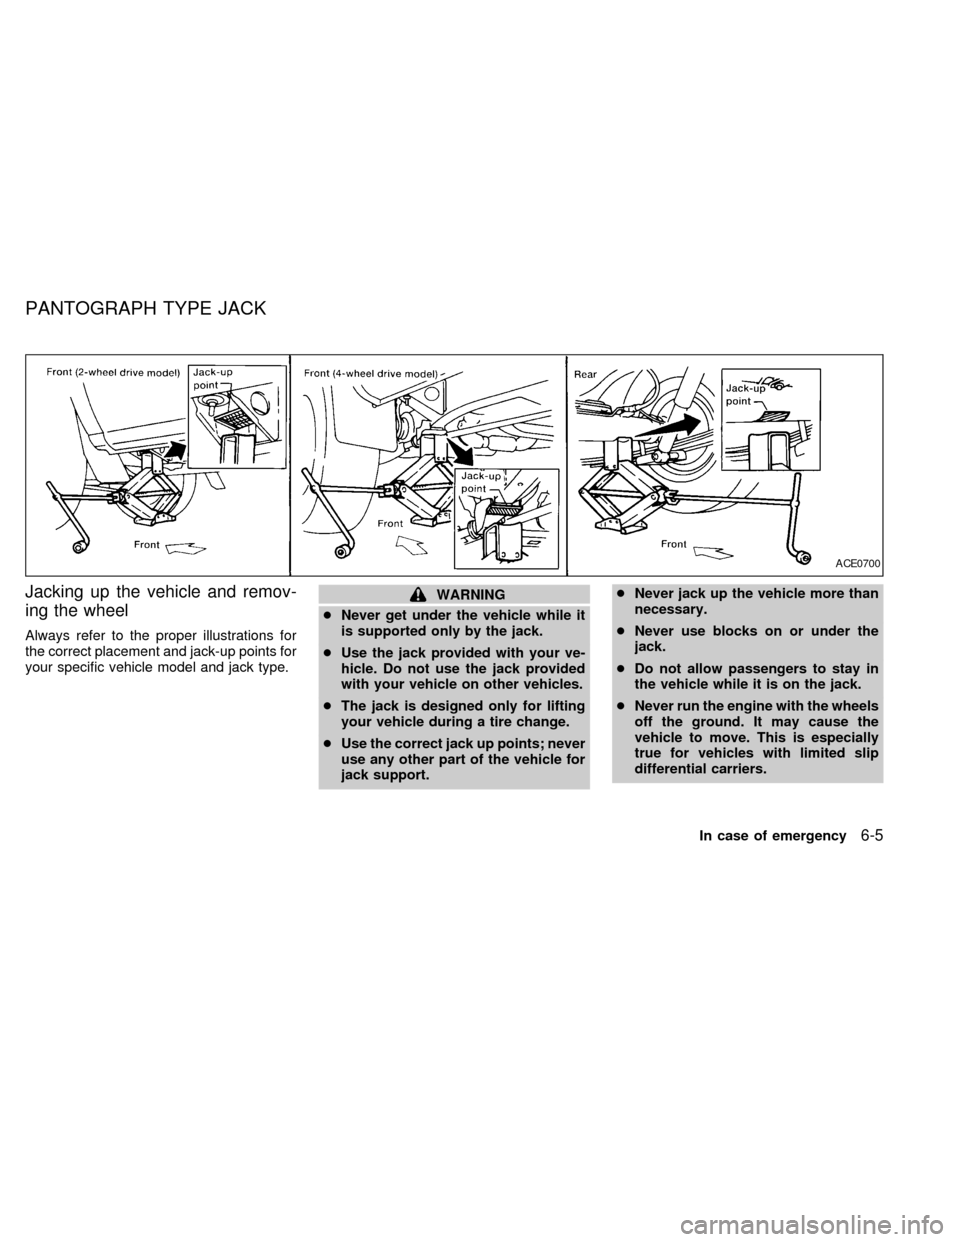
Jacking up the vehicle and remov-
ing the wheel
Always refer to the proper illustrations for
the correct placement and jack-up points for
your specific vehicle model and jack type.
WARNING
cNever get under the vehicle while it
is supported only by the jack.
cUse the jack provided with your ve-
hicle. Do not use the jack provided
with your vehicle on other vehicles.
cThe jack is designed only for lifting
your vehicle during a tire change.
cUse the correct jack up points; never
use any other part of the vehicle for
jack support.cNever jack up the vehicle more than
necessary.
cNever use blocks on or under the
jack.
cDo not allow passengers to stay in
the vehicle while it is on the jack.
cNever run the engine with the wheels
off the ground. It may cause the
vehicle to move. This is especially
true for vehicles with limited slip
differential carriers.
ACE0700
PANTOGRAPH TYPE JACK
In case of emergency6-5
ZX