1998 MITSUBISHI MONTERO clock
[x] Cancel search: clockPage 179 of 1501

3000GT
Remove front console assembly. Move selector lever to "P".
Loosen nuts securing shift lock cable and remove washer and cotter pin
at cable end. Turn lock cam counterclockwise to move set lever upward.
Fit cutout in set lever on pin of lock cam "B". Gently press set lever
down while pushing cable to take up slack. See Fig. 3. Tighten nut to
specifications to secure cable. See TORQUE SPECIFICATIONS. Ensure that
cable end contacts pin on lock cam, then install washer and cotter
pin.
Fig. 3: Adjusting Shift Lock Cable (3000GT)
Courtesy of Mitsubishi Motor Sales of America.
Except 3000GT
Remove front console assembly. Move selector lever to "P".
Loosen nuts securing shift lock cable. See Fig. 4. Adjust shift lock
cable so end of cable (Red mark) sits between lobe of lock cam, then
tighten nut to specifications to secure cable. See TORQUE
SPECIFICATIONS. Install front console assembly.
Page 306 of 1501

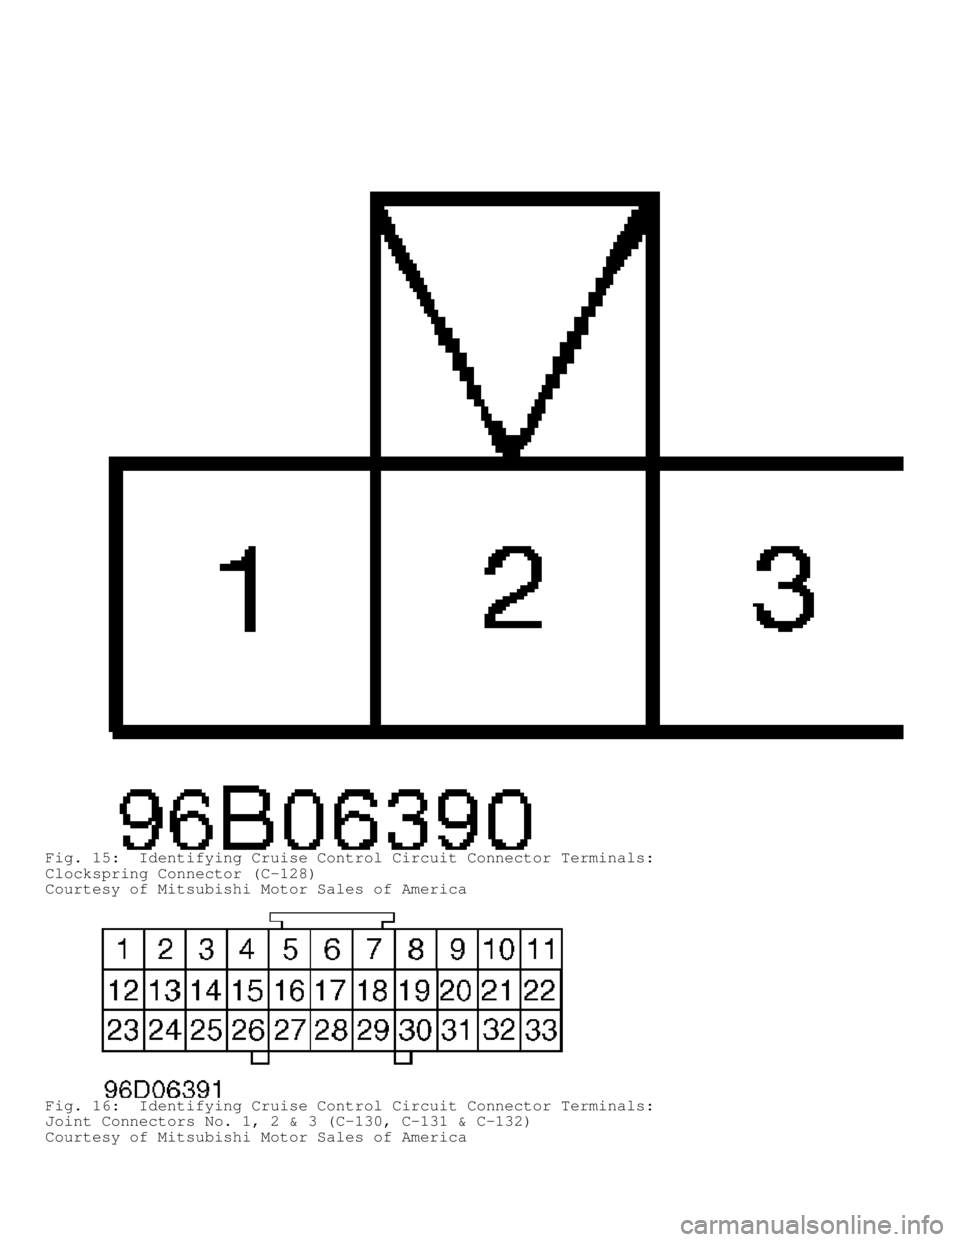
Fig. 15: Identifying Cruise Control Circuit Connector Terminals:
Clockspring Connector (C-128)
Courtesy of Mitsubishi Motor Sales of America
Fig. 16: Identifying Cruise Control Circuit Connector Terminals:
Joint Connectors No. 1, 2 & 3 (C-130, C-131 & C-132)
Courtesy of Mitsubishi Motor Sales of America
Page 316 of 1501

harness, dash wiring harness and joint connector C-132. Repair as
necessary. If malfunction remains, check harness between cruise
control main switch and power supply. Repair as necessary.
5) Check condition of cruise control ECU connector C-50.
Repair as necessary. If connector is okay and malfunction persists,
replace cruise control ECU.
Test No. 3
Malfunction of cruise control main switch or cruise control
ECU ground circuit may be present. Probable causes are:
* Malfunction of cruise control main switch.
* Malfunction of clockspring.
* Malfunction of connector.
* Malfunction of harness.
1) Check cruise control switches. See
CRUISE CONTROL SWITCH TESTS under COMPONENT TESTS. Replace any failed
switch. If switches are okay, check clockspring. See CLOCKSPRING TEST
under COMPONENT TESTS. If clockspring is okay, go to next step.
Replace clockspring if not okay.
2) Disconnect clockspring connector C-128 and measure voltage
between terminal No. 2 and ground. See Fig. 15. If battery voltage is
present, go to next step. If battery voltage is not present, check
condition of IOD connector A-09X, joint connector C-131, junction
block connector C-81, junction block connector C-94 and junction block
connector C-101. Repair as necessary. See Figs. 4, 16, 19, 21, 22, 26,
27 and 29. If connectors are okay and malfunction remains, check
harness between clockspring and power supply. Repair as necessary.
3) Check condition of cruise control ECU connector C-50 and
clockspring connector C-128. Repair as necessary. See Figs. 13 and 15.
If connectors are okay and malfunction remains, check harness between
clockspring and cruise control ECU. Repair as necessary.
Test No. 4
Malfunction of stoplight switch or stoplight circuit may be
present. Probable causes are:
* Malfunction of stoplight switch.
* Malfunction of connector.
* Malfunction of harness.
* Malfunction of cruise control ECU.
1) If stoplight does not illuminate with brake pedal
depressed, go to next step. If stoplight illuminates with pedal
depressed, replace cruise control ECU.
2) Check stoplight switch. See
BRAKELIGHT/STOPLIGHT SWITCH TEST under COMPONENT TESTS. Replace
stoplight switch as necessary. If stoplight switch is okay, go to next
step.
3) Disconnect stoplight switch connector C-55. See Fig. 14.
At harness side of connector, measure voltage between terminal No. 2
and ground. If battery voltage is present, go to next step. If battery
voltage is not present, check condition of joint connector C-131 and
junction block connector C-94. Repair as necessary. See Fig. 26. If
connectors are okay and malfunction remains, check harness between
stoplight switch and power supply. Repair as necessary.
4) Check condition of cruise control ECU connector C-50 and
stoplight switch connector C-55. Repair as necessary. If connectors
are okay and malfunction remains, check harness between stoplight
switch and cruise control ECU. Repair as necessary.
Test No. 5
Page 317 of 1501

An open circuit in output signal circuit in Neutral range is
likely reason for malfunction. Probable causes are:
* Malfunction of park/neutral switch.
* Malfunction of connector.
* Malfunction of harness.
* Malfunction of cruise control ECU.
Check condition of park/neutral switch connector B-08, dash
harness/transmission harness connector C-124, cruise control ECU
connector C-50 and joint connector C-130. Repair as necessary. If
connectors are okay and malfunction remains, check harness between
park/neutral switch and cruise control ECU. Repair as necessary. If
harness is okay, replace cruise control ECU.
Test No. 6
An open circuit in circuit inside CANCEL switch is likely
caused by a malfunction in cruise control switch. Replace cruise
control switch.
Test No. 7
Because of an open circuit in battery back-up circuit system,
fail-safe function prevents diagnostic trouble codes from being
memorized and displayed even though cruise control is canceled.
Probable causes are:
* Malfunction of connector.
* Malfunction of harness.
* Malfunction of cruise control ECU.
1) Disconnect cruise control ECU connector C-50. See Fig. 13.
At harness side of connector, measure voltage between terminal No. 16
and ground. If battery voltage is present, go to next step. If battery
voltage is not present, check and repair IOD connector A-09X, joint
connector C-132, junction block connector C-81 and junction block
connector C-93 as necessary. See Figs. 4, 16, 19, 20, 26 and 30. If
connectors are okay and malfunction remains, check harness between
cruise control ECU and power supply. Repair as necessary.
2) Check condition of cruise control ECU connector C-50.
Repair as necessary. If connector is okay and malfunction remains,
replace cruise control ECU.
Test No. 8
A malfunction of switches or fail-safe function cancelling
cruise control may be present. Probable causes are:
* Malfunction of cruise control main switch.
* Malfunction of cruise control switch.
* Malfunction of clockspring.
* Malfunction of harnesses or connectors.
* Malfunction of park/neutral position switch.
* Malfunction of cruise control ECU.
1) Attach scan tool to DLC. If scan tool can communicate with
cruise control, go to next step. If scan tool cannot communicate with
cruise control, go to TEST NO. 2.
2) If input switch inspection is possible with scan tool, go
to next step. If input switch inspection is not possible, go to TEST
NO. 3.
3) If input switch Code 21, 22 or 27 are still displayed,
replace cruise control main switch. If codes are no longer displayed,
go to next step.
4) If input switch Code 23 is still displayed, go to TEST NO.
Page 319 of 1501

CRUISE CONTROL INDICATOR TEST under COMPONENT TESTS. If cruise control
indicator is defective, replace indicator. If indicator checks okay,
go to next step.
2) If cruise control indicator illuminates when cruise
control connector C-50 terminal No. 23 is grounded at harness side,
replace cruise control ECU. If indicator does not illuminate, check
combination meter connector C-12 and cruise control ECU connector C-
50. Repair as necessary. If connectors are okay and malfunction
remains, check harness between combination meter and cruise control
ECU. Repair as necessary.
Test No. 13
1) Perform stoplight switch test. See
BRAKELIGHT/STOPLIGHT SWITCH TEST under COMPONENT TESTS. If switch is
okay, go to next step. If switch is defective, replace brakelight
switch.
2) Check cruise control ECU connector C-50, stoplight switch
connector C-55 and joint connector C-131. Repair as necessary. See
Figs. 13 , 14, 16 and 29. If connectors are okay and malfunction
remains, check harness between joint connector C-131 and cruise
control ECU.
Test No. 14 (A/T)
1) Perform park/neutral switch test. See
PARK/NEUTRAL SWITCH TEST under COMPONENT TESTS. If switch is okay, go
to next step. If switch is defective, replace switch.
2) Check starter relay. Replace if defective. If relay is
okay, check cruise control ECU connector C-50 and joint connector C-
130. Repair as necessary. See Figs. 13, 16 and 28. If connectors are
okay and malfunction remains, check harness between cruise control ECU
and power supply.
COMPONENT TESTS
ACTUATOR TEST
Remove actuator. Apply vacuum to actuator. Actuator linkage
holder should move more than 1.38" (35 mm). Actuator diaphragm should
hold vacuum. Replace actuator if actuator does not test as specified.
BRAKELIGHT/STOPLIGHT SWITCH TEST
Disconnect stoplight switch connector C-55. When brake pedal
is pressed, continuity should be present between terminals No. 2 and
3. See Fig. 14. When brake pedal is released, continuity should be
present between terminals No. 1 and 4. Replace switch if it does not
test as specified.
CLOCKSPRING TEST
WARNING: Deactivate air bag system before performing any service
operation. See AIR BAG RESTRAINT SYSTEMS article. Do not
apply electrical power to any component on steering column
without first deactivating air bag system. Air bag may
deploy.
If clockspring fails any check, replace with a NEW
clockspring.
1) Check connectors and protective tube for damage and
deformities.
2) Visually check case for damage or deformities.
Page 320 of 1501

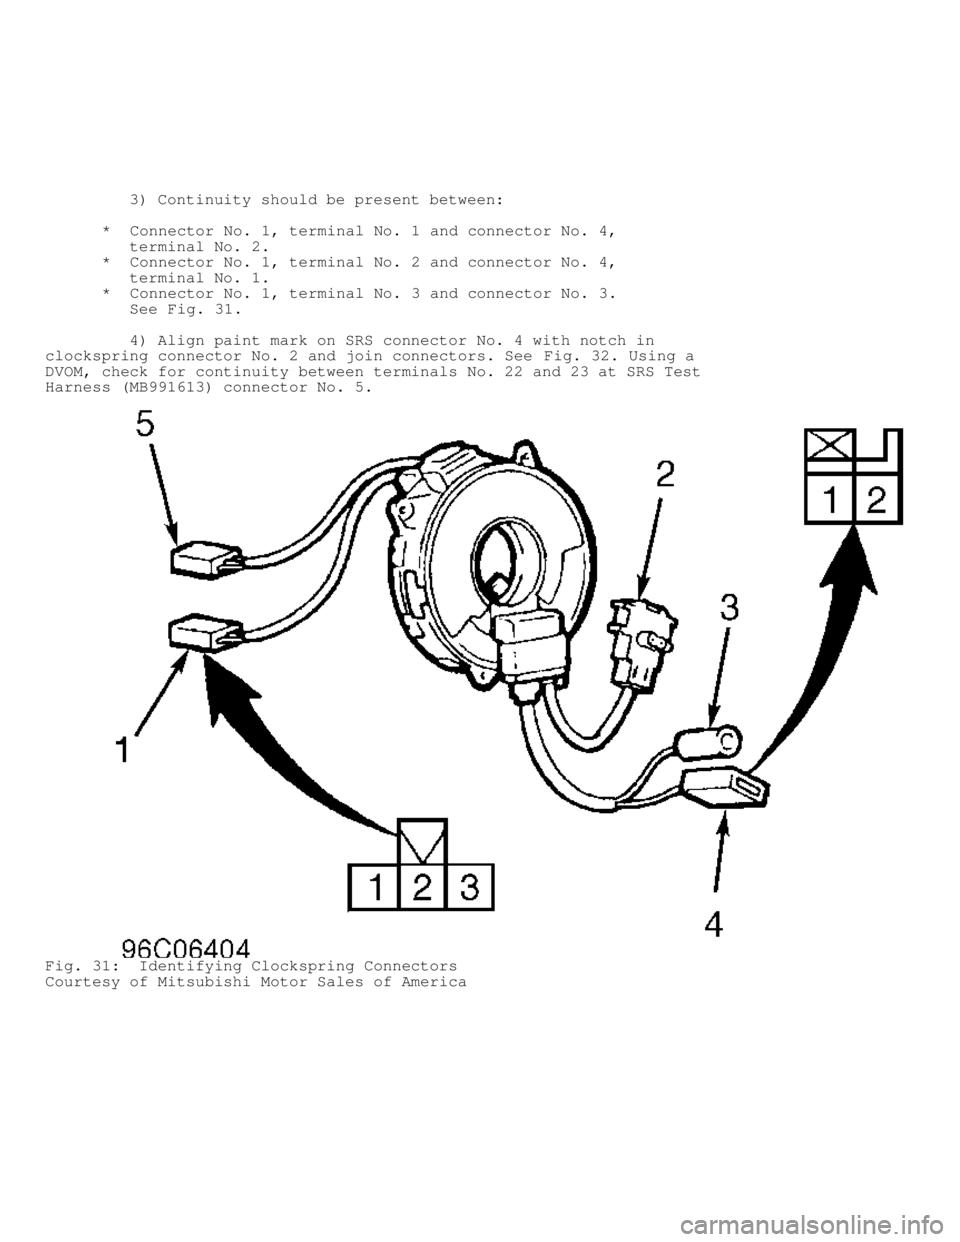
3) Continuity should be present between:
* Connector No. 1, terminal No. 1 and connector No. 4,
terminal No. 2.
* Connector No. 1, terminal No. 2 and connector No. 4,
terminal No. 1.
* Connector No. 1, terminal No. 3 and connector No. 3.
See Fig. 31.
4) Align paint mark on SRS connector No. 4 with notch in
clockspring connector No. 2 and join connectors. See Fig. 32. Using a
DVOM, check for continuity between terminals No. 22 and 23 at SRS Test
Harness (MB991613) connector No. 5.
Fig. 31: Identifying Clockspring Connectors
Courtesy of Mitsubishi Motor Sales of America
Page 321 of 1501

Fig. 32: Identifying SRS Harness Connectors
Courtesy of Mitsubishi Motor Sales of America
CLOSED THROTTLE POSITION SWITCH TEST & THROTTLE POSITION
SENSOR TEST
Closed Throttle Position Switch
1) Disconnect throttle position sensor connector. Continuity
should be present between terminals No. 1 and 2 with accelerator pedal
released. See Fig. 25. Continuity should not be present with
accelerator pedal pressed.
2) If continuity is not present with accelerator released,
loosen throttle position sensor mounting screw. Turn throttle position
sensor completely clockwise. Recheck continuity. Replace throttle
position sensor if closed throttle position switch does not test as
specified.
Page 339 of 1501

manufacturer's original setting has been changed.
1) Loosen throttle cable. Loosen fixed SAS lock nut. See
Fig. 7. Turn fixed SAS counterclockwise until throttle valve is fully
closed. Turn fixed SAS clockwise until throttle valve begins to open.
Turn fixed SAS clockwise 1 1/4 turns after throttle valve begins to
open.
2) Tighten lock nut while holding fixed SAS in position.
Adjust throttle cable. Adjust basic idle speed. See BASIC IDLE SPEED.
Adjust Throttle Position (TP) sensor. See TP SENSOR ADJUSTMENT under
THROTTLE POSITION (TP) SENSOR.
Fig. 7: Adjusting Fixed Speed Adjusting Screw (Typical)
Courtesy of Mitsubishi Motor Sales of America
IDLE MIXTURE
NOTE: Idle mixture is computer controlled on fuel injected engines
and is nonadjustable. CO level should not exceed .5%. HC
level should not exceed 100 ppm. If mixture levels exceed
limits, see G - TESTS W/CODES article.
THROTTLE POSITION (TP) SENSOR
TP SENSOR ADJUSTMENT
NOTE: Ensure basic idle speed is set to specification before
adjusting TP sensor. See BASIC IDLE SPEED under IDLE SPEED &