Page 77 of 396
MPI – On-vehicle Service13-34
9. INJECTOR CHECK
Injection Condition Check
(1) Release the residual pressure from the fuel pipe line to
prevent fuel from flowing out.
(2) Remove the injector.
(3) Set up the special tools (Injector Test Set, Adapter, Fuel
Pressure Regulator, and Clip) as illustrated below.
(4) From here on, use the same procedure as with the
conventional 4G9 engine for the check.
MD998741
MD998706 MB991607Main hose
BatteryInjectorClip: MD998746Return hose
Fuel Pressure Regulator: MD116395
10. RESISTOR CHECK
(1) Disconnect the resistor connector.
(2) Measure resistance across terminals as detailed below.
Standard value
Measurement terminalsResistance (Ω)
1 – 3
4 – 3
5 5 to 6 5 (at 20�C)
5 – 3
5.5 to 6.5 (at 20�C)
6 – 3
Resistor
Page 78 of 396
MPI – On-vehicle Service13-35
11. FUEL PUMP RELAY NO.2 CHECK
(1) Remove fuel pump relay No.2.
(2) Using jumper wires, connect fuel pump relay No.2 terminal
(3) to battery (+) terminal, and terminal (1) to battery
(–) terminal, respectively.
(3) Connecting and disconnecting the jumper wire on the
battery (–) terminal end, check for continuity across
terminal (2) and terminal (5), and across terminal (4) and
terminal (5), of fuel pump relay No.2.
Jumper wireContinuity across
terminals (2) and (5)Continuity across
terminals (4) and (5)
ConnectedNoYe s
DisconnectedYe sNo
(4) If the continuity is checked abnormally, replace fuel pump
relay No.2.
12. FUEL PUMP RESISTOR CHECK
(1) Disconnect the fuel pump resistor connector.
(2) Measure resistance across the terminals.
Standard value: 0.6 – 0.9 Ω
(3) If the measurement falls outside the specified range,
replace the fuel pump resistor.
Fuel pump relay No.2
Fuel pump resistor
Page 79 of 396
MPI – Injector13-36
INJECTOR
REMOVAL AND INSTALLATION
Pre-removal Operation
(1) Fuel Discharge Prevention
(2) Air Hose D Removal
(Refer to GROUP15 – Intercooler.)Post-installation Operation
(1) Air Hose D Installation
(Refer to GROUP15 – Intercooler.)
(2) Fuel Leakage Check
O-ring
9 {0.9}83, 6
11
12
O-ring 10 – 13 {1.0 – 1.3}
Engine oil
1
2 3
4
5
6 78 9
10 11 12
Unit: Nm {kgf�m}
4
Removal steps
1. Injector connector
2. PCV hose connection
�A�3. High-pressure fuel hose connection
4. Fuel return hose connection
5. Vacuum hose connector
�A�6. Fuel pressure regulator7. Fuel return pipe
�A�8. Delivery pipe
9. Insulator
10. Insulator
�A��A�11. Injector
12. Grommet
Page 98 of 396

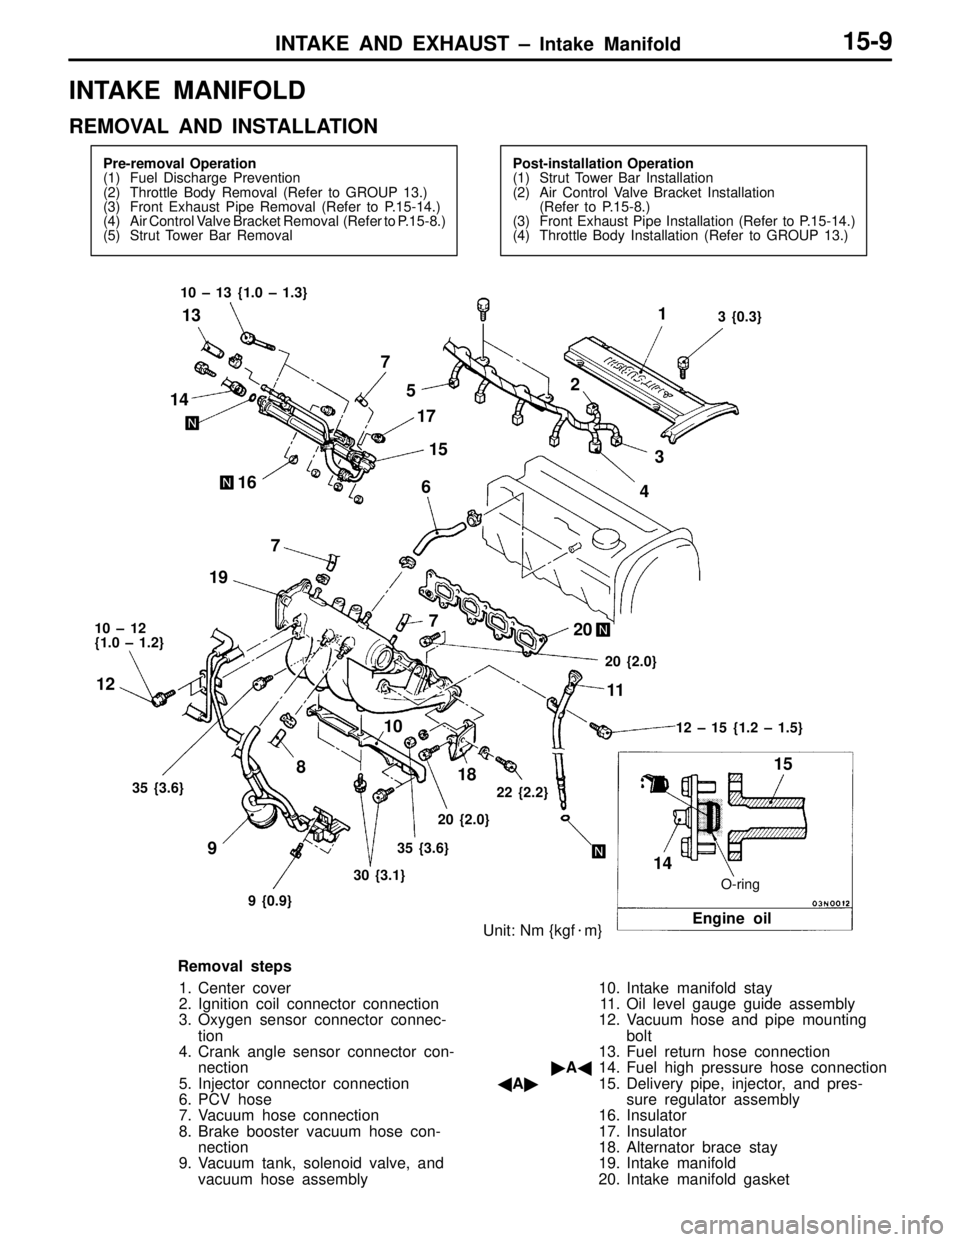
INTAKE AND EXHAUST – Intake Manifold15-9
INTAKE MANIFOLD
REMOVAL AND INSTALLATION
Pre-removal Operation
(1) Fuel Discharge Prevention
(2) Throttle Body Removal (Refer to GROUP 13.)
(3) Front Exhaust Pipe Removal (Refer to P.15-14.)
(4) Air Control Valve Bracket Removal (Refer to P.15-8.)
(5) Strut Tower Bar RemovalPost-installation Operation
(1) Strut Tower Bar Installation
(2) Air Control Valve Bracket Installation
(Refer to P.15-8.)
(3) Front Exhaust Pipe Installation (Refer to P.15-14.)
(4) Throttle Body Installation (Refer to GROUP 13.)
O-ring
Unit: Nm {kgf�m}
15
Engine oil
3 {0.3} 10 – 13 {1.0 – 1.3}
10 – 12
{1.0 – 1.2}
12 – 15 {1.2 – 1.5}
35 {3.6}
9 {0.9}30 {3.1}35 {3.6}20 {2.0}22 {2.2}20 {2.0}
14 14
167
5
17
1521
3
4 6
7 7
19
20
18 8
9 12
1011
13
Removal steps
1. Center cover
2. Ignition coil connector connection
3. Oxygen sensor connector connec-
tion
4. Crank angle sensor connector con-
nection
5. Injector connector connection
6. PCV hose
7. Vacuum hose connection
8. Brake booster vacuum hose con-
nection
9. Vacuum tank, solenoid valve, and
vacuum hose assembly10. Intake manifold stay
11. Oil level gauge guide assembly
12. Vacuum hose and pipe mounting
bolt
13. Fuel return hose connection
�A�14. Fuel high pressure hose connection
�A�15. Delivery pipe, injector, and pres-
sure regulator assembly
16. Insulator
17. Insulator
18. Alternator brace stay
19. Intake manifold
20. Intake manifold gasket
Page 99 of 396

INTAKE AND EXHAUST – Intake Manifold15-10
REMOVAL SERVICE POINT
�A�DELIVERY PIPE, INJECTOR AND PRESSURE
REGULATOR REMOVAL
Remove the delivery pipe with the injectors and pressure
regulator attached to it.
Caution
Care must be taken, when removing the delivery pipe,
not to drop the injector.
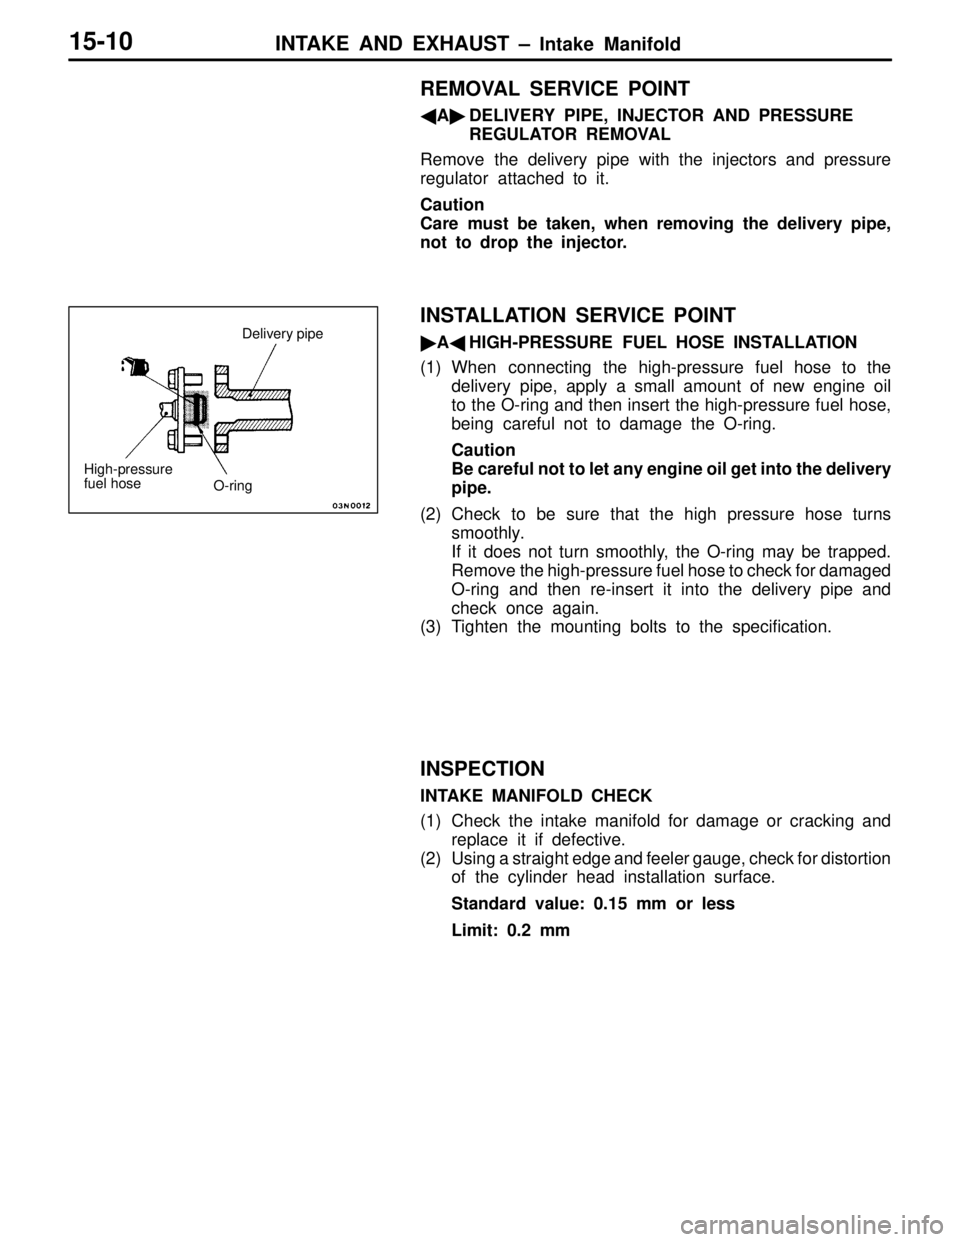
INSTALLATION SERVICE POINT
�A�HIGH-PRESSURE FUEL HOSE INSTALLATION
(1) When connecting the high-pressure fuel hose to the
delivery pipe, apply a small amount of new engine oil
to the O-ring and then insert the high-pressure fuel hose,
being careful not to damage the O-ring.
Caution
Be careful not to let any engine oil get into the delivery
pipe.
(2) Check to be sure that the high pressure hose turns
smoothly.
If it does not turn smoothly, the O-ring may be trapped.
Remove the high-pressure fuel hose to check for damaged
O-ring and then re-insert it into the delivery pipe and
check once again.
(3) Tighten the mounting bolts to the specification.
INSPECTION
INTAKE MANIFOLD CHECK
(1) Check the intake manifold for damage or cracking and
replace it if defective.
(2) Using a straight edge and feeler gauge, check for distortion
of the cylinder head installation surface.
Standard value: 0.15 mm or less
Limit: 0.2 mm
High-pressure
fuel hoseDelivery pipe
O-ring
Page 110 of 396
ENGINE EMISSION CONTROL –
Engine Control System /
Emission Control System 17-2
ENGINE CONTROL SYSTEM
SERVICE SPECIFICATIONS
ItemsStandard value
Idle speed rpm850 ± 50
EMISSION CONTROL SYSTEM
ON-VEHICLE SERVICE
SYSTEM CONFIGURATION DIAGRAM
Canister
Check
valve
Throttle body
Fuel pressure control
valve
Fuel pressure regulator
PCV valve
AirInjector
High temperature sensor*
*: EVOLUTION-IV only
Page 111 of 396
ENGINE EMISSION CONTROL – Emission Control System 17-3
VACUUM HOSE PIPING CIRCUIT DIAGRAM
Fuel pressure
control valve
Surge tank
Secondary air
control solenoid
valveBlue White
Canister
Check
valve
Throttle body
Fuel
pressure
regulatorWastegate
solenoid
valve
Secondary
air valve
Bypass
valve
Front of vehicle
Wastegate
actuator Vacuum hose color
B: Black
L: Blue
R: Red
W: White
Y: Yellow
CANISTER
REMOVAL AND INSTALLATION
Pre-removal and Post-installation Operation
�Air Cleaner Removal and Installation
2
1
3
4
Removal steps
1. Vapor hose
2. Purge hose
3. Canister
4. Canister bracket
Page 255 of 396

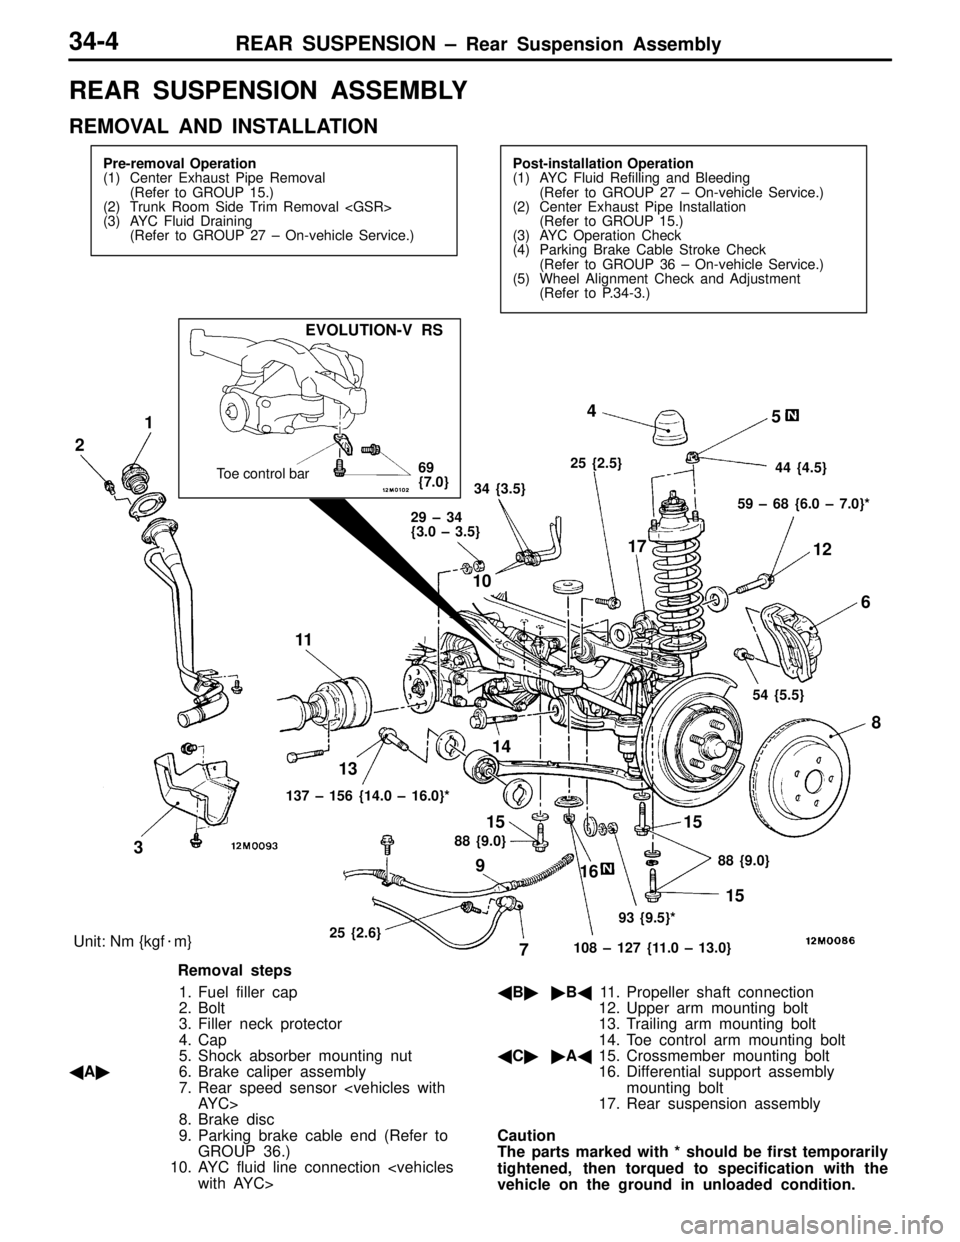
REAR SUSPENSION – Rear Suspension Assembly34-4
REAR SUSPENSION ASSEMBLY
REMOVAL AND INSTALLATION
Pre-removal Operation
(1) Center Exhaust Pipe Removal
(Refer to GROUP 15.)
(2) Trunk Room Side Trim Removal
(3) AYC Fluid Draining
(Refer to GROUP 27 – On-vehicle Service.)Post-installation Operation
(1) AYC Fluid Refilling and Bleeding
(Refer to GROUP 27 – On-vehicle Service.)
(2) Center Exhaust Pipe Installation
(Refer to GROUP 15.)
(3) AYC Operation Check
(4) Parking Brake Cable Stroke Check
(Refer to GROUP 36 – On-vehicle Service.)
(5) Wheel Alignment Check and Adjustment
(Refer to P.34-3.)
1
34
5
6
7 9 10
1112
1314
15 1617
Unit: Nm {kgf�m}
44 {4.5}
108 – 127 {11.0 – 13.0}
54 {5.5}
88 {9.0}
93 {9.5}*88 {9.0}
158 2
15
29 – 34
{3.0 – 3.5}
25 {2.6}34 {3.5}25 {2.5}
69
{7.0} Toe control bar
EVOLUTION-V RS
137 – 156 {14.0 – 16.0}*59 – 68 {6.0 – 7.0}*
Removal steps
1. Fuel filler cap
2. Bolt
3. Filler neck protector
4. Cap
5. Shock absorber mounting nut
�A�6. Brake caliper assembly
7. Rear speed sensor
AYC>
8. Brake disc
9. Parking brake cable end (Refer to
GROUP 36.)
10. AYC fluid line connection
with AYC>�B��B�11. Propeller shaft connection
12. Upper arm mounting bolt
13. Trailing arm mounting bolt
14. Toe control arm mounting bolt
�C��A�15. Crossmember mounting bolt
16. Differential support assembly
mounting bolt
17. Rear suspension assembly
Caution
The parts marked with * should be first temporarily
tightened, then torqued to specification with the
vehicle on the ground in unloaded condition.