Page 2426 of 2490
32. From engine compartment, remove crossbeam front LH
securing bolts.
33. Remove crossbeam to engine Hydramount securing bolts.
Remove bolt securing cros smember to Hydramount.
Fully withdraw bolt into crossmember insert.
Repeat procedure to remove and withdraw bolt on
opposite side
34. CAUTION: To prevent damage to ball joints, secure
each hub assembly to suspensi on turret using strong wire.
Remove lower nut and bolt from front shock absorber.
Repeat procedure to remove bo lt from opposite side shock
absorber.
35. Remove crossbeam rear securing bolts.
Remove bolt from crossbeam LH rear mounting.
Repeat procedure to remove bolt from crossbeam RH rear
mounting.
Page 2428 of 2490
Disconnect harness connector from transducer.
Remove harness from suspension assembly.
43. Remove steering rack from crossbeam.
1. Remove steering rack securing bolts.
2. Remove steering rack and mounting brackets.
44. Release stabilizer bar from link arms.
Remove link arm to stabil izer bar securing nut.
Release link arm from stabilizer bar.
Repeat procedure to release opposite end of stabilizer bar
from link arm.
45. Remove stabilizer bar from crossbeam.
Remove stabilizer bar securing bolts.
Remove stabilizer bar mountin g brackets and remove bar
from crossbeam.
46. Remove wishbone securing nuts.
1. Remove lower wishbone front arm eccentric bolt
securing nut.
2. Remove lower wishbone rear arm eccentric bolt
securing nut.
Page 2429 of 2490
Installation
Repeat procedure to remove wishbone securing nuts from
opposite side.
47. Remove upper wishbone fu lcrum shaft securing nut.
Repeat procedure to remove securing nut from opposite
side fulcrum shaft .
48. Remove wire temporarily supporting hub assembly.
49. Remove wishbone/hub assembly from crossbeam.
Supporting hub assembly, wi thdraw lower wishbone
eccentric bolts.
Supporting hub assembly, wi thdraw fulcrum shaft from
upper wishbone.
Remove wishbone/hub assembly from crossbeam.
Repeat procedure to remove wishbone/hub assembly on
opposite side.
50. Remove crossbeam front mountings.
Remove front mounting heatshield.
Remove four bolts securing mounting to crossbeam.
Repeat procedure to remove mounting on opposite side.
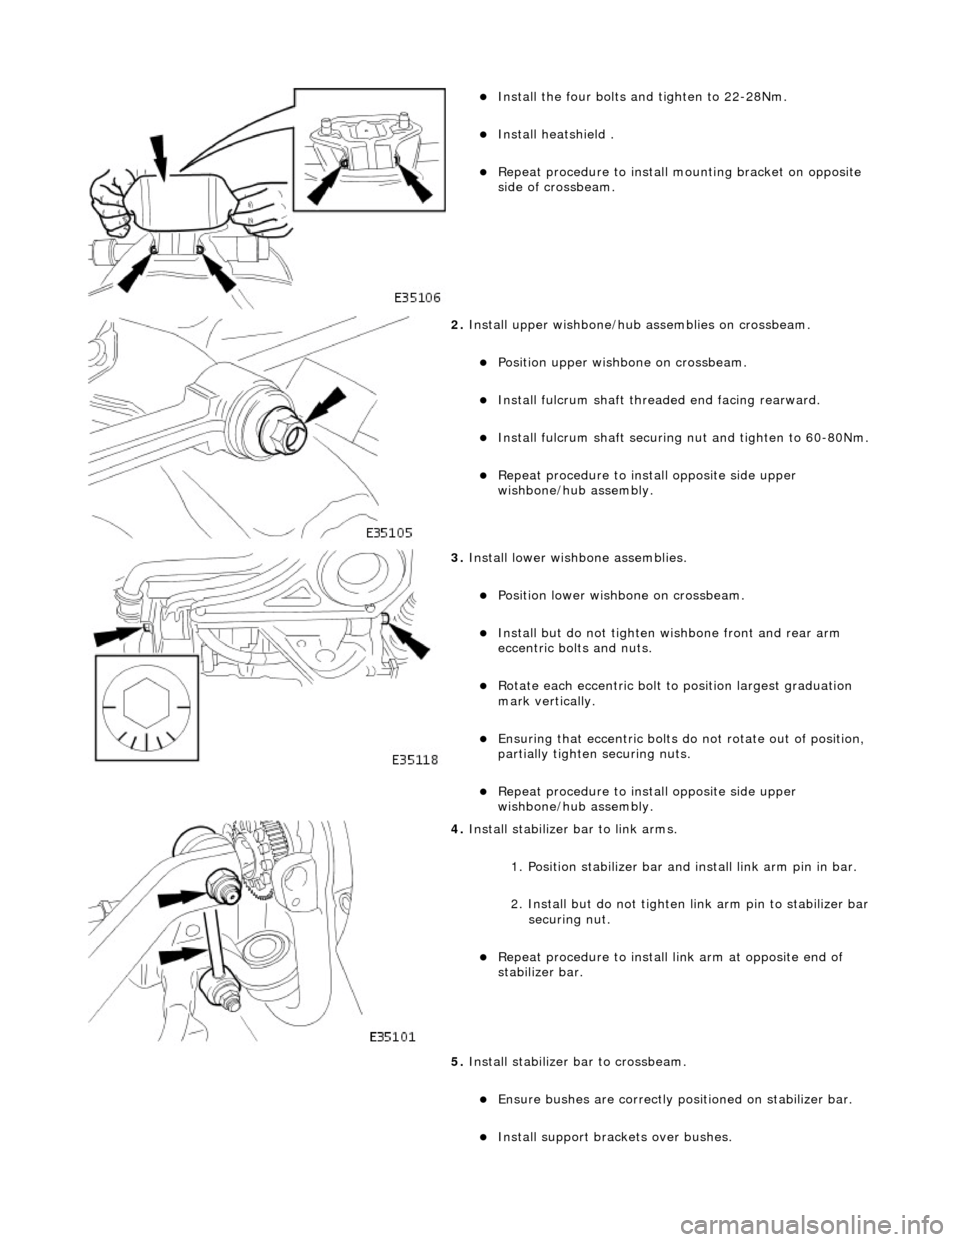
1. Install front mounting brackets.
Position and fully seat mounting bracket on crossbeam.
Page 2430 of 2490

Install the four bolts and tighten to 22-28Nm.
Install heatshield .
Repeat procedure to install mounting bracket on opposite
side of crossbeam.
2. Install upper wishbone/hub assemblies on crossbeam.
Position upper wishbone on crossbeam.
Install fulcrum shaft thread ed end facing rearward.
Install fulcrum shaft securing nut and tighten to 60-80Nm.
Repeat procedure to install opposite side upper
wishbone/hub assembly.
3. Install lower wishbone assemblies.
Position lower wishbone on crossbeam.
Install but do not tighten wi shbone front and rear arm
eccentric bolts and nuts.
Rotate each eccentric bolt to position largest graduation
mark vertically.
Ensuring that eccentric bolts do not rotate out of position,
partially tighten securing nuts.
Repeat procedure to inst all opposite side upper
wishbone/hub assembly.
4. Install stabilizer bar to link arms.
1. Position stabilizer bar and install link arm pin in bar.
2. Install but do not tighten li nk arm pin to stabilizer bar
securing nut.
Repeat procedure to install link arm at opposite end of
stabilizer bar.
5. Install stabilizer bar to crossbeam.
Ensure bushes are correctly posi tioned on stabilizer bar.
Install support brackets over bushes.
Page 2432 of 2490
10. With assistance position crossbeam/suspension assembly on
jack with protective wood under.
11. Traverse assembly into position below vehicle.
12. Ensure steering harn ess connector is positioned to avoid
damage during crossbeam lift .
13. NOTE: It may be necessary to use a hammer and drift to
finally align new mounting with body location.
Carefully raise crossbeam assembly into position.
Ensure that dowels of both crossbeam mountings are
correctly seated in body locations.
14. Ensure that both engine hydram ounts are correctly seated in
crossbeam locations.
15. Install crossbeam rear mountings.
Align rear mounting rubber with body location.
Install rear mounting securing bolt and nut and tighten
nut to 131-185 Nm.
Repeat procedure to install opposite side rear mounting
bolt and nut.
16. From engine compartment, install but do not tighten
crossbeam front RH bolts.
Page 2433 of 2490
17. From engine compartment, install crossbeam front LH bolts
and tighten to 22-28Nm..
18. Install power steering fluid reservoir.
Position reservoir on mounting bracket.
Install reservoir securi ng nuts and bolts.
19. From engine compartment, tighten crossbeam front RH bolts
to 22-28Nm.
20. Install shock absorber on lower wishbone.
Lift lower wishbone to align shock absorber lower
mounting.
Install bolt and nut and ti ghten nut to 43-57Nm.
Page 2434 of 2490
Repeat procedure to install opposite side shock absorber.
21. Install lower steering column on pinion shaft.
Move column downwards to engage coupling splines on
pinion shaft.
1. Install nut and bolt and tighten to 22-28Nm.
22. Lower and withdraw jack from crossbeam.
23. Release engine from support tool.
1. Slacken hook adjustment nuts until weight of engine is released.
2. Remove hooks from engine front lifting eyes.
3. Remove special tool 303- 021 from fender channel.
24. Install crossbeam to engine Hydramount securing bolts.
Install bolt securing Hydr amount to crossmember and
tighten to 22-28Nm.
Repeat procedure to install crossmember opposite side
securing bolt.
25. Position and connect harnes s to steering transducer.
RHD vehicles. Position steeri ng harness behind return
pipe.
Connect harness to transducer.
Page 2437 of 2490
35. Using new tiestrap, secure undertray to crossbeam brace.
36. Install generator cool ing duct deflector.
Position deflector over rear vertical duct.
Slide deflector forward to engage center tang over
undertray.
Install bolt and ti ghten to 17-23Nm.
37. Using new scrivets, secure un dertray to each wheelarch
liner.
38. Install both front road wheels. Refer to Section 100-02.
39. Raise vehicle, remove st ands and lower vehicle.
40. Ensuring graduation mark remains aligned, finally tighten
wishbone rear eccentric bolt to 113-153Nm.