Page 77 of 2490
10
.
Install road wheel. Re fer to Section 100-02
11. Raise vehicle, remove stands and fully lower vehicle.
12
.
Fully slacken nut on special tool 204-114.
13
.
Release dowel of special tool from suspension turret slot.
14. Raise vehicle for access an d remove special tool from
suspension.
15. Fully lower vehicle.
16. Carry out steering geometry an d wheel alignment checks and
if necessary adjust. Refer to 57.65.01.
Page 78 of 2490
Front Suspension - Rear Lower Arm
Remo
val and Installation
Remov
a
l
CAUTI
O
N: Replacement of
nuts and bolts: Various thread-locking devices are used on nuts and bolts throughout the
vehicle. These devices restrict the number of times a nut or bolt can be used. Refer to Section 100-00 for further
information.
S p
ecial Tool(s)
R
o
ad spring compressor
204-111 (JD115)
Taper separator
2
11-098 (JD 100)
Ball
Jo
int Taper Separator
204-192 (JD 219)
Bal l
joint splitter
204-293
1. Ra
ise front of vehicle and support on stands. Refer to Section
100-02.
2. Remove appropriate road wheel. Refer to Section 100-02.
3. CAUTIO
N: Do not suspend caliper from brake hose as
this will damage the hose.
Remove brake calipers from carriers. 1. Remove caliper spring clip.
2. Remove guide pin dust caps.
3. Slacken and withdraw guide pins.
4. Remove caliper from carrier and tie to suspension mounting bracket.
4. Ra
ise vehicle further to provid
e access for Special Tool 204-
Page 80 of 2490
10. NOTE
: It is not necessary to re
move Special Tool from spring
at this stage.
Remove spring assembly and Special Tool 204-111 from
suspension turret.
11. Lower vehicle to working heig ht and support on stands.
12 . Remove an
d discard tiestraps
securing wheel speed sensor
harness to upper wishbone.
13 . R
emove wheel speed sensor se
curing screw and withdraw
sensor from vertical link.
14 . R
emove nut securing tie rod oute
r ball joint to steering arm.
15. Release tie rod ball joint from vertical link.
Page 88 of 2490

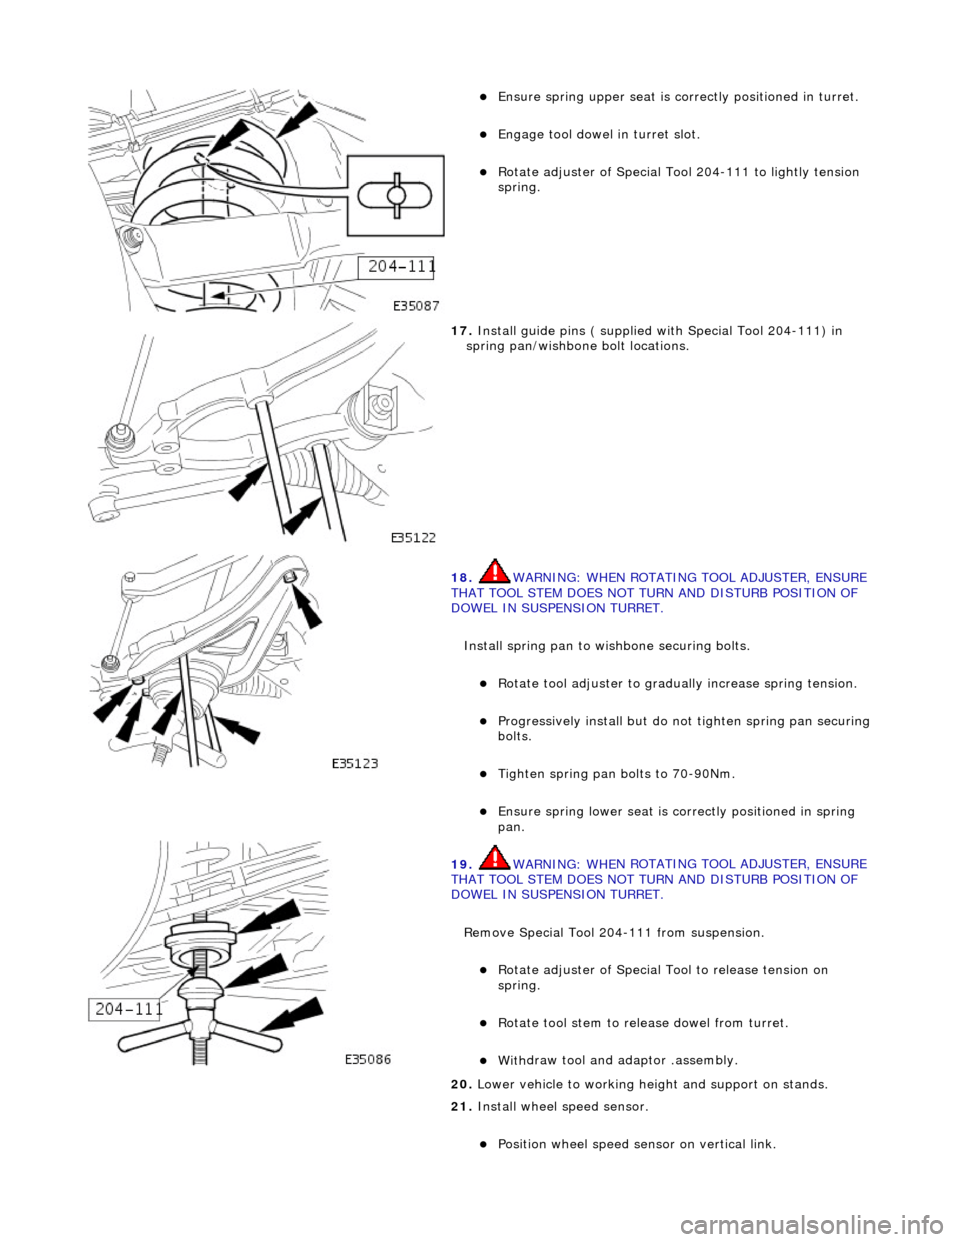
Ensure spring
upper se
at is correctly positioned in turret.
Engage tool dowel in turret slo
t.
R
o
tate adjuster of Special Tool 204-111 to lightly tension
spring.
17 . Ins
tall guide pins ( supplied with Special Tool 204-111) in
spring pan/wishbone bolt locations.
18 . WARNING: WHE
N ROTATING TOOL ADJUSTER, ENSURE
THAT TOOL STEM DOES NOT TU RN AND DISTURB POSITION OF
DOWEL IN SUSPENSION TURRET.
Install spring pan to wishbone securing bolts.
Ro t
ate tool adjuster to gradua
lly increase spring tension.
Pr
ogressively install but do no
t tighten spring pan securing
bolts.
Tigh ten spring pan
bolts to 70-90Nm.
Ensure spri
ng
lower seat is co
rrectly positioned in spring
pan.
19 . WARNING: WHE
N ROTATING TOOL ADJUSTER, ENSURE
THAT TOOL STEM DOES NOT TU RN AND DISTURB POSITION OF
DOWEL IN SUSPENSION TURRET.
Remove Special Tool 204-111 from suspension.
Rotat
e adjuster of Special Tool to release tension on
spring.
R otate
tool stem to release dowel from turret.
With
draw tool and adaptor
.assembly.
20
. Lower vehi
cle to working heig
ht and support on stands.
21. Install wheel speed sensor.
Positi
on wheel speed sensor on vertical link.
Page 89 of 2490
Inst
all sensor bolt an
d tighten to 8-10Nm.
22
.
Connect wheel speed sensor harness.
1. Connect wheel speed sensor harness to sensor.
2. Using new tiestraps secure wheel speed sensor harness to upper wishbone.
23
.
Install brake calipers.
R
emove tie supporting brake caliper.
1. Install caliper on carrier.
2. Install guide pins.
3. Install guide pin dust caps.
4. Install caliper spring clip.
24. Install road wheel. Re fer to Section 100-02.
25. Raise vehicle, remove stands and lower vehicle onto road
wheels.
26
.
Ensuring graduation mark remains aligned, finally tighten
wishbone rear eccentric bolt to 113-153Nm.
27. Check wheel alignment and if necessary adjust. Refer to
57.65.01.
Page 90 of 2490
Front Suspension - Rear Lower Arm Bushing
Remo
val and Installation
Remov
a
l
CAUTI
O
N: Replacement of
nuts and bolts: Various thread-locking devices are used on nuts and bolts throughout the
vehicle. These devices restrict the number of times a nut or bolt can be used. Refer to Section 100-00 for further
information.
S p
ecial Tool(s)
R
o
ad spring compressor
204-111 (JD115)
Taper separator
2
11-098 (JD 100)
Ball
Jo
int Taper Separator
204-192 (JD 219)
Bal l
joint splitter
204-293
1. Ra
ise front of vehicle and support on stands. Refer to Section
100-02.
2. Remove appropriate road wheel. Refer to Section 100-02.
3. CAUTIO
N: Do not suspend caliper from brake hose as
this will damage the hose.
Remove brake calipers from carriers. 1. Remove caliper spring clip.
2. Remove guide pin dust caps.
3. Slacken and withdraw guide pins.
4. Remove caliper from carrier and tie to suspension mounting bracket.
4. Ra
ise vehicle further to provid
e access for Special Tool 204-
Page 92 of 2490
10. NOTE
: It is not necessary to re
move Special Tool from spring
at this stage.
Remove spring assembly and Special Tool 204-111 from
suspension turret.
11. Lower vehicle to working heig ht and support on stands.
12 . Re
move tiestraps securing wheel speed sensor harness to
upper wishbone.
13 . R
emove wheel speed sensor se
curing screw and withdraw
sensor from vertical link.
14. Remove nut securing tie rod oute r ball joint to steering arm.
Page 102 of 2490

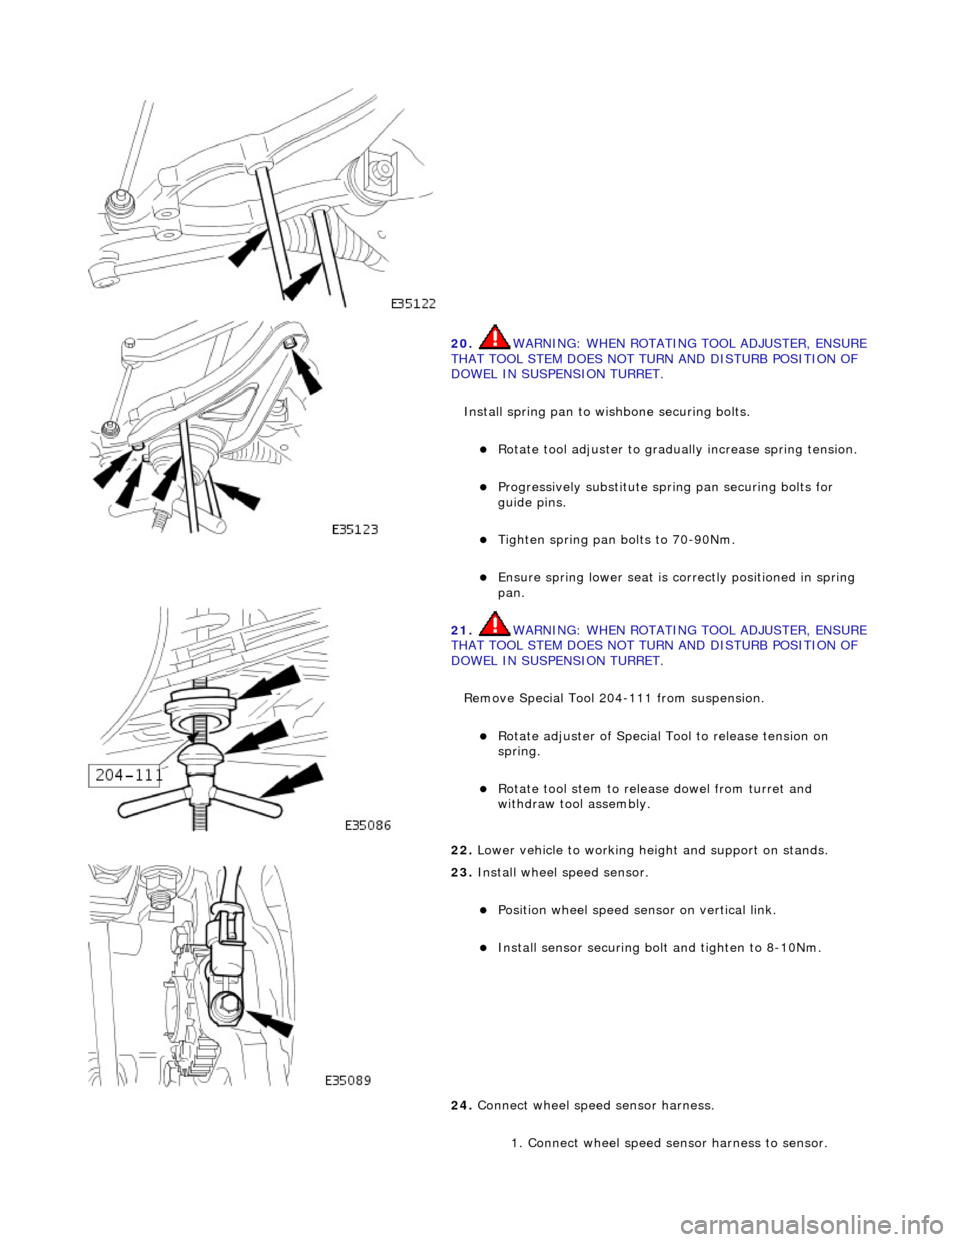
20. WARNING: WHE
N ROTATING TOOL ADJUSTER, ENSURE
THAT TOOL STEM DOES NOT TU RN AND DISTURB POSITION OF
DOWEL IN SUSPENSION TURRET.
Install spring pan to wishbone securing bolts.
Ro t
ate tool adjuster to gradua
lly increase spring tension.
Pr
ogressively substitute spri
ng pan securing bolts for
guide pins.
Tighten spring pan
bolts to 70-90Nm.
Ensure spri
ng
lower seat is co
rrectly positioned in spring
pan.
21 . WARNING: WHE
N ROTATING TOOL ADJUSTER, ENSURE
THAT TOOL STEM DOES NOT TU RN AND DISTURB POSITION OF
DOWEL IN SUSPENSION TURRET.
Remove Special Tool 204-111 from suspension.
Rotat
e adjuster of Special Tool to release tension on
spring.
R o
tate tool stem to release dowel from turret and
withdraw tool assembly.
22 . Lower vehi
cle to working heig
ht and support on stands.
23 . Inst
all wheel speed sensor.
Posi
ti
on wheel speed sensor on vertical link.
Instal
l sensor securing bolt
and tighten to 8-10Nm.
24. Connect wheel speed sensor harness.
1. Connect wheel speed sensor harness to sensor.