1998 ISUZU TROOPER run flat
[x] Cancel search: run flatPage 286 of 3573
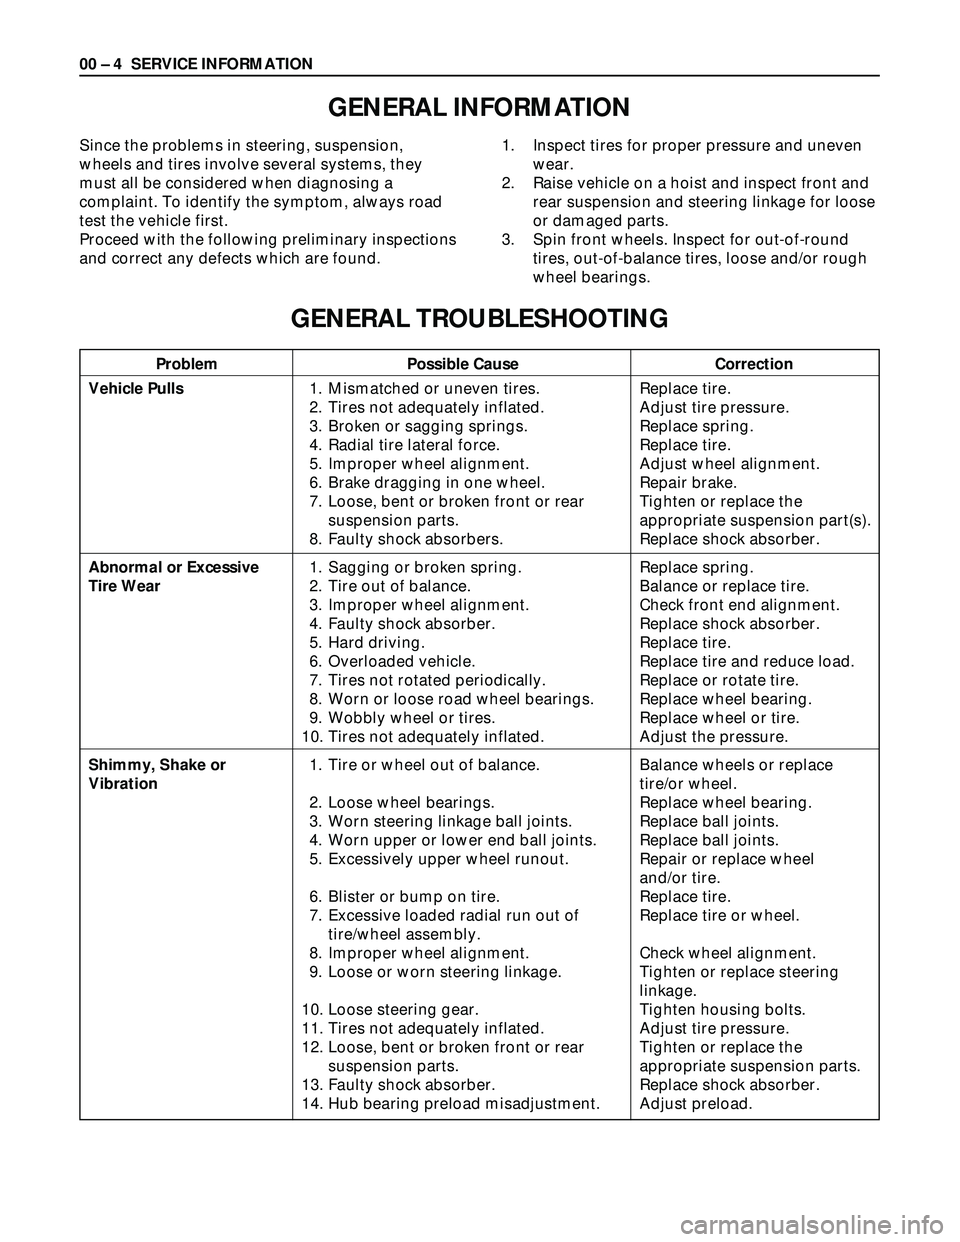
Problem Possible Cause Correction
00 – 4 SERVICE INFORMATION
GENERAL INFORMATION
Since the problems in steering, suspension,
wheels and tires involve several systems, they
must all be considered when diagnosing a
complaint. To identify the symptom, always road
test the vehicle first.
Proceed with the following preliminary inspections
and correct any defects which are found.1. Inspect tires for proper pressure and uneven
wear.
2. Raise vehicle on a hoist and inspect front and
rear suspension and steering linkage for loose
or damaged parts.
3. Spin front wheels. Inspect for out-of-round
tires, out-of-balance tires, loose and/or rough
wheel bearings.
GENERAL TROUBLESHOOTING
Vehicle Pulls
Abnormal or Excessive
Tire Wear
Shimmy, Shake or
Vibration1. Mismatched or uneven tires.
2. Tires not adequately inflated.
3. Broken or sagging springs.
4. Radial tire lateral force.
5. Improper wheel alignment.
6. Brake dragging in one wheel.
7. Loose, bent or broken front or rear
suspension parts.
8. Faulty shock absorbers.
1. Sagging or broken spring.
2. Tire out of balance.
3. Improper wheel alignment.
4. Faulty shock absorber.
5. Hard driving.
6. Overloaded vehicle.
7. Tires not rotated periodically.
8. Worn or loose road wheel bearings.
9. Wobbly wheel or tires.
10. Tires not adequately inflated.
1. Tire or wheel out of balance.
2. Loose wheel bearings.
3. Worn steering linkage ball joints.
4. Worn upper or lower end ball joints.
5. Excessively upper wheel runout.
6. Blister or bump on tire.
7. Excessive loaded radial run out of
tire/wheel assembly.
8. Improper wheel alignment.
9. Loose or worn steering linkage.
10. Loose steering gear.
11. Tires not adequately inflated.
12. Loose, bent or broken front or rear
suspension parts.
13. Faulty shock absorber.
14. Hub bearing preload misadjustment.Replace tire.
Adjust tire pressure.
Replace spring.
Replace tire.
Adjust wheel alignment.
Repair brake.
Tighten or replace the
appropriate suspension part(s).
Replace shock absorber.
Replace spring.
Balance or replace tire.
Check front end alignment.
Replace shock absorber.
Replace tire.
Replace tire and reduce load.
Replace or rotate tire.
Replace wheel bearing.
Replace wheel or tire.
Adjust the pressure.
Balance wheels or replace
tire/or wheel.
Replace wheel bearing.
Replace ball joints.
Replace ball joints.
Repair or replace wheel
and/or tire.
Replace tire.
Replace tire or wheel.
Check wheel alignment.
Tighten or replace steering
linkage.
Tighten housing bolts.
Adjust tire pressure.
Tighten or replace the
appropriate suspension parts.
Replace shock absorber.
Adjust preload.
Page 288 of 3573
00 – 6 SERVICE INFORMATION
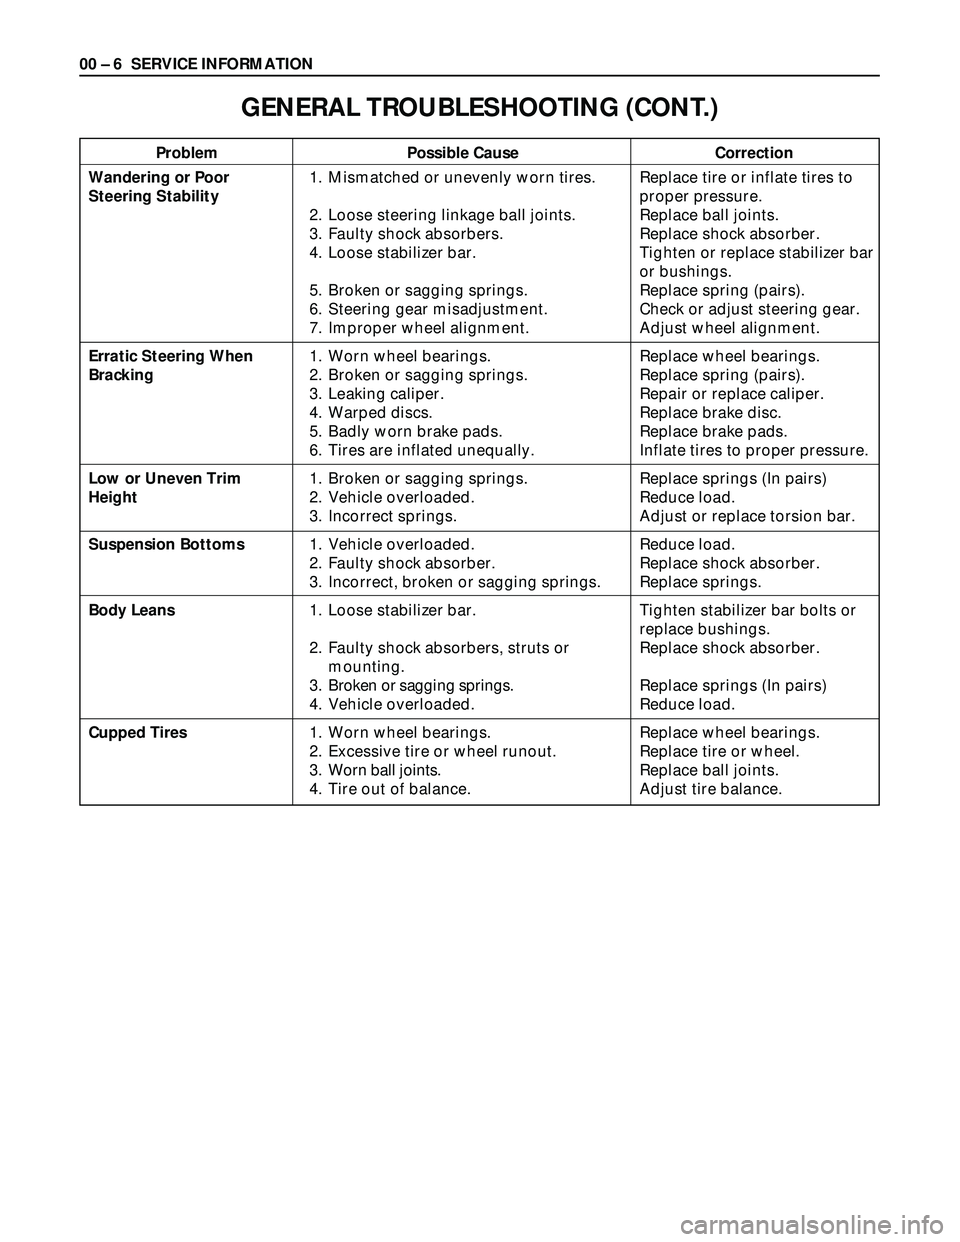
Problem Possible Cause Correction
GENERAL TROUBLESHOOTING (CONT.)
Wandering or Poor
Steering Stability
Erratic Steering When
Bracking
Low or Uneven Trim
Height
Suspension Bottoms
Body Leans
Cupped Tires1. Mismatched or unevenly worn tires.
2. Loose steering linkage ball joints.
3. Faulty shock absorbers.
4. Loose stabilizer bar.
5. Broken or sagging springs.
6. Steering gear misadjustment.
7. Improper wheel alignment.
1. Worn wheel bearings.
2. Broken or sagging springs.
3. Leaking caliper.
4. Warped discs.
5. Badly worn brake pads.
6. Tires are inflated unequally.
1. Broken or sagging springs.
2. Vehicle overloaded.
3. Incorrect springs.
1. Vehicle overloaded.
2. Faulty shock absorber.
3. Incorrect, broken or sagging springs.
1. Loose stabilizer bar.
2. Faulty shock absorbers, struts or
mounting.
3. Broken or sagging springs.
4. Vehicle overloaded.
1. Worn wheel bearings.
2. Excessive tire or wheel runout.
3. Worn ball joints.
4. Tire out of balance.Replace tire or inflate tires to
proper pressure.
Replace ball joints.
Replace shock absorber.
Tighten or replace stabilizer bar
or bushings.
Replace spring (pairs).
Check or adjust steering gear.
Adjust wheel alignment.
Replace wheel bearings.
Replace spring (pairs).
Repair or replace caliper.
Replace brake disc.
Replace brake pads.
Inflate tires to proper pressure.
Replace springs (In pairs)
Reduce load.
Adjust or replace torsion bar.
Reduce load.
Replace shock absorber.
Replace springs.
Tighten stabilizer bar bolts or
replace bushings.
Replace shock absorber.
Replace springs (In pairs)
Reduce load.
Replace wheel bearings.
Replace tire or wheel.
Replace ball joints.
Adjust tire balance.
Page 305 of 3573
INSPECTION
Before making any adjustments affecting caster, camber
or toe-in, the following front end inspection should be
made.
INSPECT
1. Tires for proper inflation pressure. Refer to “Wheels
and Tires” in section 3E.
2. Front wheel bearings for proper adjustment. Refer to
“Front Wheel Drive” in section 4C.
3. Ball joints, tie rod ends and relay rods. If excessive
looseness is noted, correct before adjusting. Refer to
“Steering Linkage” in section 2A.
4. Wheel and tires for run-out. Refer to “Wheels and
Tires”in section 3E.
5. Trim height. If not within specifications, the
correction must be made before adjusting caster.
6. Steering gear for looseness at the frame.
7. Shock absorbers for leaks or any noticeable noise.
Refer to “Front Suspension” in section 3C.
8. Control arms or stabilizer bar attachment for
looseness. Refer to “Front Suspension“ in section 3C.
9. Alignment equipment. Follow the manufacturer’s
instructions.
10. Level of the vehicle. The vehicle must be on a level
surface.
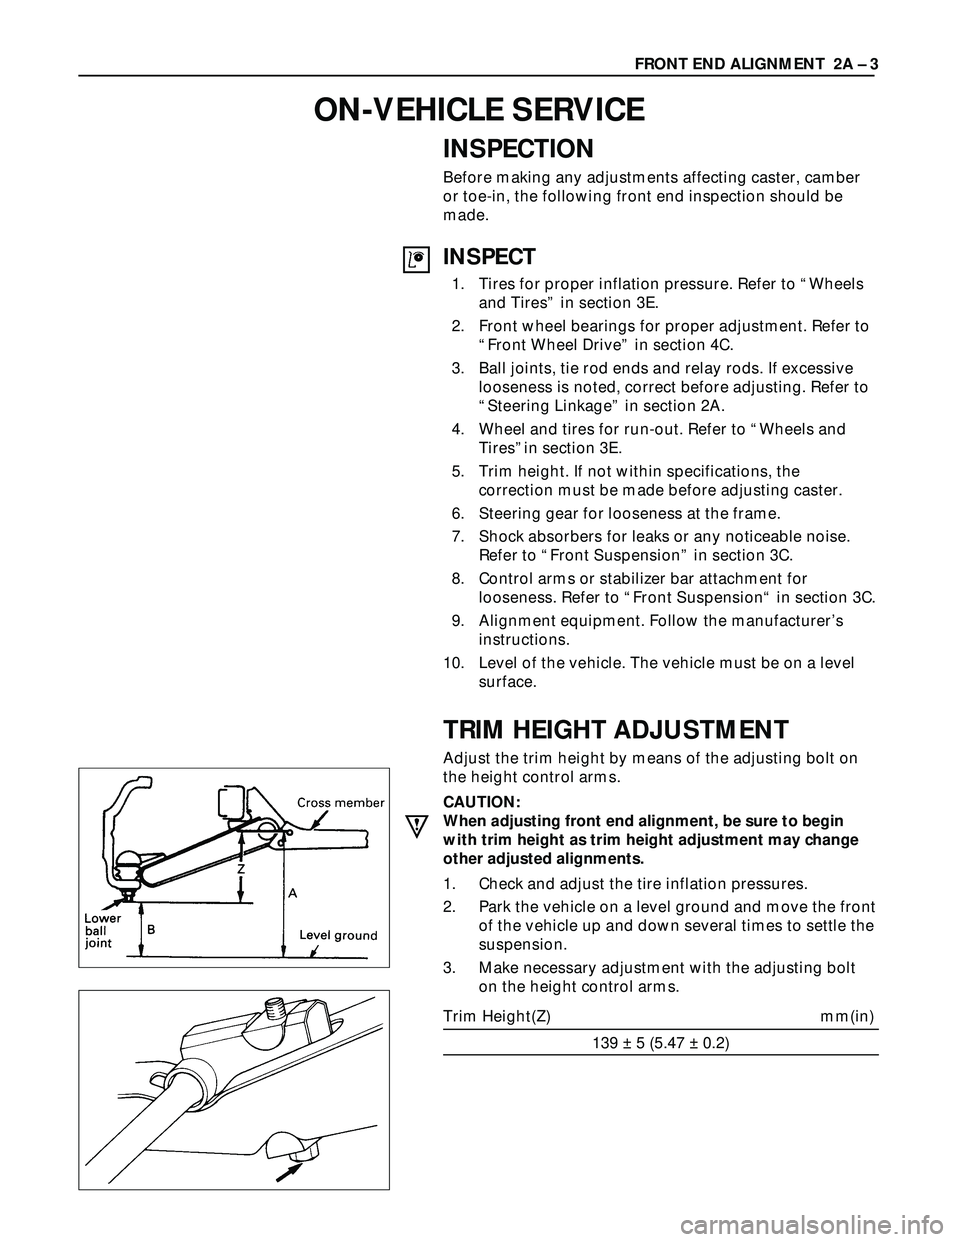
TRIM HEIGHT ADJUSTMENT
Adjust the trim height by means of the adjusting bolt on
the height control arms.
CAUTION:
When adjusting front end alignment, be sure to begin
with trim height as trim height adjustment may change
other adjusted alignments.
1. Check and adjust the tire inflation pressures.
2. Park the vehicle on a level ground and move the front
of the vehicle up and down several times to settle the
suspension.
3. Make necessary adjustment with the adjusting bolt
on the height control arms.
Trim Height(Z) mm(in)
139 ± 5 (5.47 ± 0.2)FRONT END ALIGNMENT 2A – 3
ON-VEHICLE SERVICE
Page 436 of 3573
WHEELS AND TIRES 3E – 5
WHEELS
REPLACEMENT
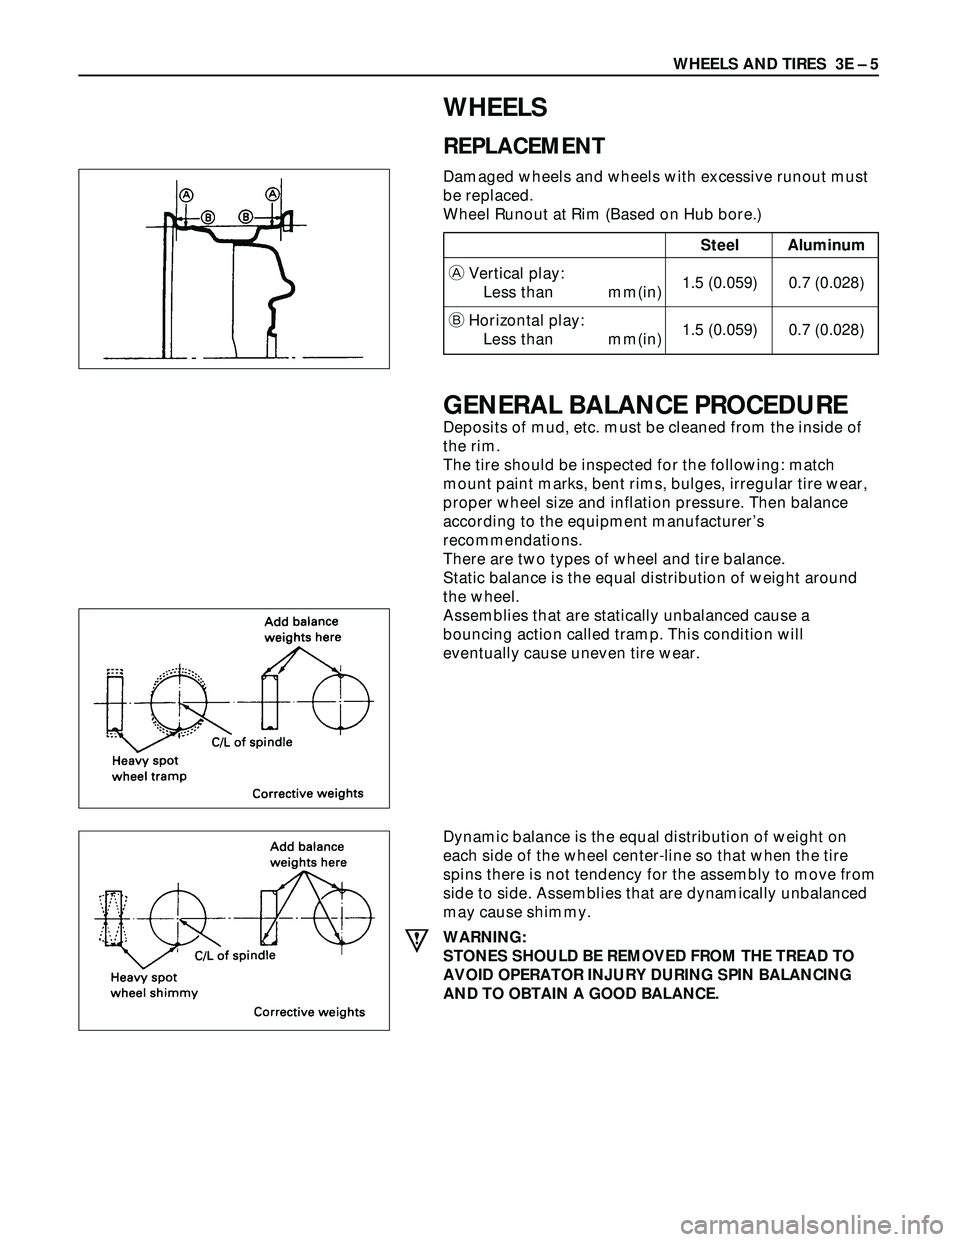
Damaged wheels and wheels with excessive runout must
be replaced.
Wheel Runout at Rim (Based on Hub bore.)
GENERAL BALANCE PROCEDURE
Deposits of mud, etc. must be cleaned from the inside of
the rim.
The tire should be inspected for the following: match
mount paint marks, bent rims, bulges, irregular tire wear,
proper wheel size and inflation pressure. Then balance
according to the equipment manufacturer’s
recommendations.
There are two types of wheel and tire balance.
Static balance is the equal distribution of weight around
the wheel.
Assemblies that are statically unbalanced cause a
bouncing action called tramp. This condition will
eventually cause uneven tire wear.
Dynamic balance is the equal distribution of weight on
each side of the wheel center-line so that when the tire
spins there is not tendency for the assembly to move from
side to side. Assemblies that are dynamically unbalanced
may cause shimmy.
WARNING:
STONES SHOULD BE REMOVED FROM THE TREAD TO
AVOID OPERATOR INJURY DURING SPIN BALANCING
AND TO OBTAIN A GOOD BALANCE.
Steel Aluminum
AVertical play:
Less than mm(in)1.5 (0.059) 0.7 (0.028)
BHorizontal play:
Less than mm(in)1.5 (0.059) 0.7 (0.028)
Page 470 of 3573
DIFFERENTIAL (REAR 220mm)
4A2A±3
Diagnosis
Many noises that seem to come from the rear axle
actually originate from other sources such as tires, road
surface, wheel bearings, engine, transmission, muffler, or
body drumming. Investigate to find the source of the
noise before disassembling the rear axle. Rear axles, like
any other mechanical device, are not absolutely quiet but
should be considered quiet unless some abnormal noise
is present.
To make a systematic check for axle noise, observe the
following:
1. Select a level asphalt road to reduce tire noise and
body drumming.
2. Check rear axle lubricant level to assure correct level,
and then drive the vehicle far enough to thoroughly
warm up the rear axle lubricant.
3. Note the speed at which noise occurs. Stop the
vehicle and put the transmission in neutral. Run the
engine speed slowly up and down to determine if the
noise is caused by exhaust, muffler noise, or other
engine conditions.
4. Tire noise changes with different road surfaces; axle
noises do not. Temporarily inflate all tires to 344 kPa
(3.5kg/cm
2, 50 psi) (for test purposes only). This will
change noise caused by tires but will not affect noise
caused by the rear axle.
Rear axle noise usually stops when coasting at
speeds under 48 km/h (30 mph); however, tire noise
continues with a lower tone. Rear axle noise usually
changes when comparing pull and coast, but tire
noise stays about the same.
Distinguish between tire noise and rear axle noise by
noting if the noise changes with various speeds or
sudden acceleration and deceleration. Exhaust and
axle noise vary under these conditions, while tire
noise remains constant and is more pronounced at
speeds of 32 to 48 km/h (20 to 30 mph). Further check
for tire noise by driving the vehicle over smooth
pavements or dirt roads (not gravel) with the tires at
normal pressure. If the noise is caused by tires, it will
change noticeably with changes in road surface.
5. Loose or rough front wheel bearings will cause noise
which may be confused with rear axle noise; however,
front wheel bearing noise does not change when
comparing drive and coast. Light application of the
brake while holding vehicle speed steady will often
cause wheel bearing noise to diminish. Front wheel
bearings may be checked for noise by jacking up the
wheels and spinning them or by shaking the wheels to
determine if bearings are loose.
6. Rear suspension rubber bushings and spring
insulators dampen out rear axle noise when correctly
installed. Check to see that there is no link or rod
loosened or metal±to±metal contact.
7. Make sure that there is no metal±to±metal contact
between the floor and the frame.
After the noise has been determined to be in the axle, the
type of axle noise should be determined, in order to make
any necessary repairs.
Gear Noise
Gear noise (whine) is audible from 32 to 89 km/h (20 to 55
mph) under four driving conditions.
1. Driving under acceleration or heavy pull.
2. Driving under load or under constant speed.
3. When using enough throttle to keep the vehicle from
driving the engine while the vehicle slows down
gradually (engine still pulls slightly).
4. When coasting with the vehicle in gear and the throttle
closed. The gear noise is usually more noticeable
between 48 and 64 km/h (30 and 40 mph) and 80 and
89 km/h (50 and 55 mph).
Bearing Noise
Bad bearings generally produce a rough growl or grating
sound, rather than the whine typical of gear noise.
Bearing noise frequently ªwow±wowsº at bearing rpm,
indicating a bad pinion or rear axle side bearing. This
noise can be confused with rear wheel bearing noise.
Rear Wheel Bearing Noise
Rear wheel bearing noise continues to be heard while
coasting at low speed with transmission in neutral. Noise
may diminish by gentle braking. Jack up the rear wheels,
spin them by hand and listen for noise at the hubs.
Replace any faulty wheel bearings.
Knock At Low Speeds
Low speed knock can be caused by worn universal joints
or a side gear hub counter bore in the cage that is worn
oversize. Inspect and replace universal joints or cage and
side gears as required.
Backlash Clunk
Excessive clunk on acceleration and deceleration can be
caused by a worn rear axle pinion shaft, a worn cage,
excessive clearance between the axle and the side gear
splines, excessive clearance between the side gear hub
and the counterbore in the cage, worn pinion and side
gear teeth, worn thrust washers, or excessive drive pinion
and ring gear backlash. Remove worn parts and replace
as required. Select close±fitting parts when possible.
Adjust pinion and ring gear backlash.
Page 506 of 3573
DIFFERENTIAL (REAR 244mm)
4A2B±3
Diagnosis
Many noises that seem to come from the rear axle
actually originate from other sources such as tires, road
surface, wheel bearings, engine, transmission, muffler, or
body drumming. Investigate to find the source of the
noise before disassembling the rear axle. Rear axles, like
any other mechanical device, are not absolutely quiet but
should be considered quiet unless some abnormal noise
is present.
To make a systematic check for axle noise, observe the
following:
1. Select a level asphalt road to reduce tire noise and
body drumming.
2. Check rear axle lubricant level to assure correct level,
and then drive the vehicle far enough to thoroughly
warm up the rear axle lubricant.
3. Note the speed at which noise occurs. Stop the
vehicle and put the transmission in neutral. Run the
engine speed slowly up and down to determine if the
noise is caused by exhaust, muffler noise, or other
engine conditions.
4. Tire noise changes with different road surfaces; axle
noises do not. Temporarily inflate all tires to 344 kPa
(3.5kg/cm
2, 50 psi) (for test purposes only). This will
change noise caused by tires but will not affect noise
caused by the rear axle.
Rear axle noise usually stops when coasting at
speeds under 48 km/h (30 mph); however, tire noise
continues with a lower tone. Rear axle noise usually
changes when comparing pull and coast, but tire
noise stays about the same.
Distinguish between tire noise and rear axle noise by
noting if the noise changes with various speeds or
sudden acceleration and deceleration. Exhaust and
axle noise vary under these conditions, while tire
noise remains constant and is more pronounced at
speeds of 32 to 48 km/h (20 to 30 mph). Further check
for tire noise by driving the vehicle over smooth
pavements or dirt roads (not gravel) with the tires at
normal pressure. If the noise is caused by tires, it will
change noticeably with changes in road surface.
5. Loose or rough front wheel bearings will cause noise
which may be confused with rear axle noise; however,
front wheel bearing noise does not change when
comparing drive and coast. Light application of the
brake while holding vehicle speed steady will often
cause wheel bearing noise to diminish. Front wheel
bearings may be checked for noise by jacking up the
wheels and spinning them or by shaking the wheels to
determine if bearings are loose.
6. Rear suspension rubber bushings and spring
insulators dampen out rear axle noise when correctly
installed. Check to see that there is no link or rod
loosened or metal±to±metal contact.
7. Make sure that there is no metal±to±metal contact
between the floor and the frame.
After the noise has been determined to be in the axle, the
type of axle noise should be determined, in order to make
any necessary repairs.
Gear Noise
Gear noise (whine) is audible from 32 to 89 km/h (20 to 55
mph) under four driving conditions.
1. Driving under acceleration or heavy pull.
2. Driving under load or under constant speed.
3. When using enough throttle to keep the vehicle from
driving the engine while the vehicle slows down
gradually (engine still pulls slightly).
4. When coasting with the vehicle in gear and the throttle
closed. The gear noise is usually more noticeable
between 48 and 64 km/h (30 and 40 mph) and 80 and
89 km/h (50 and 55 mph).
Bearing Noise
Bad bearings generally produce a rough growl or grating
sound, rather than the whine typical of gear noise.
Bearing noise frequently ªwow±wowsº at bearing rpm,
indicating a bad pinion or rear axle side bearing. This
noise can be confused with rear wheel bearing noise.
Rear Wheel Bearing Noise
Rear wheel bearing noise continues to be heard while
coasting at low speed with transmission in neutral. Noise
may diminish by gentle braking. Jack up the rear wheels,
spin them by hand and listen for noise at the hubs.
Replace any faulty wheel bearings.
Knock At Low Speeds
Low speed knock can be caused by worn universal joints
or a side gear hub counter bore in the cage that is worn
oversize. Inspect and replace universal joints or cage and
side gears as required.
Backlash Clunk
Excessive clunk on acceleration and deceleration can be
caused by a worn rear axle pinion shaft, a worn cage,
excessive clearance between the axle and the side gear
splines, excessive clearance between the side gear hub
and the counterbore in the cage, worn pinion and side
gear teeth, worn thrust washers, or excessive drive pinion
and ring gear backlash. Remove worn parts and replace
as required. Select close±fitting parts when possible.
Adjust pinion and ring gear backlash.
Page 881 of 3573
POWER ASSISTED BRAKE SYSTEM 5C – 3
BRAKE SYSTEM DIAGNOSIS
ROAD TESTING THE BRAKES
Brake Test
Brakes should be tested on a dry, clean, reasonably
smooth and level roadway. A true test of brake
performance cannot be made if the roadway is wet,
greasy or covered with loose dirt so that all tires do
not grip the road equally. Testing will also be
adversely affected if the roadway is crowned so as to
throw the weight of the vehicle toward wheels on one
side or if the roadway is so rough that wheels tend to
bounce. Test the brakes at different vehicle speeds
with both light and heavy pedal pressure; however,
avoid locking the wheels and sliding the tires. Locked
wheels and sliding tires do not indicate brake
efficiency, since heavily braked but turning wheels
will stop the vehicle in less distance than locked
wheels. More tire-to-road friction is present with a
heavily braked turning tire then with a sliding tire.
The standard brake system is designed and balanced
to avoid locking the wheels except at very high
deceleration levels.
It is designed this way because the shortest stopping
distance and best control is achieved without brake
lock-up.
Because of high deceleration capability, a firmer pedal
may be felt at higher deceleration levels.
External Conditions That Affect Brake
Performance
1. Tires: Tires having unequal contact and grip on the
road will cause unequal braking. Tires must be
equally inflated, identical in size, and the tread
pattern of right and left tires must be
approximately equal.
2. Vehicle loading: A heavily loaded vehicle requires
more braking effort.
3. Wheel Alignment: Misalignment of the wheels,
particularly in regard to excessive camber and
caster, will cause the brakes to pull to one side.
BRAKE FLUID LEAKS
With engine running at idle and the transmission in
“Neutral”, depress the brake pedal and hold a
constant foot pressure on the pedal. If pedal gradually
falls away with the constant pressure, the hydraulic
system may be leaking.
Check the master cylinder fluid level. While a slight
drop in reservoir level will result from normal lining
wear, an abnormally low level in resevoir indicates a
leak in the system. The hydraulic system may be
leaking internally as well as externally. Refer to
“Master Cylinder Inspection”. Also, the system may
appear to pass this test but still have slight leakage. If
fluid level is normal, check the vacuum booster push
Page 883 of 3573
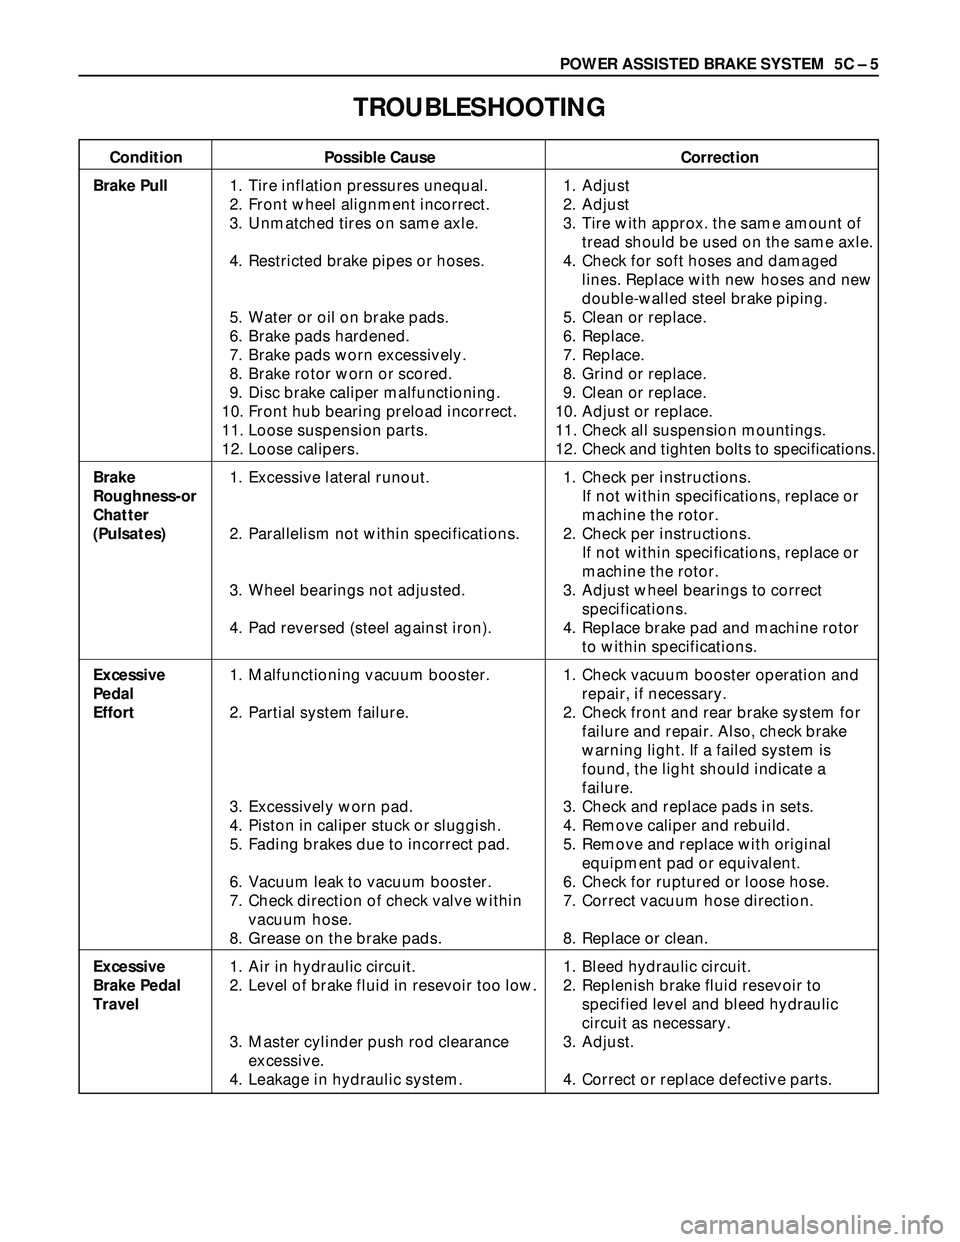
POWER ASSISTED BRAKE SYSTEM 5C – 5
TROUBLESHOOTING
Condition Possible Cause Correction
Brake Pull1. Tire inflation pressures unequal. 1. Adjust
2. Front wheel alignment incorrect. 2. Adjust
3. Unmatched tires on same axle. 3. Tire with approx. the same amount of
tread should be used on the same axle.
4. Restricted brake pipes or hoses. 4. Check for soft hoses and damaged
lines. Replace with new hoses and new
double-walled steel brake piping.
5. Water or oil on brake pads. 5. Clean or replace.
6. Brake pads hardened. 6. Replace.
7. Brake pads worn excessively. 7. Replace.
8. Brake rotor worn or scored. 8. Grind or replace.
9. Disc brake caliper malfunctioning. 9. Clean or replace.
10. Front hub bearing preload incorrect. 10. Adjust or replace.
11. Loose suspension parts. 11. Check all suspension mountings.
12. Loose calipers. 12. Check and tighten bolts to specifications.
Brake 1. Excessive lateral runout. 1. Check per instructions.
Roughness-orIf not within specifications, replace or
Chattermachine the rotor.
(Pulsates)2. Parallelism not within specifications. 2. Check per instructions.
If not within specifications, replace or
machine the rotor.
3. Wheel bearings not adjusted. 3. Adjust wheel bearings to correct
specifications.
4. Pad reversed (steel against iron). 4. Replace brake pad and machine rotor
to within specifications.
Excessive 1. Malfunctioning vacuum booster. 1. Check vacuum booster operation and
Pedal repair, if necessary.
Effort2. Partial system failure. 2. Check front and rear brake system for
failure and repair. Also, check brake
warning light. If a failed system is
found, the light should indicate a
failure.
3. Excessively worn pad. 3. Check and replace pads in sets.
4. Piston in caliper stuck or sluggish. 4. Remove caliper and rebuild.
5. Fading brakes due to incorrect pad. 5. Remove and replace with original
equipment pad or equivalent.
6. Vacuum leak to vacuum booster. 6. Check for ruptured or loose hose.
7. Check direction of check valve within 7. Correct vacuum hose direction.
vacuum hose.
8. Grease on the brake pads. 8. Replace or clean.
Excessive 1. Air in hydraulic circuit. 1. Bleed hydraulic circuit.
Brake Pedal 2. Level of brake fluid in resevoir too low. 2. Replenish brake fluid resevoir to
Travelspecified level and bleed hydraulic
circuit as necessary.
3. Master cylinder push rod clearance 3. Adjust.
excessive.
4. Leakage in hydraulic system. 4. Correct or replace defective parts.