1998 ISUZU TROOPER clutch
[x] Cancel search: clutchPage 131 of 3573
AIR CONDITIONING 1B Ð 5
With some compressors the differential between
the intake pressure and discharge pressure
generated while the compressor is operating is
used for lubrication instead of an oil pump.
The specified amount of the DKV-14D, DKS-15CH
and HD6 compressors oil is 150cc (4.2 Imp fl oz).
Also, compressor oil to be used varies according to
the compressor model. Be sure to avoid mixing
two or more different types of oil.
If the wrong oil is used, lubrication will be poor and
the compressor will seize or malfunction.
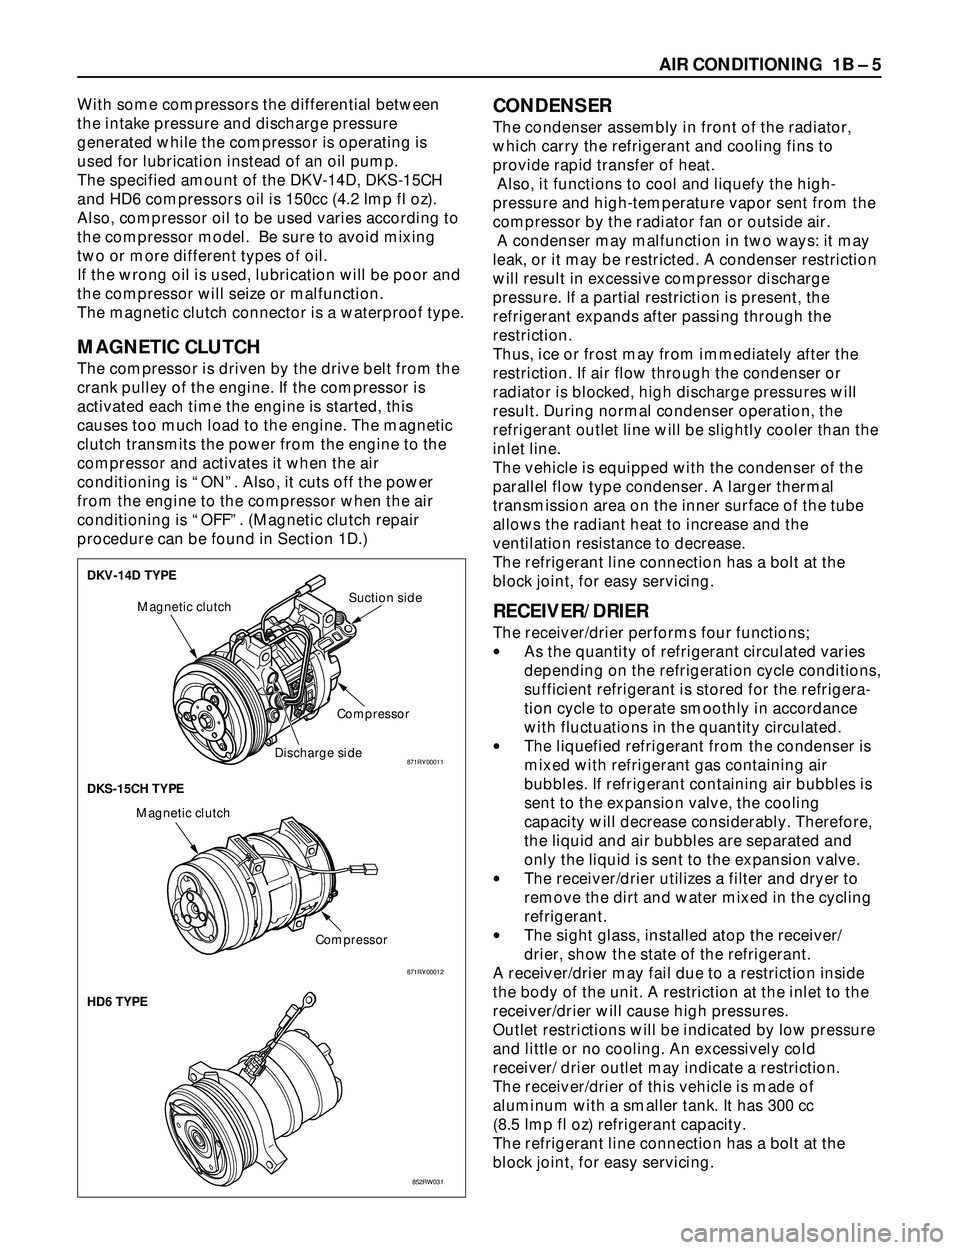
The magnetic clutch connector is a waterproof type.
MAGNETIC CLUTCH
The compressor is driven by the drive belt from the
crank pulley of the engine. If the compressor is
activated each time the engine is started, this
causes too much load to the engine. The magnetic
clutch transmits the power from the engine to the
compressor and activates it when the air
conditioning is ÒONÓ. Also, it cuts off the power
from the engine to the compressor when the air
conditioning is ÒOFFÓ. (Magnetic clutch repair
procedure can be found in Section 1D.)
CONDENSER
The condenser assembly in front of the radiator,
which carry the refrigerant and cooling fins to
provide rapid transfer of heat.
Also, it functions to cool and liquefy the high-
pressure and high-temperature vapor sent from the
compressor by the radiator fan or outside air.
A condenser may malfunction in two ways: it may
leak, or it may be restricted. A condenser restriction
will result in excessive compressor discharge
pressure. If a partial restriction is present, the
refrigerant expands after passing through the
restriction.
Thus, ice or frost may from immediately after the
restriction. If air flow through the condenser or
radiator is blocked, high discharge pressures will
result. During normal condenser operation, the
refrigerant outlet line will be slightly cooler than the
inlet line.
The vehicle is equipped with the condenser of the
parallel flow type condenser. A larger thermal
transmission area on the inner surface of the tube
allows the radiant heat to increase and the
ventilation resistance to decrease.
The refrigerant line connection has a bolt at the
block joint, for easy servicing.
RECEIVER/DRIER
The receiver/drier performs four functions;
·As the quantity of refrigerant circulated varies
depending on the refrigeration cycle conditions,
sufficient refrigerant is stored for the refrigera-
tion cycle to operate smoothly in accordance
with fluctuations in the quantity circulated.
·The liquefied refrigerant from the condenser is
mixed with refrigerant gas containing air
bubbles. If refrigerant containing air bubbles is
sent to the expansion valve, the cooling
capacity will decrease considerably. Therefore,
the liquid and air bubbles are separated and
only the liquid is sent to the expansion valve.
·The receiver/drier utilizes a filter and dryer to
remove the dirt and water mixed in the cycling
refrigerant.
·The sight glass, installed atop the receiver/
drier, show the state of the refrigerant.
A receiver/drier may fail due to a restriction inside
the body of the unit. A restriction at the inlet to the
receiver/drier will cause high pressures.
Outlet restrictions will be indicated by low pressure
and little or no cooling. An excessively cold
receiver/ drier outlet may indicate a restriction.
The receiver/drier of this vehicle is made of
aluminum with a smaller tank. It has 300 cc
(8.5 Imp fl oz) refrigerant capacity.
The refrigerant line connection has a bolt at the
block joint, for easy servicing.
DKV-14D TYPE
DKS-15CH TYPE
HD6 TYPE
Magnetic clutch
CompressorSuction side
Discharge side
Compressor Magnetic clutch
852RW031 871RY00012
871RY00011
Page 132 of 3573
1B Ð 6 AIR CONDITIONING
DUAL PRESSURE SWITCH
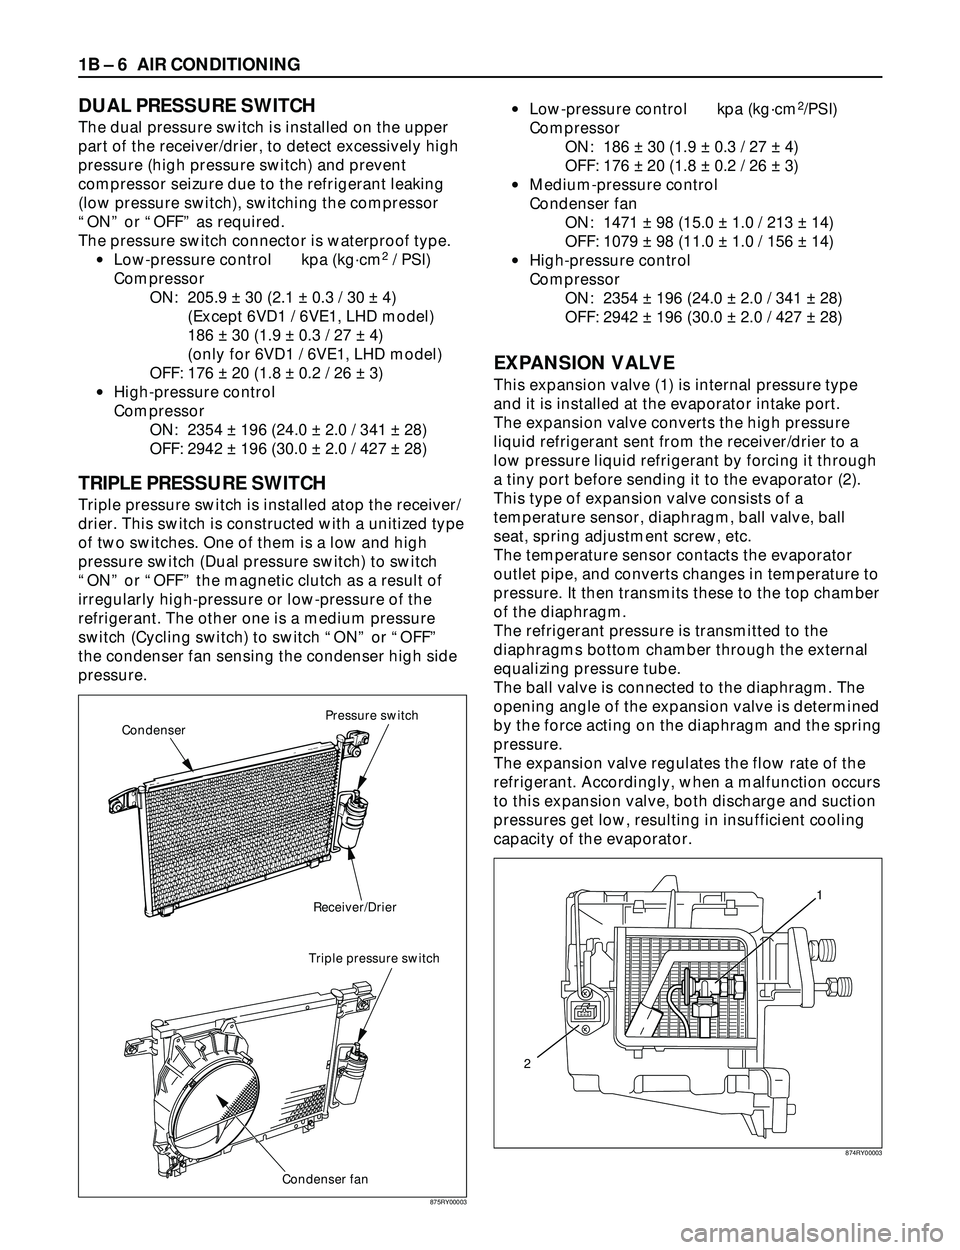
The dual pressure switch is installed on the upper
part of the receiver/drier, to detect excessively high
pressure (high pressure switch) and prevent
compressor seizure due to the refrigerant leaking
(low pressure switch), switching the compressor
ÒONÓ or ÒOFFÓ as required.
The pressure switch connector is waterproof type.
·Low-pressure control kpa (kgácm
2/ PSI)
Compressor
ON: 205.9 ± 30 (2.1 ± 0.3 / 30 ± 4)
(Except 6VD1 / 6VE1, LHD model)
186 ± 30 (1.9 ± 0.3 / 27 ± 4)
(only for 6VD1 / 6VE1, LHD model)
OFF: 176 ± 20 (1.8 ± 0.2 / 26 ± 3)
·High-pressure control
Compressor
ON: 2354 ± 196 (24.0 ± 2.0 / 341 ± 28)
OFF: 2942 ± 196 (30.0 ± 2.0 / 427 ± 28)
TRIPLE PRESSURE SWITCH
Triple pressure switch is installed atop the receiver/
drier. This switch is constructed with a unitized type
of two switches. One of them is a low and high
pressure switch (Dual pressure switch) to switch
ÒONÓ or ÒOFFÓ the magnetic clutch as a result of
irregularly high-pressure or low-pressure of the
refrigerant. The other one is a medium pressure
switch (Cycling switch) to switch ÒONÓ or ÒOFFÓ
the condenser fan sensing the condenser high side
pressure.·Low-pressure control kpa (kgácm
2/PSI)
Compressor
ON: 186 ± 30 (1.9 ± 0.3 / 27 ± 4)
OFF: 176 ± 20 (1.8 ± 0.2 / 26 ± 3)
·Medium-pressure control
Condenser fan
ON: 1471 ± 98 (15.0 ± 1.0 / 213 ± 14)
OFF: 1079 ± 98 (11.0 ± 1.0 / 156 ± 14)
·High-pressure control
Compressor
ON: 2354 ± 196 (24.0 ± 2.0 / 341 ± 28)
OFF: 2942 ± 196 (30.0 ± 2.0 / 427 ± 28)
EXPANSION VALVE
This expansion valve (1) is internal pressure type
and it is installed at the evaporator intake port.
The expansion valve converts the high pressure
liquid refrigerant sent from the receiver/drier to a
low pressure liquid refrigerant by forcing it through
a tiny port before sending it to the evaporator (2).
This type of expansion valve consists of a
temperature sensor, diaphragm, ball valve, ball
seat, spring adjustment screw, etc.
The temperature sensor contacts the evaporator
outlet pipe, and converts changes in temperature to
pressure. It then transmits these to the top chamber
of the diaphragm.
The refrigerant pressure is transmitted to the
diaphragms bottom chamber through the external
equalizing pressure tube.
The ball valve is connected to the diaphragm. The
opening angle of the expansion valve is determined
by the force acting on the diaphragm and the spring
pressure.
The expansion valve regulates the flow rate of the
refrigerant. Accordingly, when a malfunction occurs
to this expansion valve, both discharge and suction
pressures get low, resulting in insufficient cooling
capacity of the evaporator.
Pressure switch
Receiver/Drier
Triple pressure switch
Condenser fan Condenser
1
2
875RY00003874RY00003
Page 133 of 3573
AIR CONDITIONING 1B Ð 7
EVAPORATOR
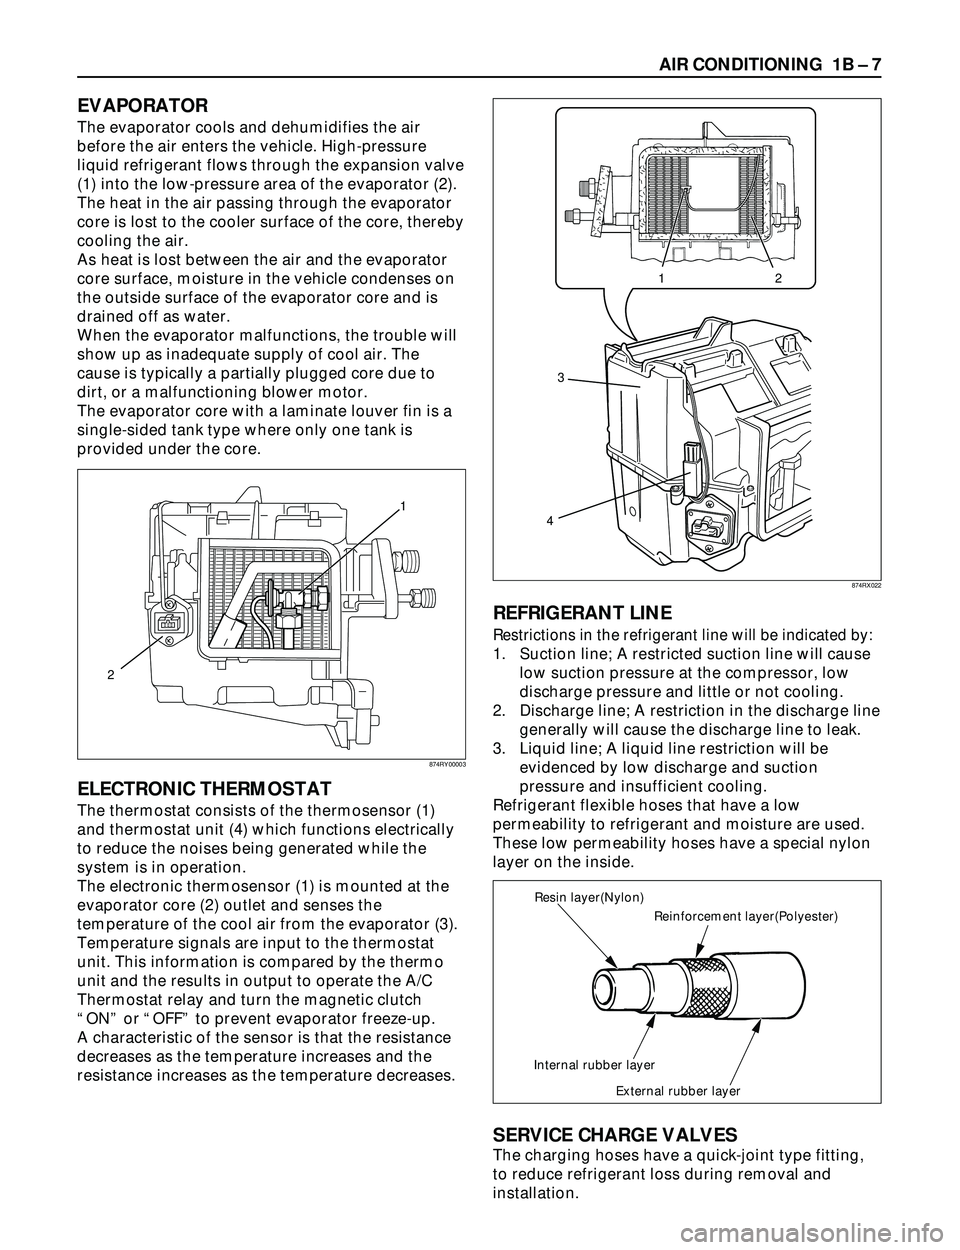
The evaporator cools and dehumidifies the air
before the air enters the vehicle. High-pressure
liquid refrigerant flows through the expansion valve
(1) into the low-pressure area of the evaporator (2).
The heat in the air passing through the evaporator
core is lost to the cooler surface of the core, thereby
cooling the air.
As heat is lost between the air and the evaporator
core surface, moisture in the vehicle condenses on
the outside surface of the evaporator core and is
drained off as water.
When the evaporator malfunctions, the trouble will
show up as inadequate supply of cool air. The
cause is typically a partially plugged core due to
dirt, or a malfunctioning blower motor.
The evaporator core with a laminate louver fin is a
single-sided tank type where only one tank is
provided under the core.
ELECTRONIC THERMOSTAT
The thermostat consists of the thermosensor (1)
and thermostat unit (4) which functions electrically
to reduce the noises being generated while the
system is in operation.
The electronic thermosensor (1) is mounted at the
evaporator core (2) outlet and senses the
temperature of the cool air from the evaporator (3).
Temperature signals are input to the thermostat
unit. This information is compared by the thermo
unit and the results in output to operate the A/C
Thermostat relay and turn the magnetic clutch
ÒONÓ or ÒOFFÓ to prevent evaporator freeze-up.
A characteristic of the sensor is that the resistance
decreases as the temperature increases and the
resistance increases as the temperature decreases.
REFRIGERANT LINE
Restrictions in the refrigerant line will be indicated by:
1. Suction line; A restricted suction line will cause
low suction pressure at the compressor, low
discharge pressure and little or not cooling.
2. Discharge line; A restriction in the discharge line
generally will cause the discharge line to leak.
3. Liquid line; A liquid line restriction will be
evidenced by low discharge and suction
pressure and insufficient cooling.
Refrigerant flexible hoses that have a low
permeability to refrigerant and moisture are used.
These low permeability hoses have a special nylon
layer on the inside.
SERVICE CHARGE VALVES
The charging hoses have a quick-joint type fitting,
to reduce refrigerant loss during removal and
installation.
12
3
4
Reinforcement layer(Polyester) Resin layer(Nylon)
Internal rubber layer
External rubber layer
1
2
874RY00003874RX022
Page 149 of 3573
AIR CONDITIONING 1B Ð 23
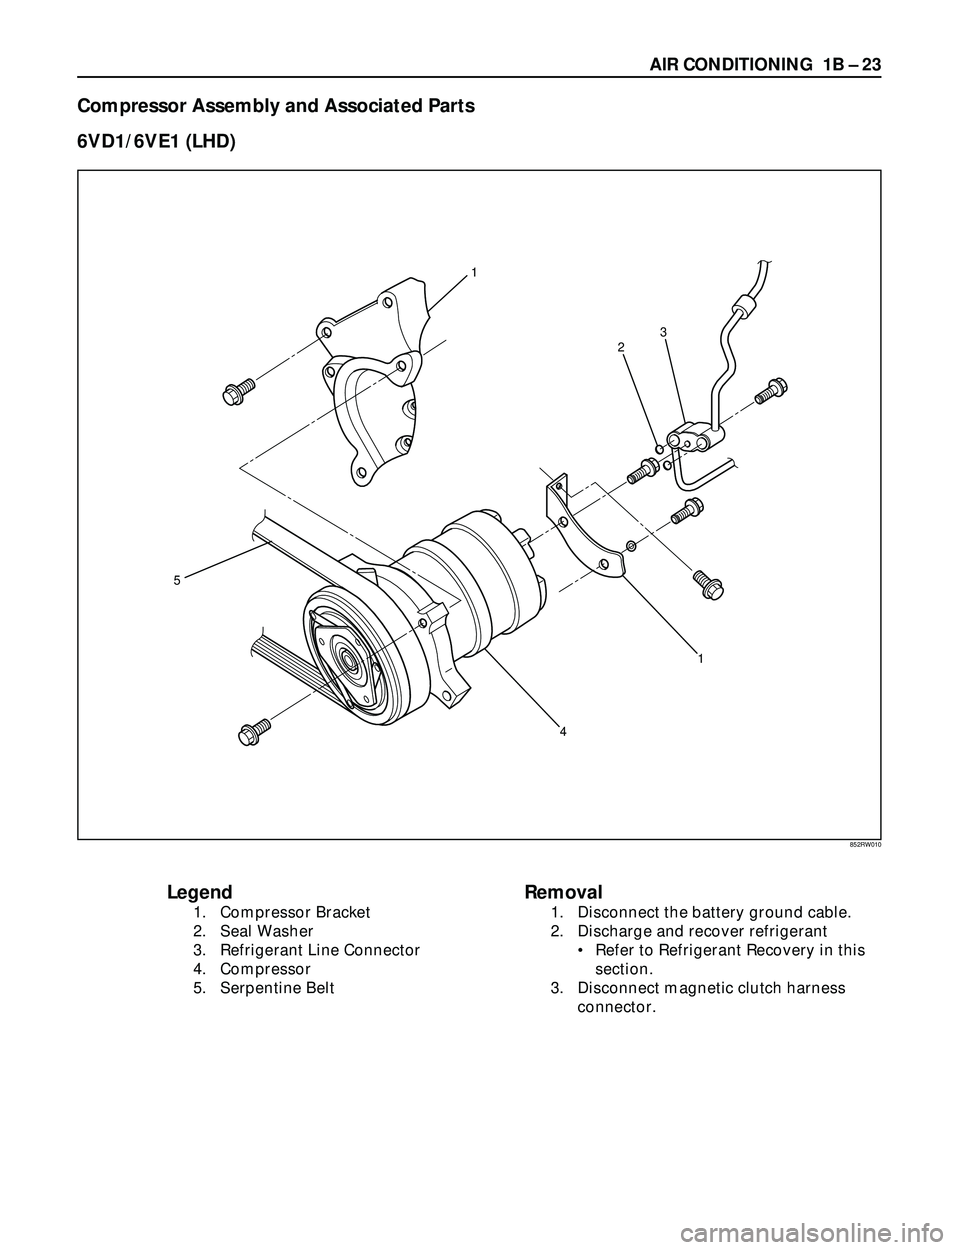
Legend
1. Compressor Bracket
2. Seal Washer
3. Refrigerant Line Connector
4. Compressor
5. Serpentine Belt
Removal
1. Disconnect the battery ground cable.
2. Discharge and recover refrigerant
¥ Refer to Refrigerant Recovery in this
section.
3. Disconnect magnetic clutch harness
connector.
Compressor Assembly and Associated Parts
6VD1/6VE1 (LHD)
1
5
23
4
1
852RW010
Page 151 of 3573
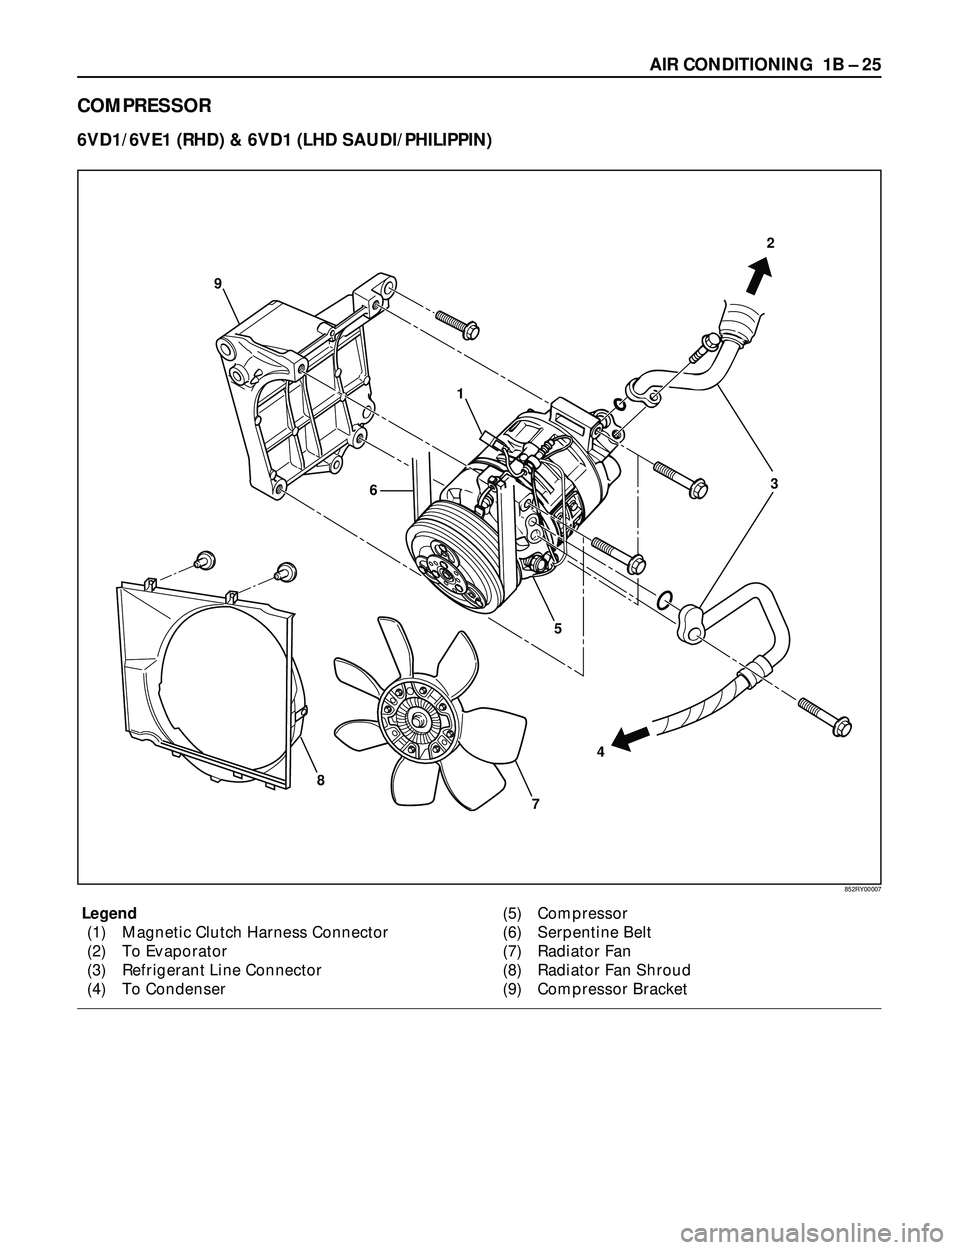
AIR CONDITIONING 1B Ð 25
Legend
(1) Magnetic Clutch Harness Connector
(2) To Evaporator
(3) Refrigerant Line Connector
(4) To Condenser(5) Compressor
(6) Serpentine Belt
(7) Radiator Fan
(8) Radiator Fan Shroud
(9) Compressor Bracket
COMPRESSOR
6VD1/6VE1 (RHD) & 6VD1 (LHD SAUDI/PHILIPPIN)
3
42
5
7
8
9
1
6
852RY00007
Page 152 of 3573
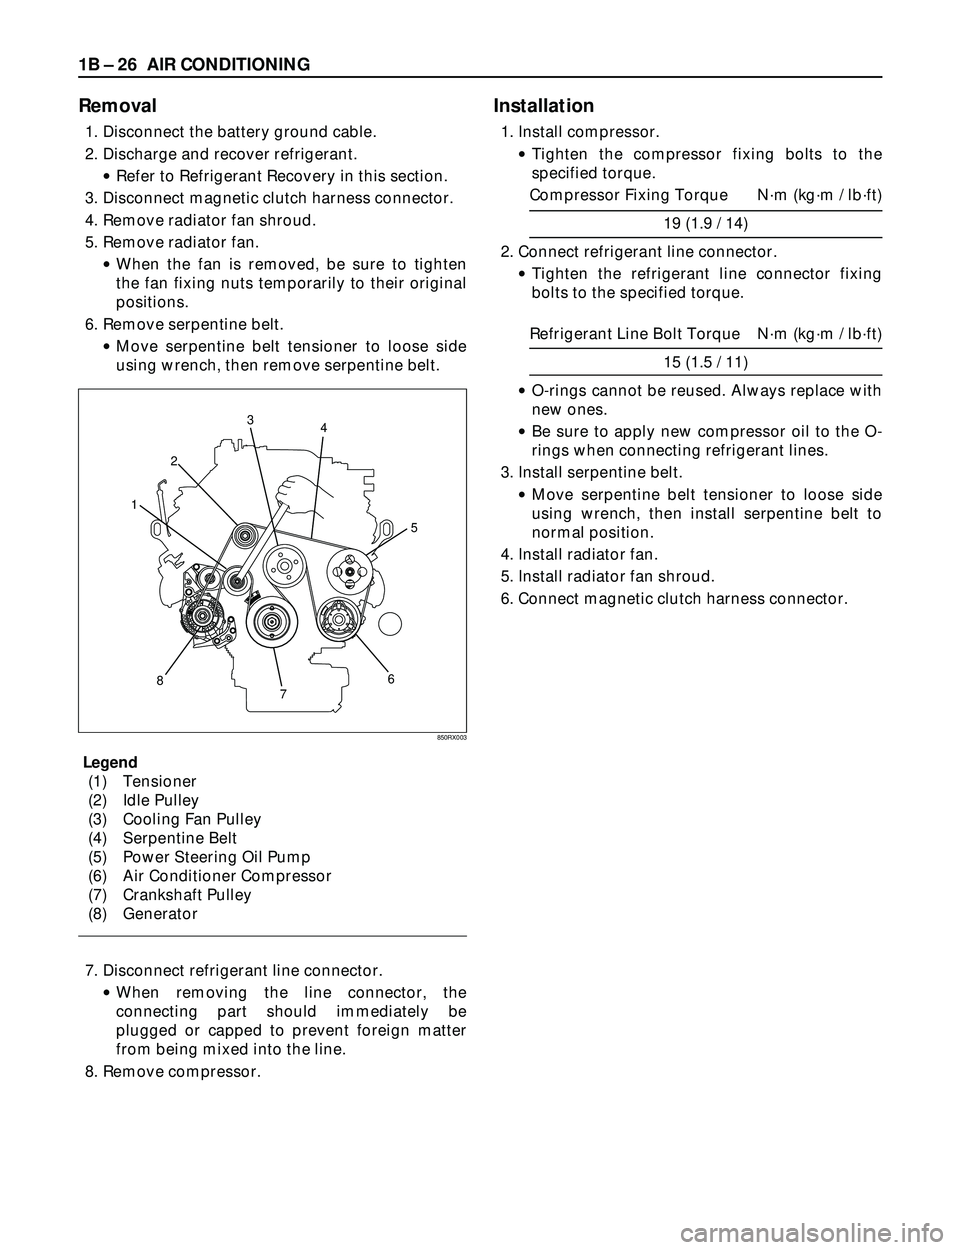
1B Ð 26 AIR CONDITIONING
Removal
1. Disconnect the battery ground cable.
2. Discharge and recover refrigerant.
·Refer to Refrigerant Recovery in this section.
3. Disconnect magnetic clutch harness connector.
4. Remove radiator fan shroud.
5. Remove radiator fan.
·When the fan is removed, be sure to tighten
the fan fixing nuts temporarily to their original
positions.
6. Remove serpentine belt.
·Move serpentine belt tensioner to loose side
using wrench, then remove serpentine belt.
Legend
(1) Tensioner
(2) Idle Pulley
(3) Cooling Fan Pulley
(4) Serpentine Belt
(5) Power Steering Oil Pump
(6) Air Conditioner Compressor
(7) Crankshaft Pulley
(8) Generator
7. Disconnect refrigerant line connector.
·When removing the line connector, the
connecting part should immediately be
plugged or capped to prevent foreign matter
from being mixed into the line.
8. Remove compressor.
Installation
1. Install compressor.
·Tighten the compressor fixing bolts to the
specified torque.
Compressor Fixing Torque Nám (kgám / lbáft)
19 (1.9 / 14)
2. Connect refrigerant line connector.
·Tighten the refrigerant line connector fixing
bolts to the specified torque.
Refrigerant Line Bolt Torque Nám (kgám / lbáft)
15 (1.5 / 11)
·O-rings cannot be reused. Always replace with
new ones.
·Be sure to apply new compressor oil to the O-
rings when connecting refrigerant lines.
3. Install serpentine belt.
·Move serpentine belt tensioner to loose side
using wrench, then install serpentine belt to
normal position.
4. Install radiator fan.
5. Install radiator fan shroud.
6. Connect magnetic clutch harness connector.
3
4
2
7 86 1
5
850RX003
Page 153 of 3573
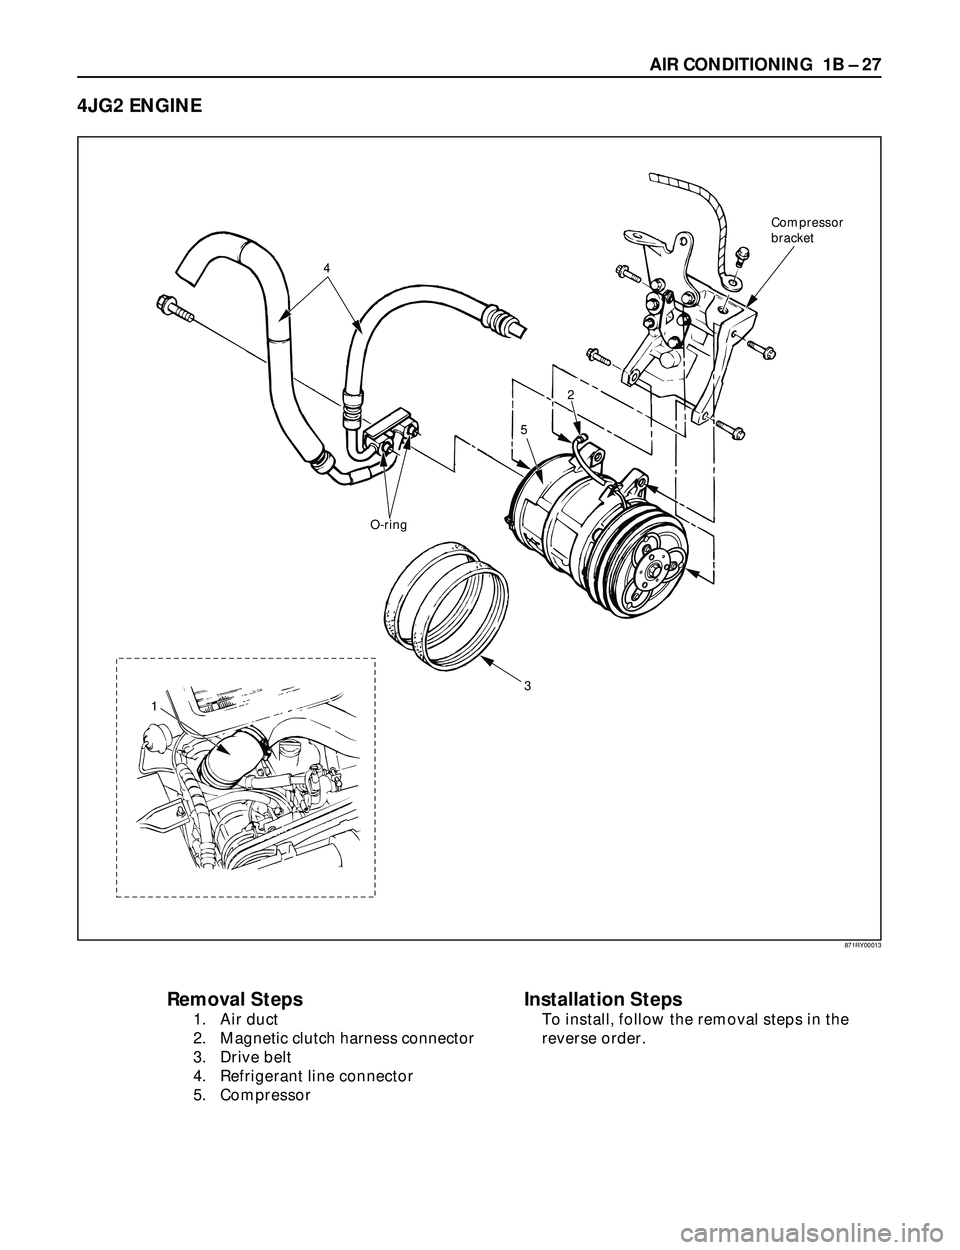
AIR CONDITIONING 1B Ð 27
871RY00013
Removal Steps
1. Air duct
2. Magnetic clutch harness connector
3. Drive belt
4. Refrigerant line connector
5. Compressor
Installation Steps
To install, follow the removal steps in the
reverse order.
4JG2 ENGINE
Compressor
bracket
2
5
13
4
O-ring
Page 154 of 3573
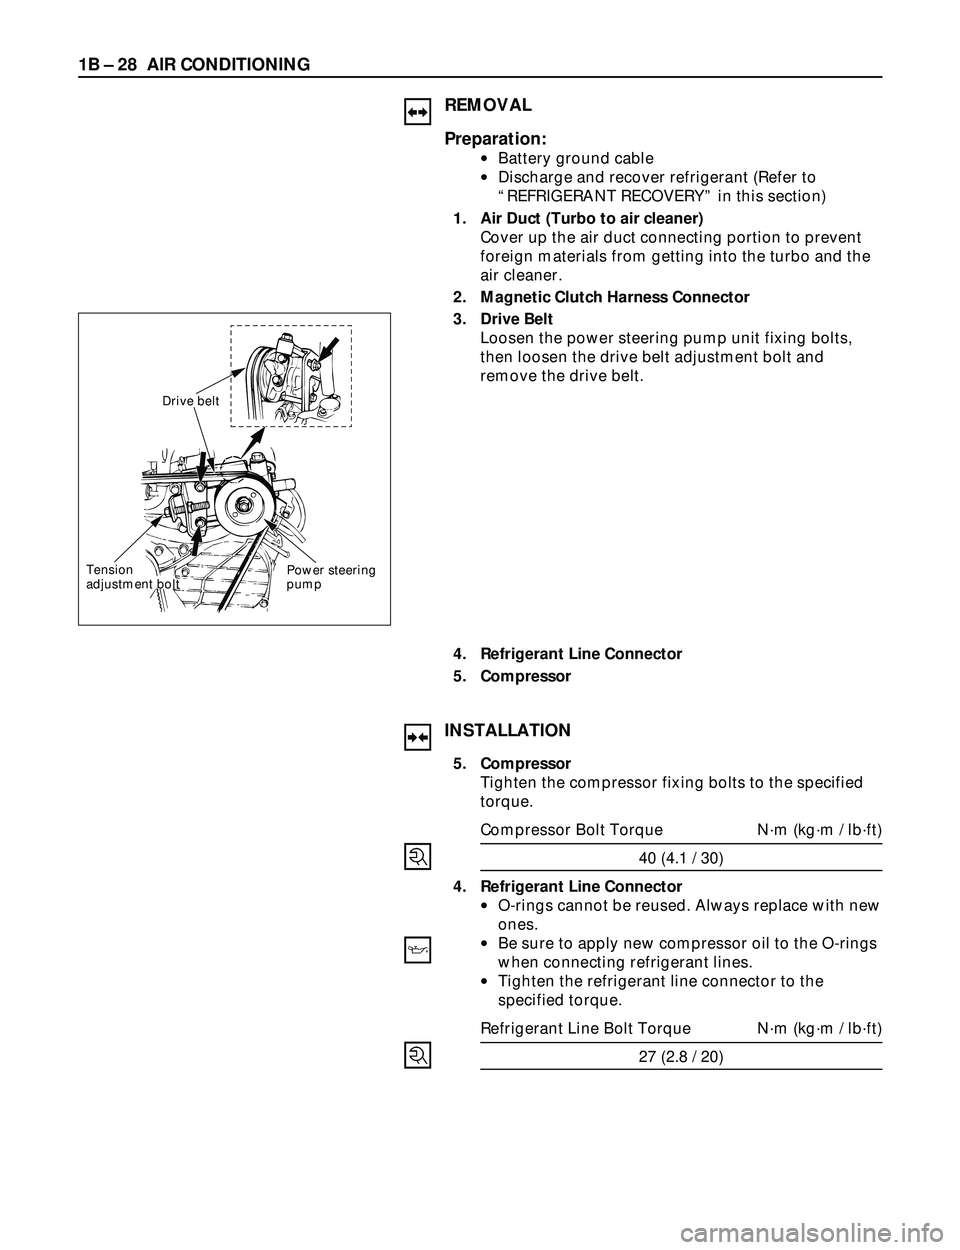
1B Ð 28 AIR CONDITIONING
REMOVAL
Preparation:
·Battery ground cable
·Discharge and recover refrigerant (Refer to
ÒREFRIGERANT RECOVERYÓ in this section)
1. Air Duct (Turbo to air cleaner)
Cover up the air duct connecting portion to prevent
foreign materials from getting into the turbo and the
air cleaner.
2. Magnetic Clutch Harness Connector
3. Drive Belt
Loosen the power steering pump unit fixing bolts,
then loosen the drive belt adjustment bolt and
remove the drive belt.
4. Refrigerant Line Connector
5. Compressor
Drive belt
Power steering
pump Tension
adjustment bolt
INSTALLATION
5. Compressor
Tighten the compressor fixing bolts to the specified
torque.
Compressor Bolt Torque Nám (kgám / lbáft)
40 (4.1 / 30)
4. Refrigerant Line Connector
·O-rings cannot be reused. Always replace with new
ones.
·Be sure to apply new compressor oil to the O-rings
when connecting refrigerant lines.
·Tighten the refrigerant line connector to the
specified torque.
Refrigerant Line Bolt Torque Nám (kgám / lbáft)
27 (2.8 / 20)