Page 3256 of 3573
8F±61 BODY STRUCTURE
4. Remove waterproof sheet.
�Take notice of the door harness and the grommet,
peel the waterproof sheet off the door panel
carefully.
631RS003
5. Remove glass.
�Bring the glass (1) down to the position where the
fixing bolts can be seen.
�Remove the glass fixing bolts from the window
regulator (2) and lower the front side of the glass.
631RS004
�When the front side of the glass comes off the glass
run (3), turn the glass inside out and pull it up from
its rear side.
631RS005
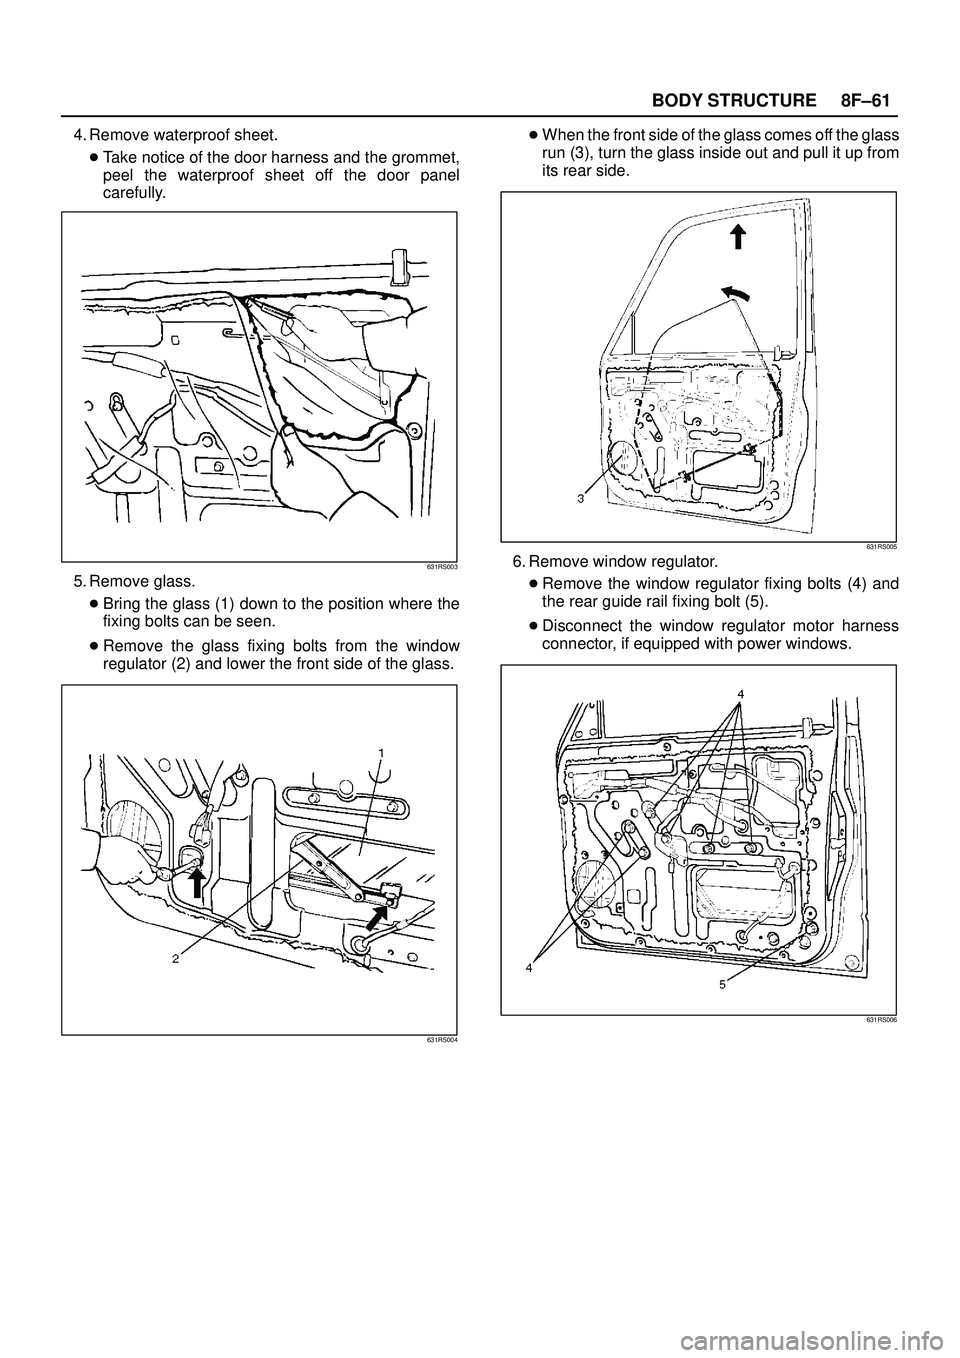
6. Remove window regulator.
�Remove the window regulator fixing bolts (4) and
the rear guide rail fixing bolt (5).
�Disconnect the window regulator motor harness
connector, if equipped with power windows.
631RS006
Page 3257 of 3573
 out from the door frame
groove.
631RS007
8. Remove rear guide rail.
Installation
To install, follow the removal steps in the reverse o")
8F±62BODY STRUCTURE
7. Remove glass run.
�Pull the glass run (6) out from the door frame
groove.
631RS007
8. Remove rear guide rail.
Installation
To install, follow the removal steps in the reverse order,
noting the following points.
1. Apply soap and water to the door frame groove. Insert
the glass run (1) to the door frame from the A corner in
the arrow±marked directions.
Install the glass run with its wider end pointed to the
inside of the vehicle.
A10RS023
2. Set the glass into the door panel with the front side of
the glass lowered and insert the rear side of the glass
into the glass run (1). Then insert the front side of the
glass into the glass run in order to install the glass to
the glass run while raising it up along the glass run.
3. Tighten the window regulator and the glass fixing
bolts and nuts to the specified torque.
Torque : 8 Nwm (0.8kg´m/69 lb in)4. Check to see of the window regulator operates
smoothly and the glass opens and closes properly.
Install the waterproof sheet with no clearance
between the door panel and the waterproof sheet.
Page 3258 of 3573
8F±63 BODY STRUCTURE
Rear Window Regulator And Glass
Parts Location
651RW018
Legend
(1) Window Regulator
(2) Glass
(3) Cable Fixing Clip(4) Window Regulator Motor Connector
(5) Door Trim Panel
(6) Waterproof Sheet
Removal
1. Disconnect the battery ground cable.
2. Remove door trim panel.
�Refer to Door Trim Panel (Rear) removal procedure
in this section.
3. Remove waterproof sheet (1).
�Taking notice of the door harness, peel the
waterproof sheet off the door panel carefully.
651RS002
Page 3260 of 3573
8F±65 BODY STRUCTURE
Rear Door Fixed Glass And Glass Run
Parts Location
651RW019
Legend
(1) Glass Run
(2) Rear Fixed Glass
(3) Sash Division(4) Sash Division Fixing Bolts
(5) Door Trim Panel
(6) Waterproof Sheet
(7) Glass
Removal
1. Disconnect the battery ground cable.
2. Remove door trim panel.
3. Remove waterproof sheet.
4. Remove glass.
�Refer to Window Regulator and Glass removal
procedure in this section.
5. Remove glass run.
�Pull the glass run (1) out from the door frame.
651RS007
Page 3263 of 3573
8F±68BODY STRUCTURE
Rear Door Moulding
Parts Location
645RS003
Legend
(1) Rear Door Side Moulding(2) Rear Door Corner Moulding
(3) Rear Door Upper Moulding
Removal
1. Disconnect the battery ground cable.
2. Remove rear door side moulding.
3. Remove rear door upper moulding.
4. Remove rear door corner moulding.
�Avoiding the weatherstrip (3), pry the moulding (2)
out from the door frame (1).
645RS004
Installation
To install, follow the removal steps in the reverse order,
noting the following points.
1. Install each moulding with no clearance between
each piece of moulding.
2. Assemble the edge portion (A portion) of the
moulding so that the clearance between the rear side
moulding and the waist seal is 1 mm (0.04 in).
Page 3265 of 3573
8F±70BODY STRUCTURE
Rear Door Waist Seal
Parts Location
651RW013
Legend
(1) Rear Door Waist Seal
Removal and Installation
Refer to Front Door Waist Seal in this section.
Page 3268 of 3573
8F±73 BODY STRUCTURE
Rear Door Weatherstrip
Parts Location
655RW010
Legend
(1) Check Arm Pin(2) Rear Door Weather Strip
(3) Clip
Removal and Installation
Refer to Front Door Weatherstrip in this section.
Page 3270 of 3573
8F±75 BODY STRUCTURE
Rear Door Seal Finisher
Parts Location
655RS002
Legend
(1) Rear Door Sill Plate and Luggage Side Lower
Cover
(2) Rear Door Seal Finisher
Removal
1. Disconnect the battery ground cable.
2. Remove rear door sill plate and the luggage side
lower cover.
3. Remove rear door seal finisher (1).
�Pull the rear door seal finisher (1) out from the body
panel.
635RS003
Installation
1. Install the rear door seal finisher (2).
�Insert the rear door seal finisher (2) into the A corner
and install the finisher in the arrow-marked
directions.
655RS002
2. Install the rear door sill plate and luggage side lower
cover.
�Be careful not to allow the sill plate and the cover to
distort or twist the finisher.
 Window Regulator
(2) Glass
(3) Cable Fixing Clip(4) Window Regulator Motor Connector
(5) Door Trim Panel
(6) Wa")
 Glass Run
(2) Rear Fixed Glass
(3) Sash Division(4) Sash Division Fixing Bolts
(5) Door Trim Panel
(6) Wate")
 Rear Door Side Moulding(2) Rear Door Corner Moulding
(3) Rear Door Upper Moulding
Removal
1. Disconnect the battery ground ca")
 Rear Door Waist Seal
Removal and Installation
Refer to Front Door Waist Seal in this section.")
 Check Arm Pin(2) Rear Door Weather Strip
(3) Clip
Removal and Installation
Refer to Front Door Weatherstrip in this sect")
 Rear Door Sill Plate and Luggage Side Lower
Cover
(2) Rear Door Seal Finisher
Removal
1. Disconnect the battery ground")