Page 132 of 3573

1B Ð 6 AIR CONDITIONING
DUAL PRESSURE SWITCH
The dual pressure switch is installed on the upper
part of the receiver/drier, to detect excessively high
pressure (high pressure switch) and prevent
compressor seizure due to the refrigerant leaking
(low pressure switch), switching the compressor
ÒONÓ or ÒOFFÓ as required.
The pressure switch connector is waterproof type.
·Low-pressure control kpa (kgácm
2/ PSI)
Compressor
ON: 205.9 ± 30 (2.1 ± 0.3 / 30 ± 4)
(Except 6VD1 / 6VE1, LHD model)
186 ± 30 (1.9 ± 0.3 / 27 ± 4)
(only for 6VD1 / 6VE1, LHD model)
OFF: 176 ± 20 (1.8 ± 0.2 / 26 ± 3)
·High-pressure control
Compressor
ON: 2354 ± 196 (24.0 ± 2.0 / 341 ± 28)
OFF: 2942 ± 196 (30.0 ± 2.0 / 427 ± 28)
TRIPLE PRESSURE SWITCH
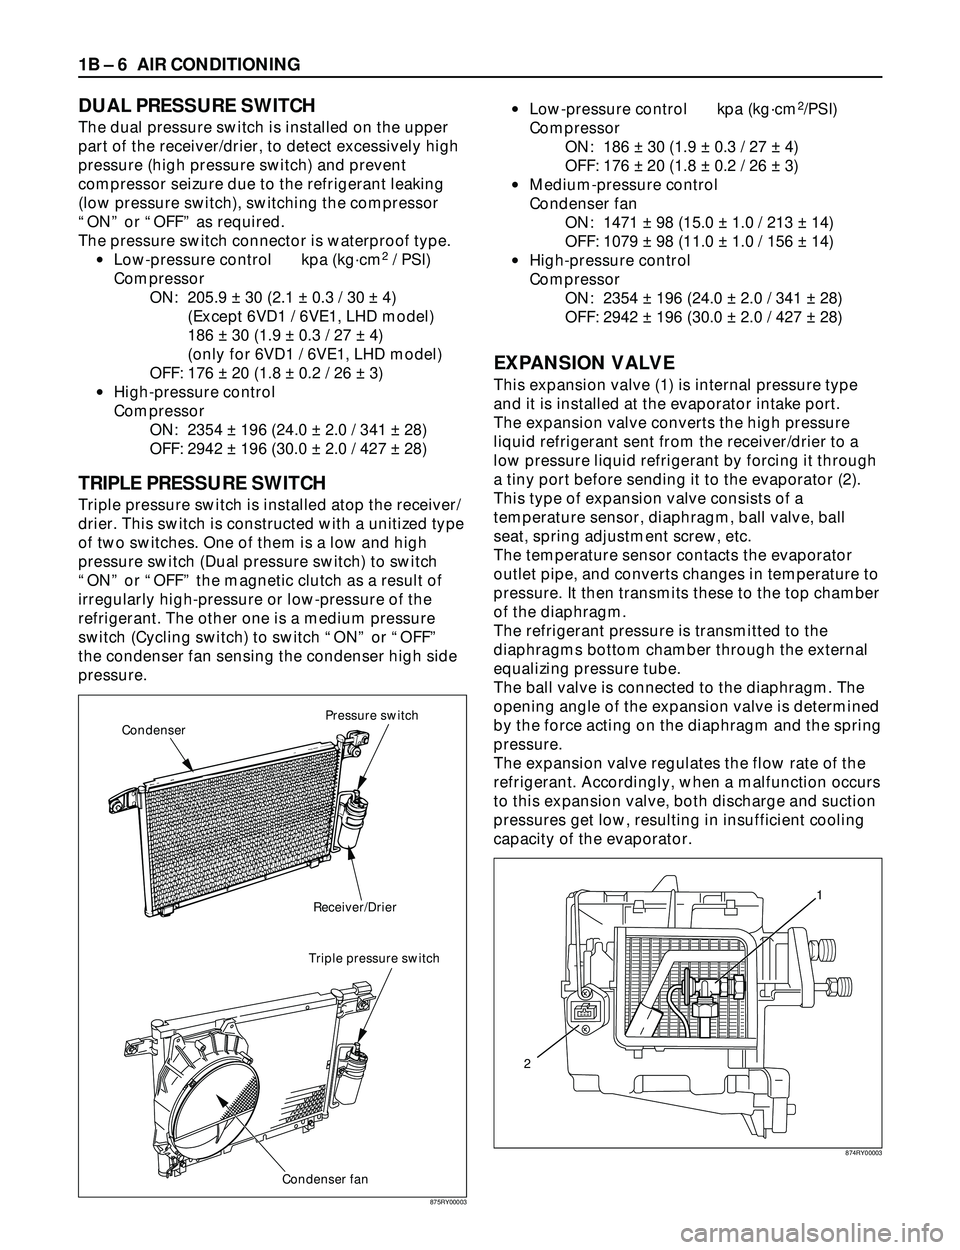
Triple pressure switch is installed atop the receiver/
drier. This switch is constructed with a unitized type
of two switches. One of them is a low and high
pressure switch (Dual pressure switch) to switch
ÒONÓ or ÒOFFÓ the magnetic clutch as a result of
irregularly high-pressure or low-pressure of the
refrigerant. The other one is a medium pressure
switch (Cycling switch) to switch ÒONÓ or ÒOFFÓ
the condenser fan sensing the condenser high side
pressure.·Low-pressure control kpa (kgácm
2/PSI)
Compressor
ON: 186 ± 30 (1.9 ± 0.3 / 27 ± 4)
OFF: 176 ± 20 (1.8 ± 0.2 / 26 ± 3)
·Medium-pressure control
Condenser fan
ON: 1471 ± 98 (15.0 ± 1.0 / 213 ± 14)
OFF: 1079 ± 98 (11.0 ± 1.0 / 156 ± 14)
·High-pressure control
Compressor
ON: 2354 ± 196 (24.0 ± 2.0 / 341 ± 28)
OFF: 2942 ± 196 (30.0 ± 2.0 / 427 ± 28)
EXPANSION VALVE
This expansion valve (1) is internal pressure type
and it is installed at the evaporator intake port.
The expansion valve converts the high pressure
liquid refrigerant sent from the receiver/drier to a
low pressure liquid refrigerant by forcing it through
a tiny port before sending it to the evaporator (2).
This type of expansion valve consists of a
temperature sensor, diaphragm, ball valve, ball
seat, spring adjustment screw, etc.
The temperature sensor contacts the evaporator
outlet pipe, and converts changes in temperature to
pressure. It then transmits these to the top chamber
of the diaphragm.
The refrigerant pressure is transmitted to the
diaphragms bottom chamber through the external
equalizing pressure tube.
The ball valve is connected to the diaphragm. The
opening angle of the expansion valve is determined
by the force acting on the diaphragm and the spring
pressure.
The expansion valve regulates the flow rate of the
refrigerant. Accordingly, when a malfunction occurs
to this expansion valve, both discharge and suction
pressures get low, resulting in insufficient cooling
capacity of the evaporator.
Pressure switch
Receiver/Drier
Triple pressure switch
Condenser fan Condenser
1
2
875RY00003874RY00003
Page 133 of 3573

AIR CONDITIONING 1B Ð 7
EVAPORATOR
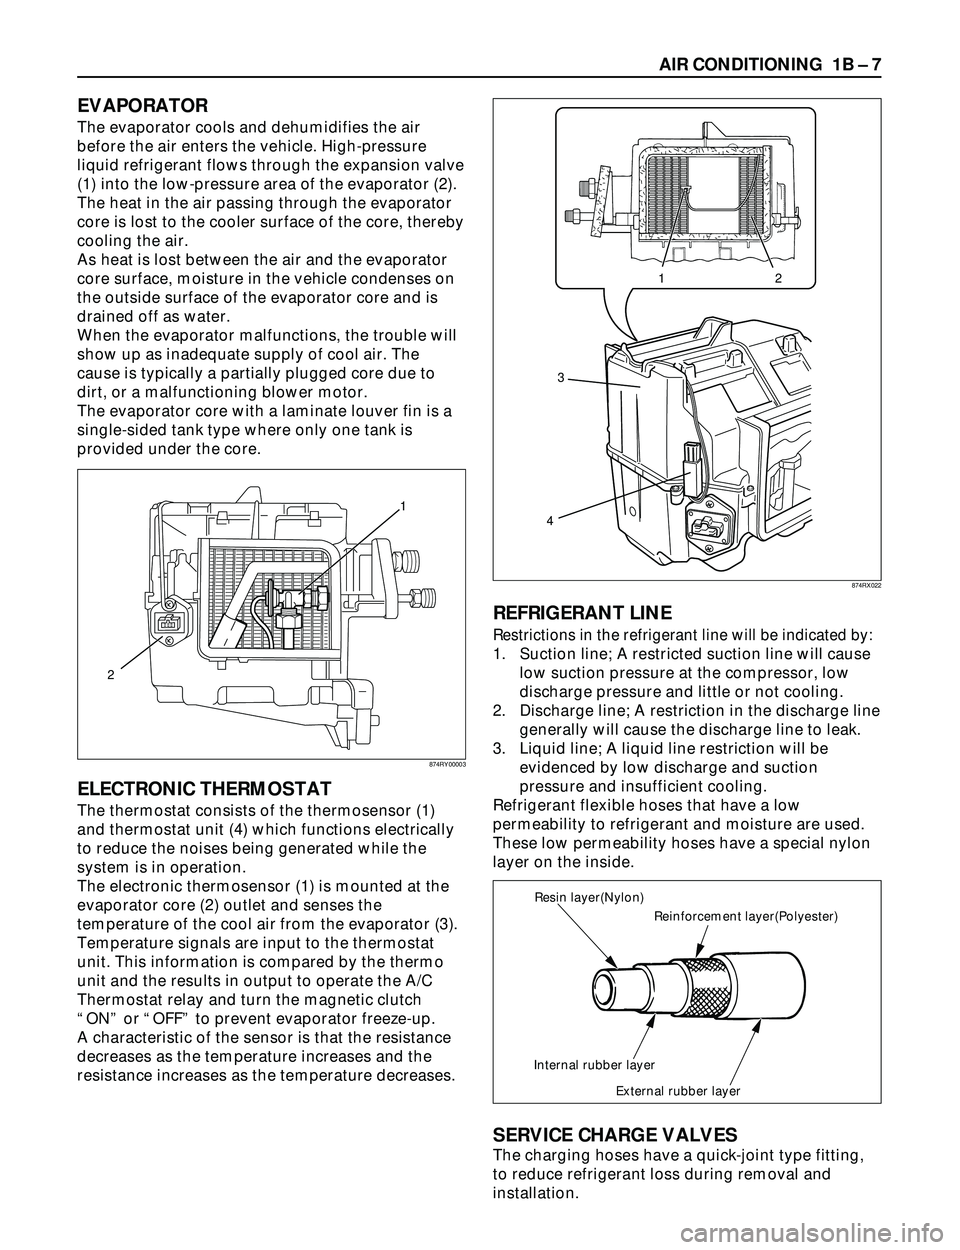
The evaporator cools and dehumidifies the air
before the air enters the vehicle. High-pressure
liquid refrigerant flows through the expansion valve
(1) into the low-pressure area of the evaporator (2).
The heat in the air passing through the evaporator
core is lost to the cooler surface of the core, thereby
cooling the air.
As heat is lost between the air and the evaporator
core surface, moisture in the vehicle condenses on
the outside surface of the evaporator core and is
drained off as water.
When the evaporator malfunctions, the trouble will
show up as inadequate supply of cool air. The
cause is typically a partially plugged core due to
dirt, or a malfunctioning blower motor.
The evaporator core with a laminate louver fin is a
single-sided tank type where only one tank is
provided under the core.
ELECTRONIC THERMOSTAT
The thermostat consists of the thermosensor (1)
and thermostat unit (4) which functions electrically
to reduce the noises being generated while the
system is in operation.
The electronic thermosensor (1) is mounted at the
evaporator core (2) outlet and senses the
temperature of the cool air from the evaporator (3).
Temperature signals are input to the thermostat
unit. This information is compared by the thermo
unit and the results in output to operate the A/C
Thermostat relay and turn the magnetic clutch
ÒONÓ or ÒOFFÓ to prevent evaporator freeze-up.
A characteristic of the sensor is that the resistance
decreases as the temperature increases and the
resistance increases as the temperature decreases.
REFRIGERANT LINE
Restrictions in the refrigerant line will be indicated by:
1. Suction line; A restricted suction line will cause
low suction pressure at the compressor, low
discharge pressure and little or not cooling.
2. Discharge line; A restriction in the discharge line
generally will cause the discharge line to leak.
3. Liquid line; A liquid line restriction will be
evidenced by low discharge and suction
pressure and insufficient cooling.
Refrigerant flexible hoses that have a low
permeability to refrigerant and moisture are used.
These low permeability hoses have a special nylon
layer on the inside.
SERVICE CHARGE VALVES
The charging hoses have a quick-joint type fitting,
to reduce refrigerant loss during removal and
installation.
12
3
4
Reinforcement layer(Polyester) Resin layer(Nylon)
Internal rubber layer
External rubber layer
1
2
874RY00003874RX022
Page 171 of 3573

AIR CONDITIONING 1B Ð 45
Removal
1. Disconnect the battery ground cable.
2. Discharge and recover refrigerant.
·Refer to Refrigerant Recovery in this section.
3. Remove evaporator assembly.
·Refer to Evaporator Assembly in this section.
4. Remove pollen filter.
5. Pull the sensor from the evaporator assembly.
6. Remove attaching screw.
7. Remove upper case.
8. Remove lower case.
·Slit the case parting face with a knife since the
lining is separated when removing the
evaporator.
·Lift to remove the upper case.9. Remove evaporator core.
10. Remove expansion valve.
·Tear off the insulator carefully.
·Use a back-up wrench when disconnecting all
refrigerant pipes.
Installation
To install, follow the removal steps in the reverse
order, noting the following points:
1. The sensor is installed on the core with the clip.
2. The sensor must not interfere with the
evaporator core.
3. When installing the new evaporator core, install
the thermo sensor (2) to the evaporator core (1)
specified position with the clip in the illustration.
874RS006
874RY00005
874RY00006
SENSOR TO BE LOCATED
AT 7TH LINE FROM LEFT
57.5mm(2.26 in.) 21
Lower case Upper case
874RX021
Page 172 of 3573
1B Ð 46 AIR CONDITIONING
4. O-rings cannot be reused, Always replace with
new ones.
5. Be sure to apply new compressor oil to the O-
rings when connecting lines.
6. Be sure to install the sensor and the insulator on
the place where they were before.
7. To install a new evaporator core, add 50cc (1.7
fl. oz.) of new compressor oil to the new core.
8. Tighten the refrigerant lines to the specified
torque. Refer to Main Data and Specifications for
Torque Specifications in this section.
9. Apply an adhesive to the parting face of the
lining when assembling the evaporator
assembly.
Page 173 of 3573
AIR CONDITIONING 1B Ð 47
ELECTRONIC THERMOSTAT
Legend
(1) Thermo Sensor
(2) Evaporator Core
(3) Evaporator
(4) Thermostat Unit
Removal
1. Disconnect the battery ground cable.
2. Discharge and recover refrigerant.
·Refer to Refrigerant Recovery in this section.
3. Remove evaporator assembly.
·Refer to Evaporator Assembly removal
procedure in this section.
4. Remove electronic thermostat.
·Pull the sensor from the evaporator assembly.
Installation
To install, follow the removal steps in the reverse
order, noting the following points.
1. Install the thermostat sensor to the evaporator
core specified position with the clip.
2. The sensor is installed on the core with the clip
and it must not interfere with the core.
12
3
4
874RX022
SENSOR TO BE LOCATED
AT 7TH LINE FROM LEFT
57.5mm(2.26 in.) 21
Lower case Upper case
874RX021
Page 186 of 3573

1BÐ60 AIR CONDITIONING
��
��
����������������
��
����������������
��
�;�&�9�&�-
�"�6�5�0
�"���$�0
�'
�'�"�6�5�0�-�0�)
�*
1
13
10
9
7
6
5
8 11122
4 3
FULL AUTOMATIC AIR CONDITIONING SYSTEM
GENERAL DESCRIPTION
Using a variety of sensors, this full automatic heater and air conditioner accurately senses outside air
temperature, solar radiation quantity, evaporatorÕs blowing temperature, heater core coolant temperature
and interior temperature, then enters these data to the automatic heater/air conditioner control unit
(equipped with the built-in micro-computer). The data provided to the control unit enables to automatically
control blow temperature and blow air quantity, turn on or off the compressor and switch the blow port as
well as switching between the fresh air intake and interior air circulation.
Resetting the automatic function allows you to switch to the manual control mode.
The self-diagnosis function of the automatic heater and air conditioner control unit (with the built-in micro-
computer) allows the unit to access and diagnose a failed part easier and quicker.
Full Automatic Air Conditioner Parts Configuration
865RY0004
Legend
(1) Lower Center Vent Box
(2) Sun Sensor
(3) Mix Actuator
(4) Mode Actuator
(5) Heater Unit
(6) In Car Sensor(7) Pollen Filter
(8) Automatic Air Conditioner Control Unit
(9) Max-High Relay
(10) Blower Unit
(11) Intake Actuator
(12) Duct Sensor
(13) Evaporator Assembly
This illustration is based on RHD
Page 189 of 3573
AIR CONDITIONING 1BÐ63
E-19
A/C TEHRMO
RELAY
THERMO
UNITPRESSURE
SW
I-3214I-334I-3318I-3211
AUTO A/C CONTROL UNIT
H-1616
H-241
H-611
H-1617
H-416
0.5P/G 0.5Y/B 0.5Y/B
0.5P/G
0.5G/O
1.25B
0.5G/O
0.5G/B
0.5G/B
0.5BR/Y 0.5BR/Y 0.5BR/Y 0.3G/B
0.5L/O
0.5L/W
0.3L/R
0.3L/Y
0.3BR/B0.5B 1.25B0.5G/B0.5G/W 0.5G/W 0.5G/W 0.5BR0.5LG 0.5BR
0.5BR 0.5RB
0.5BR
0.5BR
0.5BR
0.5BR
0.3B/L 0.3B/L PCM(E15)
PCM(B14)
X - 5
4X - 5
1
X -53 12
H-167
H-2413
X - 52A/C COMPRESSOR
RELAY
MAGNETIC
CLUTCHINTAKE
ACTUATOR
X - 7
4X -7
3
X -71X - 72
H-417
H-69
E-31
1
2 C-25
C-25
H-411
H-51
4
H-51
I-493
I-494 612
M
INCAR
SENSOR
I-341I-344
M
I-495
I-49I-49I-49
2I-34
3I-34
I-3312I-3313I-331I-3314
10 17 18 19 34 13 31 7
H-415
D08RY00293
Page 190 of 3573
1BÐ64 AIR CONDITIONING
3
C
HI-45
M
C-862
H-249
1C-86
6I-45
8
H-24
2
9 11 8 23 24 16 6 25 26 1 2 3 4 I-33
0.3LG/B 0.3LG/B 0.3B/L0.3B/L
AMBIENT SENSOR
3
I-336
I-32
0.3V/W0.3LG/W
0.3V/W0.3B/L 0.3B/L
0.3B/L 0.3B/L
0.3B/L
SUN SENSOR
MIX ACTUATOR
I-402I-352
H-678
1I-40
1I-35
4
H-678
I-45
5
I-32
0.3V/R0.3V/R
5H-67
2I-457I-45
15
I-33
0.3V/G0.3V/G 0.3B/L 0.3B/L
6H-67
5
I-33
0.3V0.3V
7H-67
20
I-33
0.3LG/W
DUCT SENSOR
9
VENT B/L FOOT D/F DEFB-694
H-26
M
1B-69
4
I-32
0.3Y/BR 0.3Y/BR
0.3Y/G
0.3GR/G
0.3GR
0.3GR/R 0.3Y/G
0.3GR
0.3GR/R
0.3GR/G 0.3GR/G
0.3B/L 0.3B/L0.3GR/L 0.3GR/L
0.3GR/R
5B-69
3
I-32
4B-693B-69
10
I-33
8B-69
9
I-33
7B-69
8
I-33
2
11 12 18 19 5 1B-696B-69
H-25H-25H-26H-26H-25H-268
H-25
7
I-3311
I-336
I-33
MODE ACTUATOR
AUTO A/C CONTROL UNIT
D08RY00120