Page 155 of 272

Towing a Trailer
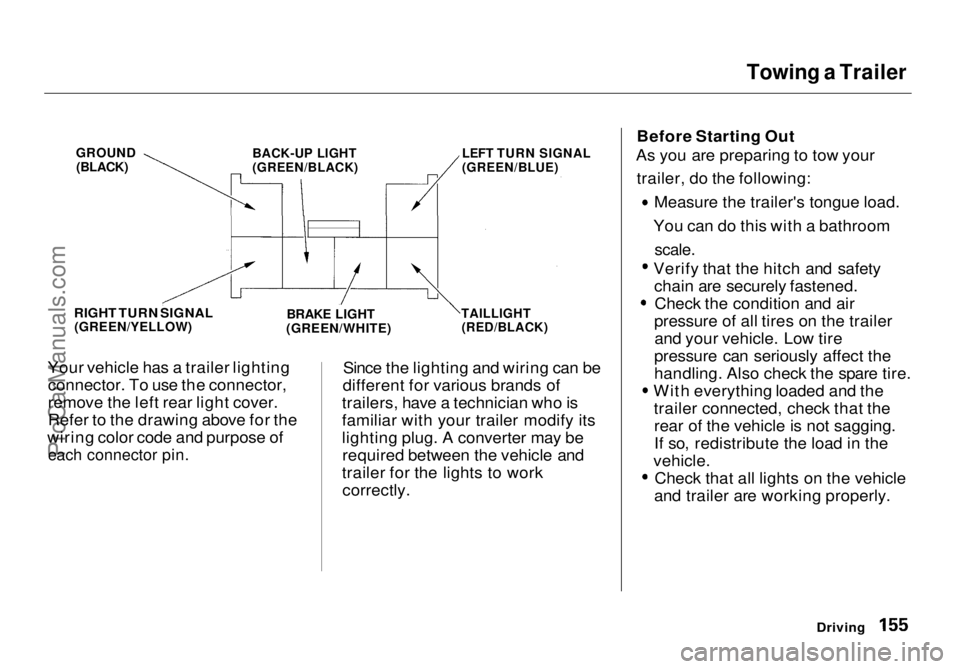
Your vehicle has a trailer lighting connector. To use the connector,
remove the left rear light cover.
Refer to the drawing above for the
wiring color code and purpose of
each connector pin.
Since the lighting and wiring can be
different for various brands of
trailers, have a technician who is
familiar with your trailer modify its
lighting plug. A converter may be required between the vehicle and
trailer for the lights to work correctly. Before Starting Out
As you are preparing to tow your
trailer, do the following: Measure the trailer's tongue load.
You can do this with a bathroom
scale.
Verify that the hitch and safety
chain are securely fastened. Check the condition and air
pressure of all tires on the trailer and your vehicle. Low tire
pressure can seriously affect the
handling. Also check the spare tire. With everything loaded and the
trailer connected, check that therear of the vehicle is not sagging.
If so, redistribute the load in the
vehicle. Check that all lights on the vehicle
and trailer are working properly.
Driving
GROUND
(BLACK)
BACK-UP LIGHT
(GREEN/BLACK)
LEFT TURN SIGNAL
(GREEN/BLUE)
RIGHT TURN SIGNAL
(GREEN/YELLOW)
BRAKE LIGHT
(GREEN/WHITE)
TAILLIGHT
(RED/BLACK)ProCarManuals.comMain Menu Table of Contents s t
Page 156 of 272

Towing a Trailer
Towing Safety
Your vehicle will not stop as quicklywith a trailer in tow. Leave extra distance between your vehicle and
other vehicles. Avoid braking or
turning suddenly. This could cause
the trailer to jackknife or possibly
turn over.
Keep in mind that your total vehicle
is now much longer. Leave more
room when making turns. The trailer
tracks a smaller arc than the vehicle
and can hit or run over something
that the vehicle misses. When
passing another vehicle, make sure
the trailer is clear before changing
lanes.
The vehicle/trailer combination is
more affected by crosswinds and
buffeting. When being passed by a
large vehicle, keep a constant speed and steer straight ahead. If there is
too much wind buffeting, slow down
to get out of the other vehicle's air
turbulence.
Towing a trailer puts an extra load on your vehicle. You should have
your vehicle serviced according to the "Maintenance Schedule undersevere driving conditions" on page 164. This extra load is magnified when
you are driving in hilly terrain.
Watch the temperature gauge closely when climbing hills. If it gets
near the hot area, turn off the air
conditioning (if it is on). If this does
not reduce the heat, it may be
necessary to pull to the side of the
road and wait for the engine to cool.
If the automatic transmission shifts
frequently between 3rd and 4th gears, put it in D3. This will help
prevent the transmission fromoverheating. Help keep the brakes
from overheating by shifting to a lower gear when going downhill.
DrivingProCarManuals.comMain Menu Table of Contents s t
Page 157 of 272
Towing a Trailer
If you have to stop while going uphill,
do not hold the vehicle in place by
pressing on the accelerator. This can cause the automatic transmission tooverheat. Use the parking brake or
footbrake.
When parking your vehicle and trailer, especially on a hill, be sure to
follow all the normal precautions.
Turn your front wheels into the curb, set the parking brake firmly, and put
the transmission in Park. In addition,
place wheel chocks at each of the
trailer's tires. Backing up with a trailer is difficult
and takes practice. Drive slowly,
make small movements with the steering wheel, and have someonestand outside to guide you. Grip the
steering wheel on the bottom (rather
than the usual position near the top). Move your hand to the left to get the
trailer to move to the left, and right
to move the trailer right.
DrivingProCarManuals.comMain Menu Table of Contents s t
Page 165 of 272
Maintenance Schedule (Severe Conditions)
Follow the Severe Conditions
Maintenance Schedule if youdrive your vehicle MAINLY
under one or more of the
following conditions:
Driving less than 5 miles (8
km) per trip or, in freezing temperatures, driving less
than 10 miles (16 km) per trip. Driving in extremely hot
[over 90°F (32° C)] conditions. Extensive idling or long
periods of stop-and-go driving.
Trailer towing, driving with a roof top carrier, or driving in
mountainous conditions. Driving on muddy, dusty, or
de-iced roads.
For Canadian Owners
Follow the Maintenance
Schedule for Severe Conditions.
* 1: Refer to page 195 for replacement
information under special driving
conditions.
MaintenanceProCarManuals.comMain Menu Table of Contents s t
Page 166 of 272
Maintenance Schedule for Severe Conditions (listed by distance/time)
Use this schedule if your vehicle is MAINLY driven in any of the following Severe Conditions, or normally driven in Canada; otherwise use the Normal
Schedule. Service at the indicated distance or time, whichever comes first. Do the items in A, B, C as required for each distance/time.
Severe Conditions:
Driving less than 5 mi (8 km) per trip or, in freezing temperatures, driving less than 10 mi (16 km) per trip.
Driving in extremely hot (over 90°F/32°C) conditions.
Extensive idling or long periods of stop-and-go driving.
Trailer towing, driving with a roof top carrier, or driving in mountainous conditions. Driving on muddy, dusty, or de-iced roads.
CONTINUED
Maintenance
page 199ProCarManuals.comMain Menu Table of Contents s t
Page 188 of 272
Battery
Check the condition of your vehicle's
battery monthly. You should check
the color of the test indicator window, and for corrosion on the terminals. TEST INDICATOR WINDOW
Check the battery condition by
looking at the test indicator window on the battery.
The label on the battery explains the test indicator's colors. Check the battery terminals for
corrosion (a white or yellowish
powder). To remove it, cover the
terminals with a solution of baking soda and water. It will bubble up and
turn brown. When this stops, wash it off with plain water. Dry off the
battery with a cloth or paper towel. Coat the terminals with grease to
help prevent future corrosion.
CONTINUED
MaintenanceProCarManuals.comMain Menu Table of Contents s t
Page 190 of 272
Wiper Blades
WIPER ARMS
Check the condition of the wiper
blades at least every six months. Look for signs of cracking in the
rubber, or areas that are getting
hard. Replace the blades if you find
these signs, or they leave streaks and unwiped areas when used.
To replace the front wiper blades:
1. Raise the wiper arm off the windshield. LOCK TAB
2. Disconnect the blade assembly from the wiper arm by pushing inthe lock tab. Hold it in while you
push the blade assembly toward
the base of the arm.
BLADE
3. Remove the blade from its holder by grasping the tabbed end of the
blade. Pull firmly until the tabscome out of the holder.
CONTINUED
MaintenanceProCarManuals.comMain Menu Table of Contents s t
Page 210 of 272

Storing Your Vehicle
If you need to park your vehicle for
an extended period (more than one
month), there are several things you
should do to prepare it for storage.
Proper preparation helps prevent
deterioration and makes it easier to
get your vehicle back on the road. If
possible, store your vehicle indoors.
Fill the fuel tank.
Change the engine oil and filter(see page 175 ). Wash and dry the exterior
completely.
Clean the interior. Make sure the
carpeting, floor mats, etc. are
completely dry. Leave the parking brake off. Put
the transmission in Park. Block the rear wheels. If the vehicle is to be stored for a
longer period, it should be supported on jackstands so the
tires are off the ground.
Leave one window open slightly (if
the vehicle is being stored
indoors).
Disconnect the battery.
Support the front and rear wiper
blade arms with a folded towel or rag so they do not touch the
windshield.
To minimize sticking, apply a
silicone spray lubricant to all door
and trunk seals. Also, apply a body
wax to the painted surfaces that mate with the door and trunk seals. Cover the vehicle with a
"breathable" vehicle cover, one
made from a porous material such as cotton. Nonporous materials,
such as plastic sheeting, trap
moisture, which can damage the
paint. If possible, run the engine for a
while periodically (preferably once a month).
If you store your vehicle for 12
months or longer, have your Honda dealer perform the inspections called
for in the 24 months/30,000 miles (48,000 km) maintenance schedule
(Normal Conditions) as soon as you
take it out of storage (see page 164 ).
The replacements called for in the maintenance schedule are not
needed unless the vehicle has
actually reached that time or mileage.
MaintenanceProCarManuals.comMain Menu Table of Contents s t