Page 51 of 272
Control Locations
Instruments and Controls
MIRROR
CONTROLS
(P.84)
DIGITAL CLOCK
(P.86)
HEATING/COOLING
CONTROLS
(P.94)
AUDIO SYSTEM
(P.
103)
DOOR LOCK
SWITCH
(P.70)
POWER WINDOW
SWITCH
(P.82)
FUEL FILL
DOOR RELEASE
(P.129)
HOOD RELEASEHANDLE
(P.
130)ProCarManuals.comMain Menu Table of Contents s t
Page 52 of 272

Indicator Lights
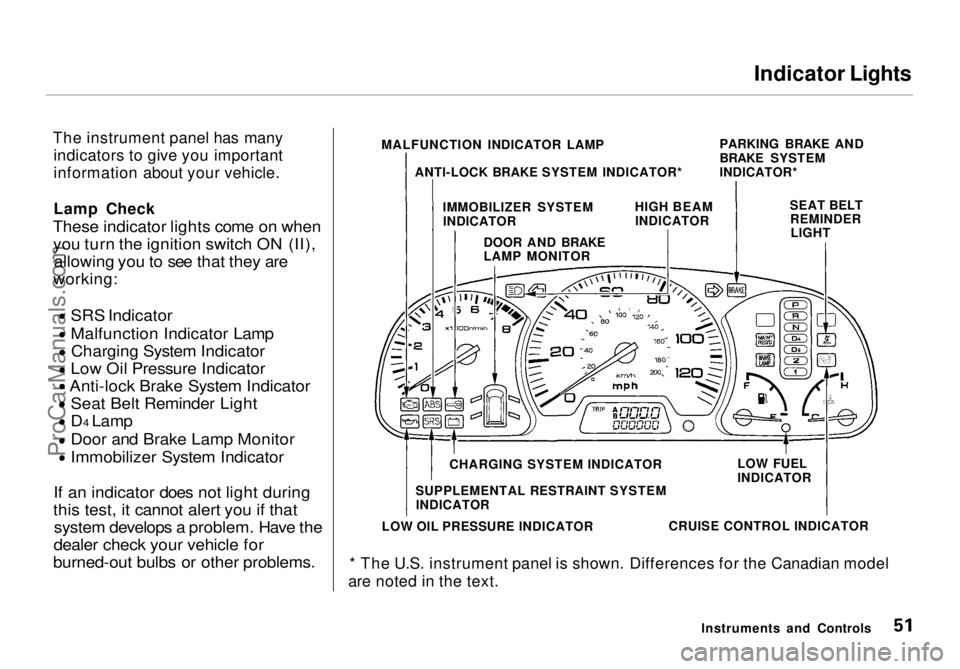
The instrument panel has many indicators to give you important
information about your vehicle.
Lamp Check
These indicator lights come on when you turn the ignition switch ON (II), allowing you to see that they are
working:
SRS Indicator
Malfunction Indicator Lamp
Charging System Indicator
Low Oil Pressure Indicator
Anti-lock Brake System Indicator
Seat Belt Reminder Light
D4 Lamp
Door and Brake Lamp Monitor
Immobilizer System Indicator
If an indicator does not light during
this test, it cannot alert you if that system develops a problem. Have the
dealer check your vehicle for
burned-out bulbs or other problems.
* The U.S. instrument panel is shown. Differences for the Canadian model
are noted in the text.
Instruments and Controls
MALFUNCTION INDICATOR LAMP
ANTI-LOCK BRAKE SYSTEM INDICATOR* PARKING BRAKE AND
BRAKE SYSTEM
INDICATOR*
IMMOBILIZER SYSTEM INDICATOR HIGH BEAM
INDICATOR SEAT BELT
REMINDERLIGHT
DOOR AND BRAKE
LAMP MONITOR
CHARGING SYSTEM INDICATOR
SUPPLEMENTAL RESTRAINT SYSTEM INDICATOR
LOW OIL PRESSURE INDICATOR CRUISE CONTROL INDICATORLOW FUEL
INDICATORProCarManuals.comMain Menu Table of Contents s t
Page 54 of 272

Indicator Lights
U.S.
Anti-lock Brake System
(ABS) Indicator
This light normally comes on when you turn the ignition switch ON (II) and goes off after the engine starts.
If it comes on at any other time,
there is a problem in the ABS. If this
happens, take the vehicle to your dealer to have it checked. With the
light on, your vehicle still has normal
braking ability but no anti-lock. Turn Signal and
Hazard Warning
Indicators
The left or right turn signal light blinks when you signal a lane changeor turn. If the light does not blink or
blinks rapidly, it usually means one of the turn signal bulbs is burned out (see page 207). Replace the bulb as
soon as possible, since other drivers
cannot see that you are signalling.
When you turn on the Hazard
Warning switch, both turn signal lights blink. All turn signals on theoutside of the vehicle should flash. Door and Brake Lamp Monitor
The appropriate light comes on in this display if the tailgate or any dooris not closed tightly. If a brake lightdoes not work, the BRAKE LAMP
indicator comes on when you push
the brake pedal with the ignition switch ON (II).
A burned out brake light is a hazard when drivers behind you cannot tell
you are braking. Have your brakelights repaired right away.
All the lights in the monitor display come on for a few seconds when you
turn the ignition switch ON (II).
Instruments and Controls
BRAKE LAMP
INDICATOR
ABS
CanadaProCarManuals.comMain Menu Table of Contents s t
Page 55 of 272

Indicator Lights, Gauges
"Daytime Running
Lights" Indicator
Canadian models only
This indicator lights when you turn the ignition switch to ON (II) with
the headlight switch off and the
parking brake set. It should go off if
you turn on the headlights or release
the parking brake. If it comes on at any other time, it means there is a
problem with the DRL. There may also be a problem with the high
beam headlights.
Cruise Control Indicator
This lights when you set the cruise control. See page 64 for informationon operating the cruise control. High Beam Indicator
This light comes on with the high beam headlights. See page 40 for
information on the headlightcontrols.
On Canadian models, this indicator
comes on with reduced brightness
when the Daytime Running Lights (DRL) are on (see page 58).
Immobilizer SystemIndicator
This indicator comes on for a few seconds when you turn the ignition
switch ON (II). It will then go off if
you have inserted a properly-coded ignition key. If it is not a properly-
coded key, the indicator will blink
and the engine will not start (see
page 68).
This indicator also blinks several times when you turn the ignitionswitch from ON (II) to ACCESSORY (I) or LOCK (0).
Tachometer The tachometer shows the enginespeed in revolutions per minute (rpm). To protect the engine from
damage, never drive with the
tachometer needle in the red zone.
Trip Meter
This meter shows the number of miles (U.S.) or kilometers (Canada)
driven since you last reset it.
There are two trip meters, Trip A and Trip B. Each trip meter works
independently, so you can keep trackof two different distances.
To reset a trip meter, display it and then press the Reset button for morethan two seconds. Both trip meters
will reset if the vehicle's battery goes dead or is disconnected.
Instruments and Controls
DRL
CRUISE
CONTROL
ProCarManuals.comMain Menu Table of Contents s t
Page 59 of 272

Controls Near the Steering Wheel
Headlights
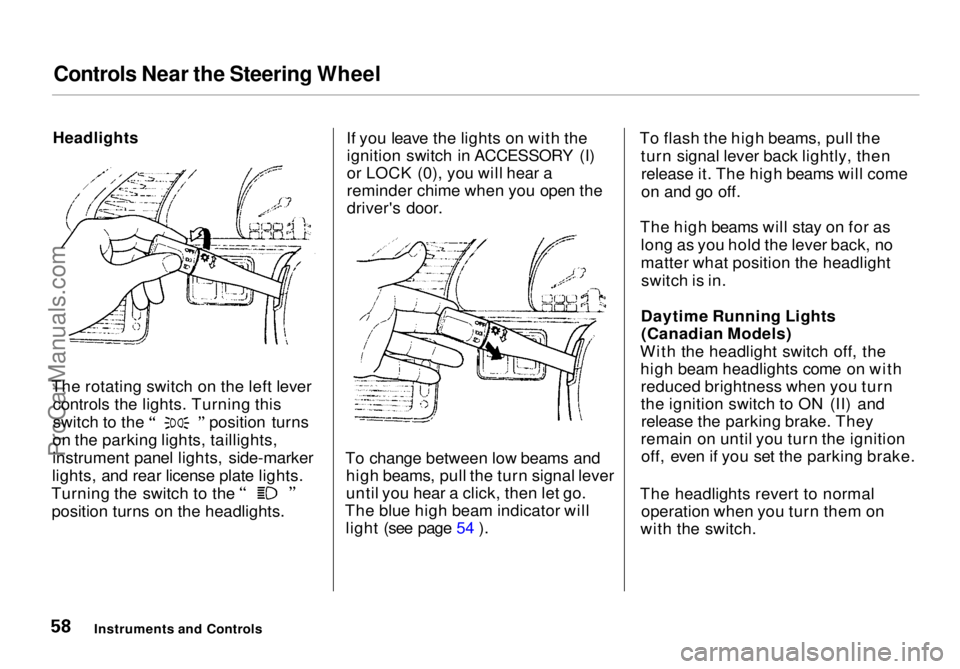
The rotating switch on the left lever controls the lights. Turning this switch to the position turns
on the parking lights, taillights,
instrument panel lights, side-marker
lights, and rear license plate lights. Turning the switch to the
position turns on the headlights. If you leave the lights on with the
ignition switch in ACCESSORY (I)
or LOCK (0), you will hear a
reminder chime when you open the
driver's door.
To change between low beams and high beams, pull the turn signal lever
until you hear a click, then let go.
The blue high beam indicator will light (see page 54 ). To flash the high beams, pull the
turn signal lever back lightly, thenrelease it. The high beams will come
on and go off.
The high beams will stay on for as long as you hold the lever back, no
matter what position the headlightswitch is in.
Daytime Running Lights (Canadian Models)
With the headlight switch off, the high beam headlights come on withreduced brightness when you turn
the ignition switch to ON (II) andrelease the parking brake. They
remain on until you turn the ignition off, even if you set the parking brake.
The headlights revert to normal operation when you turn them on
with the switch.
Instruments and ControlsProCarManuals.comMain Menu Table of Contents s t
Page 60 of 272
Controls Near the Steering Wheel
The knob on the dashboard to the left of the steering column controls
the brightness of the instrument
panel lights. Push the knob to get it
to pop out. Turn the knob to adjust
the brightness. Push the knob back
in to lock your adjustment. Turn Signals
Signal a turn or lane change with this
lever. Push down on the lever tosignal a left turn, and up to signal a
right turn. If you push it up or down all the way, the turn signal continues
to blink even when you release the
lever. It shuts off automatically as
you complete the turn. To signal a lane change, push lightly
on the turn signal lever in the proper
direction and hold it. The lever will
return to the center position as soon as you release it.
Instruments and Controls
TURN SIGNAL LEVER
Instrument Panel BrightnessProCarManuals.comMain Menu Table of Contents s t
Page 62 of 272

Controls Near the Steering Wheel
Windshield Washers
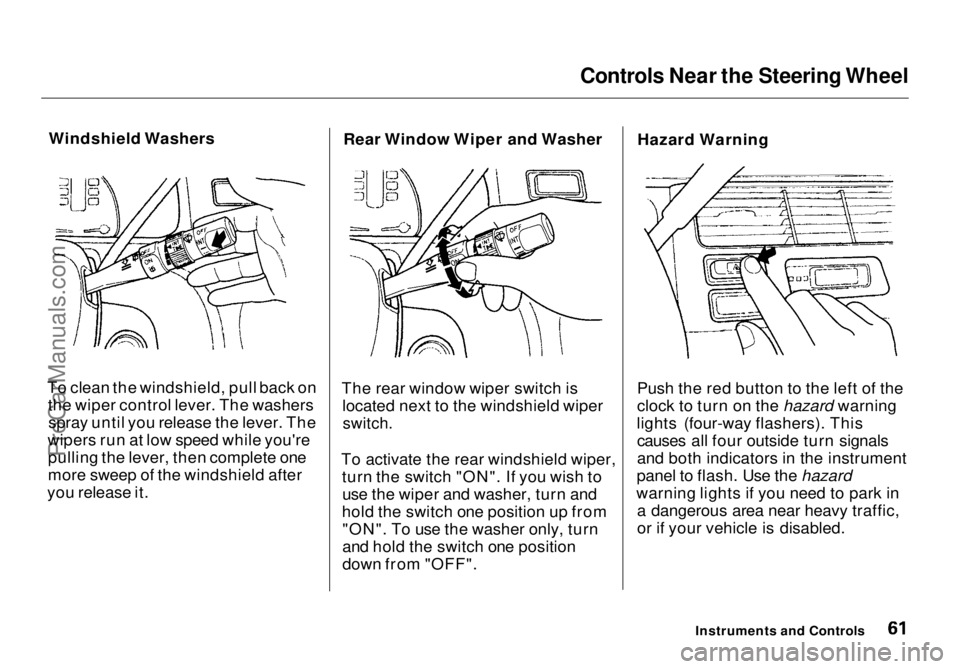
To clean the windshield, pull back on the wiper control lever. The washersspray until you release the lever. The
wipers run at low speed while you're pulling the lever, then complete one
more sweep of the windshield after
you release it. Rear Window Wiper and Washer
The rear window wiper switch is located next to the windshield wiper
switch.
To activate the rear windshield wiper, turn the switch "ON". If you wish touse the wiper and washer, turn and
hold the switch one position up from "ON". To use the washer only, turn
and hold the switch one position
down from "OFF". Hazard Warning
Push the red button to the left of the
clock to turn on the hazard warning
lights (four-way flashers). This causes all four outside turn signals
and both indicators in the instrument
panel to flash. Use the hazard
warning lights if you need to park in a dangerous area near heavy traffic,
or if your vehicle is disabled.
Instruments and ControlsProCarManuals.comMain Menu Table of Contents s t
Page 64 of 272
Controls Near the Steering Wheel
To adjust the steering wheel upward or downward:
1. Push the lever under the steering column all the way down.
2. Move the steering wheel to the desired position, making sure the
wheel points toward your chest, not toward your face. Make sure
you can see the instrument panel gauges and the indicator lights. 3. Push the lever up to lock the
steering wheel in that position.
4. Make sure you have securely locked the steering wheel in place
by trying to move it up and down.
Instruments and ControlsProCarManuals.comMain Menu Table of Contents s t