Page 1015 of 1681

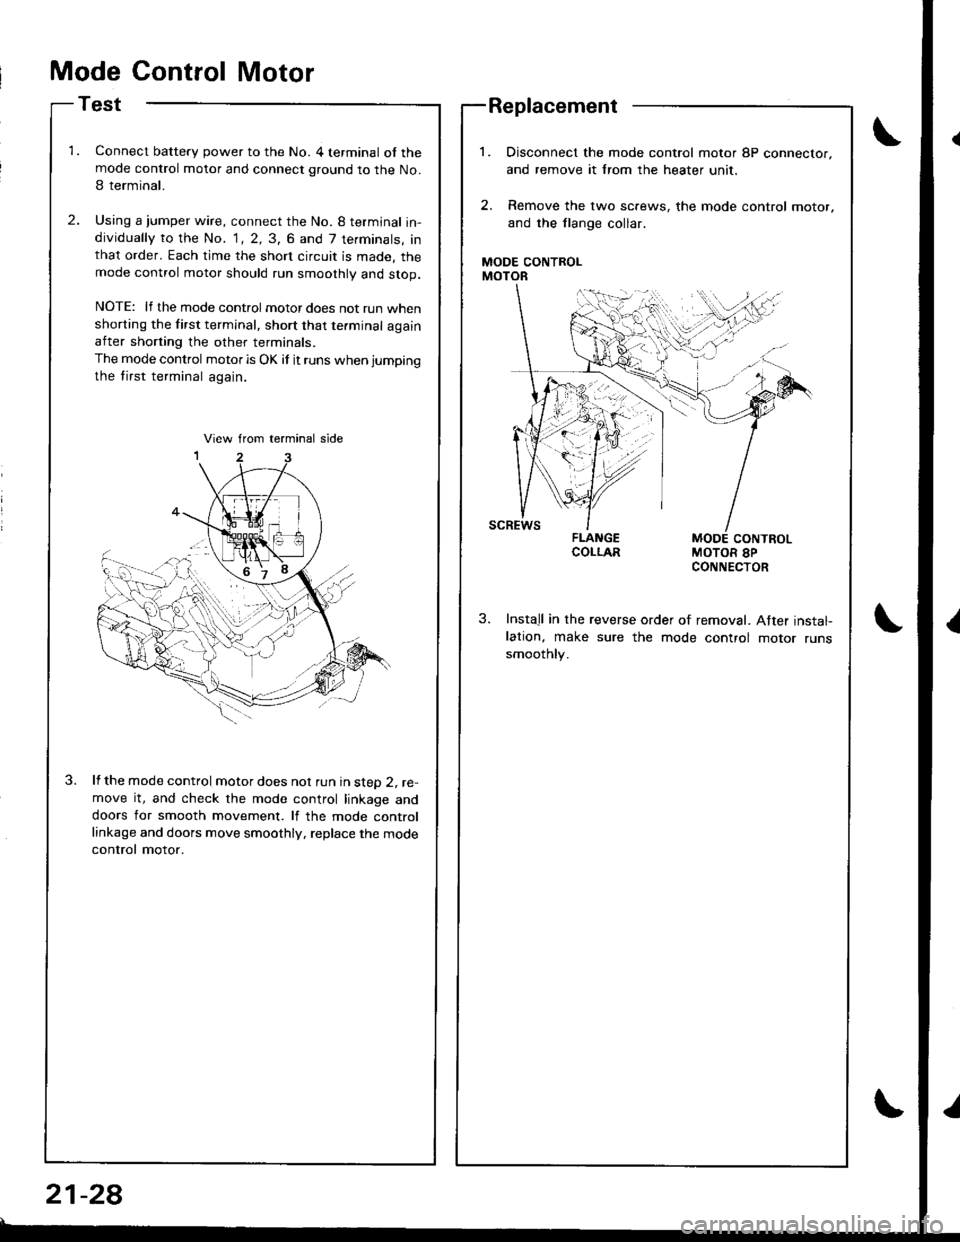
Mode Control Motor
Test
Connect battery power to the No. 4 terminal of themode control motor and connect ground to the No.
I terminal.
Using a jumper wire, connect the No. 8 termjnal in-dividually to the No. 1, 2, 3, 6 and 7 terminals, inthat order. Each time the short circuit is made. themode control motor should run smoothly and stop.
NOTE: lf the mode control motor does not run whenshorting the first terminal, short that te.minal againafter shorting the other terminals.
The mode control motor is OK if it runs when jumping
the tirst terminal again.
lf the mode control motor does nol run in steD 2, re-move it, and check the mode control linkage anddoors for smooth movement. lf the mode controllinkage and doors move smoothly, replace the mode
control motor.
Replacement
MODE CONTROLMOTOR
Disconnect the mode control motor 8P connector,
and remove it lrom the heater unit,
Remove the lwo sc.ews, the mode control motor,
and the flange collar.
MODE CONTROLMOTOR 8PCONNECTOR
Install in the reverse order of removal. After instal-lation, make sure the mode control motor runssmoothly.
21-28
Page 1016 of 1681

lli
''
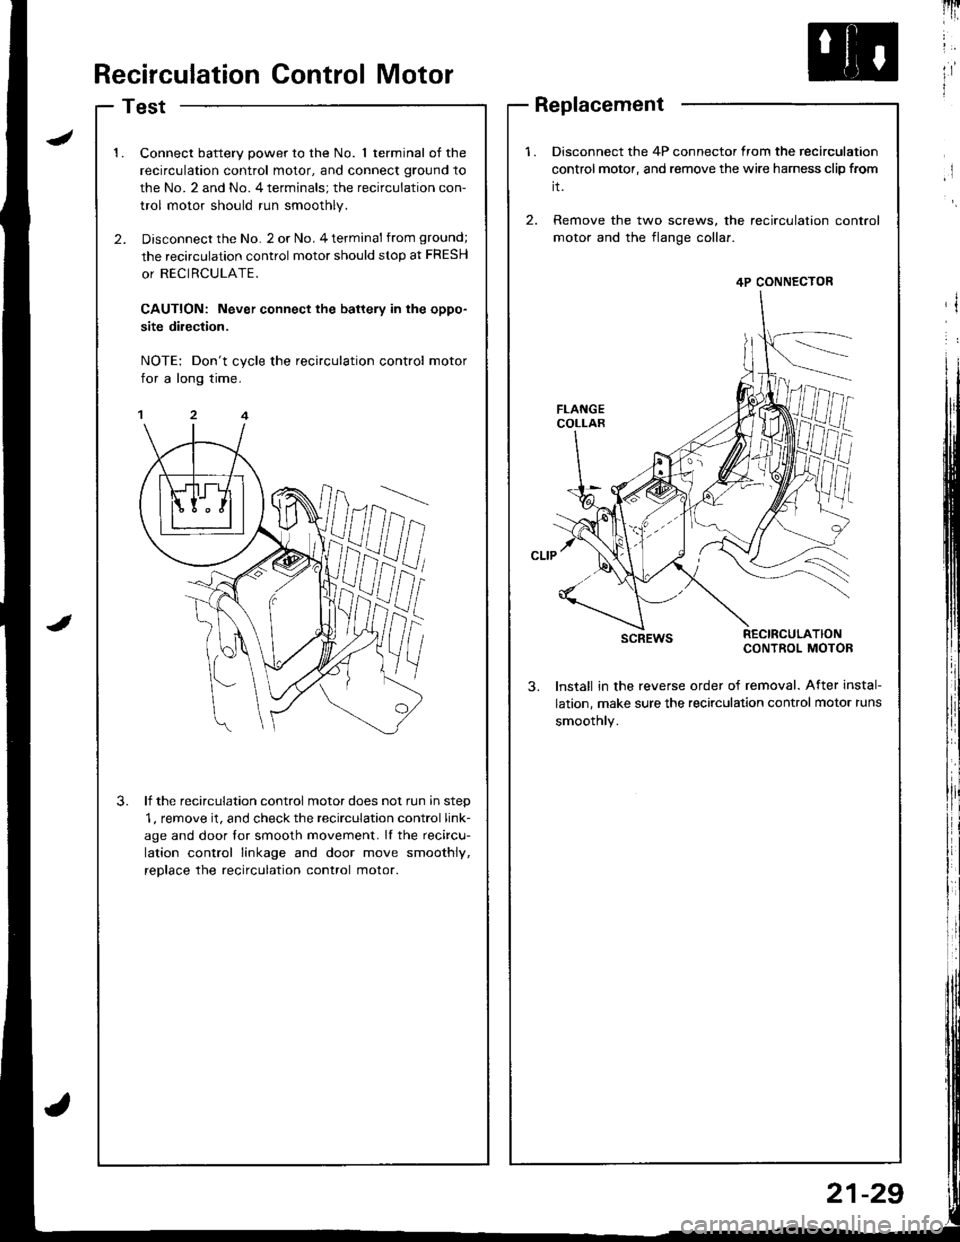
ltRecirculation Control Motor
Test
1.Connect battery power to the No. 1 terminal of the
recirculation control motor, and connect ground to
the No. 2 and No. 4 terminals; the recirculation con-
trol motor should run smoothly.
Disconnect the No. 2 or No. 4 terminal from ground;
the recirculation control motor should stop at FRESH
or RECIRCULATE.
CAUTION: Never connect the battery in the oppo-
site dilection.
NOTE: Don't cycle the recirculation control motor
for a long time.
lf the recirculation control motor does not run in step
1, remove it, and check the recirculation control link-
age and door lor smooth movement. If the recircu-
lation control linkage and door move smoothly,
reDlace the recirculation control motor.
3.
1.Disconnect the 4P connector from the recirculation
control motor, and remove the wire harness clip from
it.
2. Remove the two screws, the recirculation
motor and the flange collaf.
scREwsRECIRCULATIONCONTROL MOTOB
lnstall in the revefse order of removal. After instal-
lation, make sure the recirculation control motor runs
smoothly.
4P CONNECTOR
Replacement
21-29
Page 1017 of 1681
Relay
Test
There should be continuity between the No, I and No.3
terminals when power and ground are connected to the
No. 2 and No, 4 terminals, and there should be no conti-
nuitv when 9ower is disconnected.
rl
I
tb
I
Heater Fan Switch
Test
Check for continuity between the terminals according to
the table below.
Terminal
PositionFDBEc
OFF
o-o
2o--o
3o-o
G_o
21-30
Page 1025 of 1681

J
Troubleshooting
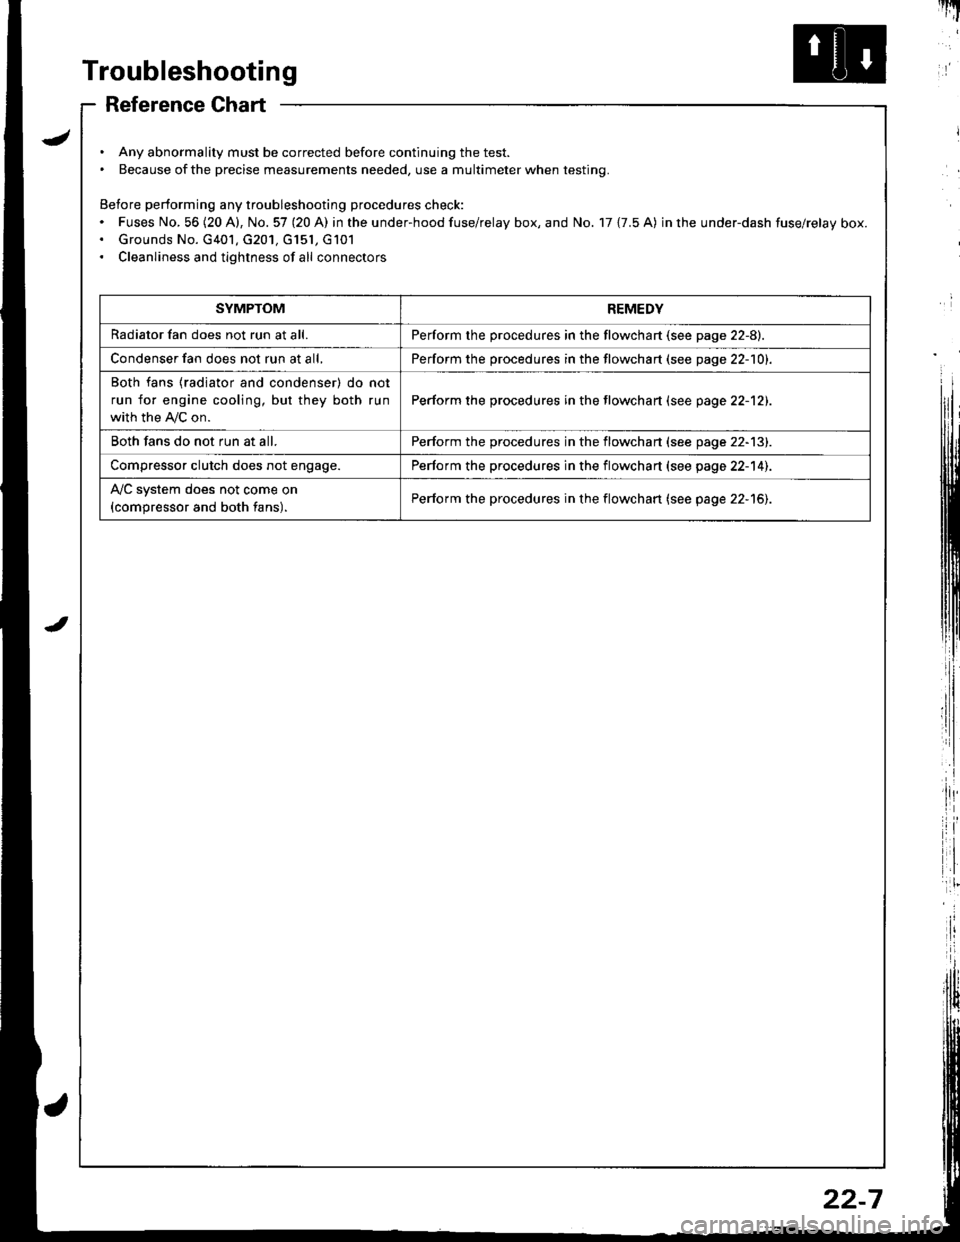
Reference Chart
. Any abnormality must be corrected before continuing the test.. Because of the precise measurements needed, use a multimeter when testing.
Before performing any troubleshooting procedures check:. Fuses No, 56 (20 A), No. 57 (20 A) in the under-hood fuse/relay box, and No. 17 {7.5 A) in rhe under-dash fuse/relay box.. Grounds No. G401, G201, G151, G101. Cleanliness and tightness of all connectors
I'IT
I
I
SYMPTOMREMEDY
Radiator fan does not run at all.Perform the procedures in the flowchart {see page 22-8).
Condenser fan does not run at all,Perform the procedures in the flowchart (see page 22-1O1.
Both fans {radiator and condenser) do not
run for engine cooling, but they both run
with the IVC on.
Perform the procedures in the tlowchart (see page 22-12).
Both fans do not run at all.Perform the procedures in the flowchart (see page 22-13).
Compressor clutch does not engage.Perform the procedures in the flowchart (see page 22-14).
l'lc system does not come on
{compressor and both fans).Perform the procedures in the flowchart (see page 22-15).
22-7
Page 1026 of 1681

Troubleshooting
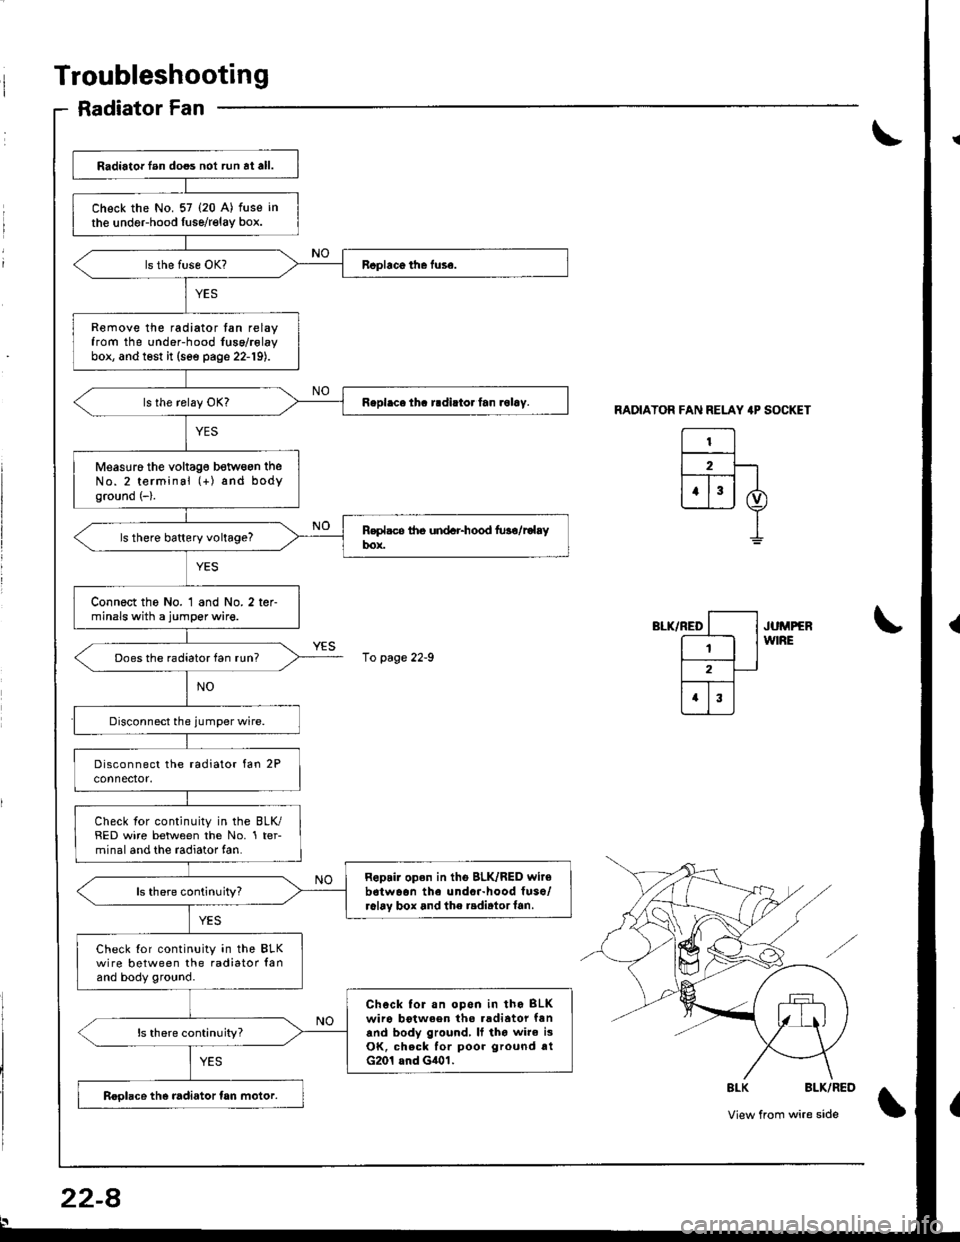
Radiator Fan
RADIATOR FAN RELAY 4P SOCKET
El2F-lt--T-- |
ujj I
I
",-*rrro [--l .u^rrrr
E lw'RE
l2-
trI
\
\
8LK BLK/RED
View from wire side\
Radiator lan does not run at all.
Chock the No. 57 (20 A) fuse in
the undeFhood fuse/relay box.
Remove the radiator tan relayfrom the under-hood fuse/rolaybox, and test it (see page 22-19).
Measuro the voltag€ betwogn theNo.2 terminal (+) and bodyground (-).
ls there battery voltage?
Connect the No. 1 and No. 2 ter-minals with a jumper wire.
Does the radiator fan run?
Check for continuity in the BLK/RED wire between the No. 1 ter-minal and the radiator fan.
Repair open in tho BLK/RED wir6b6twaon the undor-hood fuso/r6l6v box and the radirtorf6n.ls there continuity?
Check Ior continuity in the BLKwire between the radiator lanand body ground.
Chock for.n opon in tho BLKwiro botween tho .adiator fanand body ground, It tho wire i3OK, check for poor ground rtG201 and G401.
ls there continuity?
Roolace the radiator tan motor.
10 page 22-9
22-8
Page 1027 of 1681
From page 22 8
RADIATORFAN RELAY
l-'--l
| 2 |
[T;]
I BrK/YEt
o)
I
RELAY 4P SOCKET
Disconnect the,umper wire andturn the ignition switch ON (II).
Measure the voltage between theNo. 4 terminal (+i and bodyground ( ).
Ropair op€n in the GRN wire be-tween the undor-hood Iuse/.elay box and the A/C diode.
ls there battery voltage?
Repair open in the BLK/YEL wirebotwean the under-hood tuse/relay box snd the under-daahfuso/relay box,
22-9
Page 1028 of 1681
Troubleshooting
Condenser Fan
0
Remove the condenser fan relayfrom the underhood fuse/relaybox, and test it (see page 22-19).
Roplaco the condenser fan rgley.
Measure the voltage between tlieNo. 2 terminal {+) and bodyground (-).
Connect the No. 1 and No. 2 ter-minals with a jumper wire.
Does the condenser fan run?
Check for continuity in the BLU/BLK wire between lhe No. 1 ter'minal and the condenser fan.
Ropair open in the BLU/BLK wir.between tho undor-hood fu3e/relay box and lh€ condan3er fan.ls there continuity?
Check for continuity in the BLKwire between the condenser fanand body ground.
Check tor an ooen in the BLKwir6 betwoen the condan3er fanand body ground. lf the wire isOK, check for poor ground atGr51.
ReDlace the condenser fan motor,
CONDENSER FAN RELAY 4P S(rcKET
ls the relay OK?
YES
RoDlace the undor-hood tuse/r€lay box.JUMPERWIRE
To page 22 11
',,/-i, /
cr-i,
View from wire sideq
BI-U/BLX
22-
Page 1029 of 1681
Disconnect the jumper wire andturn the ignition switch ON (ll).
Measu16 tho voltagg botween theNo.4 terminal {+) and bodyground (-),
R.prir op.n In th. BLK/YEL wir.batwaen tha undar-hood fuaa/ral.y box and tho undar.daahfuro/rclay box.
R€move the A,/C diode from thsund6r-hood tuso/relav box.
ls the A,/C diode OK?
R.prir op.n in tha BLU/YEL wir.batw..n th. und.r.hood tu../rol.y box .nd th. A/C dlod..
From page 22-10
CONDENSER FAN RELAY IP SOCKET
I
22-1