Page 64 of 251
Controls Near the Steering Wheel
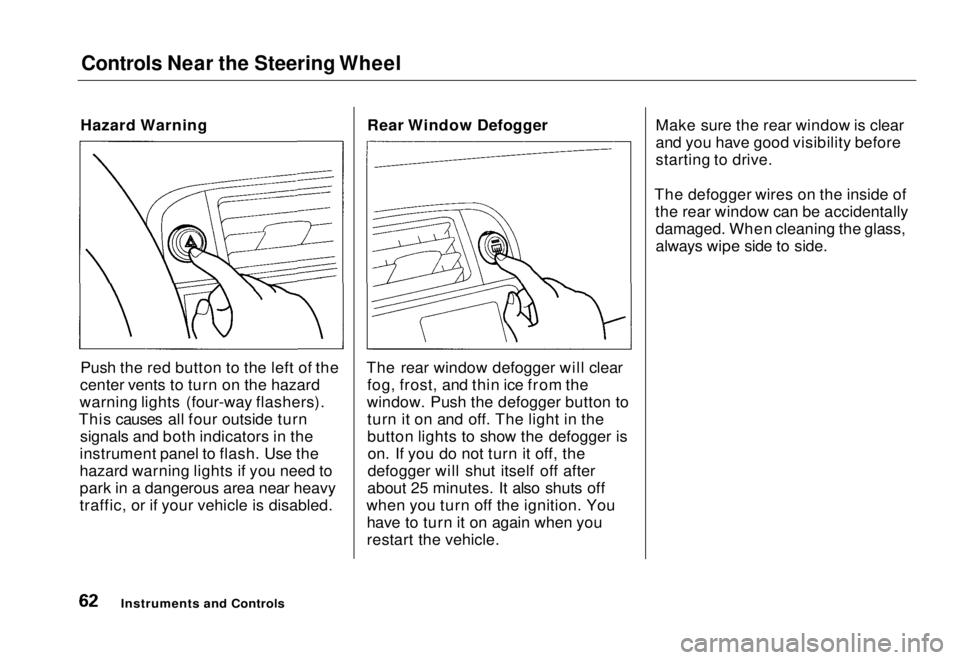
Hazard Warning
Push the red button to the left of the
center vents to turn on the hazard
warning lights (four-way flashers).
This causes all four outside turn signals and both indicators in the
instrument panel to flash. Use the
hazard warning lights if you need to
park in a dangerous area near heavy
traffic, or if your vehicle is disabled. Rear Window Defogger
The rear window defogger will clear fog, frost, and thin ice from the
window. Push the defogger button to turn it on and off. The light in the
button lights to show the defogger ison. If you do not turn it off, the
defogger will shut itself off after
about 25 minutes. It also shuts off
when you turn off the ignition. You have to turn it on again when you
restart the vehicle. Make sure the rear window is clear
and you have good visibility before
starting to drive.
The defogger wires on the inside of the rear window can be accidentallydamaged. When cleaning the glass,
always wipe side to side.
Instruments and ControlsMain Menu Table of Contents s t
Page 65 of 251
Controls Near the Steering Wheel
Steering Wheel Adjustment
See page 16 for important safety
information about how to properly
position the steering wheel.
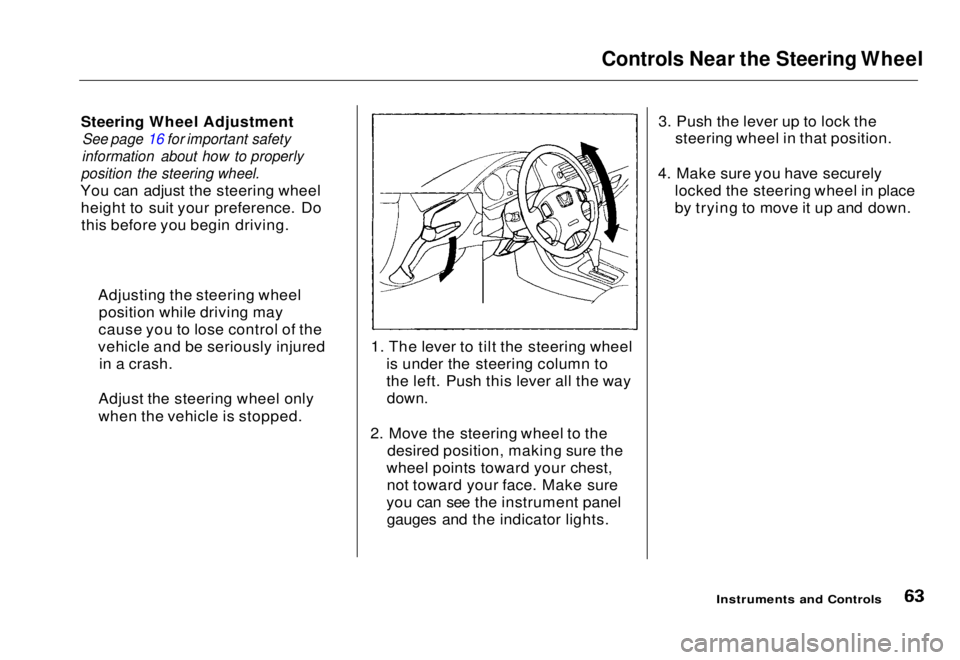
You can adjust the steering wheel height to suit your preference. Dothis before you begin driving.
1. The lever to tilt the steering wheelis under the steering column to
the left. Push this lever all the way
down.
2. Move the steering wheel to the desired position, making sure the
wheel points toward your chest, not toward your face. Make sure
you can see the instrument panel gauges and the indicator lights. 3. Push the lever up to lock the
steering wheel in that position.
4. Make sure you have securely locked the steering wheel in place
by trying to move it up and down.
Instruments and Controls
Adjusting the steering wheel
position while driving may
cause you to lose control of the
vehicle and be seriously injured in a crash.
Adjust the steering wheel only
when the vehicle is stopped.Main Menu Table of Contents s t
Page 70 of 251
Keys and Locks
LOCK (0) — You can insert or
remove the key only in this position.
To switch from ACCESSORY to LOCK, you must push the key in
slightly as you turn it. If your vehicle
has an automatic transmission, it
must also be in Park. The anti-theft
lock will lock the steering column
when you remove the key. If the front wheels are turned, the
anti-theft lock may sometimes make
it difficult to turn the key from
LOCK to ACCESSORY. Firmly turn
the steering wheel to the left or to
the right as you turn the key. ACCESSORY (I) — In this position,
you can operate the audio system and the accessory power socket.
ON (II) — This is the normal key
position when driving. All features
and accessories on the vehicle are
usable. Several of the lights on the
instrument panel come on as a test
when you turn the ignition switch
from ACCESSORY to ON (see page 51).
START (III) — Use this position
only to start the engine. The switch
returns to ON (II) when you let go of
the key.
You will hear a reminder beeper if
you leave the key in the ignition switch in the LOCK (0) or
ACCESSORY (I) position and open the driver's door. Remove the key to
turn off the beeper. Door Locks
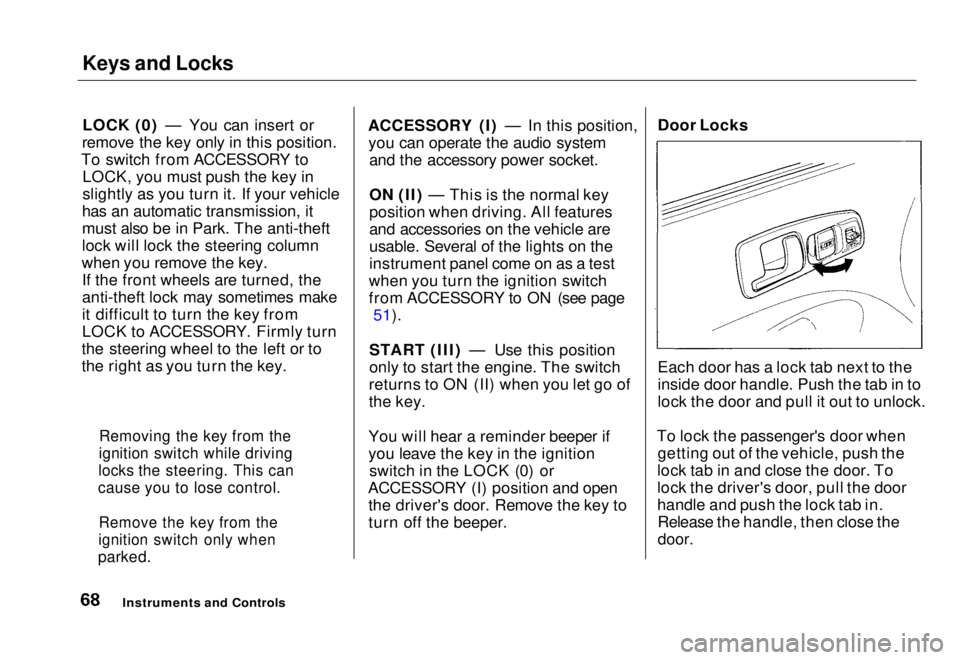
Each door has a lock tab next to the
inside door handle. Push the tab in to
lock the door and pull it out to unlock.
To lock the passenger's door when getting out of the vehicle, push the
lock tab in and close the door. To
lock the driver's door, pull the door
handle and push the lock tab in. Release the handle, then close the
door.
Instruments and Controls
Removing the key from the
ignition switch while driving
locks the steering. This can
cause you to lose control.
Remove the key from the
ignition switch only when
parked.Main Menu Table of Contents s t
Page 81 of 251
Moonroof, Mirrors
Moonroof
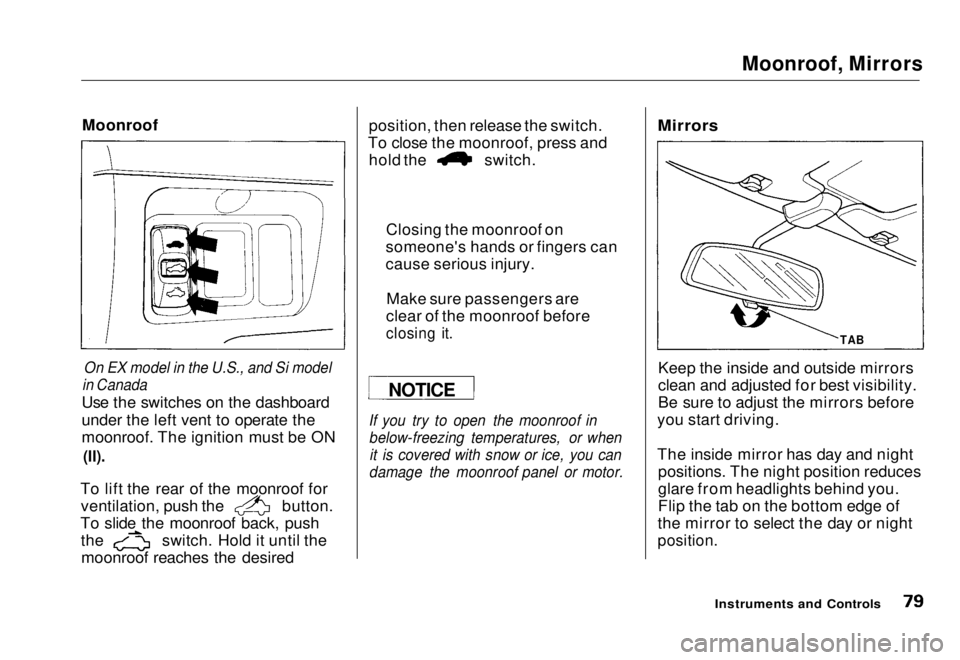
On EX model in the U.S., and Si model
in Canada
Use the switches on the dashboard
under the left vent to operate the
moonroof. The ignition must be ON
(II).
To lift the rear of the moonroof for ventilation, push the button.
To slide the moonroof back, push the switch. Hold it until the
moonroof reaches the desired position, then release the switch.
To close the moonroof, press and hold the switch.
If you try to open the moonroof in below-freezing temperatures, or whenit is covered with snow or ice, you can
damage the moonroof panel or motor.
Mirrors
Keep the inside and outside mirrors
clean and adjusted for best visibility.
Be sure to adjust the mirrors before
you start driving.
The inside mirror has day and night positions. The night position reduces
glare from headlights behind you.
Flip the tab on the bottom edge of
the mirror to select the day or night
position.
Instruments and Controls
NOTICE
Closing the moonroof on
someone's hands or fingers can
cause serious injury.
Make sure passengers are
clear of the moonroof before
closing it.
TABMain Menu Table of Contents s t
Page 86 of 251
Interior Light
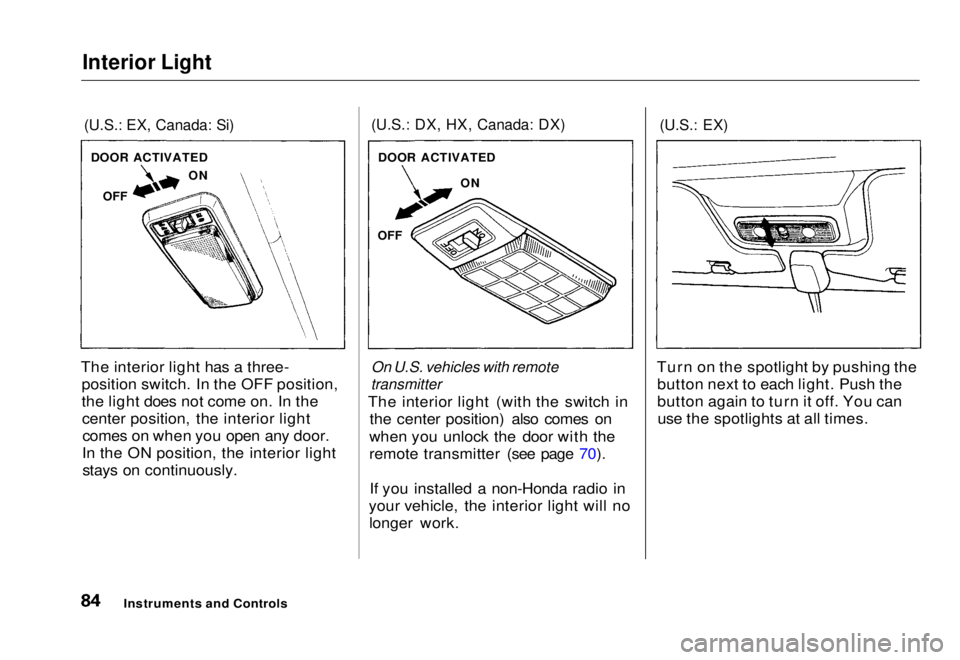
(U.S.: EX, Canada: Si)
The interior light has a three- position switch. In the OFF position,
the light does not come on. In thecenter position, the interior lightcomes on when you open any door.
In the ON position, the interior light stays on continuously.
(U.S.: DX, HX, Canada: DX)
On U.S. vehicles with remote
transmitter
The interior light (with the switch in the center position) also comes on
when you unlock the door with the
remote transmitter (see page 70).
If you installed a non-Honda radio in
your vehicle, the interior light will no longer work.
(U.S.: EX)
Turn on the spotlight by pushing the button next to each light. Push the
button again to turn it off. You canuse the spotlights at all times.
Instruments and Controls
DOOR ACTIVATED
OFF ON
DOOR ACTIVATED
ON
OFFMain Menu Table of Contents s t
Page 88 of 251
Heating and Cooling
Proper use of the Heating and
Cooling system can make the
interior dry and comfortable, and
keep the windows clear for best
visibility.
If your vehicle does not have air
conditioning, it can be installed at
any time. Your dealer will install a
Genuine Honda air conditioning
system that meets Honda's high
quality standards and is designed to
exactly fit your vehicle. Please
contact your dealer for more
information.
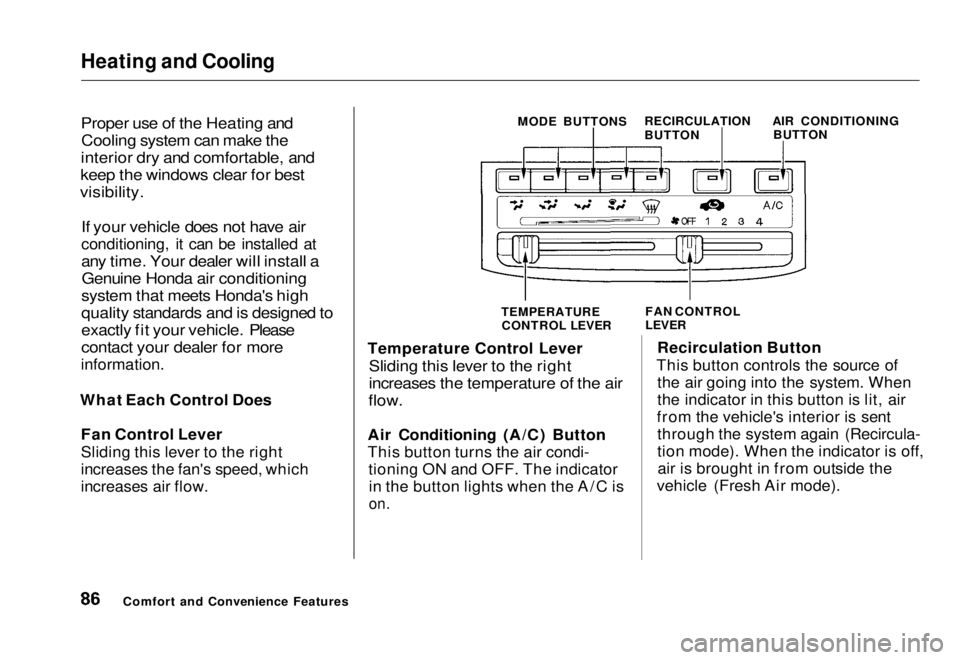
What Each Control Does Fan Control Lever
Sliding this lever to the right
increases the fan's speed, which
increases air flow.
Comfort and Convenience Features MODE BUTTONS
RECIRCULATION
BUTTON AIR CONDITIONING
BUTTON
TEMPERATURE
CONTROL LEVER FAN CONTROL
LEVER
Temperature Control Lever
Sliding this lever to the right
increases the temperature of the air
flow.
Air Conditioning (A/C) Button
This button turns the air condi- tioning ON and OFF. The indicatorin the button lights when the A/C is
on.
Recirculation Button
This button controls the source of the air going into the system. When
the indicator in this button is lit, air
from the vehicle's interior is sent through the system again (Recircula-
tion mode). When the indicator is off,air is brought in from outside the
vehicle (Fresh Air mode).Main Menu Table of Contents s t
Page 116 of 251
Accessories and Modifications
Modifying your vehicle, or installingsome non-Honda accessories, can
make your vehicle unsafe. Before
you make any modifications or add
any accessories, be sure to read the
following information.
Accessories
Your dealer has Genuine Honda accessories that allow you to
personalize your vehicle. These accessories have been designed and
approved for your vehicle, and are
covered by warranty.
Non-Honda accessories are usually
designed for universal applications.
Although aftermarket accessories may fit on your vehicle, they may not
meet factory specifications, and
could adversely affect your vehicle's
handling and stability. (See "Modifications" on page 115 for
additional information.) When properly installed, car phones,
alarms, two-way radios, and low-
powered audio systems should not
interfere with your vehicle's
computer-controlled systems, such as the SRS and anti-lock brake
system.
However, if electronic accessories
are improperly installed, or exceed
your vehicle's electrical system capacity, they can interfere with the operation of your vehicle, or even
cause the airbags to deploy.
Before installing any accessory:
Make sure the accessory does notobscure any lights, or interfere
with proper vehicle operation or performance.
Be sure electronic accessories do
not overload electrical circuits (see page 225). Have the installer contact your
Honda dealer for assistance before
installing any electronic accessory.
If possible, have your dealer inspect
the final installation.
Before Driving
Improper accessories or
modifications can affect your
vehicle's handling, stability and performance, and cause a
crash in which you can be hurt
or killed.
Follow all instructions in this
owner's manual regarding
accessories and modifications.Main Menu Table of Contents s t
Page 122 of 251
Preparing to Drive
You should do the following checks and adjustments every day before
you drive your vehicle.
1. Make sure all windows, mirrors, and outside lights are clean and
unobstructed. Remove frost, snow, or ice.
2. Check that the hood and trunk are fully closed.
3. Visually check the tires. If a tire looks low, use a gauge to check its
pressure.
4. Check that any items you may be
carrying with you inside are stored
properly or fastened down
securely.
5. Check the adjustment of the seat (see page 74).
6. Check the adjustment of the inside and outside mirrors (see
page 79).
7. Check the adjustment of the steering wheel (see page 63).
8. Make sure the doors are securely closed and locked. 9. Fasten your seat belt. Check that
your passengers have fastened
their seat belts (see page 7).
10. Turn the ignition switch ON (II). Check the indicator lights in the
instrument panel.
11. Start the engine (see page 121).
12. Check the gauges and indicator lights in the instrument panel (see
page 33).
DrivingMain Menu Table of Contents s t