1998 GMC SIERRA instrument panel
[x] Cancel search: instrument panelPage 245 of 452
During your trip, check occasionally to be sure that the
load is secure, and that the lamps and any trailer brakes
are still working.
Following Distance
Stay at least twice as far behind the vehicle ahead as you
would when driving your vehicle without
a trailer. This
can help
you avoid situations that require heavy braking
and sudden turns.
Passing
You’ll need more passing distance up ahead when
you’re towing a trailer. And, because you’re a good deal
longer,
you’ll need to go much farther beyond the
passed vehicle before you can return to
your lane.
Backing Up
Hold the bottom of the steering wheel with one hand.
Then, to move the trailer
to the left, just move that hand
to the left.
To move the trailer to the right, move your
hand to the right. Always back up slowly and, if
possible, have someone guide you.
Making Turns
I NOTICE:
Making very sharp turns while trailering could
cause the trailer to come in contact with the
vehicle. Your vehicle could be damaged. Avoid
making very sharp turns while trailering.
When you’re turning with a trailer, make wider turns than
normal. Do this
so your trailer won’t strike soft shoulders,
curbs, road signs, trees or other objects. Avoid jerky or
sudden maneuvers. Signal well in advance.
Turn Signals When Towing a Trailer
The arrows on your instrument panel will flash
whenever
you signal a turn or lane change. Properly
hooked up, the trailer lamps will also flash, telling other
drivers you’re about to turn, change lanes or stop.
When towing a trailer, the arrows on your instrument
panel
will flash for turns even if the bulbs on the trailer are
burned out. Thus,
you may think drivers behind you are
seeing your signal when they are not. It’s important to
check occasionally
to be sure the trailer bulbs are
still working.
ProCarManuals.com
Page 265 of 452
5. Put the transfer case in NEUTRAL (N). See
“Four-Wheel Drive’’
in the Index for the proper
procedure to select NEUTRAL
(N).
6. When the vehicle is hooked up. release the
parking brake.
7. Turn the ignition key to OFF.
Four- Wheel-Drive Vehicles (Electronic
Transfer Case)
Eml Limits -- 35 mph (55 km/JZ), 50 milc?s (80 kndh)
If your vehicle is four-wheel drive with an electronic
transfer case, use the following directions:
I. Engage the parking brake.
2. Turn the ignition key to ON.
3. Clamp the steering wheel in a straight-ahead position
with
a clamping device designed for towing service.
(Do not use the vehicle’s steering column lock for this.)
4. Put the transmission in NEUTRAL (N).
5. Put the transfer case in 2 High (2HI).
6. When the vehicle is hooked up, release the
parking brake.
7. Turn the ignition key to OFF.
NOTICE:
If your vehicle is equipped with four-wheel drive
and the towing limits must be exceeded, a towing
dolly must be used under the front wheels or
vehicle/powertrain damage will occur.
I NOTICE:
Towing pickup models from the rear while loaded
with heavy cargo may cause the frame side rails
to flex sufficiently to allow the pickup box to
contact the cab and could cause damage to the
cab and/or box.
Engine Overheating (Gasoline Engine)
You will find a coolant temperature gage on your
vehicle’s instrument panel. See “Engine Coolant
Temperature Gage”
in the Index.
If your vehicle has a diesel engine, see “Engine
Overheating”
in the Diesel Engine Supplement.
5-13
ProCarManuals.com
Page 294 of 452
Be sure the posted octane is at least 87. If the octane is
less than
87, you may get a heavy knocking noise when
you drive. If it’s bad enough, it can damage your engine.
If you’re using fuel rated at 87 octane or higher and you
hear heavy knocking, your engine needs service. But
don’t worry if you hear a little pinging noise when
you’re accelerating or driving
up a hill. That’s norlnal,
and you don’t have to
buy a higher octane fuel to get rid
of pinging. It’s the heavy, constant knock that means
you have a problem.
If your vehicle is certified to meet California Emission
Standards (indicated on the underhood emission control
label),
it is designed to operate on fuels that meet
California specifications.
If such fuels are not available
in states adopting California emissions standards, your
vehicle will operate satisfactorily on fuels meeting
federal specifications, but emission control system
performance may be affected. The malfunction indicator lamp
on your instrument
panel may turn on and/or your
vehicle may fail
a smog-check test. If this occurs, return
to your authorized
GM dealer for diagnosis to determine
the cause
of’ fdilure. In the event it is determined that the
cause
of the condition is the type of fuels used, repairs
may not be covered by your warranty.
Some gasolines that are not reformulated for low
emissions contain an octane-enhancing additive called
methylcyclopentadienyl manganese tricarbonyl
(MMT);
ask your service station operator whether or not his fuel
contains MMT. General Motors does not recommend the
use
of such gasolines. If fuels containing MMT are used,
spark plug life may be reduced and your emission
control system performance may be affected. The
malfunction indicator
lamp on your instrument panel
may
turn on. If this occurs, return to your authorized
GM dealer for service.
6-4
ProCarManuals.com
Page 354 of 452
Cleaning Leather
Use a soft cloth with lukewarm water and a mild soap or
saddle soap and wipe dry with a soft cloth. Then, let the
leather dry naturally.
Do not use heat to dry.
For stubborn stains, use a leather cleaner. See your
dealer for this product.
Never use oils, varnishes, solvent-based or abrasive
cleaners, furniture polish or shoe polish on leather.
Soiled or stained leather should be cleaned
immediately.
If dirt is allowed to work into the
finish, it can harm the leather.
Cleaning the Top of the Instrument Panel
Use only mild soap and water to clean the top surfxes
of the instrument panel. Sprays containing silicones or
waxes may cause annoying reflections in the windshield
and even make
it difficult to see through the windshield
under certain conditions.
Cleaning Interior Plastic Components
Use only a mild soap and water solution on a soft
cloth or sponge. Commercial cleaners may affect the
surface finish.
Care of Safety Belts
Keep belts clean and dry.
Do not bleach or dye safety belts. If you do, it
may severely weaken them. In a crash, they
might not be able to provide adequate protection.
Clean safety belts only with mild soap and
lukewarm water.
6-64
ProCarManuals.com
Page 359 of 452
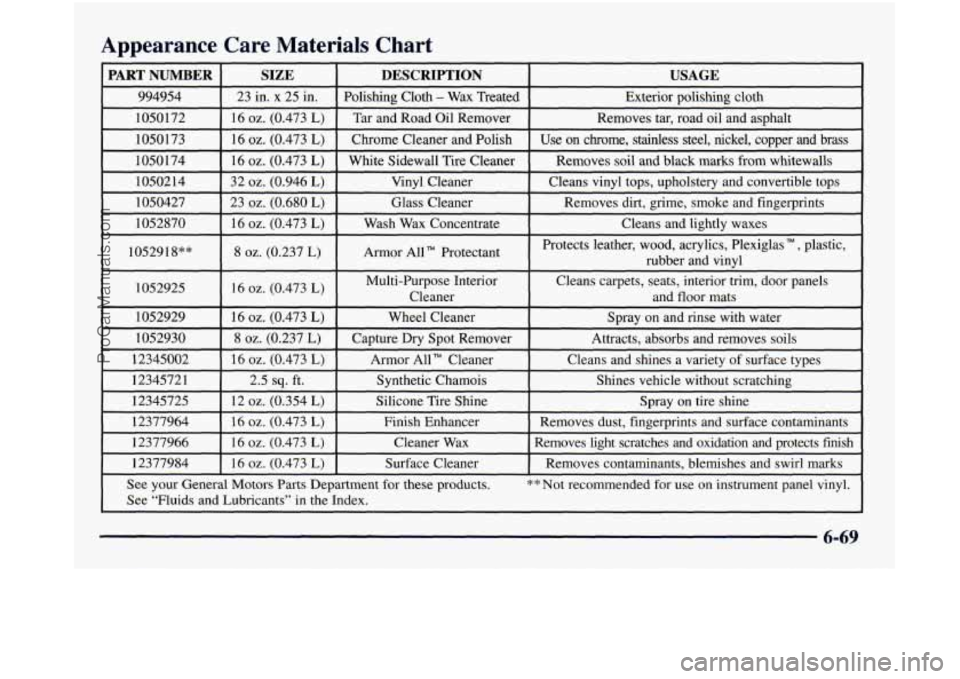
Appearance Care Materials Chart
PART NUMBER SIZE DESCRIPTION USAGE
994954 23 in. x 25 in. Polishing Cloth - Wax Treated
Exterior polishing cloth
1050172 16
oz. (0.473 L) Tar and Road Oil Remover Removes tar, road oil and asphalt
1050173 16
oz. (0.473 L) Chrome Cleaner and Polish Use on chrome, stainless steel, nickel, copper and brass
1050 174 16
oz. (0.473 L) White Sidewall Tire Cleaner Removes soil and black marks from whitewalls
1050214 32
oz. (0.946 L) Vinyl Cleaner Cleans vinyl tops, upholstery and convertible tops
1050427 23
oz. (0.680 L) Glass Cleaner Removes dirt, grime,
smoke and fingerprints
1052870
16 oz. (0.473 L) Wash Wax Concenmace Cleans and lightly waxes ~.
1052918”” 8 oz. (0.237 L) Armor All Protectant Protects
leather, wood, acrylics, Plexiglas TM , plastic,
rubber and vinyl
1052925
[ 16 oz. (0.473 L) I Multi-Purpose Interior Cleans carpets, seats, interior trim, door panels
I Cleaner and floor mats I I
1052929 I 16 oz. (0.473 L) I Wheel Cleaner I Spray on and rinse with water
1052930
8 oz. (0.237 L) Capture Dry Spot Remover
Attracts, absorbs and removes soils
12345002
16 oz. (0.473 L) Armor All” Cleaner Cleans
and shines a variety of surface types
12345721 2.5
sq. ft. Synthetic Chamois
Shines vehicle without scratching
12345725 12
oz. (0.354 L) Silicone Tire Shine Spray
on tire shine
12377964 16
oz. (0.473 L) Finish Enhancer Removes dust, fingerprints andsurface contaminants
12377966 16
oz. (0.473 L) Cleaner Wax Removes light scratches and oxidation and protects fish
12377984
I 16 oz. (0.473 L) I Surface Cleaner I Removes contaminants, blemishes and swirl marks
See your General Motors Parts Department for these products.
** Not recommended for use on instrument panel vinyl.
See “Fluids and Lubricants’’ in the Index.
6-69
ProCarManuals.com
Page 360 of 452
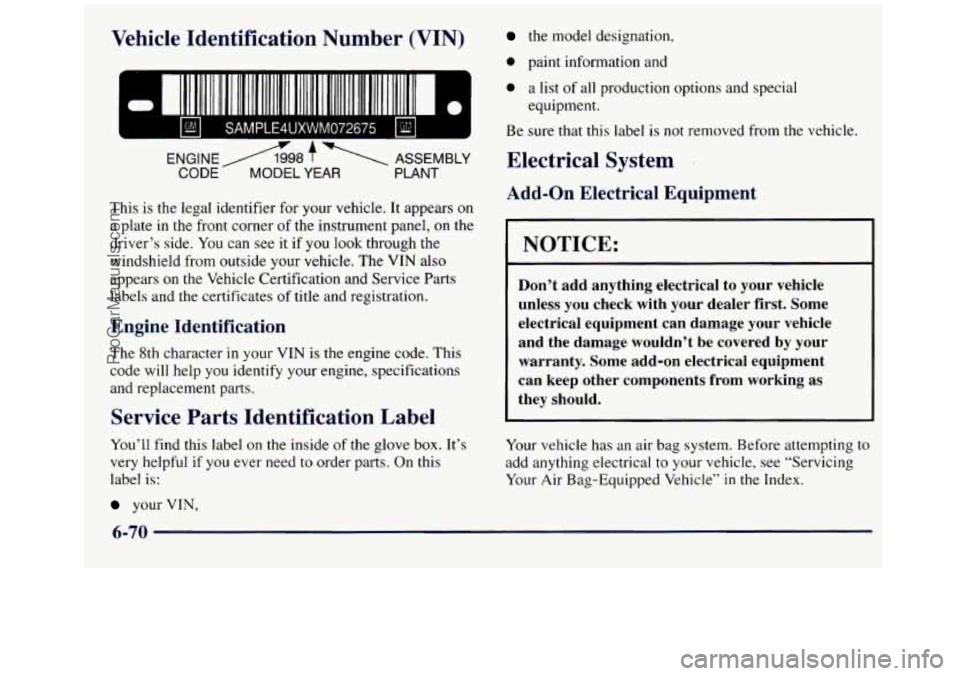
Vehicle IdentiP ’* -In N mber (VIN)
- =I I1 11111111 1111 11111111t 111 111111 II 111111111111 111111111 II
ENGINE A98 f ASSEMBLY
CODE- MODEL YEAR PLANT
This is the legal identifier for your vehicle. It appears on
a plate in the front corner
of the instrument panel, on the
driver’s side.
You can see it if you look through the
windshield from outside your vehicle. The VIN also
appears on
the Vehicle Certification and Service Parts
labels and the certificates
of title and registration.
Engine Identification
The 8th character in your VIN is the engine code. This
code will help you identify your engine, specifications
and replacement parts.
Service Parts Identification Label
You’ll find this label on the inside of the glove box. It’s
very helpful if
you ever need to order parts. On this
label is:
your VIN,
the model designation,
0 paint information and
0 a list of all production options and special
Be sure that this label is not removed from the vehicle.
equipment.
Electrical System
Add-on Electrical Equipment
1 NOTICE:
Don’t add anything electrical to your vehicle
unless you check with your dealer first. Some
electrical equipment can damage your vehicle
and the damage wouldn’t be covered
by your
warranty. Some add-on electrical equipment
can keep other components from working as
they should.
Your vehicle has an air bag system. Before attempting to
add anything electrical to your vehicle, see “Servicing
Your Air Bag-Equipped Vehicle”
in the Index.
6-70
ProCarManuals.com
Page 362 of 452
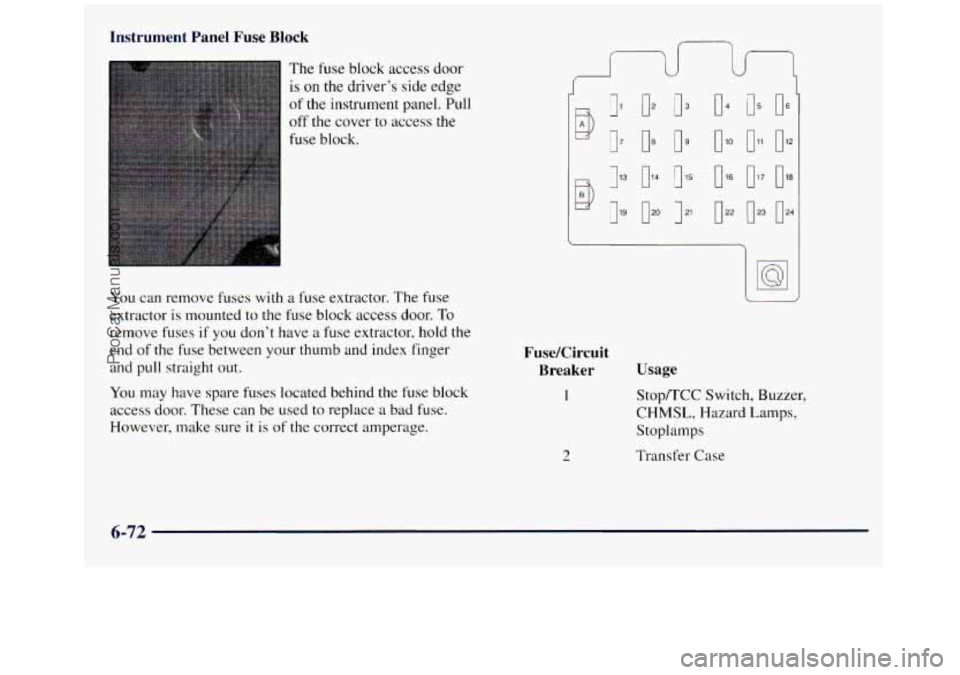
Instrument Panel Fuse Block
The fuse block access door
is on the driver’s side edge
of the instrument panel. Pull
off the cover to access the
fuse block.
You can remove
fuses with a fuse extractor. The fuse
extractor
is mounted to the fuse block access door. To
remove fuses if you don’t have a fuse extractor, hold the
end
of the fuse between your thumb and index finger
and
pull straight out.
You may have spare fuses located behind the fuse block
access door. These can be used to replace a bad fuse.
However, make
sure it is of the correct amperage.
J
D
13
ug
7 I
FuseKircuit
Breaker
1
2
Usage
Stop/TCC Switch, Buzzer,
CHMSL, Hazard Lamps,
S toplamps
Transfer
Case
6-72
ProCarManuals.com
Page 366 of 452
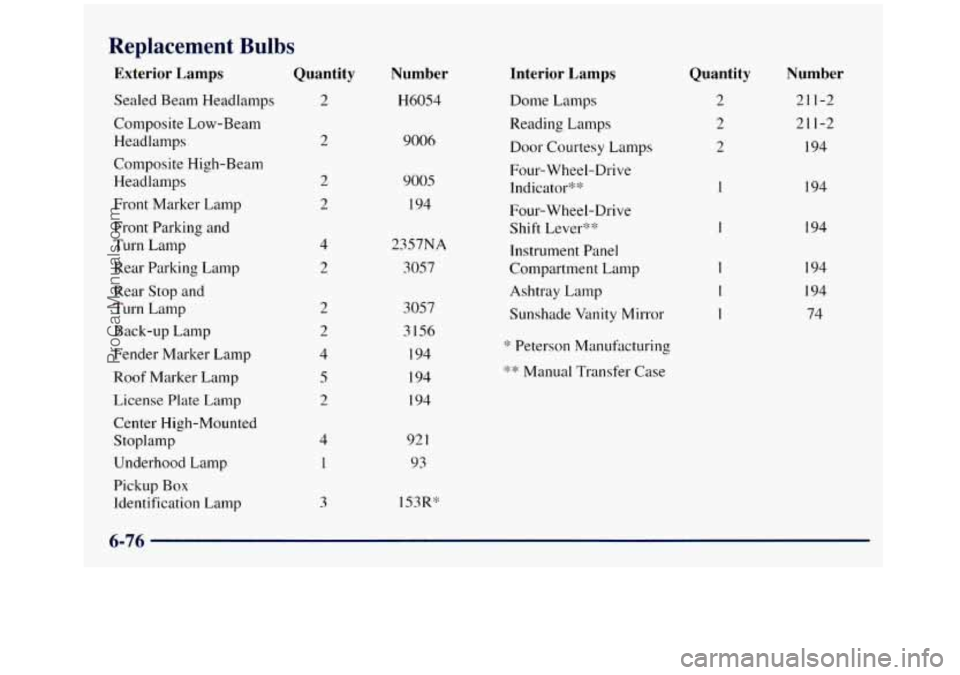
Replacen- - --:
Exterior Lamps
.-
Quantity Number
H6054
Interior Lamps Quantity Number
21 1-2
21 1-2
194
Sealed
Beam Headlamps
Composite Low-Beam
Headlamps
Composite High-Beam
Headlamps
Front Marker Lamp
Front Parking and
Turn Lamp
Rear Parking Lamp
Rear Stop and
Turn Lamp
Back-up Lamp
Fender Marker Lamp
Roof Marker Lamp
License Plate Lamp
Center High-Mounted
Stoplamp
Underhood Lamp
Pickup
Box
Identification Lamp
2 Dome Lamps
Reading Lamps Door Courtesy Lamps
Four-Wheel-Drive
Indicator**
Four-Wheel-Drive Shift Lever4:
:P
Instrument Panel
Compartment Lamp
2 9006
2
2 9005
194 1 194
1 194
4
2
2357NA
3057 194
194
74
Ashtray Lamp
Sunshade Vmity Mirror
3057
3156 I94
194
194
'@ Peterson Manufacturing
*'k Manual Transfer Case
4
1
92 1
93
3
6-76
ProCarManuals.com