1998 FORD CROWN VICTORIA ECO mode
[x] Cancel search: ECO modePage 26 of 160
Under normal conditions, your vehicle's climate control system should be
left in any position other than MAX A/C or OFF when the vehicle is
parked. This allows the vehicle to ªbreatheº through the outside air inlet
duct.
²MAX A/C-Uses recirculated air to cool the vehicle. MAX A/C is noisier
than NORM A/C but more economical and will cool the inside of the
vehicle faster. Airflow will be from the instrument panel registers. This
mode can also be used to prevent undesirable odors from entering the
vehicle.
²NORM A/C-Uses outside air to cool the vehicle. It is quieter than MAX
A/C but not as economical. Airflow will be from the instrument panel
registers.
²VENT-Distributes outside air through the instrument panel registers.
However, the air will not be cooled below the outside temperature
because the air conditioning does not operate in this mode.
²OFF-Outside air is shut out and the fan will not operate. For short
periods of time only, use this mode to prevent undesirable odors from
entering the vehicle.
²FLR-Allows for maximum heating by distributing outside air through
the floor ducts. However, the air will not be cooled below the outside
temperature because the air conditioning does not operate in this
mode.
²MIX-Distributes outside air through the windshield defroster ducts and
the floor ducts. Heating and air conditioning capabilities are provided
in this mode. For added customer comfort, when the temperature
control knob is anywhere in between the full hot and full cold
positions, the air distributed through the floor ducts will be slightly
warmer than the air sent to the windshield defroster ducts. If the
temperature is about 10ÉC (50ÉF) or higher, the air conditioner will
automatically dehumidify the air to prevent fogging.
²
-Distributes outside air through the windshield defroster ducts.
It can be used to clear ice or fog from the windshield. If the
temperature is about 10ÉC (50ÉF) or higher, the air conditioner will
automatically dehumidify the air to prevent fogging.
Operating tips
²In humid weather, selectbefore driving. This will prevent your
windshield from fogging. After a few minutes, select any desired
position.
Controls and features
26
Page 31 of 160

economical and will cool the inside of the vehicle faster. Airflow is
from the instrument panel registers. This mode can also be used to
prevent undesirable odors from entering the vehicle.
²NORM A/C-Uses outside air to cool the vehicle. The temperature
display will remain the same and air will be cooled based on the
selected temperature. It is quieter than MAX A/C but not as
economical. Fan speed will remain automatic. Airflow is from the
instrument panel registers.
²VENT-Distributes outside air through the instrument panel registers.
However, the air cannot be cooled below the outside temperature
because the air conditioning does not operate in this mode.
²FLOOR-Allows for maximum heating by distributing outside air
through the floor ducts. However, the air cannot be cooled below the
outside temperature because the air conditioning does not operate in
this mode.
²FLR²DEF-Distributes outside air through the windshield defroster
ducts and the floor ducts. Heating and air conditioning capabilities are
provided in this mode. The air will be heated or cooled based on the
temperature selection. For added customer comfort, the air
distributed through the floor ducts will be slightly warmer than the air
sent to the windshield defroster ducts. If the temperature is about
10ÉC (50ÉF) or higher, the air conditioner will automatically
dehumidify the air to prevent fogging.
²DEF
-Distributes outside air through the windshield defroster
ducts. It can be used to clear ice or fog from the windshield. If the
outside air temperature is about 10ÉC (50ÉF) or higher, the air
conditioner will automatically dehumidify the air to prevent fogging.
²OFF-Outside air is shut out and the fan will not operate. For short
periods of time, use this mode to prevent undesirable odors from
entering the vehicle. For short periods of time only, use this mode to
prevent undesirable odors from entering the vehicle.
Controls and features
31
Page 40 of 160
When programming your HomeLinktUniversal Transmitter, you
will be operating the garage door or gate. Be sure that people
and objects are out to the way to prevent potential harm or damage.
Do not use the HomeLinktUniversal Transmitter with any garage door
opener that lacks safety stop and reverse features as required by U.S.
federal safety standards (this includes any garage door opener model
manufactured before April 1, 1982). A garage door which cannot detect
an object, signaling the door to stop and reverse, does not meet current
U.S. federal safety standards. For more information on this matter, call
toll-free: 1±800±355±3515.
Programming
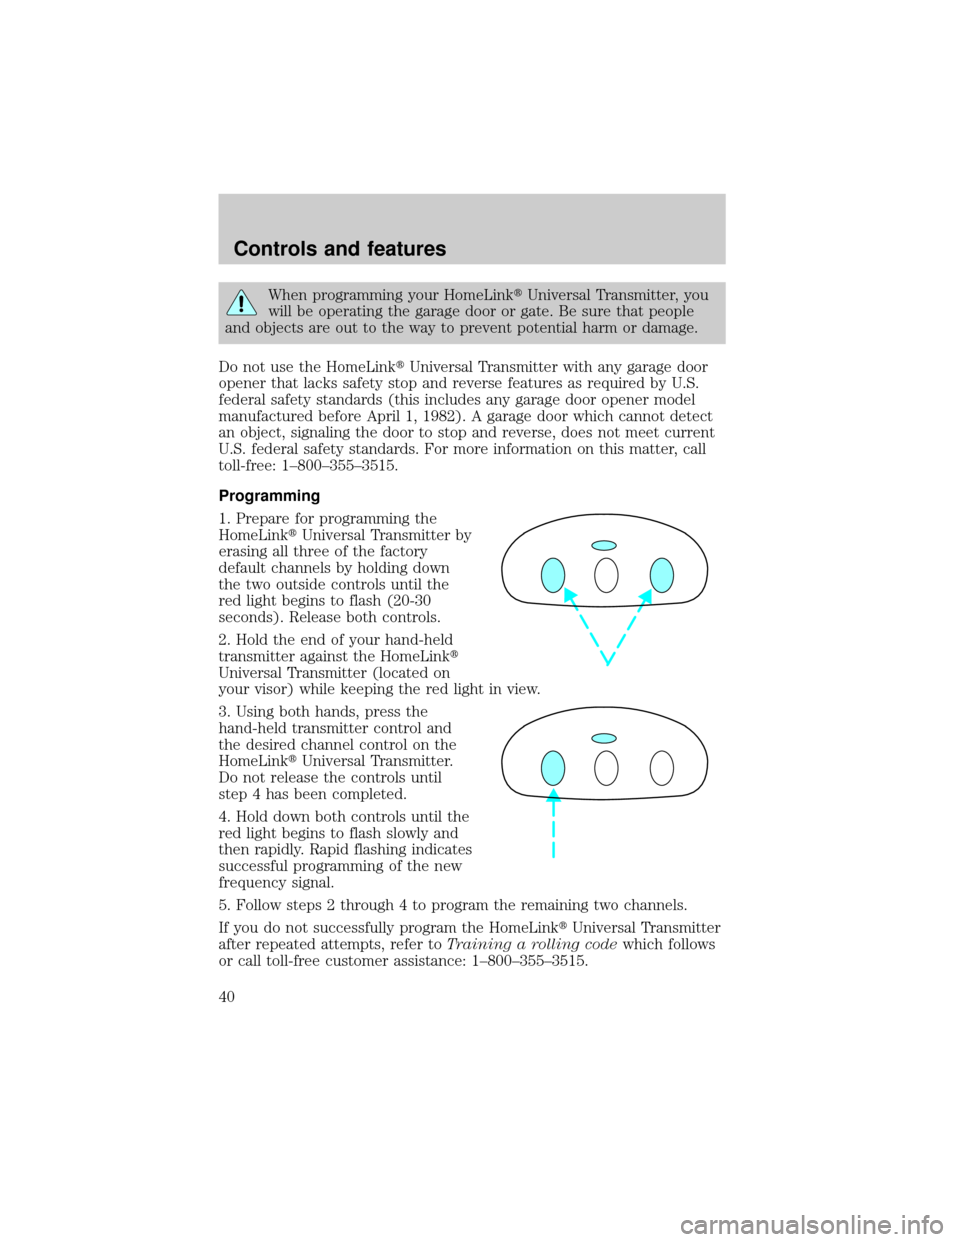
1. Prepare for programming the
HomeLinktUniversal Transmitter by
erasing all three of the factory
default channels by holding down
the two outside controls until the
red light begins to flash (20-30
seconds). Release both controls.
2. Hold the end of your hand-held
transmitter against the HomeLinkt
Universal Transmitter (located on
your visor) while keeping the red light in view.
3. Using both hands, press the
hand-held transmitter control and
the desired channel control on the
HomeLinktUniversal Transmitter.
Do not release the controls until
step 4 has been completed.
4. Hold down both controls until the
red light begins to flash slowly and
then rapidly. Rapid flashing indicates
successful programming of the new
frequency signal.
5. Follow steps 2 through 4 to program the remaining two channels.
If you do not successfully program the HomeLinktUniversal Transmitter
after repeated attempts, refer toTraining a rolling codewhich follows
or call toll-free customer assistance: 1±800±355±3515.
Controls and features
40
Page 44 of 160
Compass zone adjustment
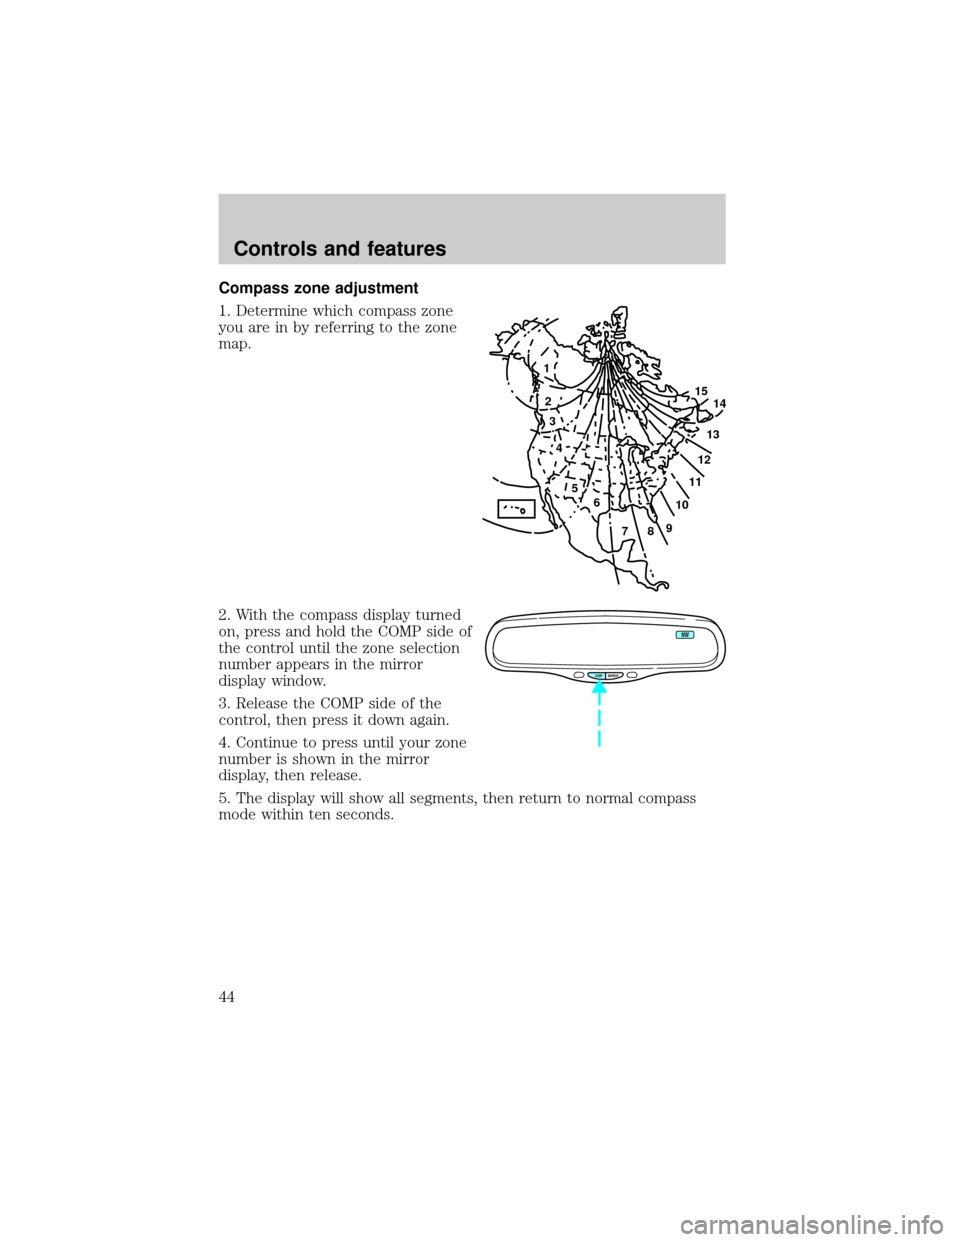
1. Determine which compass zone
you are in by referring to the zone
map.
2. With the compass display turned
on, press and hold the COMP side of
the control until the zone selection
number appears in the mirror
display window.
3. Release the COMP side of the
control, then press it down again.
4. Continue to press until your zone
number is shown in the mirror
display, then release.
5. The display will show all segments, then return to normal compass
mode within ten seconds.
1
2
3
4
5
6
7891011121314 15
COMP MIRROR
NW
Controls and features
44
Page 74 of 160
²Place seat back in upright position.
²Put the safety belt in the automatic locking mode. Refer toAutomatic
locking mode.
Ford recommends the use of a child safety seat having a top tether
strap. Install the child safety seat in a seating position which is capable
of providing a tether anchorage. For more information on top tether
straps, refer toAttaching safety seats with tether straps.
Carefully follow all of the manufacturer's instructions included
with the safety seat you put in your vehicle. If you do not install
and use the safety seat properly, the child may be injured in a sudden
stop or collision.
Installing child safety seats in combination lap and shoulder belt
seating positions
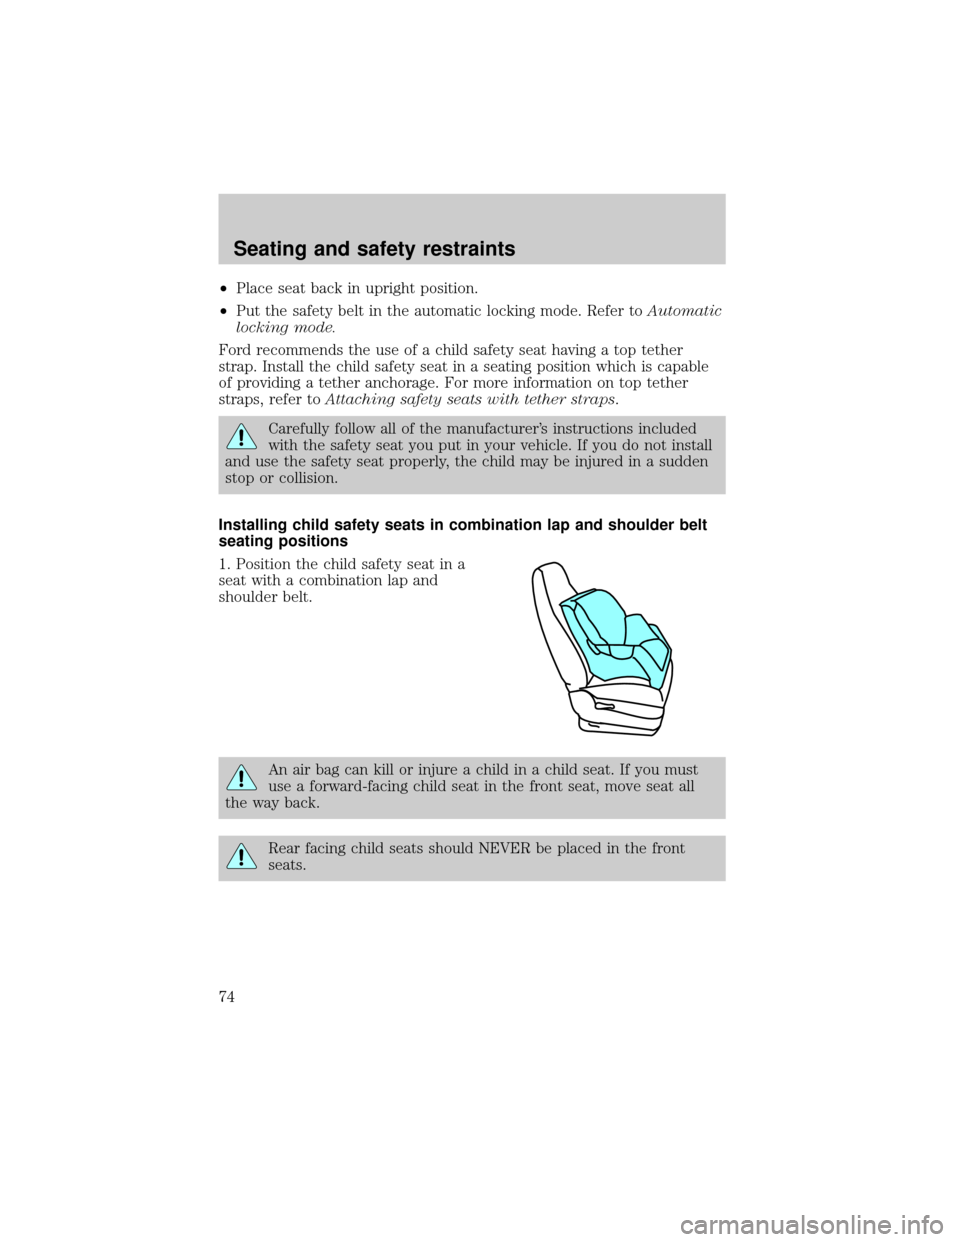
1. Position the child safety seat in a
seat with a combination lap and
shoulder belt.
An air bag can kill or injure a child in a child seat. If you must
use a forward-facing child seat in the front seat, move seat all
the way back.
Rear facing child seats should NEVER be placed in the front
seats.
Seating and safety restraints
74
Page 90 of 160
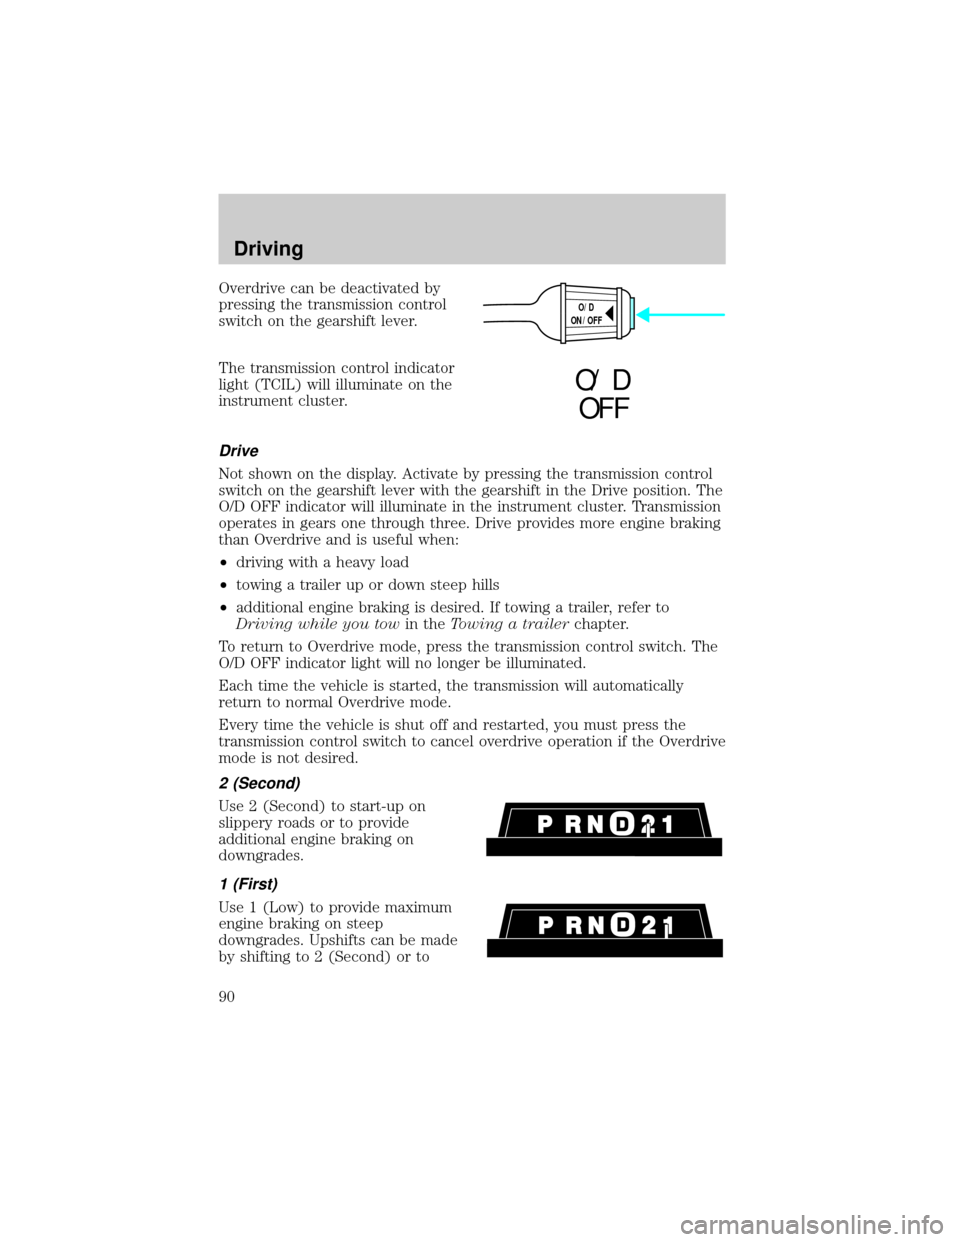
Overdrive can be deactivated by
pressing the transmission control
switch on the gearshift lever.
The transmission control indicator
light (TCIL) will illuminate on the
instrument cluster.
Drive
Not shown on the display. Activate by pressing the transmission control
switch on the gearshift lever with the gearshift in the Drive position. The
O/D OFF indicator will illuminate in the instrument cluster. Transmission
operates in gears one through three. Drive provides more engine braking
than Overdrive and is useful when:
²driving with a heavy load
²towing a trailer up or down steep hills
²additional engine braking is desired. If towing a trailer, refer to
Driving while you towin theTowing a trailerchapter.
To return to Overdrive mode, press the transmission control switch. The
O/D OFF indicator light will no longer be illuminated.
Each time the vehicle is started, the transmission will automatically
return to normal Overdrive mode.
Every time the vehicle is shut off and restarted, you must press the
transmission control switch to cancel overdrive operation if the Overdrive
mode is not desired.
2 (Second)
Use 2 (Second) to start-up on
slippery roads or to provide
additional engine braking on
downgrades.
1 (First)
Use 1 (Low) to provide maximum
engine braking on steep
downgrades. Upshifts can be made
by shifting to 2 (Second) or to
O/D
ON/OFF
O/ D
OFF
Driving
90
Page 99 of 160
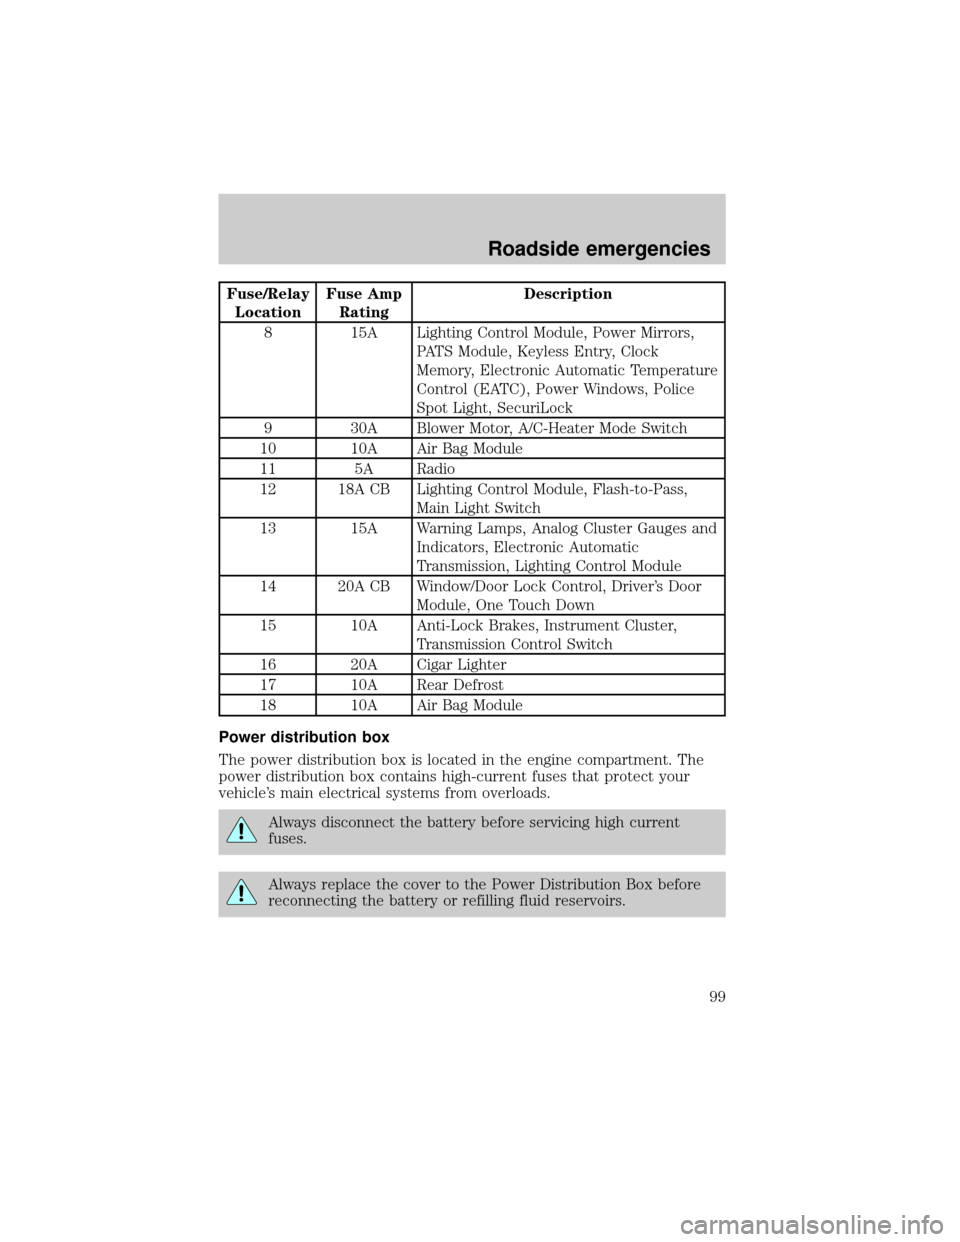
Fuse/Relay
LocationFuse Amp
RatingDescription
8 15A Lighting Control Module, Power Mirrors,
PATS Module, Keyless Entry, Clock
Memory, Electronic Automatic Temperature
Control (EATC), Power Windows, Police
Spot Light, SecuriLock
9 30A Blower Motor, A/C-Heater Mode Switch
10 10A Air Bag Module
11 5A Radio
12 18A CB Lighting Control Module, Flash-to-Pass,
Main Light Switch
13 15A Warning Lamps, Analog Cluster Gauges and
Indicators, Electronic Automatic
Transmission, Lighting Control Module
14 20A CB Window/Door Lock Control, Driver's Door
Module, One Touch Down
15 10A Anti-Lock Brakes, Instrument Cluster,
Transmission Control Switch
16 20A Cigar Lighter
17 10A Rear Defrost
18 10A Air Bag Module
Power distribution box
The power distribution box is located in the engine compartment. The
power distribution box contains high-current fuses that protect your
vehicle's main electrical systems from overloads.
Always disconnect the battery before servicing high current
fuses.
Always replace the cover to the Power Distribution Box before
reconnecting the battery or refilling fluid reservoirs.
Roadside emergencies
99
Page 106 of 160
Connecting the jumper cables
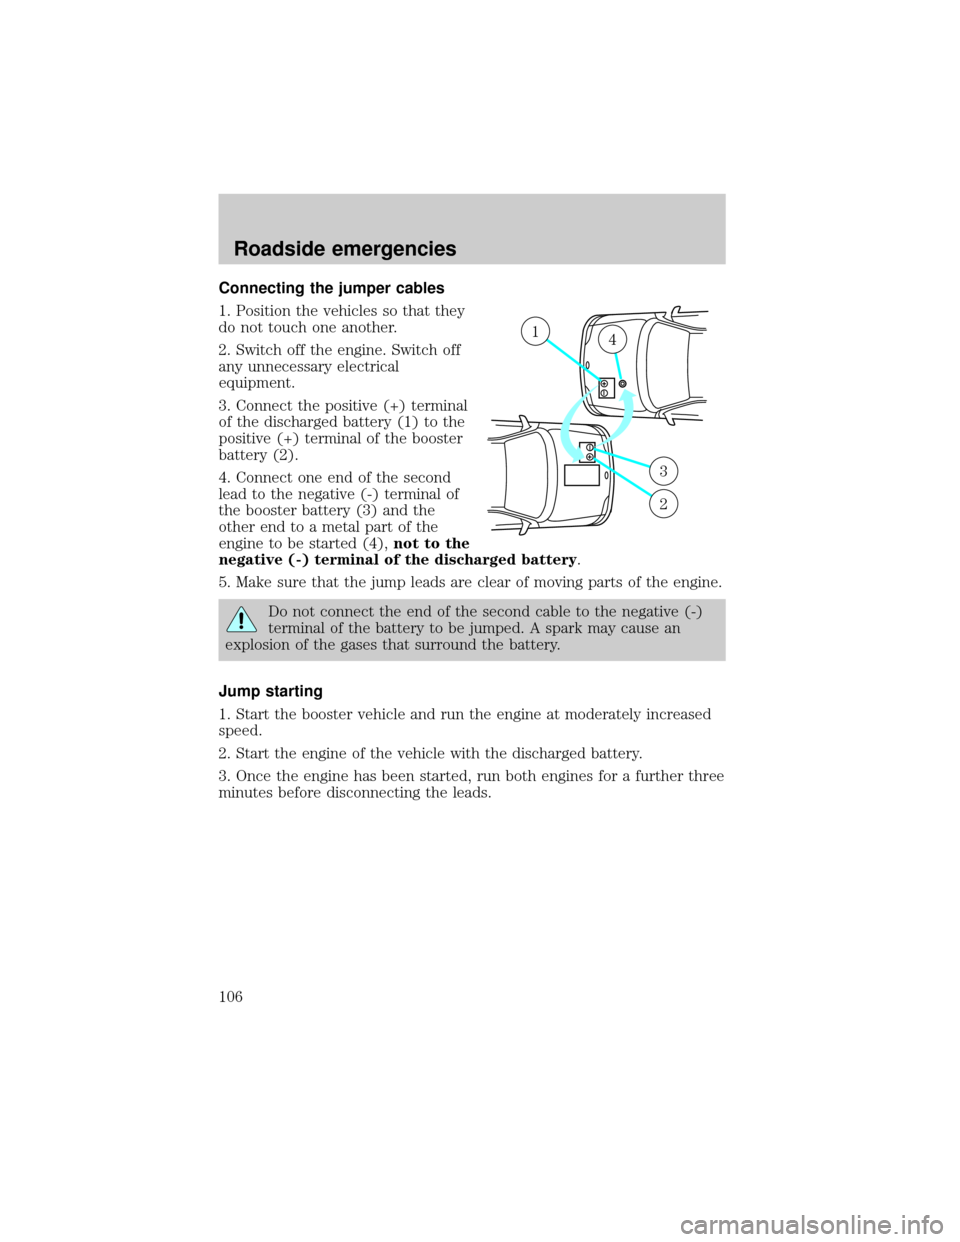
1. Position the vehicles so that they
do not touch one another.
2. Switch off the engine. Switch off
any unnecessary electrical
equipment.
3. Connect the positive (+) terminal
of the discharged battery (1) to the
positive (+) terminal of the booster
battery (2).
4. Connect one end of the second
lead to the negative (-) terminal of
the booster battery (3) and the
other end to a metal part of the
engine to be started (4),not to the
negative (-) terminal of the discharged battery.
5. Make sure that the jump leads are clear of moving parts of the engine.
Do not connect the end of the second cable to the negative (-)
terminal of the battery to be jumped. A spark may cause an
explosion of the gases that surround the battery.
Jump starting
1. Start the booster vehicle and run the engine at moderately increased
speed.
2. Start the engine of the vehicle with the discharged battery.
3. Once the engine has been started, run both engines for a further three
minutes before disconnecting the leads.
+–
+–
14
3
2
Roadside emergencies
106