1998 DODGE RAM 1500 lock
[x] Cancel search: lockPage 2306 of 2627

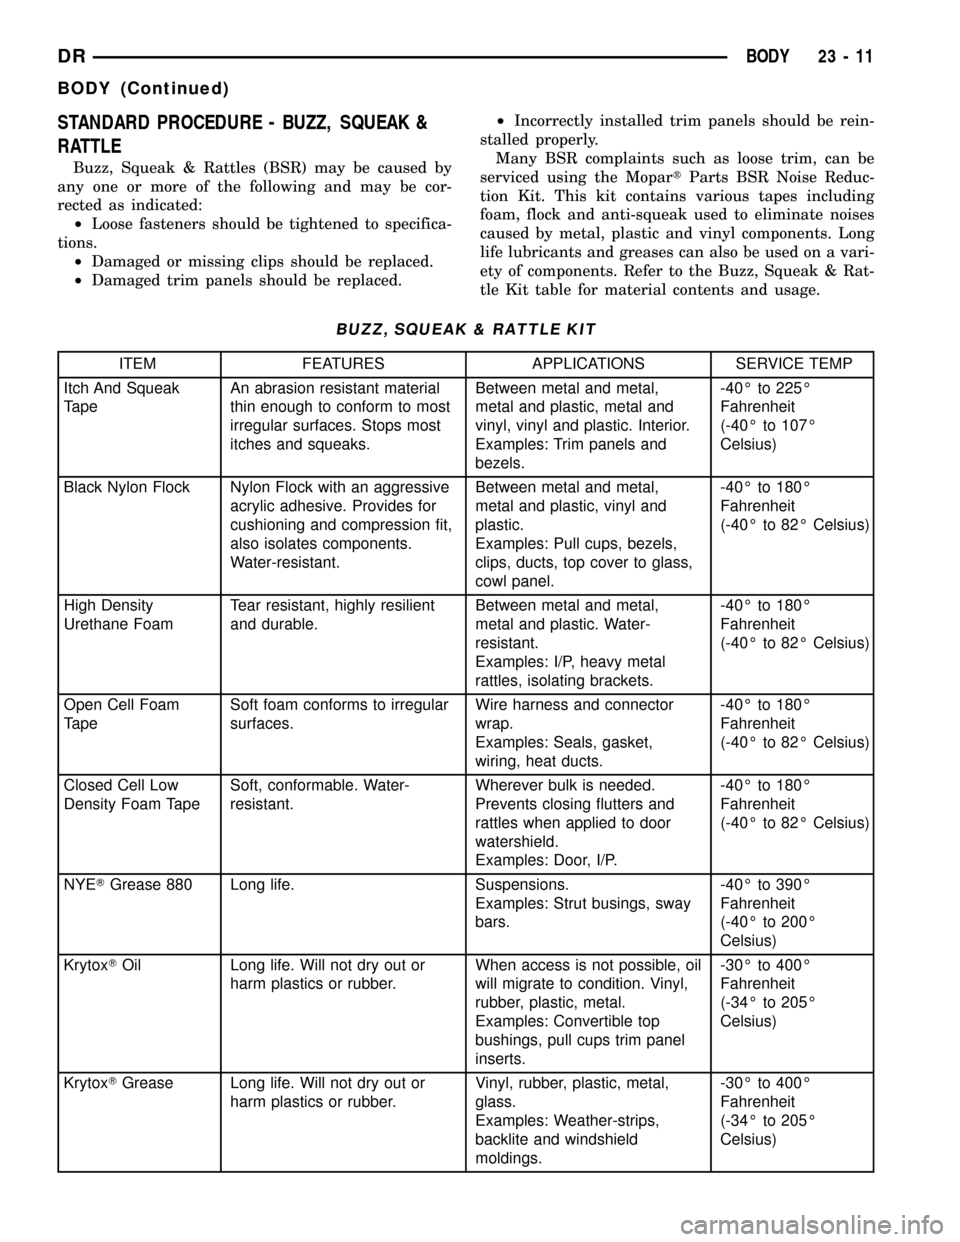
STANDARD PROCEDURE - BUZZ, SQUEAK &
RATTLE
Buzz, Squeak & Rattles (BSR) may be caused by
any one or more of the following and may be cor-
rected as indicated:
²Loose fasteners should be tightened to specifica-
tions.
²Damaged or missing clips should be replaced.
²Damaged trim panels should be replaced.²Incorrectly installed trim panels should be rein-
stalled properly.
Many BSR complaints such as loose trim, can be
serviced using the MopartParts BSR Noise Reduc-
tion Kit. This kit contains various tapes including
foam, flock and anti-squeak used to eliminate noises
caused by metal, plastic and vinyl components. Long
life lubricants and greases can also be used on a vari-
ety of components. Refer to the Buzz, Squeak & Rat-
tle Kit table for material contents and usage.
BUZZ, SQUEAK & RATTLE KIT
ITEM FEATURES APPLICATIONS SERVICE TEMP
Itch And Squeak
TapeAn abrasion resistant material
thin enough to conform to most
irregular surfaces. Stops most
itches and squeaks.Between metal and metal,
metal and plastic, metal and
vinyl, vinyl and plastic. Interior.
Examples: Trim panels and
bezels.-40É to 225É
Fahrenheit
(-40É to 107É
Celsius)
Black Nylon Flock Nylon Flock with an aggressive
acrylic adhesive. Provides for
cushioning and compression fit,
also isolates components.
Water-resistant.Between metal and metal,
metal and plastic, vinyl and
plastic.
Examples: Pull cups, bezels,
clips, ducts, top cover to glass,
cowl panel.-40É to 180É
Fahrenheit
(-40É to 82É Celsius)
High Density
Urethane FoamTear resistant, highly resilient
and durable.Between metal and metal,
metal and plastic. Water-
resistant.
Examples: I/P, heavy metal
rattles, isolating brackets.-40É to 180É
Fahrenheit
(-40É to 82É Celsius)
Open Cell Foam
TapeSoft foam conforms to irregular
surfaces.Wire harness and connector
wrap.
Examples: Seals, gasket,
wiring, heat ducts.-40É to 180É
Fahrenheit
(-40É to 82É Celsius)
Closed Cell Low
Density Foam TapeSoft, conformable. Water-
resistant.Wherever bulk is needed.
Prevents closing flutters and
rattles when applied to door
watershield.
Examples: Door, I/P.-40É to 180É
Fahrenheit
(-40É to 82É Celsius)
NYETGrease 880 Long life. Suspensions.
Examples: Strut busings, sway
bars.-40É to 390É
Fahrenheit
(-40É to 200É
Celsius)
KrytoxTOil Long life. Will not dry out or
harm plastics or rubber.When access is not possible, oil
will migrate to condition. Vinyl,
rubber, plastic, metal.
Examples: Convertible top
bushings, pull cups trim panel
inserts.-30É to 400É
Fahrenheit
(-34É to 205É
Celsius)
KrytoxTGrease Long life. Will not dry out or
harm plastics or rubber.Vinyl, rubber, plastic, metal,
glass.
Examples: Weather-strips,
backlite and windshield
moldings.-30É to 400É
Fahrenheit
(-34É to 205É
Celsius)
DRBODY 23 - 11
BODY (Continued)
Page 2310 of 2627

TAILGATE
TABLE OF CONTENTS
page page
CHECK CABLE
REMOVAL.............................15
INSTALLATION.........................15
COVER
REMOVAL.............................16
INSTALLATION.........................16
HINGE
REMOVAL.............................16
INSTALLATION.........................16
LATCH
REMOVAL.............................16INSTALLATION.........................16
LATCH STRIKER
REMOVAL.............................16
INSTALLATION.........................17
RELEASE HANDLE/LATCH REMOTE
REMOVAL.............................17
INSTALLATION.........................17
TAILGATE
REMOVAL.............................17
INSTALLATION.........................17
CHECK CABLE
REMOVAL
(1) Open tailgate.
(2) Pry lock tab outward to clear stud head on
cargo box (Fig. 1).
(3) Push cable end forward until stud head is in
clearance hole portion of cable end.
(4) Separate cable end from stud.
(5) Remove screw attaching cable to tailgate. (Fig.
2)
(6) Separate check cable from tailgate.
INSTALLATION
(1) Position check cable on tailgate.
(2) Install bolt attaching small end of cable to tail-
gate.
(3) Tighten tailgate check cable bolt to 23 N´m (17
ft. lbs.).
(4) Position large end of cable onto stud head and
slide downward to secure lock tab.
Fig. 1 Tailgate Check
1 - TAILGATE STRIKER
2 - SCREW DRIVER
3 - TAILGATE CHECK CABLE
4 - LOCK TAB
Fig. 2 LATCH HANDLE - LATCH
1 - EXTERIOR HANDLE
2 - CONTROL ASSEMBLY
3 - NUTS (2)
4 - TAILGATE
5-LATCH
6 - CHECK CABLE
7 - CHECK/LATCH BOLT
8 - LATCH BOLT
DRTAILGATE 23 - 15
Page 2313 of 2627

DOOR - FRONT
TABLE OF CONTENTS
page page
DOOR
REMOVAL.............................18
INSTALLATION.........................18
ADJUSTMENTS
ADJUSTMENT........................19
DOOR GLASS
REMOVAL.............................20
INSTALLATION.........................20
EXTERIOR HANDLE
REMOVAL.............................20
INSTALLATION.........................21
GLASS RUN CHANNEL
REMOVAL.............................21
INSTALLATION.........................22
HINGE
REMOVAL.............................22
INSTALLATION.........................22
INSIDE HANDLE ACTUATOR
REMOVAL.............................22
INSTALLATION.........................22
LATCH
REMOVAL.............................23
INSTALLATION.........................23
ADJUSTMENTS
ADJUSTMENT........................23LATCH STRIKER
REMOVAL.............................23
INSTALLATION.........................23
ADJUSTMENTS
ADJUSTMENT........................24
LOCK CYLINDER
REMOVAL.............................24
INSTALLATION.........................24
TRIM PANEL
REMOVAL.............................24
INSTALLATION.........................24
WATERDAM
REMOVAL.............................25
INSTALLATION.........................25
WINDOW REGULATOR - POWER
REMOVAL.............................25
INSTALLATION.........................26
WINDOW REGULATOR - MANUAL
REMOVAL.............................26
INSTALLATION.........................27
SIDE VIEW MIRROR FLAG
REMOVAL.............................27
INSTALLATION.........................27
DOOR
REMOVAL
(1) Disconnect the door wire harness electrical con-
nector at the A-pillar. (Fig. 1)
(2) Using a grease pencil or equivalent, mark the
outline of the door hinges on the door to aid in instal-
lation.
(3) Support the door with a suitable lifting device.
NOTE: The epoxy bonded washers should not be
seperated from the hinge. If the washers are
removed the door may have to be re-adjusted.
(4) Remove the nuts and bolts attaching the door
hinges to the door.
INSTALLATION
(1) Support the door with a suitable lifting device
and install the door onto the hinges.
(2) Install the washers, if there were removed pre-
viously, nuts and tighten to 28 N´m (21 ft. lbs.).
(3) Connect the electrical connectors.
(4) Adjust the door as necessary. (Refer to 23 -
BODY/DOOR - FRONT/DOOR - ADJUSTMENTS)
23 - 18 DOOR - FRONTDR
Page 2315 of 2627

(4) Adjust the door to the correct position. (Refer
to 23 - BODY/BODY STRUCTURE/GAP AND
FLUSH - SPECIFICATIONS)
(5) Tighten the door to hinges fasteners to 28 N´m
(21 ft. lbs.).
(6) Tighten the latch striker bolts. (Refer to 23 -
BODY/DOOR - FRONT/LATCH STRIKER - INSTAL-
LATION)
DOOR GLASS
REMOVAL
(1) Remove the waterdam. (Refer to 23 - BODY/
DOOR - FRONT/WATERDAM - REMOVAL)
(2) Reinstall the window handle, if equipped.
(3) Remove the window switch from the door trim
panel and reconnect it to the door wire harness, if
equipped.
(4) Raise the window to the position shown and
remove the two nuts attaching the glass to the win-
dow regulator. (Fig. 2)
(5) Remove the two front run channel screws.
(Refer to 23 - BODY/DOOR - FRONT/GLASS RUN
CHANNEL - REMOVAL)
(6) Remove the inner belt molding. (Refer to 23 -
BODY/WEATHERSTRIP/SEALS/FRONT DOOR
INNER BELT WEATHERSTRIP - REMOVAL)
(7) Disengage the glass from the regulator and
lower into the door.
(8) Twist the glass forward in the door window
opening and remove.
INSTALLATION
(1) Position the glass into the window opening.(2) Engage the glass into the glass run weather-
strip.
(3) Raise the glass within the door opening and
connect the window regulator to the lift plate.
(4) Install the nuts and tighten to 10 N´m (89 in.
lbs.).
(5) Install the inner belt molding. (Refer to 23 -
BODY/WEATHERSTRIP/SEALS/FRONT DOOR
INNER BELT WEATHERSTRIP - INSTALLATION)
(6) Position the front run channel and install the
screws. (Refer to 23 - BODY/DOOR - FRONT/GLASS
RUN CHANNEL - INSTALLATION)
(7) Remove the window switch from the wire har-
ness, if equipped.
(8) Remove the window handle, if equipped.
(9) Install the waterdam. (Refer to 23 - BODY/
DOOR - FRONT/WATERDAM - INSTALLATION)
EXTERIOR HANDLE
REMOVAL
(1) Remove the door glass. (Refer to 23 - BODY/
DOOR - FRONT/DOOR GLASS - REMOVAL)
(2) Disconnect the lock switch electrical connector,
if equipped. (Fig. 3)
(3) Disconnect the actuator rods at the handle.
(4) Remove the nuts and remove the handle.
Fig. 2 DOOR GLASS POSITIONING
1 - SIGHT WINDOW
2 - WIDOW REGULATOR
3 - SIGHT WINDOW
4 - REGULATOR STABILIZER
Fig. 3 EXTERIOR HANDLE
1 - EXTERIOR HANDLE
2 - NUTS (2)
3 - ELECTRICAL CONNECTOR
4 - FRONT DOOR
5 - DOOR LATCH ASSEMBLY
6 - LATCH ACTUATOR ROD
7 - LOCK SWITCH WIRE HARNESS
8 - KEY CYLINDER ACTUATOR ROD
23 - 20 DOOR - FRONTDR
DOOR (Continued)
Page 2316 of 2627

INSTALLATION
(1) Install the exterior handle and install the nuts.
(2) Connect the actuator rods at the handle
(3) Connect the lock switch electrical connector, if
equipped.
(4) Install the door glass. (Refer to 23 - BODY/
DOOR - FRONT/DOOR GLASS - INSTALLATION)
GLASS RUN CHANNEL
REMOVAL
(1) Raise glass into the full up position.
(2) Remove the waterdam. (Refer to 23 - BODY/
DOOR - FRONT/WATERDAM - REMOVAL)
FRONT RUN CHANNEL
(1) Remove the window regulator. (Refer to 23 -
BODY/DOOR - FRONT/WINDOW REGULATOR -
REMOVAL)
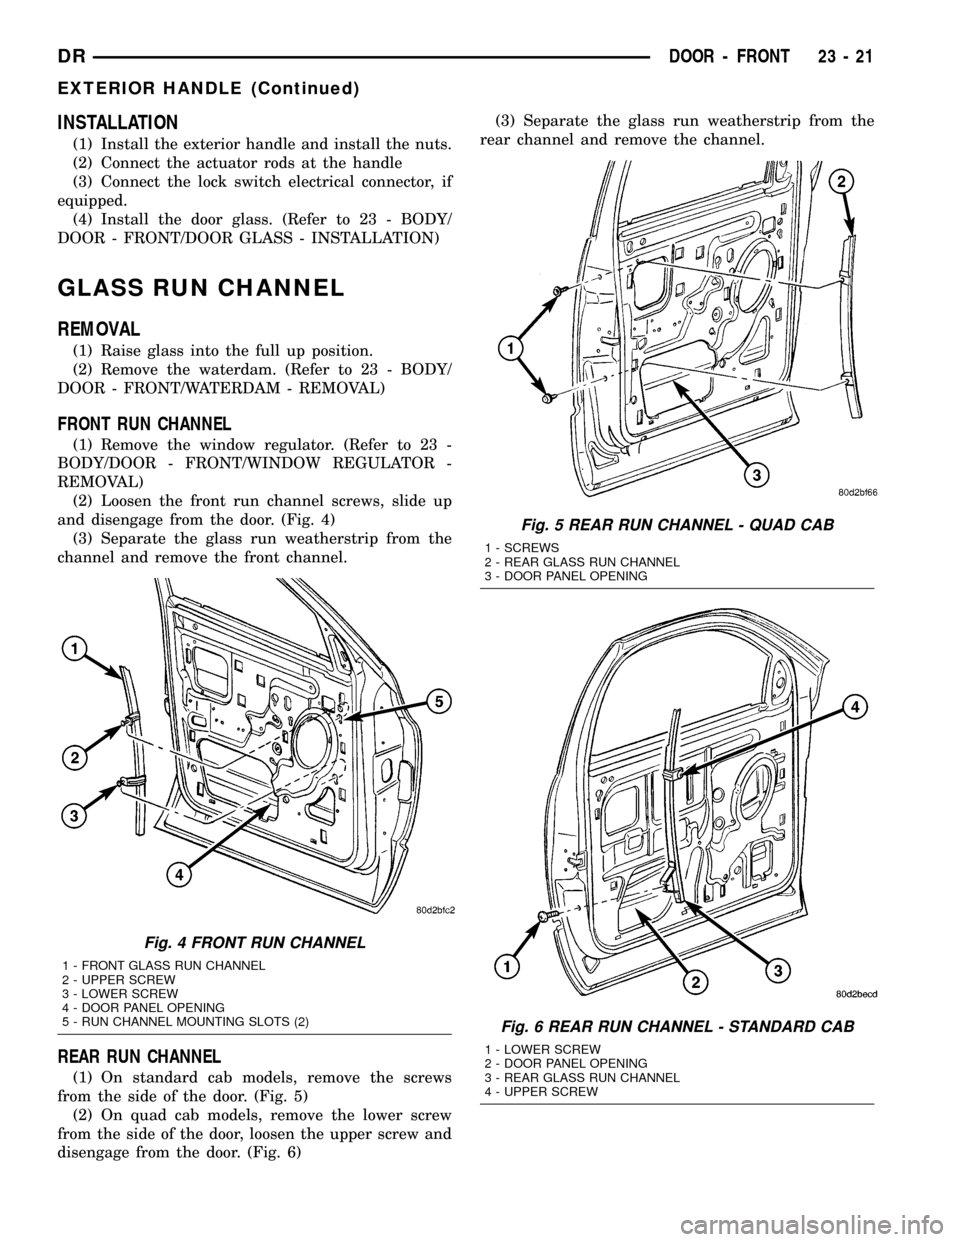
(2) Loosen the front run channel screws, slide up
and disengage from the door. (Fig. 4)
(3) Separate the glass run weatherstrip from the
channel and remove the front channel.
REAR RUN CHANNEL
(1) On standard cab models, remove the screws
from the side of the door. (Fig. 5)
(2) On quad cab models, remove the lower screw
from the side of the door, loosen the upper screw and
disengage from the door. (Fig. 6)(3) Separate the glass run weatherstrip from the
rear channel and remove the channel.
Fig. 4 FRONT RUN CHANNEL
1 - FRONT GLASS RUN CHANNEL
2 - UPPER SCREW
3 - LOWER SCREW
4 - DOOR PANEL OPENING
5 - RUN CHANNEL MOUNTING SLOTS (2)
Fig. 5 REAR RUN CHANNEL - QUAD CAB
1 - SCREWS
2 - REAR GLASS RUN CHANNEL
3 - DOOR PANEL OPENING
Fig. 6 REAR RUN CHANNEL - STANDARD CAB
1 - LOWER SCREW
2 - DOOR PANEL OPENING
3 - REAR GLASS RUN CHANNEL
4 - UPPER SCREW
DRDOOR - FRONT 23 - 21
EXTERIOR HANDLE (Continued)
Page 2319 of 2627

ADJUSTMENTS
ADJUSTMENT
(1) Using a grease pencil or equivalent, mark the
position of the striker to aid in adjustment.
(2) Loosen the striker bolts.
(3) Change the striker position to adjust the rear
gap and flush measurement. (Refer to 23 - BODY/
BODY STRUCTURE/GAP AND FLUSH - SPECIFI-
CATIONS)
(4) Tighten the bolts to 28 N´m (21 ft. lbs.).
LOCK CYLINDER
REMOVAL
(1) Remove the exterior handle. (Refer to 23 -
BODY/DOOR - FRONT/EXTERIOR HANDLE -
REMOVAL)
(2) Remove the clip and remove the lock cylinder
lever and switch, if equipped.
(3) Remove the screw and remove the lock cylin-
der. (Fig. 11)
INSTALLATION
(1) Install the lock cylinder and install the screw.
(2) Install the lock cylinder switch, if equipped,
lever and retaining clip.
(3) Install the exterior handle. (Refer to 23 -
BODY/DOOR - FRONT/EXTERIOR HANDLE -
INSTALLATION)
TRIM PANEL
REMOVAL
(1) Remove the window crank, if equipped. (Fig.
13)
(2) Remove the interior handle. (Refer to 23 -
BODY/DOOR - FRONT/INSIDE HANDLE ACTUA-
TOR - REMOVAL)
(3) Remove the screws at the mirror flag and near
the inside handle. (Fig. 12)
CAUTION: Trim panel is attached to the door using
hooks molded into the panel. Do not pull the trim
panel straight off or damage to the panel and/or
power switch assembly may occur.
(4) Lift the trim panel up off the belt seal and
attachment hooks and separate the panel from the
door slightly.
(5) Disconnect the power window switch electrical
connector, if equipped, and remove the trim panel.
INSTALLATION
(1) Install the window switch into the trim panel,
if equipped.
(2) Position the trim panel onto the lower hooks
and connect the power window switch electrical con-
nector, if equipped.
(3) Position the remaining trim panel attachment
hooks into the door panel and seat the trim panel
into the belt seal fully.
(4) Install the screws near the inside handle and
at the mirror flag.
Fig. 11 LOCK CYLINDER
1 - LOCK CYLINDER
2 - EXTERIOR HANDLE
3 - SCREW
4 - LOCK SWITCH WIRE HARNESS
Fig. 12 TRIM PANEL ASSEMBLY
1 - SCREW INSERT (2)
2 - SCREWS (2)
3 - DOOR TRIM PANEL
4 - LOWER SCREWS (3)
5 - ATTACHMENT HOOKS
23 - 24 DOOR - FRONTDR
LATCH STRIKER (Continued)
Page 2331 of 2627

EXTERIOR
TABLE OF CONTENTS
page page
BODY SIDE MOLDINGS
REMOVAL.............................36
INSTALLATION.........................36
BODY ISOLATORS
REMOVAL.............................36
INSTALLATION.........................37
CARGO BOX
REMOVAL.............................37
INSTALLATION.........................37
CARGO BOX - TIE DOWN
REMOVAL.............................38
INSTALLATION.........................38
COWL GRILLE
REMOVAL.............................38
INSTALLATION.........................38
EXTERIOR NAME PLATES
REMOVAL.............................38
INSTALLATION.........................38
FRONT FENDER
REMOVAL.............................39
INSTALLATION.........................39
FUEL FILL DOOR
REMOVAL.............................39
INSTALLATION.........................39GRILLE
REMOVAL.............................40
INSTALLATION.........................40
GRILLE FRAME
REMOVAL.............................40
INSTALLATION.........................40
FRONT WHEELHOUSE SPLASH SHIELD
REMOVAL.............................41
INSTALLATION.........................41
REAR WHEELHOUSE SPLASH SHIELD
REMOVAL.............................41
INSTALLATION.........................41
SIDE VIEW MIRROR
REMOVAL.............................41
INSTALLATION.........................42
UPPER RADIATOR CROSSMEMBER
REMOVAL.............................42
INSTALLATION.........................42
SIDE VIEW MIRROR GLASS
REMOVAL.............................42
INSTALLATION.........................43
REAR FENDER
REMOVAL.............................44
INSTALLATION.........................44
BODY SIDE MOLDINGS
REMOVAL
NOTE: Body side moldings are attached to the body
panels with adhesive tape.
(1) Apply a length of masking tape on the body
panel, parallel to the top edge of the molding and to
one end to use as a guide for installation, if neces-
sary.
(2) If temperature is below 21ÉC (70ÉF) warm
molding with a heat lamp or gun. Do not exceed 52ÉC
(120ÉF) when heating molding.
(3) Using a trim stick C-4755 or equivalent,
remove and discard the molding from the outside of
the body panel.
INSTALLATION
(1) Thoroughly clean all residue from the body side
molding attachment area of the body panel.(2) Wipe area with a clean lint free cloth moist-
ened with a 50% solution of water and alcohol and
wipe dry immediately with a dry lint free cloth.
(3) Apply new body side molding using the guide
tape on the body panel and apply consistent and uni-
form pressure of approximately 40 p.s.i. over the
entire surface of the molding.
BODY ISOLATORS
REMOVAL
(1) Loosen all cab to frame mounting bolts (six
standard cab, eight quad cab). (Fig. 1)
(2) Remove the mounting bolts and rebound cush-
ions
(3) Using a floor jack and block of wood under the
cab sill, lift the body to gain access to the isolators.
(4) Remove the isolators.
(5) Install new isolators and repeat steps one
through 4, for the opposite side.
23 - 36 EXTERIORDR
Page 2339 of 2627

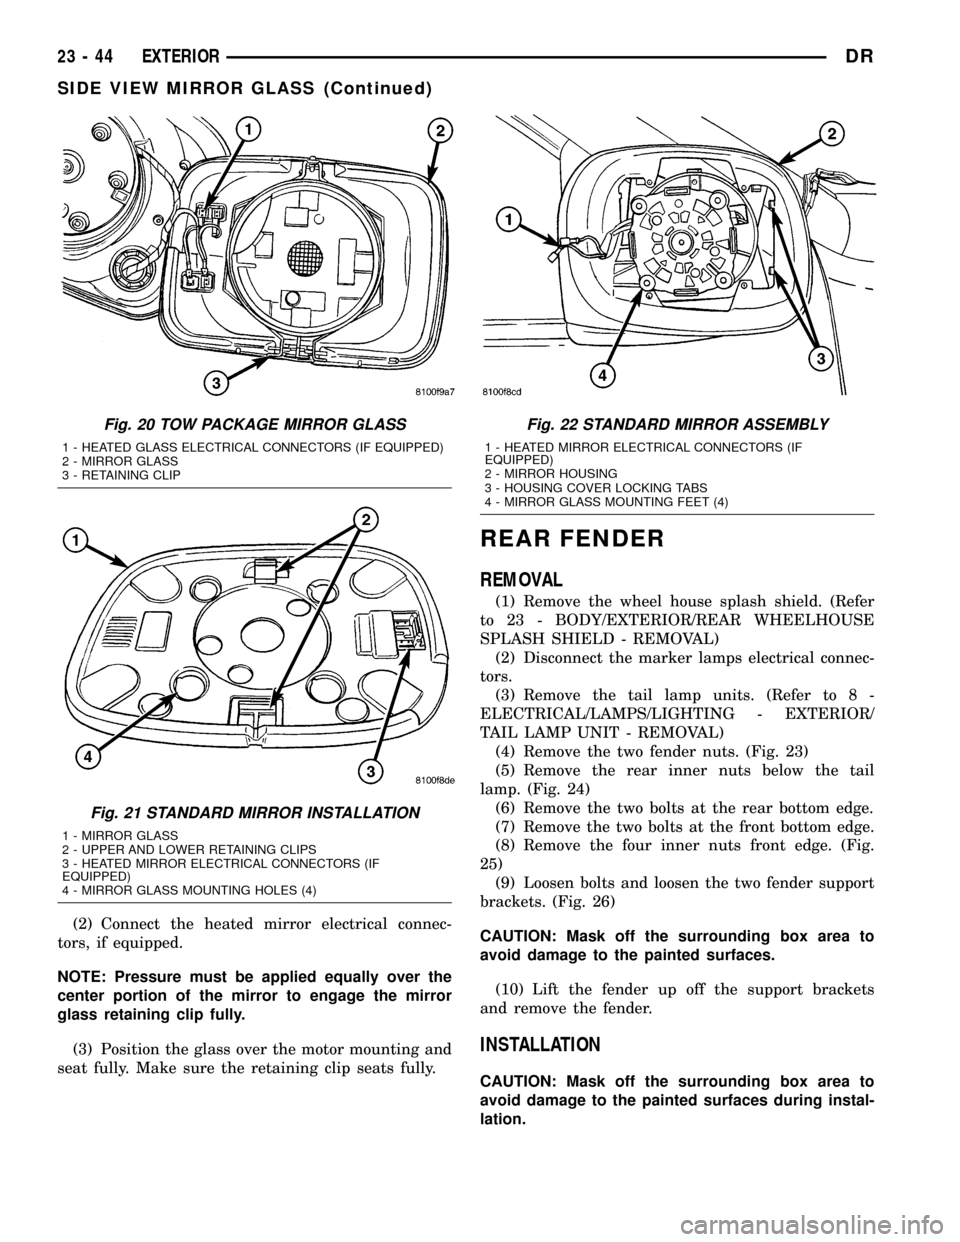
(2) Connect the heated mirror electrical connec-
tors, if equipped.
NOTE: Pressure must be applied equally over the
center portion of the mirror to engage the mirror
glass retaining clip fully.
(3) Position the glass over the motor mounting and
seat fully. Make sure the retaining clip seats fully.
REAR FENDER
REMOVAL
(1) Remove the wheel house splash shield. (Refer
to 23 - BODY/EXTERIOR/REAR WHEELHOUSE
SPLASH SHIELD - REMOVAL)
(2) Disconnect the marker lamps electrical connec-
tors.
(3) Remove the tail lamp units. (Refer to 8 -
ELECTRICAL/LAMPS/LIGHTING - EXTERIOR/
TAIL LAMP UNIT - REMOVAL)
(4) Remove the two fender nuts. (Fig. 23)
(5) Remove the rear inner nuts below the tail
lamp. (Fig. 24)
(6) Remove the two bolts at the rear bottom edge.
(7) Remove the two bolts at the front bottom edge.
(8) Remove the four inner nuts front edge. (Fig.
25)
(9) Loosen bolts and loosen the two fender support
brackets. (Fig. 26)
CAUTION: Mask off the surrounding box area to
avoid damage to the painted surfaces.
(10) Lift the fender up off the support brackets
and remove the fender.
INSTALLATION
CAUTION: Mask off the surrounding box area to
avoid damage to the painted surfaces during instal-
lation.
Fig. 20 TOW PACKAGE MIRROR GLASS
1 - HEATED GLASS ELECTRICAL CONNECTORS (IF EQUIPPED)
2 - MIRROR GLASS
3 - RETAINING CLIP
Fig. 21 STANDARD MIRROR INSTALLATION
1 - MIRROR GLASS
2 - UPPER AND LOWER RETAINING CLIPS
3 - HEATED MIRROR ELECTRICAL CONNECTORS (IF
EQUIPPED)
4 - MIRROR GLASS MOUNTING HOLES (4)
Fig. 22 STANDARD MIRROR ASSEMBLY
1 - HEATED MIRROR ELECTRICAL CONNECTORS (IF
EQUIPPED)
2 - MIRROR HOUSING
3 - HOUSING COVER LOCKING TABS
4 - MIRROR GLASS MOUNTING FEET (4)
23 - 44 EXTERIORDR
SIDE VIEW MIRROR GLASS (Continued)