1998 CHEVROLET VENTURE glove box
[x] Cancel search: glove boxPage 351 of 474

Checking or Replacing the Air Cleaner
1. Unlatch the two hooks on top of the air
cleaner housing.
2. Turn back the air inlet panel and rest it on top of the
housing. The air intake tube is designed to flex back;
you do not need to disconnect it.
3. After replacing the air cleaner filter, seat the tabs on
the bottom of the panel into the slots at the bottom.
4. Latch the hooks to secure the panel in place. If the
panel moves easily, check that the tabs
are seated
correctly in
the slots.
Operating the engine with the
air cleaner off can
cause you or others to be burned. The air cleaner
not only cleans the air, it stops flame
if the engine
backfires.
If it isn’t there, and the engine
backfires, you could be burned. Don’t drive with
it
off, and be careful working on the engine with
the air cleaner
off.
NOTICE:
If the air cleaner is off, a backfire can cause a
damaging engine fire. And, dirt can easily get
into your engine, which will damage it. Always
have the air cleaner in place when you’re driving.
Passenger Compartment Air
Filter Replacement
Passenger compartment air, both outside and
recirculated air, is routed through
a passenger
compartment filter, which is part of
a two-piece filter
system. The filter removes certain contaminants from
the air, including pollen and dust particles. Reductions
in airflow, which may occur more quickly in dusty
areas, indicate that the filter needs
to be replaced early.
For how often to change the air filter, see “Maintenance
Schedule” in the Index.
The access panel for the air filter is in the back
of the
glove box.
ProCarManuals.com
Page 352 of 474

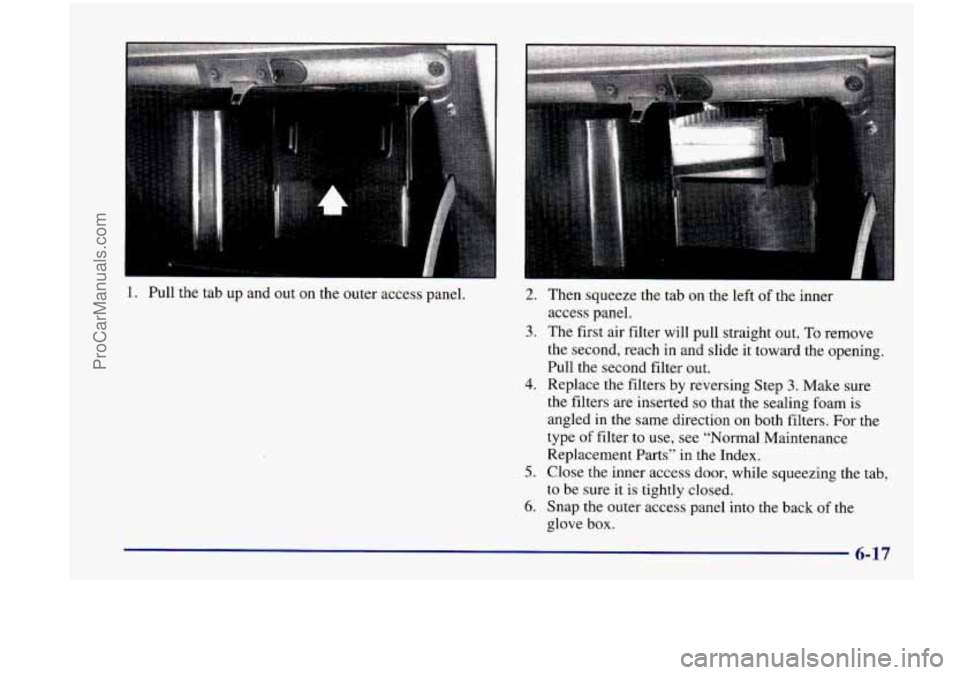
1. Pull the tab up and out on the outer access panel. 2.
3.
4.
5.
6.
Then squeeze the tab on the left of the inner
access panel.
The first air filter will pull straight out.
To remove
the second, reach in and slide it toward the opening.
Pull the second filter out.
Replace the filters by reversing Step
3. Make sure
the filters are inserted
so that the sealing foam is
angled in
the same direction on both filters. For the
type
of filter to use, see “Normal Maintenance
Replacement Parts”
in the Index.
Close the inner access door, while saueezing the tab,
to be sure it is tightly closed.
Snap the outer access panel into the back of
the
glove box.
6-17
ProCarManuals.com
Page 393 of 474

Fuses and Circuit Breakers
The wiring circuits in your vehicle are protected from
short circuits by a combination of fuses, circuit breakers
and fusible thermal links.
Look at the silver-colored band inside the fuse. If
the
band is broken or melted, replace the fuse. Be sure you
replace a bad fuse with a new one of the identical size
and rating.
If you ever have a problem on the road and don’t have
a spare fuse, you can borrow one that has the same
amperage or use one of the spare fuses in the underhood
fuse and relay center. Just pick some feature of your
vehicle that you can get along without
-- like the radio
or cigarette lighter -- and use its fuse, if it is the right
amperage. Replace it as
soon as you can.
There are two fuse blocks in your vehicle: the
instrument panel fuse block and the underhood fuse
and relay center.
Instrument Panel Fuse Block
The instrument panel
fuse block is to the right
of the glove box. Pull the
door open to access the
instrument panel fuse block.
6-58
ProCarManuals.com
Page 433 of 474

At Least Twice a Year
Restraint System Check
Make sure the safety belt reminder light and all your
belts, buckles, latch plates, retractors and anchorages are
working properly. If your vehicle has a built-in child
restraint, also periodically make sure the harness straps,
latch plates, buckle, clip, child head restraint and
anchorages are working properly.
Look for any other
loose or damaged safety belt and built-in child restraint
system
parts. If you see anything that might keep a
safety belt or built-in child restraint system from doing
its job, have it repaired. Have any torn or frayed safety
belts or harness straps replaced.
Also look for
any opened or broken air bag coverings,
and have them repaired or replaced. (The air bag system
does not need regular maintenance.)
Wiper Blade Check
Inspect wiper blades for wear or cracking. Replace blade
inserts that appear worn or damaged or that streak or
miss areas of the windshield. Also see “Wiper Blades,
Cleaning”
in the Index.
Automatic Transaxle Check
Check the transaxle fluid level; add if needed. See
“Automatic Transaxle” in the Index. A fluid loss may
indicate
a problem. Check the system and repair if needed.
At Least Once a Year
Key Lock Cylinders Service
Lubricate the key lock cylinders with the lubricant
specified in
Part D.
Body Lubrication Service
Lubricate all body door hinges, including the liftgate.
Also lubricate all hinges and latches, including those for
the hood, power sliding door cable, rear compartment,
glove box door and any folding seat hardware.
Part D
tells you what to use. More frequent lubrication may be
required when exposed to a corrosive environment.
7-30
ProCarManuals.com
Page 462 of 474

Front Seat Storage Net ........................... 2-71
Front Sidemarker Lamp Bulb Replacement
........... 6-36
Front Towing
.................................. 5-10
Fuel
.......................................... 6-3
Filling Your Tank
.............................. 6-5
Gage
....................................... 2-97
In Foreign Countries ........................... 6-5
Fuses and Circuit Breakers ....................... 6-58
Gages Engine Coolant Temperature
.................... 2-9 1
Fuel ....................................... 2-97
Speedometer
................................. 2-85
Garage Door Opener Compartment
................. 2-67
Gear Positions. Automatic Transaxle
................ 2-30
GloveBox
.................................... 2-66
Gross Axle Weight Rating
........................ 4-31
Gross Vehicle Weight Rating
...................... 4-30
Guide en Franpis
11
GAWR ....................................... 4-31
.. .................................
GVWR ....................................... 4-30
Halogen Bulbs
................................ 6-31
Hazard Warning Flashers
.......................... 5-2
Head Restraints
................................. 1-6
Headlamps
.................................... 2-60
Bulb Replacement ............................ 6-3 1
OnReminder ................................ 2-60
Wiring
..................................... 6-57
HighLow Beam Changer ...................... 2-54
Hearing Impaired. Customer Assistance
.............. 8-4 Heating
........................................ 3-4
High-BeamHeadlamps
.......................... 2-54
Highway Hypnosis
.............................. 4-24
Hill and Mountain Roads
......................... 4-24
Hitches. Trailer
................................. 4-36
Hood
Checking Things Under ......................... 6-8
Prop ........................................ 6-9
Release ...................................... 6-8
Horn ......................................... 2-52
Hydroplaning .................................. 4-20
Ignition Positions
.............................. 2-26
Ignition Transaxle Lock Check
.................... 7-32
Illuminated Entry
............................... 2-62
Inflation. Tire
.................................. 6-41
Inflator. Air
................................... 2-78
Inside Daymight Rearview Mirror
................. 2-65
Inspections
Brake System
................................ 7-33
Exhaust Systems
............................. 7-33
Front Drive Axle Boot ......................... 7-33
Front Drive Axle Seal
......................... 7-33
Radiator and Heater Hose
...................... 7-33
Steering
.................................... 7-33
Suspension
.................................. 7-33
Throttle
System .............................. 7-33
InstrumentPanel
............................... 2-82
Cleaning
.................................... 6-50
Cluster ..................................... 2-84
FuseBlock
.................................. 6-58
Light Intensity Control ......................... 2-61
ProCarManuals.com