1998 CHEVROLET CAVALIER ECO mode
[x] Cancel search: ECO modePage 167 of 400
Downloaded from www.Manualslib.com manuals search engine P.SCAN: Press this button to listen to each of your
favorite stations stored on your pushbuttons for a few
seconds. The radio will scan through each of the stations
stored on your pushbuttons, except those stations with
weak reception. The AUTO TONE setting stored for
that pushbutton will be automatically chosen. Press P.SCAN or one of the pushbuttons again to stop
scanning. P.SCAN will be displayed whenever the tuner
is in the P.SCAN mode. The channel number (Pl-P6)
will appear momentarily just before the frequency is
displayed. In
FM mode, this function will scan through
both
FM1 and FM2 preset stations and FMl or FM2 will
appear on the display.
Setting the Tone
BASS: Press this knob lightly so it extends. Turn the
knob to the right to increase bass and to the left
to
decrease bass. When you use this control, the radio’s
AUTO TONE setting will switch to manual and the
AUTO TONE display will go blank.
TREB: Press this knob lightly so it extends. Turn the
knob to the right to increase treble and to the
left to
decrease treble. When you use this control,
the radio’s
AUTO TONE setting will switch to manual and the
AUTO TONE display will go blank.
If a station is weak
or noisy, you may want
to decrease the treble. Push these knobs back into their stored positions when
you’re not using them.
AUTO TONE: This feature allows you to choose preset
bass and treble equalization settings designed for
country/western, classical, news, rock, pop and jazz
stations.
CN will appear on the display when you first
press
AUTO TONE. Each time you press it, another
setting will appear on the display. Press it again after
JAZZ appears and the AUTO TONE display will go
blank. Tone control will return to the BASS and TREB knobs. Also,
if you use the BASS and TREB knobs,
control will return to them and the AUTO TONE
display will go blank. Use PUSHBUTTONS to program
AUTO TONE.
Adjusting the Speakers
BAL: Press this knob lightly so it extends. Turn the
knob to the right for the right speakers and to the left
for the left speakers. The middle position balances the
sound between the speakers.
FADE: Press this knob lightly so it extends. Turn the
knob to the right to adjust the sound to the front
speakers and to the left for the rear speakers. The middle
position balances the sound between the speakers.
Push these knobs back into their stored positions when you’re not using them.
3-13
Page 171 of 400
Downloaded from www.Manualslib.com manuals search engine SCAN: Press one of the SEEK arrows for two seconds,
and SCAN will appear on the display. Use SCAN to
listen to stations for a few seconds. The radio will
go to
a station, stop for a few seconds, then go on to the next
station. Press
SEEK again to stop scanning. The sound
will mute while scanning.
PUSHBUTTONS: The six numbered pushbuttons let
you return to your favorite stations. You can set
up to
18 stations (six AM, six FM1 and six FM2). Just:
1.
2.
3.
4.
5.
6.
Turn the radio on.
Press AM-FM to select the band.
Tune in the desired station.
Press AUTO TONE to select the equalization that
best suits the type of station selected.
Press and hold one
of the six numbered buttons. The
sound will mute. When it returns, release the button.
Whenever you press that numbered button, the
station you set will return and the AUTO TONE
equalization that you selected will also be
automatically selected for that button.
Repeat the steps for each pushbutton.
P.SCAN: Press this button to listen to each of your
favorite stations stored on your pushbuttons for
a few
seconds. The radio will scan through each
of the stations stored
on your pushbuttons, except those stations with
weak reception. The
AUTO TONE setting stored for
that pushbutton will be automatically chosen. Press
PSCAN or one of the pushbuttons again to stop
scanning. PSCAN will be displayed whenever the tuner
is in the P.SCAN mode. The channel number (Pl-P6)
will appear momentarily just before the frequency is
displayed. In
FM mode, this function will scan through
both FM 1 and FM2 preset stations and
FM 1 or FM2 will
appear on the display.
Setting the Tone
BASS: Press this knob lightly so it extends. Turn the
knob to the right to increase bass and to the left to
decrease bass. When you use this control, the radio’s
AUTO TONE setting will switch
to manual and the
AUTO TONE display will
go blank.
TREB: Press this knob lightly so it extends. Turn the
knob to the right to increase treble and to the left to
decrease treble. When you use this control, the radio’s
AUTO TONE setting will switch to manual and the
AUTO TONE display will
go blank. If a station is weak
or noisy, you may want to decrease the treble.
Push these knobs back into their stored positions when
you’re not using them.
3-17
Page 181 of 400
Downloaded from www.Manualslib.com manuals search engine a Section 4 Your Driving and the Road
Here you’ll find information about driving on different kinds\
of roads and in varying weather conditions. We’ve also
included many other useful tips on driving.
4-2
4-3
4-5 4-6
4- 10
4-12
4- 12
4-
14
4-15
4- 16
4- 19
4-20 Defensive Driving
Drunken Driving
Control
of a Vehicle
Braking Steering
Off-Road Recovery
Passing
Loss of Control
Driving at Night Driving in Rain and on Wet Roads
City Driving
Freeway Driving 4-2 1
4-22
4-22
4-24
4-28
4-3
1
4-33
4-40 Before Leaving on
a Long Trip
Highway Hypnosis
Hill and Mountain Roads
Winter Driving
Recreational Vehicle Towing
Loading Your Vehicle
Towing a Trailer (Models with 2.4L Engine
and 4-Speed Automatic Transaxle)
Towing a Trailer (Except Models
with 2.4L Engine and 4-Speed
Automatic Transaxle)
Page 213 of 400
Downloaded from www.Manualslib.com manuals search engine Towing a Trailer (Models with
2.4L Engine and 4-Speed
Automatic Transaxle)
I--
If you don’t use the correct equipment and drive
properly, you can lose control when you pull a
trailer. For example,
if the trailer is too heavy, the
brakes may not work well
-- or even at all. You
and your passengers could be seriously injured.
You may also damage your vehicle; the resulting
repairs would not be covered by your warranty.
Pull
a trailer only if you have followed all the
steps in this section. Ask your dealer for advice
and information about towing a trailer with
your vehicle.
Do not tow a trailer if your vehicle is equipped with a
2.2L (Code 4) engine. You also cannot tow a trailer if
your vehicle is equipped with a manual or a three-speed
automatic transaxle, or is a convertible model. Your
vehicle can tow a trailer if it is equipped with a
2.4L engine and 4 speed automatic transaxle and the
proper trailer towing equipment.
To identify what the
vehicle trailering capacity is for your vehicle, you
should read the information
in “Weight of the Trailer”
that appears later in this section. But trailering is
different than just driving your vehicle by itself.
Trailering means changes in handling, durability and
fuel economy. Successful, safe trailering takes correct
equipment, and
it has to be used properly.
That’s the reason for this part. In it
are many
time-tested, important trailering tips and safety rules.
Many of these are important for your safety and that of
your passengers.
So please read this section carefully
before you pull a trailer.
Load-pulling components such as the engine, transaxle,
wheel assemblies and tires are forced to work harder
against the drag of the added weight. The engine is
required to operate at relatively higher speeds and under
greater loads, generating extra heat. What’s more, the
trailer adds considerably to wind resistance, increasing
the pulling requirements.
4-33
Page 321 of 400
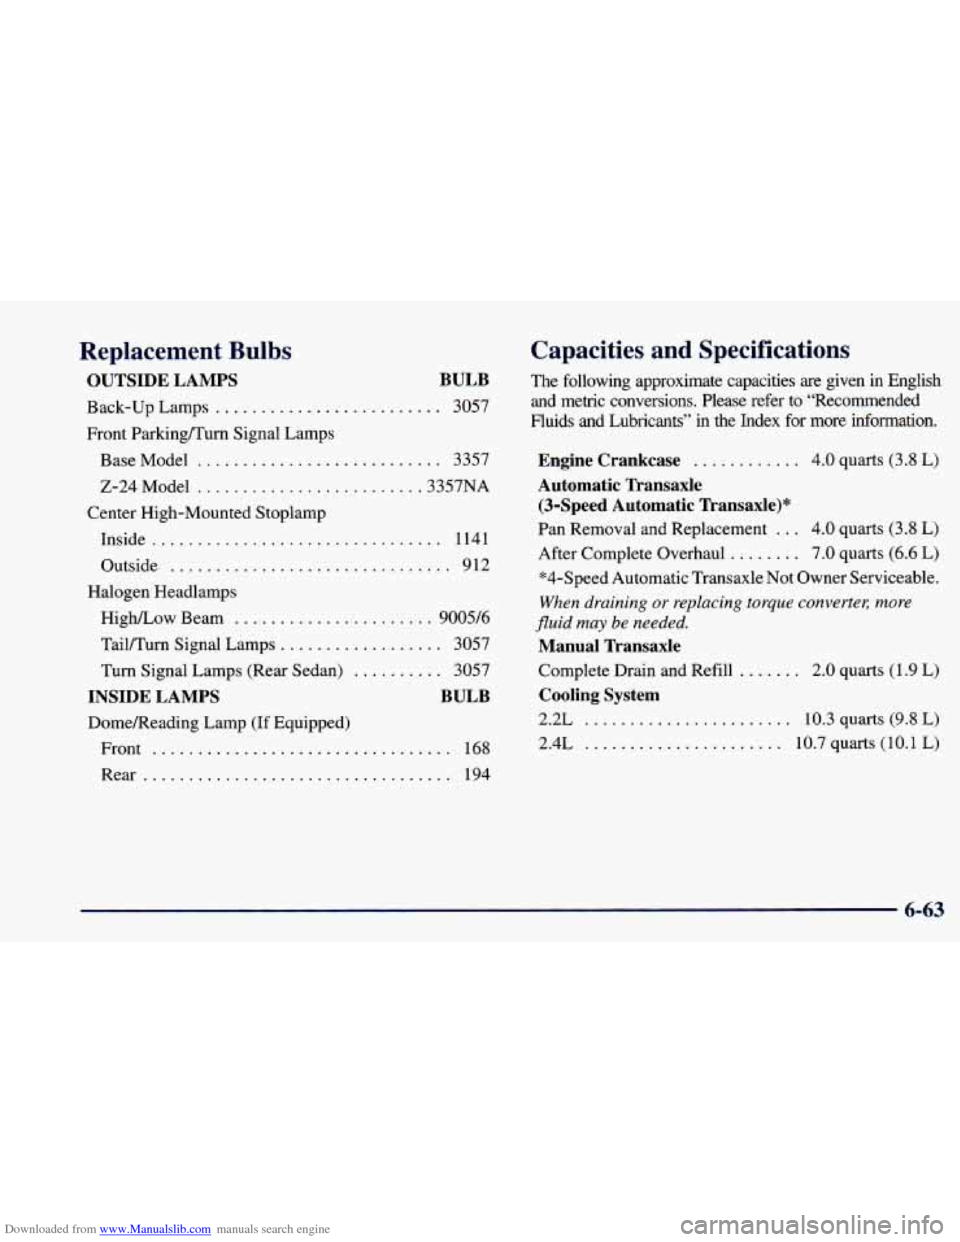
Downloaded from www.Manualslib.com manuals search engine Replacement Bulbs
OUTSIDE LAMPS BULB
Back-up Lamps ......................... 3057
Front ParkingRurn Signal Lamps
BaseModel
........................... 3357
2-24Model
......................... 3357NA
Center High-Mounted Stoplamp Inside
................................ 1141
Outside
............................... 912
Halogen Headlamps HigWLow Beam
...................... 9005/6
Tail/Turn Signal Lamps .................. 3057
Turn Signal Lamps (Rear Sedan)
.......... 3057
INSIDE LAMPS BULB
Domemeading Lamp (If Equipped)
Front
................................. 168
Rear
.................................. 194
Capacities and Specifications
The following approximate capacities are given in English and metric conversions. Please refer to “Recommended
Fluids and Lubricants” in the Index for more information.
Engine Crankcase ............ 4.0 quarts (3.8 L)
Automatic Transaxle
(3-Speed Automatic Transaxle)*
Pan Removal and Replacement ... 4.0 quarts (3.8 L)
After Complete Overhaul
........ 7.0 quarts (6.6 L)
*4-Speed Automatic Transaxle Not Owner Serviceable.
When draining or replacing torque convertec more
fluid may
be needed.
Manual Transaxle
Complete Drain and Refill ....... 2.0 quarts (1.9 L)
Cooling System
2.2L ....................... 10.3 quarts (9.8 L)
2.4L ...................... 10.7 quarts (10.1 L)
6-63