1998 CHEVROLET CAVALIER climate control
[x] Cancel search: climate controlPage 107 of 400
Downloaded from www.Manualslib.com manuals search engine Running Your Engine While You’re
Parked (Automatic Transaxle)
It’s better not to park with the engine running. But if yo\
u
ever have to, here are
some things to know.
I
Idling the engine with the climate control
system
off could allow dangerous exhaust into
your vehicle (see the earlier Caution under
“Engine Exhaust”).
Also, idling in
a closed-in place can let deadly
carbon monoxide
(CO) into your vehicle even if
the fan switch is at the highest setting. One place
this can happen
is a garage. Exhaust -- with
CO -- can come in easily. NEVER park in a
garage with the engine running.
Another closed-in place can be
a blizzard.
(See “Blizzard” in the Index.)
It can be dangerous to get out of your vehicle if
the shift lever is not fully in PARK (P) with the
parking brake firmly
set. Your vehicle can roll.
Don’t leave your vehicle when the engine is
running unless you have to.
If you’ve left the
engine running, the vehicle can move suddenly.
You or others could be injured.
To be sure your
vehicle won’t move, even when you’re on fairly
level ground, always set your parking brake and
move the shift lever to PARK
(P).
Follow the proper steps to be sure your vehicle won’t
move. See “Shifting Into
PARK (P)” in the Index.
If you are parking on a hill and if you’re pulling a
trailer,
also see “Towing a Trailer” in the Index.
2-31
Page 137 of 400
Downloaded from www.Manualslib.com manuals search engine Your instrument panel is designed to let you know at a glance how your vehicle is running. You’ll know how fast
you’re going, how much fuel is left in the tank, and many other things you’ll need to drive sa\
fely and economically,
The main components
of your instrument panel are:
1. Instrument Panel Intensity Control
2. Turn SignaVMultifunction Lever
3. Hazard Warning Flashers Switch
4. Ignition Switch
5. Windshield Wiperwasher Controls
6. Audio System
7. Climate Controls and Rear Window Defogger
8. Ashtray
9. Parking Brake Lever
10. Tilt Steering Wheel Lever (If Equipped)
11. Hood Release Lever
12. Fuse Panel
2-61
Page 156 of 400
Downloaded from www.Manualslib.com manuals search engine Comfort Controls Fan Knob
This section tells you how to make your air system work
for
you. The optional climate control system with air
conditioning
uses ozone-friendly R- 134a refrigerant.
With these systems,
you can control the ventilation
and heating in your vehicle. Your vehicle also has the
flow-through ventilation system described later in
this section.
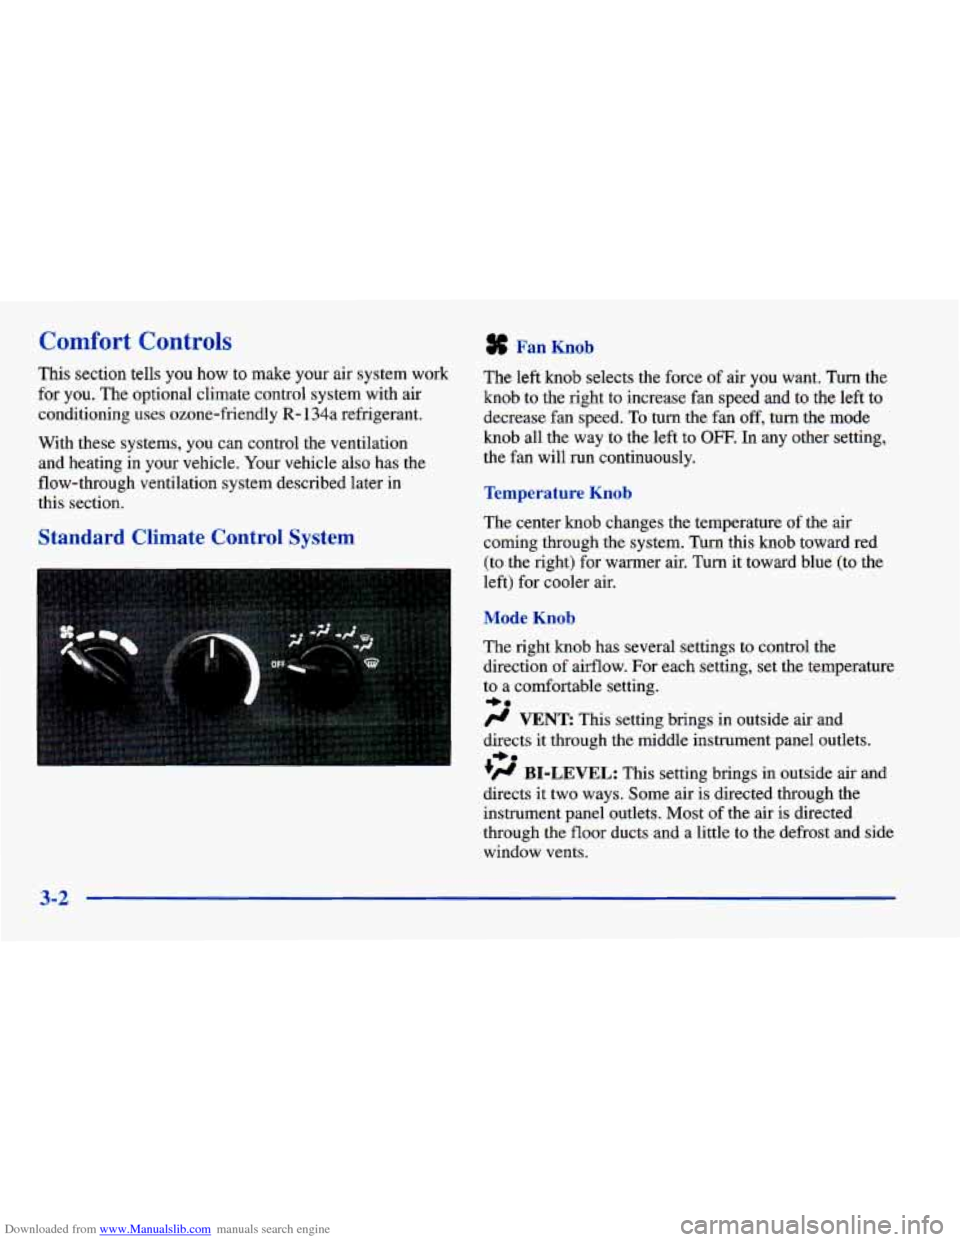
Standard Climate Control System
The left knob selects the force of air you want. Turn the
knob to the right to increase fan speed
and to the left to
decrease fan speed.
To turn the fan off, turn the mode
knob all the way
to the left to OFF. In any other setting,
the fan will run continuously.
Temperature Knob
The center knob changes the temperature of the air
coming through the system. Turn this knob toward red (to the right) for warmer air. Turn it toward blue (to the
left) for cooler air.
Mode Knob
The right knob has several settings to control the
direction of airflow. For each setting, set the temperature
to
a comfortable setting.
# VENT This setting brings in outside air and
directs it through the middle instrument panel outlets.
+’ BI-LEVEL: This setting brings in outside air and
directs
it two ways. Some air is directed through the
instrument panel outlets. Most of the air is directed
through the floor ducts and a little to
the defrost and side
window vents.
+e
+e
3-2
Page 157 of 400
Downloaded from www.Manualslib.com manuals search engine 0
+’ FLOOR: This setting sends most of the air
through the ducts near the floor. The rest comes out
of
the defroster and side window vents.
+# DEFOG: This setting allows half of the air to
go to the floor ducts and half to the defroster and side
window vents.
w.
DEFROST: This setting directs most of the air
through the defroster and side window vents. Some
of
the air goes to the floor ducts.
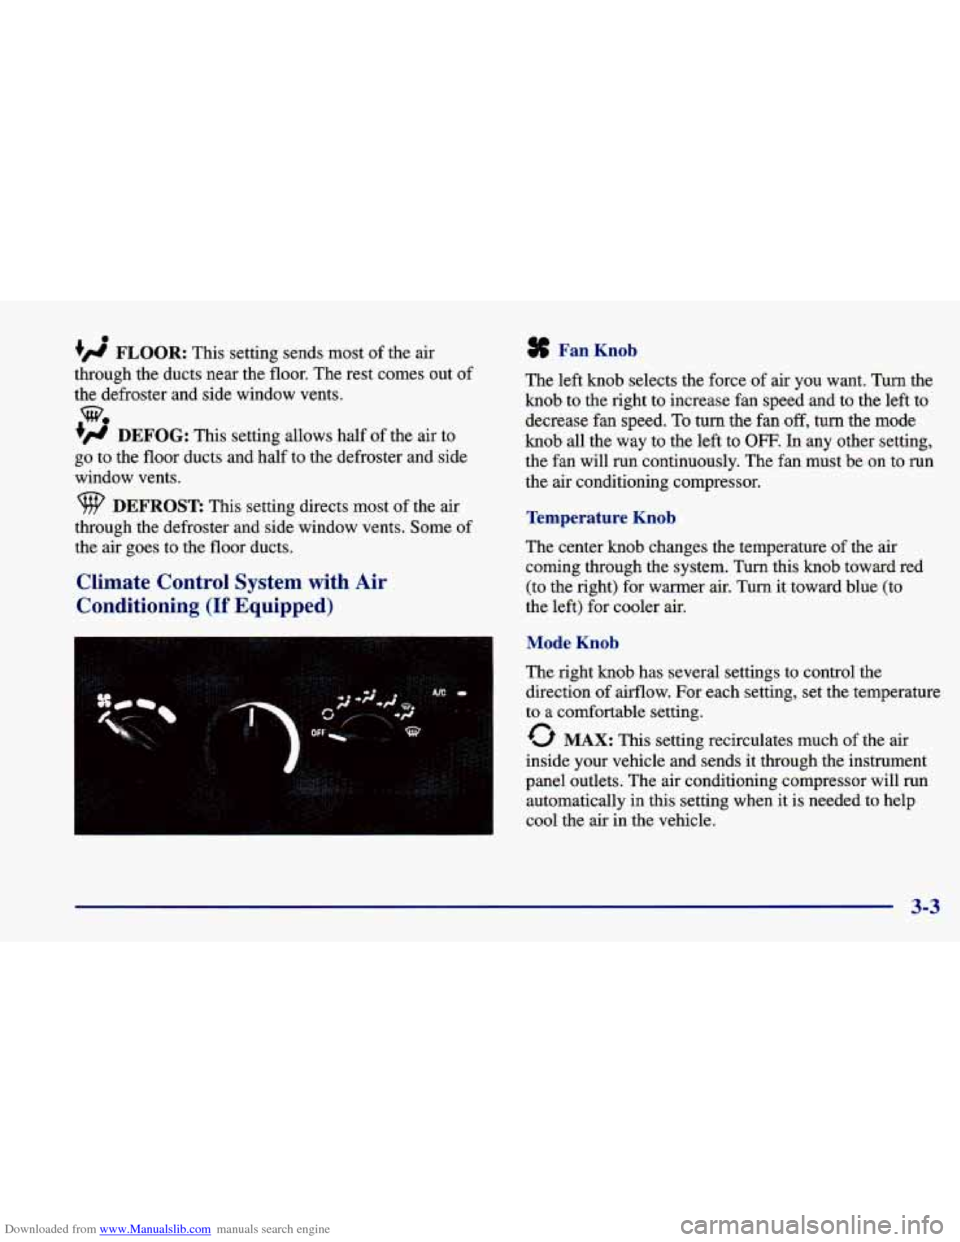
Climate Control System with Air
Conditioning
(If Equipped)
Fan Knob
The left knob selects the force of air you want. Turn the
knob to the right to increase fan speed and to the left to
decrease fan speed.
To turn the fan off, turn the mode
knob all the way to the left to OFF. In any other setting,
the fan will run continuously. The fan must be
on to run
the
air conditioning compressor.
Temperature Knob
The center knob changes the temperature of the air
coming through the system. Turn this
knob toward red
(to the right) for warmer air. Turn it toward blue
(to
the left) for cooler air.
Mode Knob
The right knob has several settings to control the
direction of airflow. For each setting, set the temperature
to a comfortable setting.
0 MAX: This setting recirculates much of the air
inside your vehicle and sends it through the instrument
panel outlets. The air conditioning compressor will run
automatically in this setting when it is needed to help
cool the air in the vehicle.
3-3
Page 303 of 400
Downloaded from www.Manualslib.com manuals search engine Uniform Tire Quality Grading
The following information relates to the system developed
by the United States National Highway Traffic Safety Administration, which grades tires by treadwear, traction
and temperature performance.
(This applies only to
vehicles sold in the United States.) The grades are molded
on the sidewalls of most passenger car tires. The Uniform
Tire Quality Grading system does not apply to deep tread, winter-type snow tires, space-saver or temporary use spare
tires, tires with nominal rim diameters of 10 to
12 inches
(25 to 30 cm), or to some limited-production tires.
While the tires available on General Motors passenger
cars and light trucks may vary with respect to these grades, they must also conform to Federal safety
requirements and additional General Motors Tire
Performance Criteria (TPC) standards.
Treadwear
The treadwear grade is a comparative rating based on
the wear rate of the tire when tested under controlled
conditions on a specified government test course. For
example, a tire graded 150 would wear one and
a half
(1
1/2) times as well on the government course as a tire
graded
100. The relative performance of tires depends
upon the actual conditions of their use, however, and
may depart significantly from the norm due to variations in driving habits, service practices and differences in
road characteristics and climate.
Traction -- A, B, C
The traction grades, from highest to lowest, are A, B, and
C,
and they represent the tire’s ability to stop on wet
pavement as measured under controlled conditions on specified government test surfaces
of asphalt and concrete.
A tire marked
C may have poor traction performance.
Warning: The traction grade assigned to this tire is based
on braking (straight ahead) traction tests and does not include cornering (turning) traction.
Temperature -- A, B, C
The temperature grades are A (the highest), B, and C,
representing the tire’s resistance to the generation of
heat and its ability to dissipate heat when tested under
controlled conditions on
a specified indoor laboratory
test wheel. Sustained high temperature can cause the
material of the tire to degenerate and reduce tire life, and
excessive temperature can lead to sudden tire failure.
The grade C corresponds to a level of performance
which all passenger car tires must meet under the
Federal Motor Vehicle Safety Standard
No. 109. Grades
B and A represent higher levels of performance on the
laboratory test wheel than the minimum required by law.
6-45
Page 312 of 400
Downloaded from www.Manualslib.com manuals search engine To protect the convertible top:
0 After you wash the vehicle, make sure the top is
completely dry before you lower it.
Don’t get any cleaner on the vehicle’s painted finish;
it could leave streaks.
If you decide to go through an automatic car wash,
ask the manager if the equipment could damage
your top.
Before entering a car wash, set the climate control to
VENT and the fan control to the highest speed. This will
help to prevent water under high pressure from entering
around the convertible top.
Cleaning Aluminum Wheels
(If Equipped)
Keep your wheels clean using a soft clean cloth with
mild soap and water. Rinse with clean water. After
rinsing thoroughly, dry with a soft clean towel.
A wax
may then be applied. The surface
of these wheels is similar to the painted
surface
of your vehicle. Don’t use strong soaps,
chemicals, abrasive polishes, abrasive cleaners
or
abrasive cleaning brushes on them because you could
damage the surface.
Don’t take your vehicle through
an automatic car wash
that has silicon carbide tire cleaning brushes. These
brushes can also damage the surface of these wheels.
Cleaning T-- I
To clean your tires, ;e a stiff brush with a tire cleaner.
I- NOTICE:
When applying a tire dressing always take care to
wipe off any overspray
or splash from all painted
surfaces
on the body or wheels of the vehicle.
Petroleum-based products may damage the
paint finish.
Page 385 of 400
Downloaded from www.Manualslib.com manuals search engine Inside of Your Vehicle ......................... 6-49
Instrument Panel
............................. 6-50
Interior Plastic Components
..................... 6-5 1
Outside of Your Vehicle ........................ 6-52
Special Problems
............................. 6-50
Stains
...................................... 6-50
Tires
....................................... 6-54
Vinyl
....................................... 6-50
Wheels ..................................... 6-54
Windshield and Wiper Blades
................... 6-51
Climate Control System. Standard
................... 3-2
Climate Control System with Air Conditioning
......... 3-3
Clock. Setting the
................................ 3-7
Clutch Fluid. Hydraulic
.......................... 6-24
Clutch. Hydraulic
............................... 6-24
Comfort Controls
................................ 3-2
Compact Disc AdapterKit
.................................. 3-15
Care
....................................... 3-24
Player
...................................... 3-16
Theft-Deterrent Feature
........................ 3-20
Compact Disc Player
............................ 3-16
Care
....................................... 3-24
Compact Spare Tire
............................. 5-33
Control of a Vehicle
.............................. 4-5
Convenience Net
............................... 2-47
Convertible Top
Bypassswitch
............................... 2-57
Cleaning
.................................... 6-53
Installing the Boot
............................ 2-51
Lowering
................................... 2-4 9 Lowering Manually
........................... 2-57
Raising
..................................... 2-56
Raising Manually
............................. 2-57
Removing the Boot
........................... 2-54
Convex Outside Mirror
.......................... 2-46
Coolant
....................................... 6-25
Heater. Engine
............................... 2-18
SurgeTank
.................................. 5-16
Surge Tank Pressure Cap
....................... 6-28
Cooling System
................................ 5-16
Courtesy Transportation
........................... 8-8
Cruise Control ................................. 2-36
Cupholders
.................................... 2-47
Customer Assistance for Text Telephone Users
......... 8-4
Customer Assistance Information
................... 8-1
Customer Satisfaction Procedure .................... 8-2
Operation
................................... 2-49
Damage. Finish
............................... 6-55
Damage. Sheet Metal
............................ 6-55
Daytime Running Lamps
......................... 2-40
DeadBattery
................................... 5-3
Defects. Reporting Safety ........................ 8-10
Defensive Driving
............................... 4-2
Defogger. Rear Window
.......................... 3-6
Defogging
..................................... 3-6
Defrosting
..................................... 3-6
Dimensions. Vehicle
............................ 6-65
Dolby B Noise Reduction
........................ 3-15
Dome Lamp Bulb Replacement
.................... 6-39
9-3