Page 156 of 211

155n
RepairsIndexOverview Controls Car care Technology Data
Caring for your carSince dirt and grease gradually attack
the protective layer of the leather, the
cleaned surfaces should be treated with
BMW leather care agent. This also acts
as an antistatic agent.
For protection against dampness or
moisture, treat the leather with a BMW
impregnating agent.
We recommend that you perform this
procedure twice a year on leather ex-
posed to normal use.
Spills should be wiped up immediately.
Remove grease and oil stains without
rubbing by carefully dabbing with a
cloth soaked in spot remover.
If the upholstery is to be exposed to in-
tense sunlight or if the vehicle is to be
stored for an extended period, cover all
leather surfaces (or, better yet, the win-
dows) to prevent fading.Cleaning agents can contain sub-
stances that are dangerous or
pose health risks. Therefore, always
comply with the warnings and danger
notices on the package.
Open the doors or windows on your ve-
hicle when cleaning the interior. Never
clean your vehicle with solvents or
other materials not specifically intended
for this application.<
Page 158 of 211
157n
RepairsIndexOverview Controls Car care Technology Data
Technical modifications to the vehicleAny authorized BMW center will be glad
to inform you of the advisability, legal
requirements and factory recommenda-
tions with regard to technical modifica-
tions on the car. For this purpose, the
BMW center requires the Vehicle Identi-
fication Number and, in some cases,
also the engine number.Light-Emitting Diodes (LEDs)Light-emitting diodes installed behind
translucent lenses serve as the light
source for many of the controls and dis-
plays in your vehicle. The concept be-
hind their operation is related to that
employed for lasers, and they are offi-
cially designated as Class 1 light-emit-
ting diodes. Do not remove the protective lens
and avoid staring directly at the
unfiltered beam for extended periods
(several hours), as inflammation of the
iris could result.<
Page 159 of 211
158n
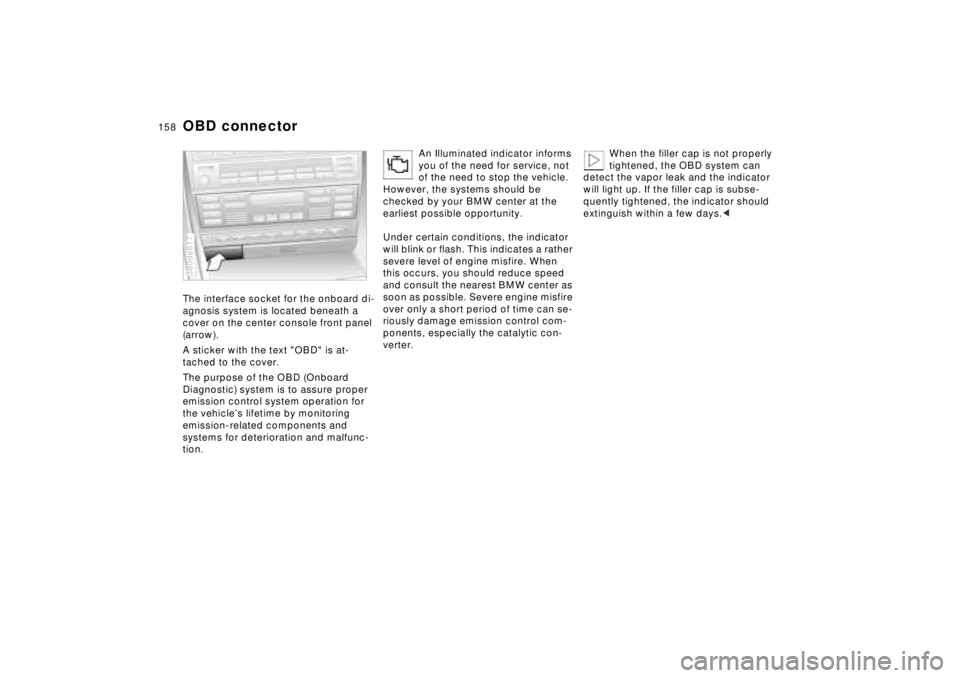
OBD connectorThe interface socket for the onboard di-
agnosis system is located beneath a
cover on the center console front panel
(arrow).
A sticker with the text "OBD" is at-
tached to the cover.
The purpose of the OBD (Onboard
Diagnostic) system is to assure proper
emission control system operation for
the vehicle’s lifetime by monitoring
emission-related components and
systems for deterioration and malfunc-
tion.380de617
An Illuminated indicator informs
you of the need for service, not
of the need to stop the vehicle.
However, the systems should be
checked by your BMW center at the
earliest possible opportunity.
Under certain conditions, the indicator
will blink or flash. This indicates a rather
severe level of engine misfire. When
this occurs, you should reduce speed
and consult the nearest BMW center as
soon as possible. Severe engine misfire
over only a short period of time can se-
riously damage emission control com-
ponents, especially the catalytic con-
verter.
When the filler cap is not properly
tightened, the OBD system can
detect the vapor leak and the indicator
will light up. If the filler cap is subse-
quently tightened, the indicator should
extinguish within a few days.<
Page 165 of 211
164n
Lamps and bulbs
For checking and adjusting head-
lamp aim, please contact your
BMW center.<
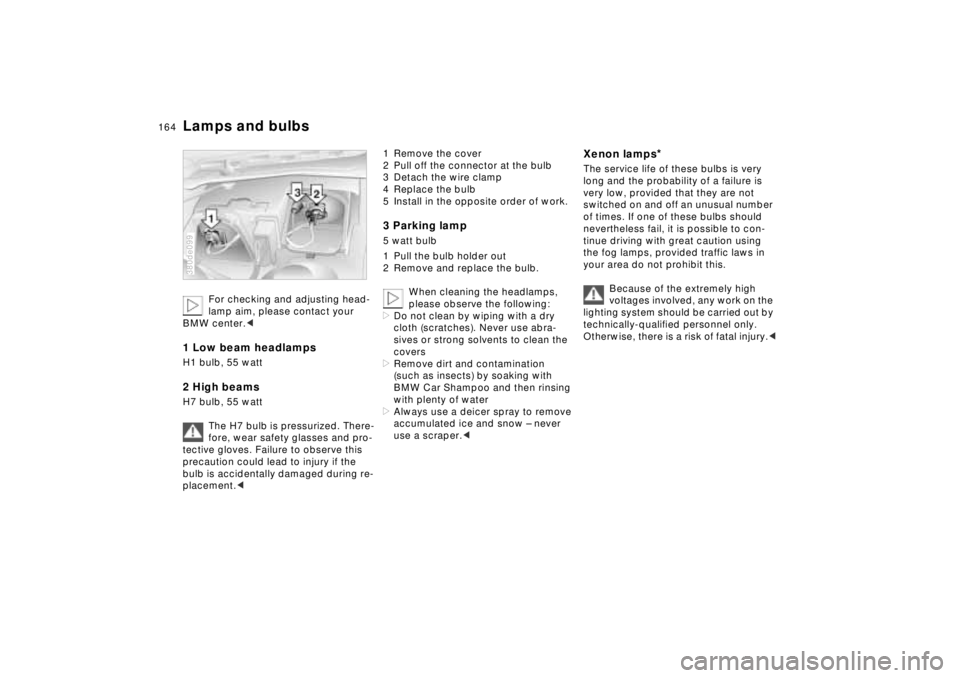
1 Low beam headlampsH1 bulb, 55 watt 2 High beamsH7 bulb, 55 watt
The H7 bulb is pressurized. There-
fore, wear safety glasses and pro-
tective gloves. Failure to observe this
precaution could lead to injury if the
bulb is accidentally damaged during re-
placement.< 380de099
1 Remove the cover
2 Pull off the connector at the bulb
3 Detach the wire clamp
4 Replace the bulb
5 Install in the opposite order of work.3 Parking lamp5 watt bulb
1 Pull the bulb holder out
2 Remove and replace the bulb.
When cleaning the headlamps,
please observe the following:
>Do not clean by wiping with a dry
cloth (scratches). Never use abra-
sives or strong solvents to clean the
covers
>Remove dirt and contamination
(such as insects) by soaking with
BMW Car Shampoo and then rinsing
with plenty of water
>Always use a deicer spray to remove
accumulated ice and snow – never
use a scraper.<
Xenon lamps
*
The service life of these bulbs is very
long and the probability of a failure is
very low, provided that they are not
switched on and off an unusual number
of times. If one of these bulbs should
nevertheless fail, it is possible to con-
tinue driving with great caution using
the fog lamps, provided traffic laws in
your area do not prohibit this.
Because of the extremely high
voltages involved, any work on the
lighting system should be carried out by
technically-qualified personnel only.
Otherwise, there is a risk of fatal injury.<
Page 166 of 211
165n
RepairsIndexOverview Controls Car care Technology Data
Lamps and bulbsTurn signals/Parking lamps
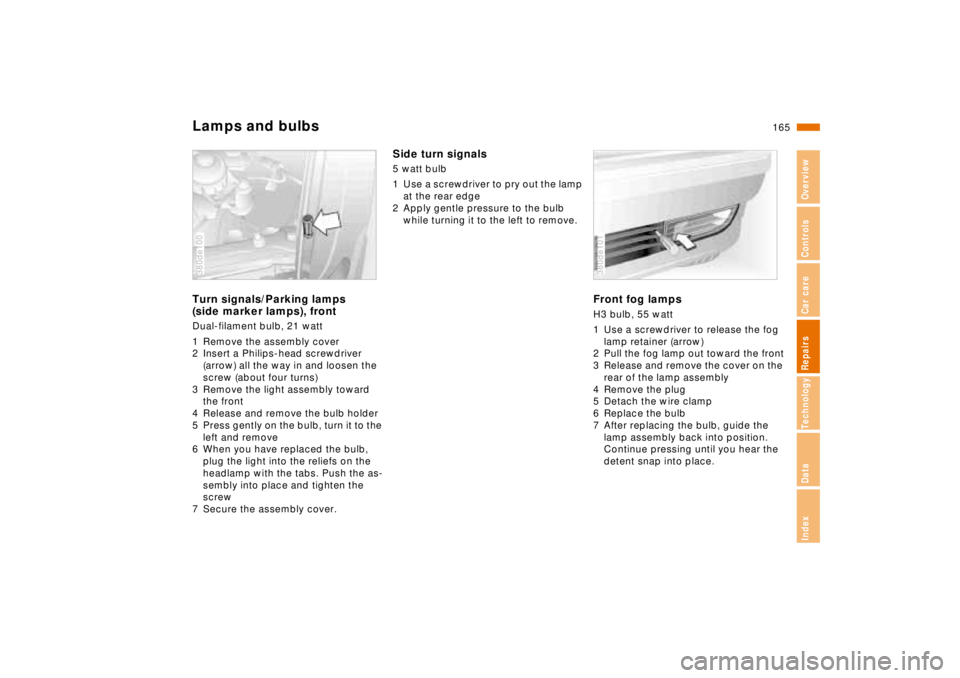
(side marker lamps), frontDual-filament bulb, 21 watt
1 Remove the assembly cover
2 Insert a Philips-head screwdriver
(arrow) all the way in and loosen the
screw (about four turns)
3 Remove the light assembly toward
the front
4 Release and remove the bulb holder
5 Press gently on the bulb, turn it to the
left and remove
6 When you have replaced the bulb,
plug the light into the reliefs on the
headlamp with the tabs. Push the as-
sembly into place and tighten the
screw
7 Secure the assembly cover.380de100
Side turn signals5 watt bulb
1 Use a screwdriver to pry out the lamp
at the rear edge
2 Apply gentle pressure to the bulb
while turning it to the left to remove.
Front fog lampsH3 bulb, 55 watt
1 Use a screwdriver to release the fog
lamp retainer (arrow)
2 Pull the fog lamp out toward the front
3 Release and remove the cover on the
rear of the lamp assembly
4 Remove the plug
5 Detach the wire clamp
6 Replace the bulb
7 After replacing the bulb, guide the
lamp assembly back into position.
Continue pressing until you hear the
detent snap into place.380de101
Page 168 of 211

167n
RepairsIndexOverview Controls Car care Technology Data
Lamps and bulbsInterior lampsFront:
Interior lamp (10 watt bulb) with reading
lamps (10 watt bulbs)
1 Interior lamp: Use a screwdriver to
press out the lamp sideways and re-
move the lens. Pull the bulb out of the
contact studs
2 Reading lamp: Gently press against
the lamp while turning it to the left to
remove.
Rear:
Interior lamp (10 watt bulb) with reading
lamp (5 watt bulb)
1 Use a screwdriver at the top of the
recesses to press out the light
2 Interior lamp: Push the tab back on
the reflector and change the bulb
3 Reading lamp: Gently press against
the lamp while turning it to the left to
remove.
Indirect lighting (1 watt bulb)
1 Unclip the lamp holder
2 Replace the bulb.
Footwell lamps5 watt bulb
1 Use a screwdriver to remove the lens
to the side
2 Replace the bulb.Door warning lamps5 watt bulb
1 Apply a screwdriver to the narrow
side of the lamp to pry it out
2 Turn the bulb holder to the left to
remove
3 Replace the bulb.Door handle lampsPlease contact your BMW center in the
case of a malfunction.
Glove compartment lamp5 watt bulb
1 Apply a screwdriver to the recess to
pry the lamp out
2 Remove the reflector
3 Replace the bulb.Luggage compartment lamps10 watt bulbs
Lamps on the underside of the package
tray and in the luggage compartment
lid:
1 Apply a screwdriver to the recess to
pry the lamp out
2 Remove the reflector
3 Replace the bulb.
Page 169 of 211
168n
Remote controlChanging batteryReplace the battery when the message
"REMOTE KEY BATTERY" appears in
the Check Control. The LED no longer
lights up when a button is pressed and
it is no longer possible to lock the car
using the remote key.
Install only a battery of the type that is
specified in the battery compartment
(CR 2016). Be sure the battery is in-
stalled in the correct position.
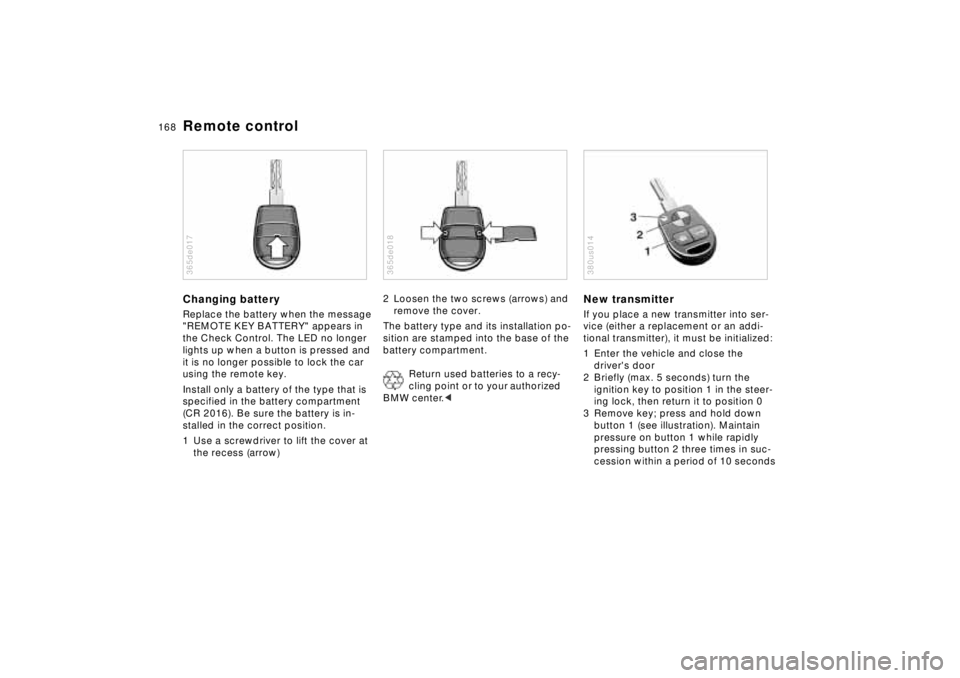
1 Use a screwdriver to lift the cover at
the recess (arrow)365de017
2 Loosen the two screws (arrows) and
remove the cover.
The battery type and its installation po-
sition are stamped into the base of the
battery compartment.
Return used batteries to a recy-
cling point or to your authorized
BMW center.< 365de018
New transmitterIf you place a new transmitter into ser-
vice (either a replacement or an addi-
tional transmitter), it must be initialized:
1 Enter the vehicle and close the
driver's door
2 Briefly (max. 5 seconds) turn the
ignition key to position 1 in the steer-
ing lock, then return it to position 0
3 Remove key; press and hold down
button 1 (see illustration). Maintain
pressure on button 1 while rapidly
pressing button 2 three times in suc-
cession within a period of 10 seconds380us014
Page 173 of 211
172n
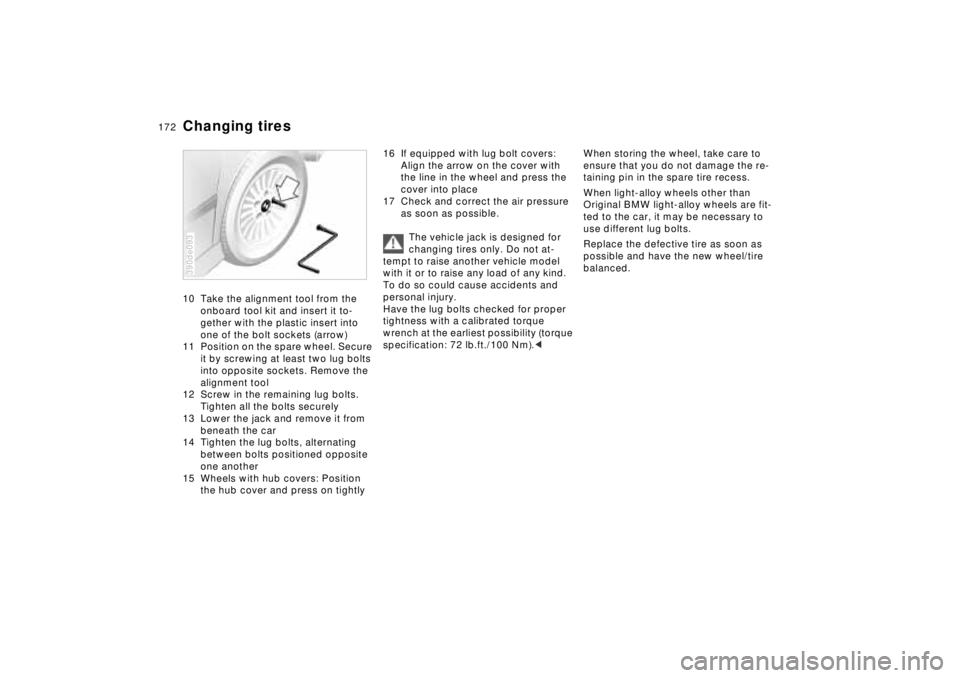
Changing tires10 Take the alignment tool from the
onboard tool kit and insert it to-
gether with the plastic insert into
one of the bolt sockets (arrow)
11 Position on the spare wheel. Secure
it by screwing at least two lug bolts
into opposite sockets. Remove the
alignment tool
12 Screw in the remaining lug bolts.
Tighten all the bolts securely
13 Lower the jack and remove it from
beneath the car
14 Tighten the lug bolts, alternating
between bolts positioned opposite
one another
15 Wheels with hub covers: Position
the hub cover and press on tightly390de093
16 If equipped with lug bolt covers:
Align the arrow on the cover with
the line in the wheel and press the
cover into place
17 Check and correct the air pressure
as soon as possible.
The vehicle jack is designed for
changing tires only. Do not at-
tempt to raise another vehicle model
with it or to raise any load of any kind.
To do so could cause accidents and
personal injury.
Have the lug bolts checked for proper
tightness with a calibrated torque
wrench at the earliest possibility (torque
specification: 72 lb.ft./100 Nm).<
When storing the wheel, take care to
ensure that you do not damage the re-
taining pin in the spare tire recess.
When light-alloy wheels other than
Original BMW light-alloy wheels are fit-
ted to the car, it may be necessary to
use different lug bolts.
Replace the defective tire as soon as
possible and have the new wheel/tire
balanced.