Page 143 of 221

142
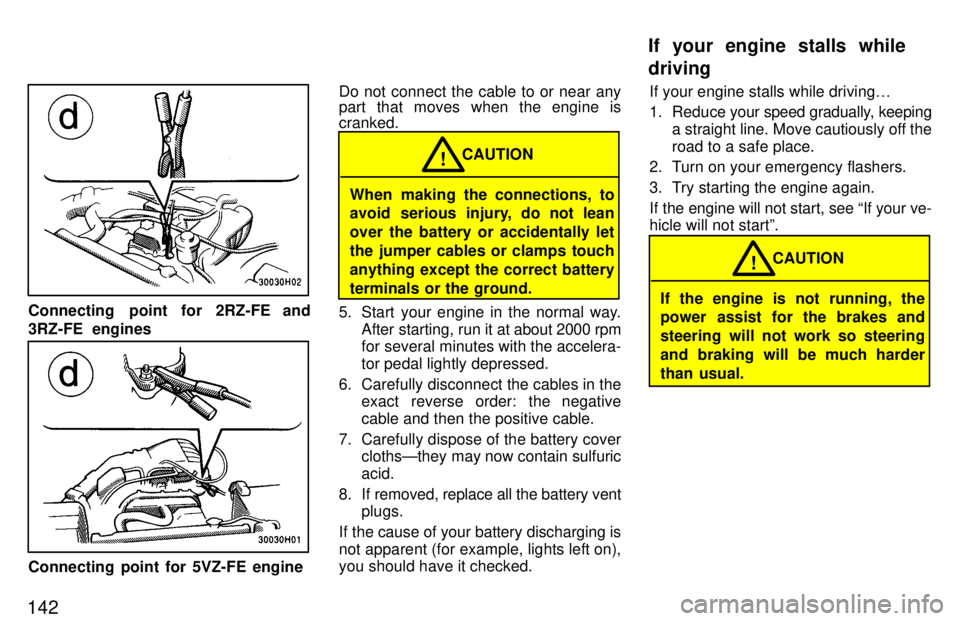
Connecting point for 2RZ-FE and
3RZ-FE engines
Connecting point for 5VZ-FE engineDo not connect the cable to or near any
part that moves when the engine is cranked.
When making the connections, to
avoid serious injury, do not lean over the battery or accidentally let
the jumper cables or clamps touchanything except the correct battery
terminals or the ground.
CAUTION
!
5. Start your engine in the normal way. After starting, run it at about 2000 rpm
for several minutes with the accelera- tor pedal lightly depressed.
6. Carefully disconnect the cables in the exact reverse order: the negative
cable and then the positive cable.
7. Carefully dispose of the battery cover clothsÐthey may now contain sulfuricacid.
8. If removed, replace all the battery vent plugs.
If the cause of your battery discharging is
not apparent (for example, lights left on), you should have it checked. If your engine stalls while driving
0
1. Reduce your speed gradually, keeping
a straight line. Move cautiously off the
road to a safe place.
2. Turn on your emergency flashers.
3. Try starting the engine again.
If the engine will not start, see If your ve-
hicle will not startº.
If the engine is not running, the
power assist for the brakes and
steering will not work so steering
and braking will be much harder
than usual. CAUTION
!
If your engine stalls while driving
Page 170 of 221

169
Tire surface and wheel nuts Check the tires carefully
for cuts, damage
or excessive wear. See Chapter 7-2 for
additional information. When checking the tires, make sure no nuts are missing,
and check the nuts for looseness. T ighten
them if necessary.
Tire rotation
Rotate the tires every 12000 km (7500
miles). See Chapter 7-2 for additional in- formation.
Fluid leaks Check underneath for leaking fuel, oil, wa-
ter or other fluid after the vehicle has been
parked for a while. If you smell fuel fumes
or notice any leak, have the cause found
and corrected immediately. Doors and engine hood Check that all doors including tailgate op- erate smoothly and all latches lock se-
curely. M ake sure the engine hood secon-
dary latch secures the hood from opening
when the primary latch is released. INSIDE THE VEHICLE Items listed below should be checked
regularly, e.g. while performing peri-
odic services, cleaning the vehicle,etc. Lights Make sure the headlights, stop lights, tail lights, turn signal lights, and other lights are all working. Check headlight aim. Service reminder indicators and
warn-
ing buzzers Check that all service reminder indicators
and warning buzzers function properly. Steering wheel
Be alert for changes in steering condition, such as hard steering or strange noise. Seats Check that all front seat controls such as
seat adjusters, seatback recliner, etc. op- erate smoothly and that all latches lock
securely in any position. Check that the
head restraints move up and down
smoothly and that the locks hold securely
in any latched position. For folding-down
seatback (bench seat), check that the
latches lock securely. Seat belts
Check that the seat belt system such as
buckles, retractors and anchors operate
properly
and smoothly. Make sure the belt
webbing is not cut, frayed, worn or dam-aged. Accelerator pedal Check the pedal for smooth operation and
uneven pedal effort or catching. Clutch pedal Check the pedal for smooth operation. Brake pedal Check the pedal for smooth operation and
that the pedal has the proper clearance. Check the brake booster function. Brakes
At a safe place, check that the brakes do not pull to one side when applied. Parking brake Check that the lever has the proper travel and that, on a safe incline, your vehicle is
held securely with only the parking brake applied.
Page 196 of 221

195
If the headlights or other electrical
components do not work, check the
fuses. If any of the fuses are blown,
they must be replaced.
See Fuse locationsº in Chapter 7-1 for
locations of the fuses.
Turn the ignition switch and inopera-
tive component off. Pull a suspected
fuse straight out and check it. Determine which fuse may be causing the
problem. The lid of the fuse box shows the name of the circuit for each fuse. See Part8 of this manual for the functions con-
trolled by each circuit. Type A fuses can be pulled out by usingthe pull-out tool. The location of the pull- out tool is shown in the illustration.
If you are not sure whether the fuse has
blown, try replacing the suspected fuse with one that you know is good.
If the fuse has blown, push a new fuse
into the clip.
Only install a fuse with the amperage rat-
ing designated on the fuse box lid.
If you do not have a spare fuse, in an
emergency you can pull out the CIGº,
RADIOº, DOMEº or A/Cº fuse, whichmay be dispensable for normal driving, and use it if its amperage rating is the same.
If you cannot use one of the same amper-
age, use one that is lower, but as close as
possible to the rating. If the amperage is
lower than that specified, the fuse might
blow out again but this does not indicate
anything
wrong. Be sure to get the correct
fuse as soon as possible and return the
substitute to its original clip.
It is a good idea to purchase a set of spare
fuses and keep them in your vehicle for emergencies.
Checking and replacing fuses
Page 197 of 221

196If the new fuse immediately blows out, there is a problem with the electrical sys-
tem.
Have your Toyota dealer correct it as
soon as possible.
Never use a fuse with a higher
amperage rating, or any other
object, in place of a fuse. This maycause extensive damage and
possibly a fire. CAUTION
!
If any washer does not work, the wash-
er tank may be empty. Add washer fluid.
You may use plain water as washer fluid.
However, in cold areas where tempera-
tures range below freezing point, use
washer fluid containing antifreeze. This
product is available at your Toyota dealer
and most auto parts stores. Follow the
manufacturer 's directions for how much
to mix with water.
NOTICE
Do not use engine antifreeze or any other substitute because it may
damage your vehicle's paint.
The following illustrations show how to
gain access to the bulbs. When replacing
a bulb, make sure the ignition switch and
light switch are off. Use bulbs with the wattage ratings given in the table.
NOTICE
Only use a bulb or unit of the listed type.
Light Bulbs and
UnitsBulb and Unit No.WType
Headlight unitsH605965/35Ð
Headlight bulbs900360/55D
Parking lights1685B
Front turn signal lights115627A
Rear turn signal lights115627A
Stop and tail lights115727/8A
Back-up lights115627A
License plate lights1943.8B
High mounted stop- light1685B
Adding washer fluid Replacing light bulbs and unitsÐ
Page 198 of 221
197
Light
Bulbs and
Units
Bulb and Unit No.WType
Headlight Interior light Normal cabXtra-cab
Ð Ð5
10C C
Personal lightsÐ5C
Door courtesy lightsÐ3C
Glovebox lightÐ1.4B
A: Single end bulbs
B: Wedge base bulbs C: Double end bulbsD: HB2 halogen bulbs
1. Loosen the parking light unit re-
taining screws and remove the
units unplugging the connectors.2. Open the hood. Release the clipsand remove the radiator grille.
The clips can be released with a flat-
blade screwdriver as shown.
ÐHeadlight units
Page 201 of 221
200
Use a Phillips-head screwdriver.Use a Phillips-head screwdriver.
ÐParking lights (two-wheel drive models)
ÐParking lights(four-wheel drive models)
Page 202 of 221
201
Removing cover clips
Installing cover clips
Use a Phillips-head screwdriver.
ÐFront turn signal lights
Page 203 of 221
202
Use a Phillips-head screwdriver.
a: Rear turn signal light
b: Stop and tail light
c: Stop and tail light
ÐRear turn signal, stop and tail, and back-up lightsÐLicense plate lights (type A)