Page 1729 of 3342
B6M0570A
6) Remove #3 spark plug cord by pulling boot, not cord
itself.
7) For subsequent procedures, refer to the procedure for
#1 spark plug.
G6M0095
4. #4 SPARK PLUG
1) Disconnect battery ground cable.
B6M0554
2) Remove battery.
B6M0561
3) Remove washer tank mounting bolts.
B6M0562A
4) Disconnect washer tank connectors.
CAUTION:
Do not disconnect washer tank hoses as washer fluid
will leak out from washer tank.
33
6-1SERVICE PROCEDURE
3. Spark Plug
Page 1730 of 3342
![SUBARU LEGACY 1997 Service Repair Manual B6M0575A
5) Move washer tank upward.
B6M0563A
6) Remove #4 spark plug cord by pulling boot, not cord
itself.
7) For subsequent procedures, refer to the procedure for
#1 spark plug. <Ref. to 6-1 [W3E1] SUBARU LEGACY 1997 Service Repair Manual B6M0575A
5) Move washer tank upward.
B6M0563A
6) Remove #4 spark plug cord by pulling boot, not cord
itself.
7) For subsequent procedures, refer to the procedure for
#1 spark plug. <Ref. to 6-1 [W3E1]](/manual-img/17/57434/w960_57434-1729.png)
B6M0575A
5) Move washer tank upward.
B6M0563A
6) Remove #4 spark plug cord by pulling boot, not cord
itself.
7) For subsequent procedures, refer to the procedure for
#1 spark plug.
CAUTION:
When removing spark plug, cover the ATF cooling
pipes with a rag to prevent damage.
B6M0572A
NOTE:
For easier removal of spark plug, diagonally insert the tools
from the direction of battery stand into plug hole as shown
in figure.
B6M0573
F: INSTALLATION (2500 cc OUTBACK
MODEL)
1. #1 SPARK PLUG
1) After setting spark plug in spark plug socket, connect
the spark plug socket, extension and Universal Joint to
each other.
2) Screw spark plug into cylinder head using the con-
nected tools above mentioned. At this point, it is necessary
to support the rear end of the tools with fingertips.
3) When spark plug is screwed in two or three turns, tem-
porarily disconnect the tools connected in step 1) above.
4) Confirm that spark plug is screwed into the cylinder
head properly by touching it with finger. If it is difficult to
reach it by hand, confirm its condition by using mirror and
suchlike.
5) Cover ABS pipes with rag to prevent damage.
34
6-1SERVICE PROCEDURE
3. Spark Plug
Page 1761 of 3342

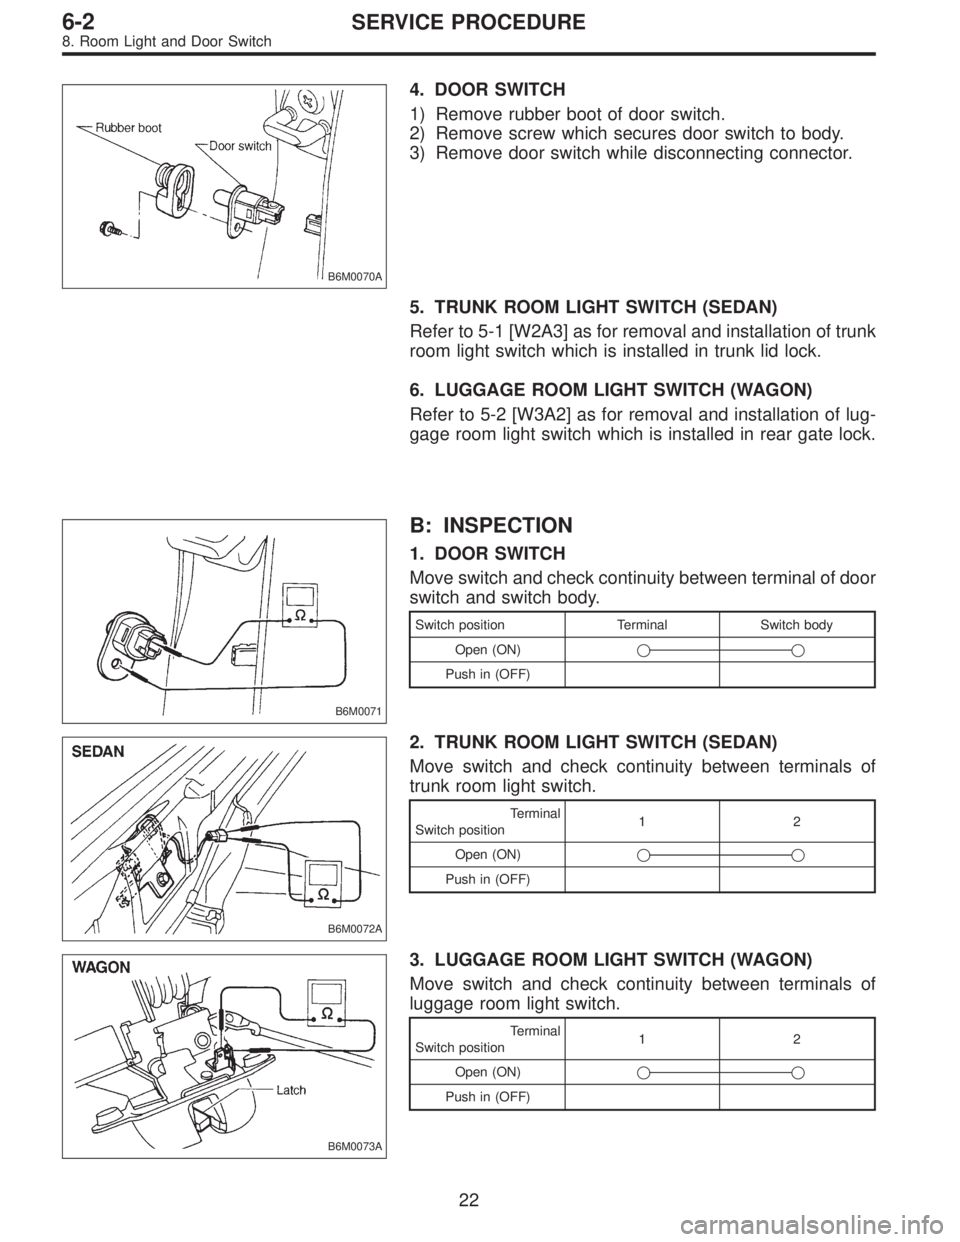
B6M0070A
4. DOOR SWITCH
1) Remove rubber boot of door switch.
2) Remove screw which secures door switch to body.
3) Remove door switch while disconnecting connector.
5. TRUNK ROOM LIGHT SWITCH (SEDAN)
Refer to 5-1 [W2A3] as for removal and installation of trunk
room light switch which is installed in trunk lid lock.
6. LUGGAGE ROOM LIGHT SWITCH (WAGON)
Refer to 5-2 [W3A2] as for removal and installation of lug-
gage room light switch which is installed in rear gate lock.
B6M0071
B: INSPECTION
1. DOOR SWITCH
Move switch and check continuity between terminal of door
switch and switch body.
Switch position Terminal Switch body
Open (ON)��
Push in (OFF)
B6M0072A
2. TRUNK ROOM LIGHT SWITCH (SEDAN)
Move switch and check continuity between terminals of
trunk room light switch.
Terminal
Switch position12
Open (ON)��
Push in (OFF)
B6M0073A
3. LUGGAGE ROOM LIGHT SWITCH (WAGON)
Move switch and check continuity between terminals of
luggage room light switch.
Terminal
Switch position12
Open (ON)��
Push in (OFF)
22
6-2SERVICE PROCEDURE
8. Room Light and Door Switch
Page 1800 of 3342
![SUBARU LEGACY 1997 Service Repair Manual 3) Remove door lock actuator assembly. <Ref. to 5-2
[W2A7].>
4) Installation is in the reverse order of removal.
Rear Gate (WAGON)
1) Remove rear gate trim panel.
2) Disconnect rod from rear gate latc SUBARU LEGACY 1997 Service Repair Manual 3) Remove door lock actuator assembly. <Ref. to 5-2
[W2A7].>
4) Installation is in the reverse order of removal.
Rear Gate (WAGON)
1) Remove rear gate trim panel.
2) Disconnect rod from rear gate latc](/manual-img/17/57434/w960_57434-1799.png)
3) Remove door lock actuator assembly.
[W2A7].>
4) Installation is in the reverse order of removal.
Rear Gate (WAGON)
1) Remove rear gate trim panel.
2) Disconnect rod from rear gate latch assembly.
3) Disconnect rear gate switch connector and power door
lock actuator connector.
4) Remove bolts which secure power door lock actuator.
5) Remove bolts which secure latch.
6) Remove latch and actuator assembly.
7) Installation is in the reverse order of removal.
B6M0070A
6. DOOR SWITCH
1) Remove rubber boot of door switch.
2) Remove screw which secures door switch to body.
3) Remove door switch while disconnecting connector.
B6M0371A
7. TRUNK LID SWITCH (SEDAN)
NOTE:
The trunk lid switch is united with the trunk lid lock.
1) Remove trunk rear trim.
2) Disconnect connector of trunk switch (combined with
trunk room light switch).
3) Put matching mark on the trunk lid lock and vehicle
body before removal.
4) Remove bolts, then remove trunk lid lock from vehicle
body.
5) Installation is in the reverse order of removal.
NOTE:
Ensure that matching mark is aligned between trunk lid
lock and vehicle body.
55
6-2SERVICE PROCEDURE
22. Security System