1997 OLDSMOBILE BRAVADA change time
[x] Cancel search: change timePage 4 of 358

GENERAL MOTORS, GM, the GM Emblem,
OLDSMOBILE,
the OLDSMOBILE Rocket Emblem
and the name BRAVADA are registered trademarks of
General Motors Corporation.
This manual includes the latest information at the time
it was printed. We reserve the right to make changes in
the product after that time without further notice.
Please keep
this manual in your Oldsmobile, so it will
be there
if you ever need it when you’re on the road. If
you sell the vehicle, please leave this manual in it so the
new owner can use
it.
Litho in U.S.A.
Part No. 22652548 A First Edition
-I-
WE SUPPORT
VOLUNTARY TECHNICIAN
CERTIFICATION THROUGH
National Institute for
AUTOMOTIVE SERVICE EXCELLENCE
We support voluntary
technician certification.
About Driving Your Bravada
As with other vehicles of this type, failure to operate this
vehicle correctly may result
in loss of control or an
accident. Be sure to read the “on-pavement” and
“off-road” driving guidelines
in this manual. (See
“Driving Guidelines” and “Operating Your Oldsmobile
Off Paved Roads”
in the Index.)
@Copyright General Motors Corporation
1996
All Rights Reserved
ProCarManuals.com
Page 55 of 358

a Section 2 Features and Controls
Here you can learn about the many standard and optional features on your Oldsnwbile, and information on starting,
shifting and braking. Also explained are the instrument panel and the warning systems that tell you
if everything is
working properly
-- and what to do if you have a problem.
2-2
2 -4
2-5
2-6
2-7
2-
IO
2-1 1
2- 12
2-13
2-
14
2-15
2-18
2-22
2-34 Important Information
About Keys
Door Locks
Operation of Child Security Locks
Remote Keyless Entry
Battery Replacement for RKE
Preventing
Theft of Your Vehicle
New Vehicle "Break-In"
Ignition Positions
Tips
on Starting Your Engine
Using the Engine Coolant Heater
Automatic Transmission Operation
Parking Brake Guidelines
Important Information
on Engine Exhaust
Operation of Your Windows 2-2s
2-25
2-26
2-27
2-28
2-3
1
2-32
2-33
2-34
2-35
2-48 2-52
Adjusting the Tilt Steering Wheel
Functions
of the Multifunction Lever
How
to Use the HighLow Beam
Headlamp Changer
Windshield Wipers and Fluid
Using Cruise Control
Exterior Lamps Daytime Running Lamps (DRL)
Rearview Mirrors
Storage Compartments
Instrument Panel Overview
All About Your Warning Lights and Gages
Interior
Lamps
ProCarManuals.com
Page 60 of 358

Keyless Entry System
You can lock and unlock your doors or unlock your
liftgate from up to
30 feet (9 m) away using the key
chain transmitter supplied with your vehicle.
Your Keyless Entry System operates on a radio
frequency subject to Federal Communications
Commission (FCC) Rules and with Industry and Science
Canada Rules.
This device complies with
Part 15 of the FCC Rules.
Operation is subject to
the following two conditions:
(1) this device may not cause harmful interference,
and
(2) this device must accept any interference received,
including interference that may cause undesired operation.
This device complies with RSS-210 of Industry and
Science Canada. Operation is subject to the following
two conditions:
(1) this device may not cause
interference, and
(2) this device must accept any
interference received, including interference that may
cause undesired operation
of the device.
The range
of this system is about 30 feet (9 m). At times
you may notice
a decrease in range. This is normal for
any remote lock control system.
If the transmitter does
not work
or if you have to stand closer to your vehicle
for the transmitter to work, try this:
0
0
0
0
Check to determine if battery replacement or
resynchronization
is necessary. See the instructions
that follow.
Check the distance. You may be too far from your
vehicle. You may need to stand closer during rainy
or snowy weather.
Check
the location. Other vehicles or objects may be
blocking the signal. Take
a few steps to the left
OS right.
If you’re still having trouble, see your Oldsmobile
retailer or
a qualified technician for service.
Changes or modifications to this system by other than an
authorized service facility could void authorization to
use
this equipment.
Operation
When you press UNLOCK, the driver’s door and
liftgate will unlock automatically.
If you press
UNLOCK again within five seconds, all
the doors will
unlock. Press LOCK to lock all the doors.
Press the REAR button twice within
3 1/2 seconds to
unlock and unlatch the liftgate. The transmission must
be
in PARK (P) or NEUTRAL (N).
2-6
ProCarManuals.com
Page 61 of 358

Matching Transmitter(s) To Your Vehicle
Each key chain transmitter is coded to prevent another
transmitter from unlocking your vehicle.
If a transmitter is
lost or stolen, a replacement can be purchased through
your retailer. Remember to bring any remaining
transmitters
with you when you go to your retailer. When
the retailer matches the replacement transmitter to your
vehicle, any remaining transmitters must also be matched.
Once your retailer has coded the new transmitter, the lost
transmitter will not unlock your vehicle. Each vehicle can
have only two tr'msmitters matched to it.
Battery Replacement
Under normal use, the battery in your key chain
transmitter should last about two years.
You can tell the battery is weak if the transmitter won't
work at the normal range in any location.
If you have to
get close to your vehicle before the transmitter works,
it's probably time to change the battery.
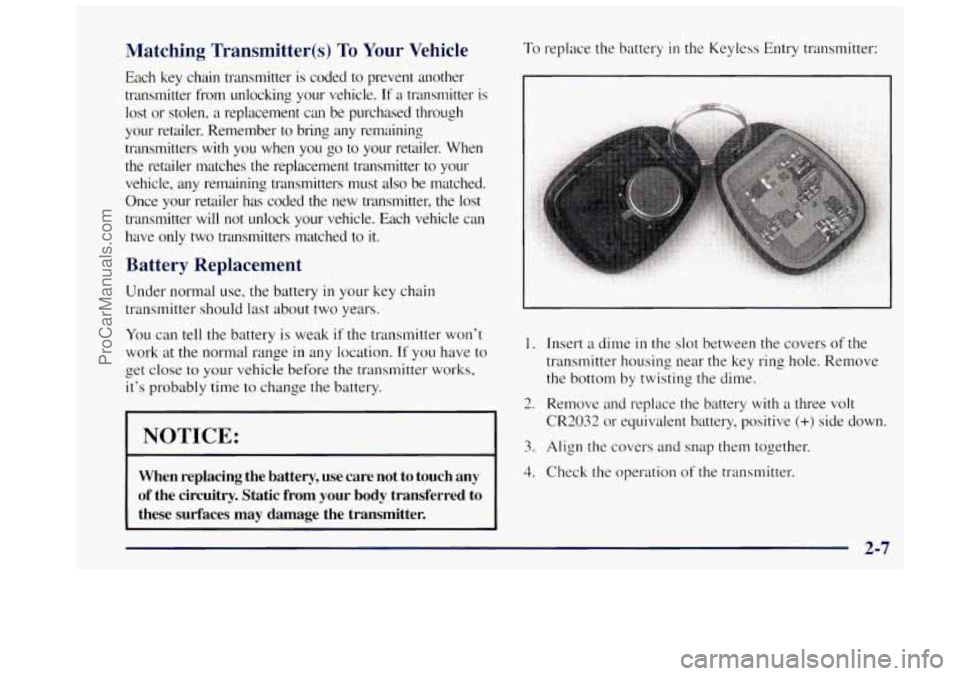
To replace the battery in the Keyless Entry transmitter:
1. Insert a dime in the slot between the covers of the
transmitter housing near the key ring hole. Remove
the bottom by twisting the dime.
2. Remove and replace the battery
with a three volt
NOTICE:
CR2032 or equivalent battery, positive (+) side down.
3. Align the covers and snap them together.
When replacing the battery, use care not to touch any
of the circuitry. Static from your body transferred to 4. Check the operation of the transmitter.
these surfaces may damage the transmitter.
2-7
ProCarManuals.com
Page 86 of 358

Press the bottom switch with the master lamps symbol on
it to turn on all the lamps listed as well as the headlamps.
Press the side of the switch marked
OFF to turn off
your lamps.
Lamps On Reminder
A reminder tone will sound when your headlamps or
parking lamps are turned on and your ignition is
in OFF,
LOCK or ACCESSORY. To turn the tone off, press the
OFF switch.
Daytime Running Lamps
Daytime Running Lamps (DRL) can make it easier for
others to see the front of your vehicle during the day.
DRL can be helpful in many different driving
conditions, but they can be especially helpful in the
short periods after dawn and before sunset.
The DRL system
will make your headlamps come on at
reduced brightness when:
the ignition is on,
the headlalnp switch is off and
0 the parking brake is released. When
the DRL are
on, only your headlamps will be on.
The taillamps, sidemarker and other lamps won’t be
on.
The instrument panel won’t be lit up either.
When
it begins to get dark, your DRL indicator light
is a reminder to turn your headlamp switch on. The
other lamps that come
on with your headlamps will also
come on.
When you
turn the headlamp switch off, the regular
lamps will go off. and your headlamps
will change to
the reduced brightness of DRL.
To idle your vehicle with the DRL off, set the parking
brake. The DRL
will stay off until you release the
parking brake.
As with any vehicle, you should turn on the regular
headlamp system when you need
it.
2-32
ProCarManuals.com
Page 101 of 358

Erasing Channels
To erase all three programmed channels, hold down the
two outside buttons
until the red light begins to flash.
Individual channels cannot be erased, but can be
reprogrammed using the procedure for programming the
transmitter explained earlier.
Training a Garage Opener with a “Rolling
Code” Feature
If you programmed the universal transmitter, but the
garage door will not open, and
if your garage door opener
was manufactured after 1995,
YOLK garage door may have
a security feature that changes the “code” of your garage
door opener every time
it is opened or closed.
To determine if your garage door opener has this
“rolling code” feature, press the appropriate button on
the universal transmitter that was programmed.
If the
red light flashes rapidly for one
to two seconds, then
turns solid, your garage door opener has this feature.
To program a garage door opener- with the rolling code
feature, do the following:
1. Program your hand-held transmitter to the universal
transmitter by following the steps provided under
“Programming the Transmitter” earlier
in this section.
2.
3.
4.
5.
6.
Remove the cover panel from the garage door opener
receiver.
It is located near the garage door opener motor.
Locate the training button on the garage door opener
receiver. The exact location and color will vary
among brands.
Press the training button on the garage door opener
receiver for one to two seconds.
Return to your vehicle and press the programmed
button on the universal transmitter
until the red light
flashes rapidly (about two seconds).
Release the button, then repress
it to confirm it was
programmed to the garage door opener receiver.
You may now use either the universal transmitter or the
hand-held transmitter to open your garage door. If you
still have difficulty
in programming and require
assistance, please call 1-800-355-35 15.
Accessories
Accessories for the universal transmitter are available
from the manufacturer of the
unit. If you would like
additional information, please call 1-800-355-35
15.
2-47
ProCarManuals.com
Page 119 of 358

e
+# HEATER: This setting directs warmed air through
the heater floor outlets and windshield defroster outlets.
we
+# BLEND: Airtlow is divided equally between the
heater floor outlet and the windshield defroster outlets.
%? DEFROST This setting directs most air through
the windshield defroster outlets and some through the
heater outlets.
Air Conditioning
On hot days, open the windows long enough to let hot
inside air escape. This reduces the time
it takes for your
vehicle to cool down. Then keep your windows closed
for the air conditioner to work its best.
For quick cool-down on very hot days, use
MAX A/C
with the temperature knob turned counterclockwise.
This setting should be used to keep odors and/or dust
from entering the vehicle. For normal cooling on hot
days, use A/C with the temperature knob turned
counterclockwise.
On cool but sunny days, use BI-LEVEL A/C to deliver
warm air to the floor and cooler air to the instrument
panel outlets.
When the air conditioner is on,
you may sometimes
notice slight changes
in your vehicle‘s engine speed and
power. This is normal because the system is designed to
cycle the compressor on and off to keep the
desired temperature.
Heating
The heater works best if you keep your windows closed
while using
it. On cold days, use HEATER with the
temperature knob turned clockwise.
BLEND is useful in
cool weather when you have fog or ice on the
windshield or side windows.
If you use the optional engine coolant heater before
starting your engine, your heating system will produce
warmer
air faster to heat the passenger compartment in
cold weather. See “Engine Coolant Heater” in the Tndex.
3-3
ProCarManuals.com
Page 127 of 358

AUTO TONE: Press this button to select among the
five preset equalization settings and tailor the sound to
the music or voice being heard. Each time you press the
button, the selection will switch to one
of the preset
settings
of CLASSIC, NEWS, ROCK, POP or JAZZ.
The display will show which mode the receiver
is in. To
return to the manual mode, press and release
this button
until
MAN appears on the display. This will return the
tone adjustment to the BASS and TREB controls. If a
BASS
or TREB control is rotated, the AUTO TONE
setting will change to
MAN.
Adjusting the Speakers
BAL: Press lightly on this knob to release it from its
stored position. Turn the control clockwise to adjust
sound to the right speakers and counterclockwise to
adjust sound to the left speakers. The middle position
balances the sound between
the speakers.
FADE: Press lightly on this knob to release it from its
stored position. Turn the control clockwise to adjust the
sound to the front and counterclockwise for the rear
speakers. The middle position balances the sound
between the speakers.
Push these knobs back into their stored positions when
you’re not using them.
Playing a Compact Disc
PWR: Press this knob to turn the system on. (Please note
that you can also turn the system on when
you insert a
compact disc into the player with
the ignition on.)
Insert
a disc partway into the slot, label side up. The
player will pull it in. Wait a few seconds and the disc
should play. CD and
a CD symbol will also appear on
the display. Anytime you are playing
a CD, the letters
CD will be next to the CD symbol.
If
the disc comes back out and ERR appears on the
display,
it could be that:
You are driving on a very rough road. (The disc
should play when the road gets smoother.)
The disc is upside down.
It is dirty, scratched or wet.
It is very humid. (If so, wait about an hour and
try again.)
0 The disc player is very hot.
Press RECALL
to make ERR go off the display.
PREV (1): Press PREV or the SEEK left arrow to
search for the previous selection.
If you hold this button
or press
it more than once, the disc will advance further.
Sound is muted
in this mode.
3-11
ProCarManuals.com