1997 NISSAN QUEST lock
[x] Cancel search: lockPage 107 of 247

Securing the child
Before using the integrated child safety
seats, carefully read the shoulder har-
ness, seatback release, and integrated
child safety seat cushion labels.
The following steps apply to both the left
and right integrated child safety seats.
1. Be sure your child meets all of the re-
quired age, weight and height require-
ments for the safe use of the integrated
child safety seat.
2. Be sure the second row bench seat is
securely latched to the floor of the ve-
hicle. Refer to the ``Flexible seating'' sec-
tion in this chapter for proper seat instal-
lation procedures.
3. Be sure the second row bench seatback
is locked by grasping it and trying to rock
it back and forth. Also, check that the
seatback release lever is in the full down
position.
4. Pull the cushion release strap and lower
the intregrated child safety seat cushion
completely.
APD0854
2-74
ZX
Page 109 of 247
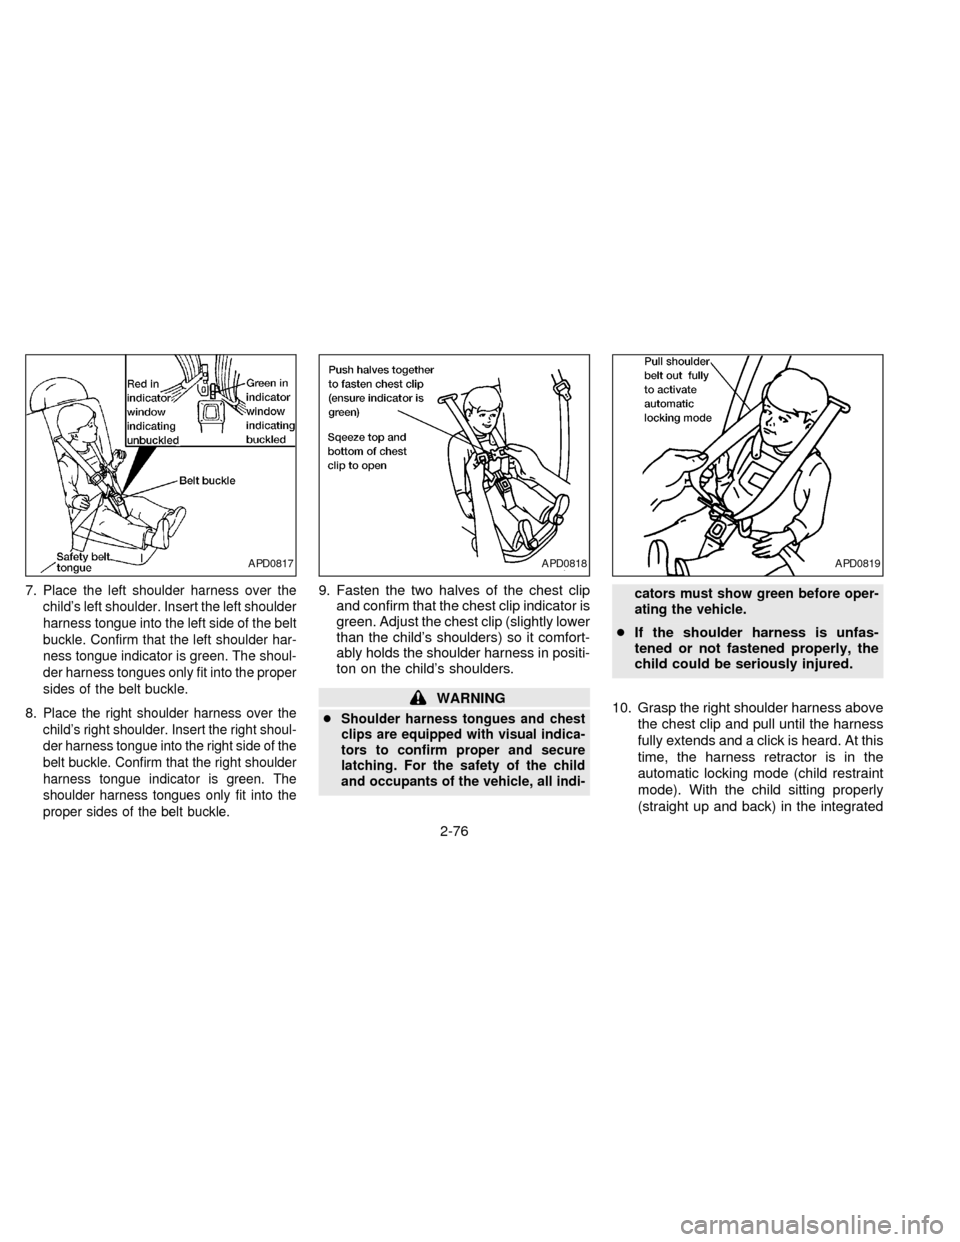
7.Place the left shoulder harness over the
child's left shoulder. Insert the left shoulder
harness tongue into the left side of the belt
buckle. Confirm that the left shoulder har-
ness tongue indicator is green. The shoul-
der harness tongues only fit into the proper
sides of the belt buckle.
8.Place the right shoulder harness over the
child's right shoulder. Insert the right shoul-
der harness tongue into the right side of the
belt buckle. Confirm that the right shoulder
harness tongue indicator is green. The
shoulder harness tongues only fit into the
proper sides of the belt buckle.
9. Fasten the two halves of the chest clip
and confirm that the chest clip indicator is
green. Adjust the chest clip (slightly lower
than the child's shoulders) so it comfort-
ably holds the shoulder harness in positi-
ton on the child's shoulders.
WARNING
cShoulder harness tongues and chest
clips are equipped with visual indica-
tors to confirm proper and secure
latching. For the safety of the child
and occupants of the vehicle, all indi-cators must show green before oper-
ating the vehicle.
cIf the shoulder harness is unfas-
tened or not fastened properly, the
child could be seriously injured.
10. Grasp the right shoulder harness above
the chest clip and pull until the harness
fully extends and a click is heard. At this
time, the harness retractor is in the
automatic locking mode (child restraint
mode). With the child sitting properly
(straight up and back) in the integrated
APD0817APD0818APD0819
2-76
ZX
Page 110 of 247
child safety seat, allow the right shoul-
der harness to retract over the right
shoulder and securely restrain the child.
A clicking sound is heard as the har-
ness retracts, indicating that the retrac-
tor is in the automatic locking mode. Be
sure the left shoulder harness is also
properly positioned over the child's left
shoulder.
11. Check that the shoulder harness is in
the automatic locking mode by trying to
pull the shoulder harness out of the
retractor. If you cannot pull any of the
shoulder harness webbing out of the
retractor, the shoulder harness is in the
automatic locking mode. If the shoulder
harness is not locked, repeat step 10. If,
after repeated attempts, the integrated
child safety seat shoulder harness can-
not be placed in the automatic locking
mode, do not use the integrated child
safety seat and have it inspected by
your NISSAN dealer.
To cancel the automatic locking mode, un-
buckle the chest clip and both shoulder
harness tongues. Allow the shoulder har-
nesses to retract completely. The automatic
locking mode is now canceled and theshoulder harness retractor is in the emer-
gency locking mode.
WARNING
The automatic locking mode (child re-
straint mode) must be reactivated each
time you place a child in the integrated
child safety seats.
In addition to the automatic locking retrac-
tors, the integrated child safety seat shoul-
der harnesses are equipped with emer-
gency locking retractors. The automatic
locking mode is best to use, especially for
children who need help staying properly
positioned in the seat and its harnesses (for
example, children who are younger and
smaller), because the belts are always
locked. In the emergency locking mode, the
shoulder belts only lock in a sudden stop or
accident, allowing a child more freedom of
movement. Use the emergency locking
mode only if you judge your child able to
remain properly positioned in the integrated
child safety seat.
Removing the child
1. Release the chest clip.
2. Release the left and right shoulder har-ness tongues from the belt buckle by
pressing the red belt buckle button.
3. Move the left and right shoulder har-
nesses aside and assist the child from
the integrated child safety seat.
Storing the Integrated Child Safety
Seat
1. Be sure the shoulder harnesses are fully
retracted and resting inside the inte-
grated child safety seat recess. It is not
necessary to reconnect the shoulder har-
nesses and belt buckle prior to storing
the integrated child safety seat.
2. While holding onto, but not pulling, the
cushion release strap, rotate the cushion
upward until it fits flush with the second
row seat back cushion and locks into
position.
3. Be sure the integrated child safety seat is
locked in the stowed position by grasping
the safety seat cushion and attempting to
lower it without pulling the cushion re-
lease strap. If the integrated child safety
seat is not locked in the stowed position,
repeat steps 1 through 3.
2-77
ZX
Page 111 of 247
Integrated Child Safety Seat main-
tenance
cTo clean the shoulder harnesses and belt
buckle webbing, apply a mild soap solu-
tion or any solution recommended for
cleaning upholstery or carpets. Then
brush the webbing, wipe it with a cloth
and allow it to dry in the shade. Do not
allow the shoulder harnesses to retract
until they are completely dry.
cThe integrated child safety seats cloth
removable pads may be cleaned with
mild soap and water. The cloth remov-
able pads are attached to the seats with
fastener strips, and may be easily re-
moved. The pads are machine washable.
Fo best results, machine wash in cold
water in the gentle cycle. Tumble dry on
low heat. Do not use chlorine bleach, and
do not dry clean.
CAUTION
Failure to follow the washing instruc-
tions provided on the cloth removable
pads may result in premature wear or
damage.cPeriodically inspect the belt and metal
components of the integrated child safety
seats, such as the buckles, tongues,
shoulder harness webbings, and latching
indicators. Periodically check the func-
tion of the integrated child safety seat
shoulder harness retractor functions. If
loose parts, deterioration, cuts, frays,
malfunctions or other damage to the belt
webbings or metal parts are found, see
your NISSAN dealer for repairs.
Inspection after an accident
If your vehicle was involved in an accident,
before using the integrated child safety
seats, all related components should be
inspected by a NISSAN dealer for damage.
Damage to the integrated child safety seats
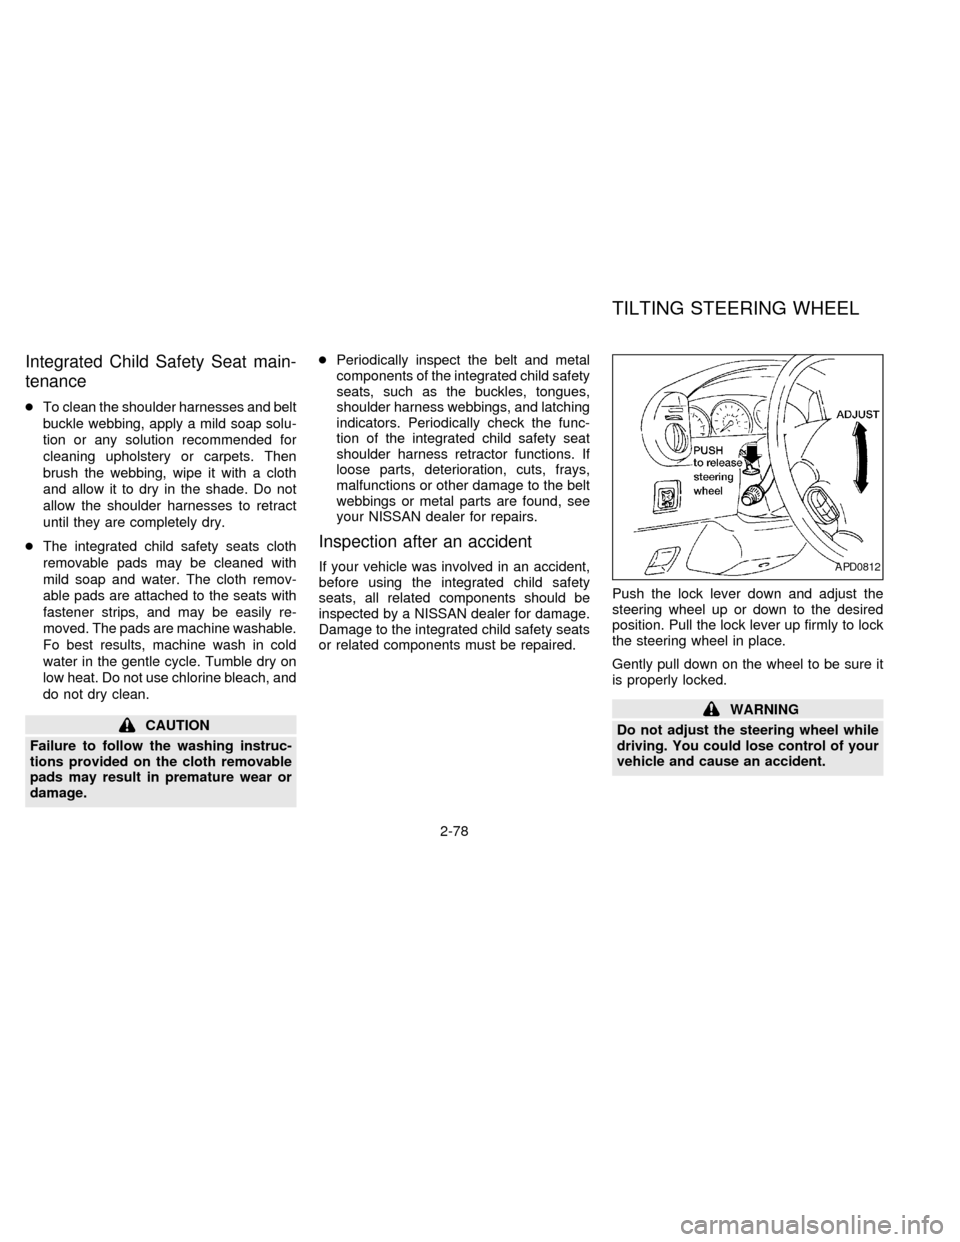
or related components must be repaired.Push the lock lever down and adjust the
steering wheel up or down to the desired
position. Pull the lock lever up firmly to lock
the steering wheel in place.
Gently pull down on the wheel to be sure it
is properly locked.
WARNING
Do not adjust the steering wheel while
driving. You could lose control of your
vehicle and cause an accident.
APD0812
TILTING STEERING WHEEL
2-78
ZX
Page 127 of 247

Servicing air conditioning
The air conditioning system in your NISSAN
vehicle is charged with a refrigerant de-
signed with the environment in mind.
This refrigerant does not harm the
earth's ozone layer.
Special charging equipment and lubricant
are required when servicing your NISSAN
air conditioner. Using improper refrigerants
or lubricants causes severe damage to your
air conditioning system. See ``Air condition-
ing system refrigerant and lubricant recom-
mendations'' in the ``Technical and con-
sumer information'' section of this manual.
Your NISSAN dealer is able to service your
environmentally ``friendly'' air conditioning
system.To turn the radio on, turn the ignition key to
ACC or ON. If you listen to the radio with the
engine not running, turn the key to the ACC
position.
Radio reception is affected by station signal
strength, distance from radio transmitter,
buildings, bridges, mountains and other ex-
ternal influences. Intermittent changes in
reception quality normally are caused by
these external influences.
Clock
For information on setting the clock, refer to
the section ``Instruments and controls''.
AM-FM RADIO WITH CASSETTE
PLAYER
Radio operation
Push the VOL-PUSH ON knob to turn the
radio on. Push the VOL-PUSH ON knob
once more to turn the radio off.
Turn the knob to adjust the volume.
Inserting a cassette tape into the cassette
player while the radio is on turns the radio
off and turns the cassette player on.
AUDIO SYSTEM
3-14
ZX
Page 133 of 247
Manual antenna
The manual antenna on your vehicle re-
mains in the up position at all times. The
antenna cannot be shortened, but can be
removed. When you need to remove the
antenna, turn its base counterclockwise.
Power antenna (if so equipped)
The power antenna automatically extends
when the radio is turned on, and retracts
when turned off or when a tape or CD is
played. If the radio is left on, the antenna
retracts and extends with the ignition key
OFF-ON operation.
CAUTION
cBefore turning the radio on, make
sure that there is no one near the
antenna outlet and there is enough
space for it to extend.
cTo prevent damage, be sure that the
power antenna is fully retracted be-
fore the vehicle enters an automated
car wash.cDirt and other foreign matter on the
power antenna rod may interrupt its
operation. Clean the rod periodically
with a damp cloth. This type of
cleaning is especially important dur-
ing the winter seasons in areas
where road salt and other chemicals
may be spread on the road surfaces
and splashed onto the antenna rod.
ANTENNA
3-20
ZX
Page 140 of 247

4Starting and driving
Precautions when starting and driving ...................4-2
Exhaust gas (carbon monoxide) ............................4-2
Three way catalyst .................................................4-2
Avoiding collision and rollover................................4-3
Drinking alcohol/drugs and driving .........................4-3
Ignition switch .........................................................4-4
Before starting the engine ......................................4-5
Driving with an automatic transmission .................4-5
Overdrive switch .....................................................4-7
Starting the engine .................................................4-8Parking brake operation .........................................4-9
Cruise control .......................................................4-10
Break-in schedule ................................................4-12
Increasing fuel economy ......................................4-12
Parking/parking on hills ........................................4-13
Power steering system .........................................4-14
Brake system........................................................4-14
Anti-lock brake system (ABS)
(if so equipped) ....................................................4-15
Cold weather driving ............................................4-16
ZX
Page 143 of 247
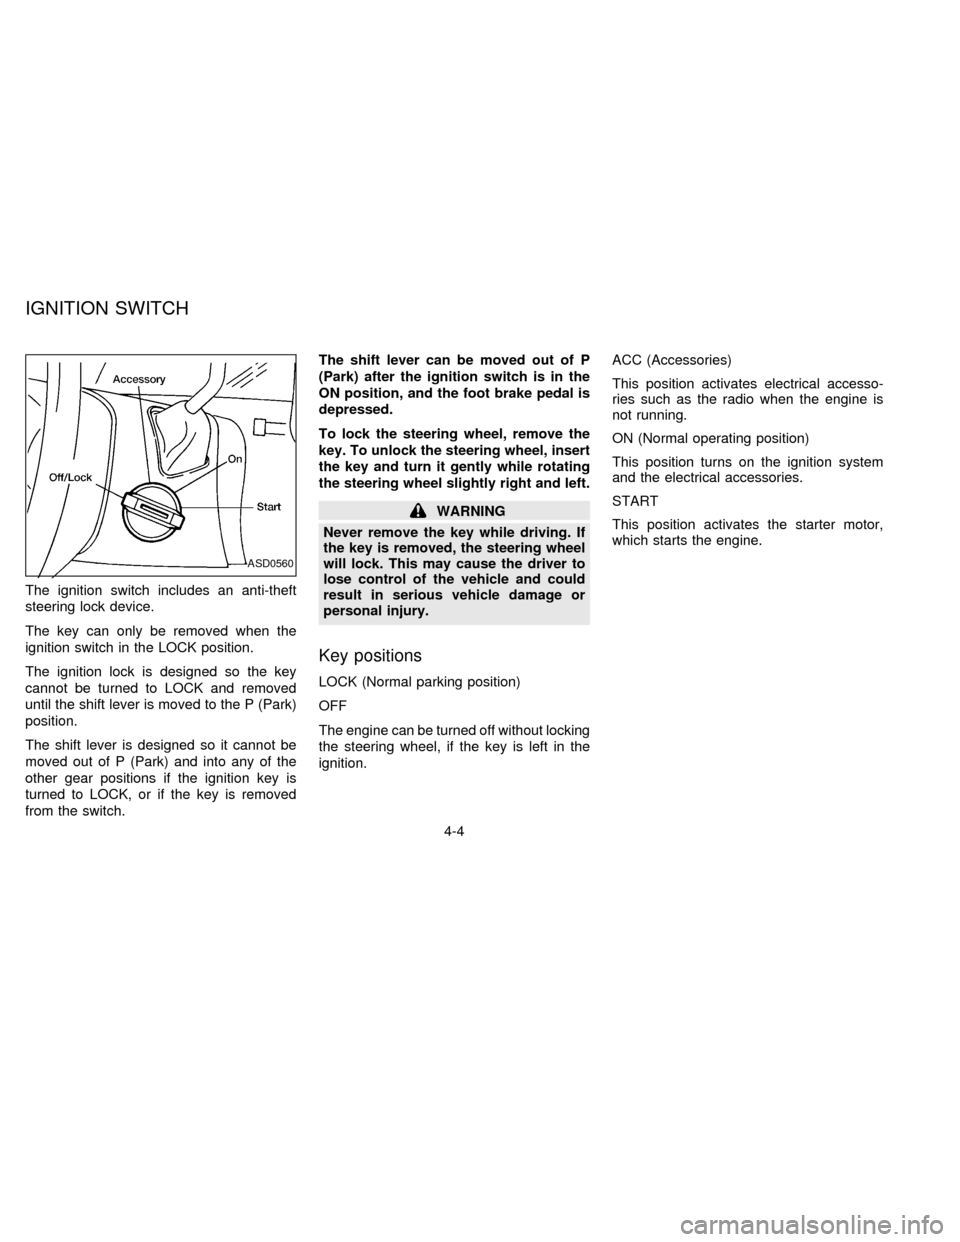
The ignition switch includes an anti-theft
steering lock device.
The key can only be removed when the
ignition switch in the LOCK position.
The ignition lock is designed so the key
cannot be turned to LOCK and removed
until the shift lever is moved to the P (Park)
position.
The shift lever is designed so it cannot be
moved out of P (Park) and into any of the
other gear positions if the ignition key is
turned to LOCK, or if the key is removed
from the switch.The shift lever can be moved out of P
(Park) after the ignition switch is in the
ON position, and the foot brake pedal is
depressed.
To lock the steering wheel, remove the
key. To unlock the steering wheel, insert
the key and turn it gently while rotating
the steering wheel slightly right and left.
WARNING
Never remove the key while driving. If
the key is removed, the steering wheel
will lock. This may cause the driver to
lose control of the vehicle and could
result in serious vehicle damage or
personal injury.
Key positions
LOCK (Normal parking position)
OFF
The engine can be turned off without locking
the steering wheel, if the key is left in the
ignition.ACC (Accessories)
This position activates electrical accesso-
ries such as the radio when the engine is
not running.
ON (Normal operating position)
This position turns on the ignition system
and the electrical accessories.
START
This position activates the starter motor,
which starts the engine.
ASD0560
IGNITION SWITCH
4-4
ZX