1997 NISSAN QUEST ECO mode
[x] Cancel search: ECO modePage 135 of 247

CD number for three seconds, then the
track number for three seconds, then dis-
plays both together for the remainder of the
track.
Push this button when a CD is already
playing to stop the CD.
If the CD button is pushed while in the radio
or tape mode, and there are no CDs loaded
in the magazine, the display window flashes
a NO DISC message for 4 seconds.
SEEK
PushSEEK to select the previous
track number, or push SEEKto se-
lect the next track number. After the last
track on a disc, pushing SEEK
se-
lects the first track of the same disc.
TUNE DISCS
PushTUNE DISCS to select the pre-
vious CD in the magazine. Push TUNE
DISCS
to select the next CD in the
magazine.
SCAN
Push this button to audition the first 10
seconds of each track on a disc. At the end
of the disc, the SCAN function continueswith the first track on the same disc. The
display window flashes the track number
being auditioned during the SCAN function.
REW
Press this button to reverse the CD mecha-
nism and move back to a previous point on
the disc. If held for less than three seconds,
this button causes the CD to reverse at
three times the normal play speed. If held
for more than three seconds, the CD re-
verses at 10 times the normal play speed.
The mechanism reverses to the beginning
of track 1 and begins play if the button is
held continuously. The volume decreases
and the display window shows the elapsed
time during the entire fast reverse period.
FF
Press this button to advance the CD mecha-
nism and move ahead on the disc. If held for
less than three seconds, this button causes
the CD to advance at three times the normal
play speed. If held for more than three
seconds, the CD advances at 10 times the
normal play speed.
The volume decreases and the display win-
dow shows the elapsed time during theentire fast forward period.
COMP
Press this button to activate the compres-
sion function. This function reduces the
dynamic range of the CD program material,
which provides the listener with a more
consistent level of volume. The display win-
dow shows a C when the compression
function is activated.
SHUFFLE
Press this button to randomly select the play
order of the tracks on a CD. When all tracks
of one CD have been played, the system
changes to the next CD in the magazine
and proceeds to play the tracks in a ran-
domly selected order. The shuffle feature
remains in effect until turned off by pressing
the SHUFFLE button again.
When the shuffle function is activated, the
display window shows the letters SHF for two
seconds, then shows the disc number and
track selected for the remainder of that selec-
tion. When a new track is selected, the letters
SHF reappear for two seconds, followed by
the new disc and track number, and so on, as
long as the shuffle function is active.
3-22
ZX
Page 138 of 247
Microphone installed model
If equipped with a genuine cellular phone,
your NISSAN features a non-directional mi-
crophone in the steering column cover, so it
is not necessary to look at or speak directly
into the microphone when calling.
To do so could detract from the driving
operation and cause an accident.
See the manual for car phone operation.
Pre-wired and antenna for phone
installed model
Some models are pre-wired to accept the
genuine NISSAN cellular phone.
In addition, the same model has the phone
antenna built into the rear glass window.
When installing a CB ham radio, a car
phone or other transmitters in your NISSAN,
be sure to observe the following cautions,
otherwise the new equipment may ad-
versely affect the MFI system and other
electronic parts.
CAUTION
cKeep the antenna as far away as
possible from the Engine Control
Module.
cAlso keep the antenna wire more
than 8 inches (20 cm) away from the
Multiport Electronic Fuel Injection
(MFI) harness. Do not route the an-
tenna wire next to any harness.
cAdjust the antenna standing-wave
ratio as recommended by the
manufacturer.
cConnect the ground wire from the
CB radio chassis to the body.
cFor details, consult a NISSAN dealer.
CB RADIO OR CAR PHONE
3-25
ZX
Page 147 of 247
nates. When cruising at a low speed
or climbing a gentle slope, you may
feel uncomfortable shift shocks as
the transmission shifts between 3rd
and overdrive repeatedly. In this
case, press the overdrive switch.
The O/D OFF indicator light comes
on at this time.
When driving conditions change, press the
overdrive switch again. The O/D OFF indi-
cator light goes out.
Remember not to drive at high speeds for
extended periods of time with the O/D OFF
light illuminated. This reduces the fuel
economy.1. Apply the parking brake.
2. Move the selector lever to P (Park) or N
(Neutral). (P preferred.)
The shift lever cannot be moved out of
P and into any of the other gear posi-
tions under the following conditions:
cThe ignition key is turned to the
OFF position.
cThe ignition key is turned to the ON
position without depressing the
foot brake pedal.
The starter is designed not to operate
if the selector lever is in one of the
driving positions.
3. Crank the enginewith your foot off the
accelerator pedalby turning the ignition
key to START. Release the key when the
engine starts. If the engine starts, but
fails to run, repeat the above procedure.
Ð If the engine is very hard to start in
extremely cold or hot weather, de-
press the accelerator pedal and hold it
to help start the engine.Ð In the summer, when restarting the
engine within 30 minutes after it has
been stopped, keep the accelerator
pedal slightly depressed while start-
ing.
CAUTION
Do not operate the starter for more than
15 seconds at a time. If the engine does
not start, turn the key off and wait 10
seconds before cranking again, other-
wise the starter could be damaged.
4. Warm-up
Allow the engine to idle for at least 30
seconds after starting. Drive at moderate
speeds for a short distance first, espe-
cially in cold weather.
STARTING THE ENGINE
4-8
ZX
Page 151 of 247

During the first 1,000 miles (1,600 km),
follow these recommendations for the future
reliability and fuel economy of your new
vehicle. Failure to follow these recommen-
dations may result in vehicle damage or
shortened engine life.
cDo not drive over 55 MPH (90 km/h) and
do not run the engine over 4,000 RPM.
Avoid driving for long periods at constant
speed, either fast or slow.
cDo not accelerate at full throttle in any
gear.
cAvoid quick starts.
cAvoid hard braking as much as possible.
cDo not tow a trailer for the first 500 miles
(800 km).cAccelerate slowly and smoothly. Main-
tain cruising speeds with a constant ac-
celerator position.
cDrive at moderate speeds on the high-
way. Driving at high speed lowers fuel
economy.
cAvoid unnecessary stopping and brak-
ing. Maintain a safe distance behind
other vehicles.
cUse a proper gear range which suits road
conditions. On level roads, shift into high
gear as soon as possible.
cAvoid unnecessary engine idling.cKeep your engine tuned up.
cFollow the recommended periodic main-
tenance schedule.
cKeep the tires inflated at the correct
pressure. Low pressure increases tire
wear and wastes fuel.
cKeep the front wheels in correct align-
ment. Improper alignment causes not
only tire wear but also lower fuel
economy.
cAir conditioner operation lowers fuel
economy. Use the air conditioner only
when necessary.
cWhen cruising at highway speeds, it is
more economical to use the air condi-
tioner and leave the windows closed to
reduce drag.
SD1001M
BREAK-IN SCHEDULE INCREASING FUEL
ECONOMY
4-12
ZX
Page 174 of 247
choosing the proper product.
cWax your vehicle only after a thorough
washing. Follow the instructions supplied
with the wax.
cDo not use a wax containing any abra-
sives, cutting compounds or cleaners
that may damage the vehicle finish.
cIf the surface does not polish easily, use
a ``road tar'' remover and wax again.
Machine compounding or aggressive pol-
ishing on a base coat/clear coat paint finish
may dull the finish or leave swirl marks.
Removing spots
Remove tar and oil spots, industrial dust,
insects, and tree sap as quickly as possible
from the surface of the paint to avoid lasting
damage or staining. Special cleaning prod-
ucts are available at your NISSAN dealer or
any automotive accessory store.
Underbody
In areas where road salt is used in winter,
the underbody must be cleaned regularly.
This prevents dirt and salt from building up
and causing underbody and suspension
corrosion. Before the winter period andagain in the spring, the underseal must be
checked and, if necessary, re-treated.
Cleaning glass
Use glass cleaner to remove smoke and
dust film from the glass surfaces. It is nor-
mal for glass to become coated with a film
after the vehicle is parked in the hot sun.
Glass cleaner and a soft cloth easily remove
this film.
CAUTION
When cleaning the inside of the win-
dow, do not use sharp-edged tools,
abrasive cleaners or chlorine-based
disinfectant cleaners. They could dam-
age the rear window defogger.
Cleaning aluminum alloy wheels
Wash regularly, especially during winter
months in areas where road salt is used.
Salt could discolor the wheel if not removed.
Chrome parts
Clean all chrome parts regularly with a
non-abrasive chrome polish to maintain the
finish.
Cleaning interior
Occasionally remove loose dust from the
interior trim, plastic parts and seats using a
vacuum cleaner or soft brush. Wipe the
vinyl and leather surfaces with a clean, soft
cloth dampened in mild soap solution, then
wipe clean with a dry, soft cloth. Before
using any fabric protector, read the manu-
facturer's recommendations. Some fabric
protectors contain chemicals that may stain
or bleach the seat material.
CAUTION
cNever use benzine, thinner, or any
similar material.
cLeather seats should be regularly
coated with a leather wax like saddle
soap. Never use car wax.
cNever use fabric protectors unless
recommended by the manufacturer.
Front floor mat positioning aid
This model includes a front floor mat
bracket to act as a floor mat positioning aid.
NISSAN floor mats, specially designed for
your vehicle, incorporate grommets. To in-
6-3
ZX
Page 221 of 247
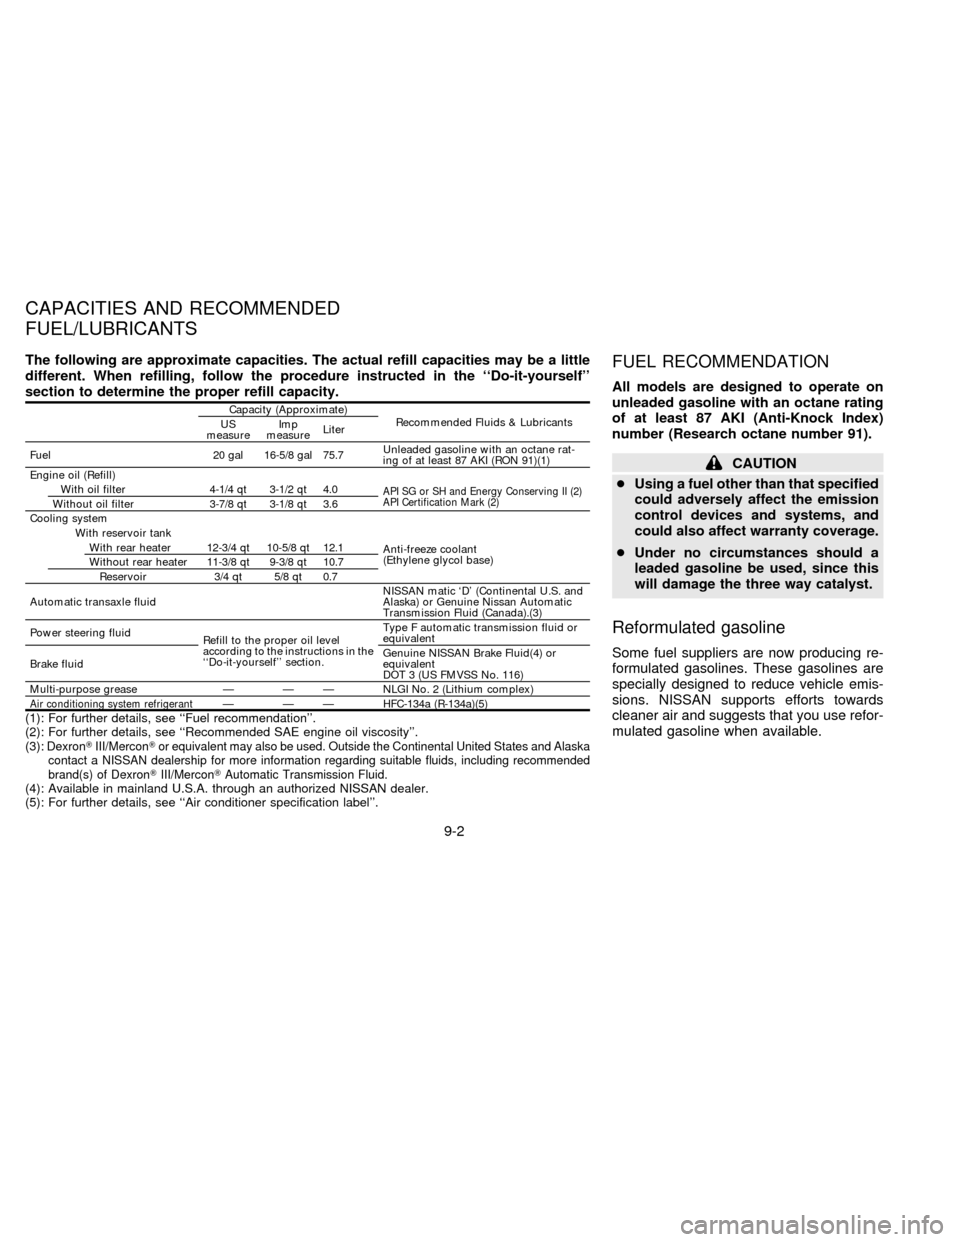
The following are approximate capacities. The actual refill capacities may be a little
different. When refilling, follow the procedure instructed in the ``Do-it-yourself''
section to determine the proper refill capacity.
Capacity (Approximate)
Recommended Fluids & Lubricants
US
measureImp
measureLiter
Fuel 20 gal 16-5/8 gal 75.7Unleaded gasoline with an octane rat-
ing of at least 87 AKI (RON 91)(1)
Engine oil (Refill)
With oil filter 4-1/4 qt 3-1/2 qt 4.0
API SG or SH and Energy Conserving II (2)
API Certification Mark (2)Without oil filter 3-7/8 qt 3-1/8 qt 3.6
Cooling system
With reservoir tank
With rear heater 12-3/4 qt 10-5/8 qt 12.1
Anti-freeze coolant
(Ethylene glycol base)
Without rear heater 11-3/8 qt 9-3/8 qt 10.7
Reservoir 3/4 qt 5/8 qt 0.7
Automatic transaxle fluidNISSAN matic `D' (Continental U.S. and
Alaska) or Genuine Nissan Automatic
Transmission Fluid (Canada).(3)
Power steering fluid
Refill to the proper oil level
according to the instructions in the
``Do-it-yourself'' section.Type F automatic transmission fluid or
equivalent
Brake fluidGenuine NISSAN Brake Fluid(4) or
equivalent
DOT 3 (US FMVSS No. 116)
Multi-purpose grease Ð Ð Ð NLGI No. 2 (Lithium complex)
Air conditioning system refrigerantÐ Ð Ð HFC-134a (R-134a)(5)(1): For further details, see ``Fuel recommendation''.
(2): For further details, see ``Recommended SAE engine oil viscosity''.
(3):
DexronTIII/MerconTor equivalent may also be used. Outside the Continental United States and Alaska
contact a NISSAN dealership for more information regarding suitable fluids, including recommended
brand(s) of DexronTIII/MerconTAutomatic Transmission Fluid.
(4): Available in mainland U.S.A. through an authorized NISSAN dealer.
(5): For further details, see ``Air conditioner specification label''.
FUEL RECOMMENDATION
All models are designed to operate on
unleaded gasoline with an octane rating
of at least 87 AKI (Anti-Knock Index)
number (Research octane number 91).
CAUTION
cUsing a fuel other than that specified
could adversely affect the emission
control devices and systems, and
could also affect warranty coverage.
cUnder no circumstances should a
leaded gasoline be used, since this
will damage the three way catalyst.
Reformulated gasoline
Some fuel suppliers are now producing re-
formulated gasolines. These gasolines are
specially designed to reduce vehicle emis-
sions. NISSAN supports efforts towards
cleaner air and suggests that you use refor-
mulated gasoline when available.
CAPACITIES AND RECOMMENDED
FUEL/LUBRICANTS
9-2
ZX
Page 232 of 247
cOverloading can shorten the life of
your vehicle. Failures caused by
overloading are not covered by your
warranty.
Your new vehicle was designed to be used
primarily to carry passengers and cargo.
Remember that towing a trailer places ad-
ditional loads on your vehicle's engine, drive
train, steering, braking and other systems.
Information on trailer towing ability and the
special equipment required should be ob-
tained from an authorized NISSAN dealer.
He can obtain aNISSAN Towing Guidefor
you.
Do not tow a trailer if your vehicle is a cargo
van model.Maximum load limits
Maximum trailer loads
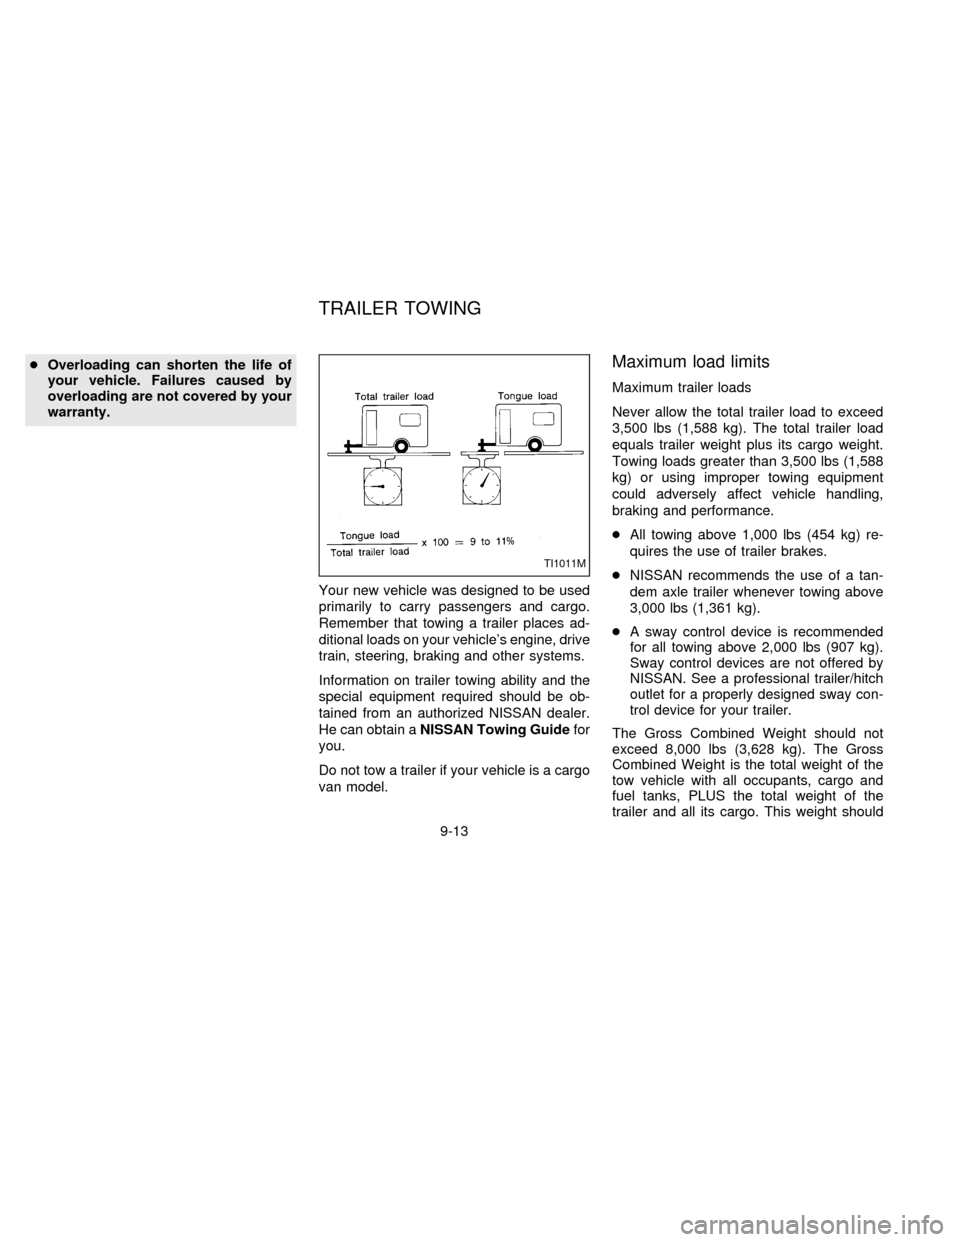
Never allow the total trailer load to exceed
3,500 lbs (1,588 kg). The total trailer load
equals trailer weight plus its cargo weight.
Towing loads greater than 3,500 lbs (1,588
kg) or using improper towing equipment
could adversely affect vehicle handling,
braking and performance.
cAll towing above 1,000 lbs (454 kg) re-
quires the use of trailer brakes.
cNISSAN recommends the use of a tan-
dem axle trailer whenever towing above
3,000 lbs (1,361 kg).
cA sway control device is recommended
for all towing above 2,000 lbs (907 kg).
Sway control devices are not offered by
NISSAN. See a professional trailer/hitch
outlet for a properly designed sway con-
trol device for your trailer.
The Gross Combined Weight should not
exceed 8,000 lbs (3,628 kg). The Gross
Combined Weight is the total weight of the
tow vehicle with all occupants, cargo and
fuel tanks, PLUS the total weight of the
trailer and all its cargo. This weight should
TI1011M
TRAILER TOWING
9-13
ZX
Page 236 of 247
Trailer brakes
If your trailer is equipped with a braking
system, make sure it conforms to Federal
and/or local regulations and it is properly
installed.
WARNING
Never connect a trailer brake system
directly to the vehicle brake system.
Pre-towing tips
cBe certain your vehicle maintains a level
position when a loaded and/or unloaded
trailer is hitched. Do not drive the vehicle
if it has an abnormal nose-up or nose-
down condition; check for improper
tongue load, overload, worn suspension
or other possible causes of either condi-
tion.
cAlways secure items in the trailer to
prevent load shift while driving.
cBe certain your rear view mirrors conform
to all federal, state or local regulations. If
not, install any mirrors required for towing
before driving the vehicle.
Trailer towing tips
In order to gain skill and an understanding
of the vehicle's behavior, you should prac-
tice turning, stopping and backing up in an
area which is free from traffic. Steering,
stability, and braking performance are
somewhat different than under normal driv-
ing conditions.
cAlways secure items in the trailer to
prevent load shift while driving.
c
Avoid abrupt starts, acceleration or stops.
cAvoid sharp turns or lane changes.
cAlways drive your vehicle at a moderate
speed.
cAlways block the wheels on both vehicle
and trailer when parking. Parking on a
slope is not recommended; however, if
you must do so, first block the wheels
and apply the parking brake, and then
move the transmission shift selector le-
ver into the P (Park) position. If you move
the shift selector lever to the P (Park)
position before blocking the wheels and
applying the parking brake, transmission
damage could occur.
cWhen going down a hill, shift into a lowergear and use the engine braking effect.
When ascending a long grade, downshift
the transmission to a lower gear and
reduce speed to reduce chances of en-
gine overloading and/or overheating.
cIf the engine coolant rises to an ex-
tremely high temperature when the air
conditioning system is on, turn the air
conditioner off. Coolant heat can be ad-
ditionally vented by opening the win-
dows, switching the fan control dial to
high and setting the temperature control
dial to the WARM position.
cTrailer towing requires more fuel than
normal circumstances.
cAvoid towing a trailer for the first 500
miles (800 km) of the vehicle's life.
cHave your vehicle serviced more often
than at intervals specified in the recom-
mended Maintenance Schedule.
cWhen making a turn, your trailer wheels
will be closer to the inside of the turn than
your vehicle wheels. To compensate for
this, make a larger than normal turning
radius during the turn.
cCrosswinds and rough roads adversely
9-17
ZX