1997 NISSAN MAXIMA air condition
[x] Cancel search: air conditionPage 113 of 215
feel uncomfortable shift shocks as the
transmission shifts between 3rd and
overdrive repeatedly. In this case, set
the overdrive switch in the ªOFF
º
position. The indicator light will come
on at this time.
When driving conditions change, reset the
overdrive switch in the ªON
º position.
Remember not to drive at high speeds for
extended periods of time with the overdrive
switch set in the ªOFF
º position. This
reduces the fuel economy.
Fail-safe
When the Fail-safe operation occurs, the next
time the key is turned to the ªONº position, the
O/D OFF light will blink for approximately 8
seconds after coming on for 2 seconds. While
the vehicle can be driven under these circum-
stances please note that the gears in the
automatic transmission will be locked in third
gear.If the vehicle is driven under extreme con-
ditions, such as excessive wheel spinning
and subsequent hard braking, the Fail-safe
system may be activated. This will occur
even if all electrical circuits are functioning
properly. In this case, turn the ignition key
ªOFFº and wait for 3 seconds. Then turn
the key back to the ªONº position. The
vehicle should return to its normal operat-
ing condition. If it does not return to its
normal operating condition, have your NIS-
SAN dealer check the transmission and
repair if necessary.
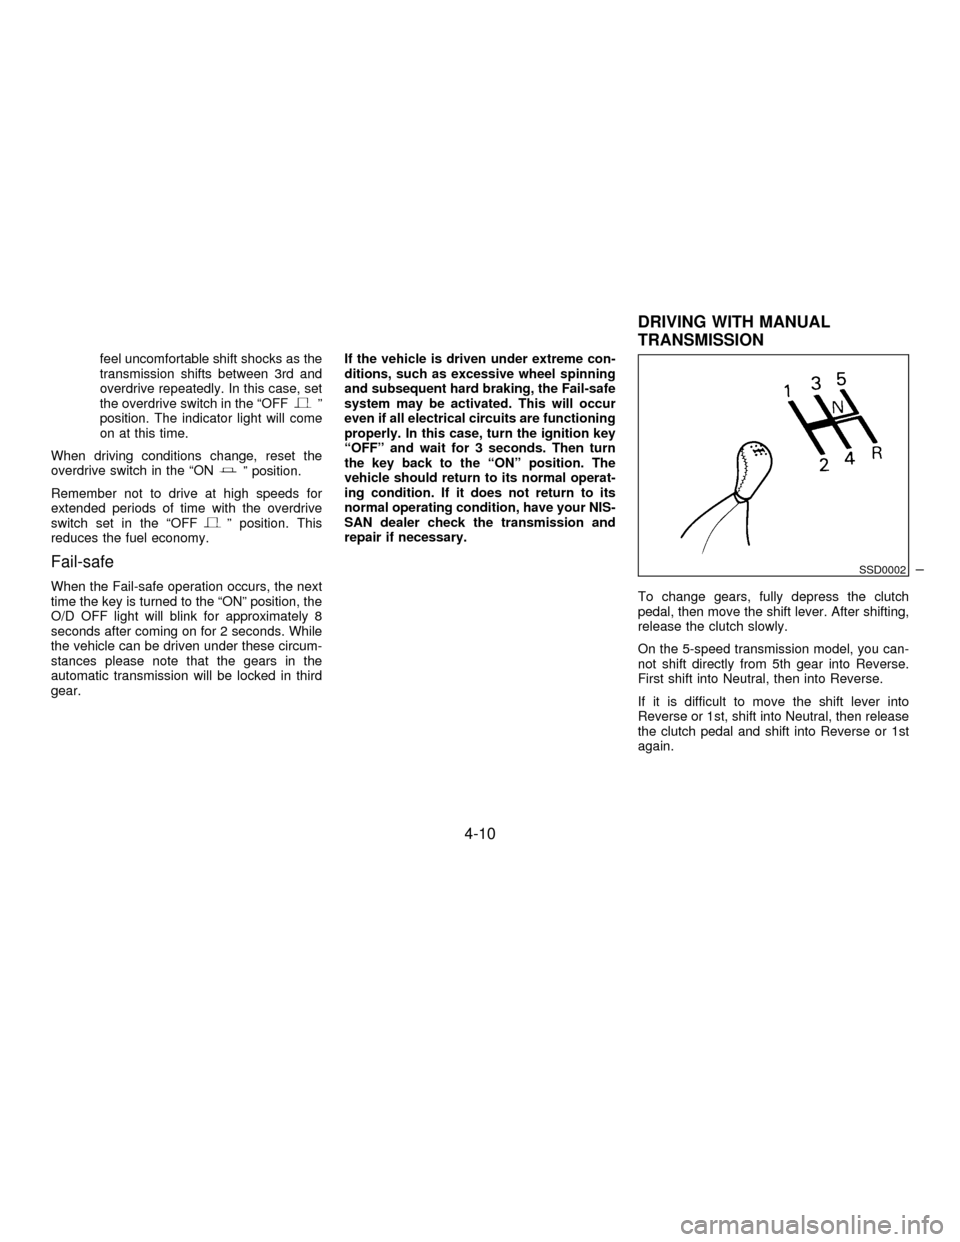
To change gears, fully depress the clutch
pedal, then move the shift lever. After shifting,
release the clutch slowly.
On the 5-speed transmission model, you can-
not shift directly from 5th gear into Reverse.
First shift into Neutral, then into Reverse.
If it is difficult to move the shift lever into
Reverse or 1st, shift into Neutral, then release
the clutch pedal and shift into Reverse or 1st
again.
SSD0002
DRIVING WITH MANUAL
TRANSMISSION
4-10
Z01.2.1/A32-DX
Page 118 of 215
During the first 1,000 miles (1,600 km), follow
these recommendations for the future reliabil-
ity and economy of your new vehicle. Failure to
follow these recommendations may result in
vehicle damage or shortened engine life.
IDo not drive over 55 MPH (90 km/h) and do
not run the engine over 4,000 rpm. Avoid
driving for long periods at constant speed,
either fast or slow.
IDo not accelerate at full throttle in any gear.
IAvoid quick starts.
IAvoid hard braking as much as possible.
IDo not tow a trailer for the first 500 miles
(800 km).
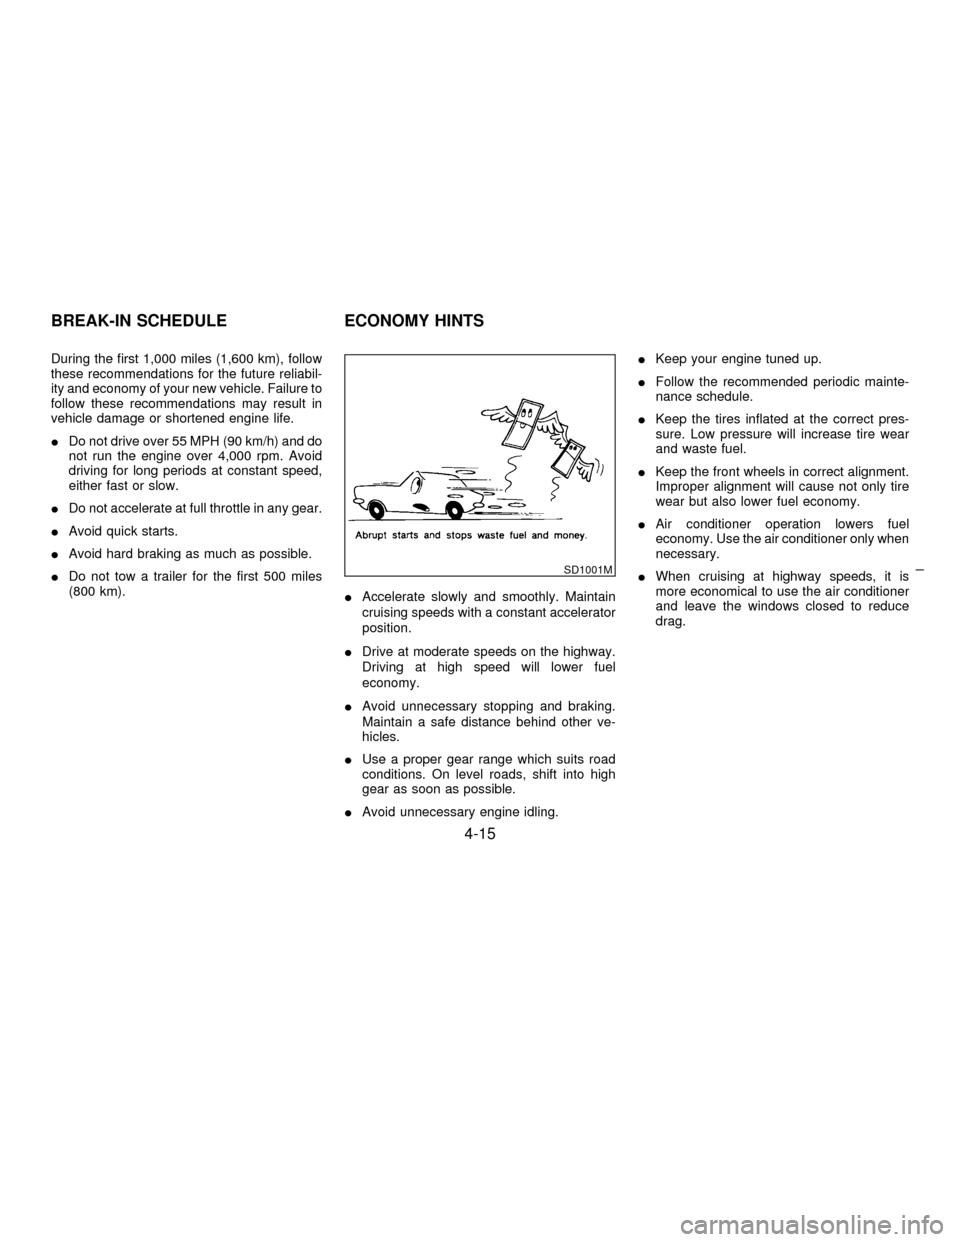
IAccelerate slowly and smoothly. Maintain
cruising speeds with a constant accelerator
position.
IDrive at moderate speeds on the highway.
Driving at high speed will lower fuel
economy.
IAvoid unnecessary stopping and braking.
Maintain a safe distance behind other ve-
hicles.
IUse a proper gear range which suits road
conditions. On level roads, shift into high
gear as soon as possible.
IAvoid unnecessary engine idling.IKeep your engine tuned up.
IFollow the recommended periodic mainte-
nance schedule.
IKeep the tires inflated at the correct pres-
sure. Low pressure will increase tire wear
and waste fuel.
IKeep the front wheels in correct alignment.
Improper alignment will cause not only tire
wear but also lower fuel economy.
IAir conditioner operation lowers fuel
economy. Use the air conditioner only when
necessary.
IWhen cruising at highway speeds, it is
more economical to use the air conditioner
and leave the windows closed to reduce
drag.
SD1001M
BREAK-IN SCHEDULE ECONOMY HINTS
4-15
Z01.2.1/A32-DX
Page 121 of 215
downshift to a lower gear before going down a
slope or long grade. Overheated brakes may
reduce braking performance and could result
in loss of vehicle control.
While driving on a slippery surface, be
careful when braking, accelerating or
downshifting. Abrupt braking or acceler-
ating could cause the wheels to skid and
result in an accident.
The anti-lock brake system controls the brakes
at each wheel so the wheels will not lock when
braking abruptly or when braking on slippery
surfaces. The system detects the rotation
speed at each wheel and varies the brake fluid
pressure to prevent each wheel from locking
and sliding. By preventing wheel lockup, the
system helps the driver maintain steering con-
trol and helps to minimize swerving and spin-
ning on slippery surfaces.
Using the system
Depress the brake pedal and hold it down.
Do not pump the brake pedal. Doing so
may result in increased stopping
distances.
Normal operation
The anti-lock brake system will not operate at
speeds below 3 to 6 MPH (5 to 10 km/h) to
completely stop the vehicle. (The speeds will
vary according to road conditions.) When the
anti-lock system senses that one or more
wheels are close to locking up, the actuator
(under the hood) rapidly applies and releases
hydraulic pressure (like pumping the brakesvery quickly). While the actuator is working,
you may feel a pulsation in the brake pedal
and hear a noise or vibration from the actuator
under the hood. This is normal and indicates
that the anti-lock system is working properly.
However, the pulsation may indicate that road
conditions are hazardous and extra care is
required while driving.
Self-test feature
The anti-lock brake system consists of elec-
tronic sensors, electric pumps, and hydraulic
solenoids controlled by a computer. The com-
puter has a built-in diagnostic feature that tests
the system each time you start the engine and
move the vehicle at a low speed in forward or
reverse. When the ªself-testº occurs, you may
hear a ªclunkº noise and/or feel a ªpulsationº in
the brake pedal. This is normal and is not an
indication of any malfunction. If the computer
senses any malfunction, it switches the anti-
lock brake system OFF and turns on the ªABSº
brake warning light in the dashboard. The
brake system will then behave normally, but
without anti-lock assistance.
If the light comes on during the self check, or
while you are driving, you should take your
vehicle to your NISSAN dealer for repair at
your earliest convenience.
ANTI-LOCK BRAKE SYSTEM
(ABS) (If so equipped)
4-18
Z01.2.1/A32-DX
Page 133 of 215
Always follow the instructions below. Fail-
ure to do so could result in damage to the
charging system and cause personal in-
jury.
1. If the booster battery is in another vehicle,
position the two vehicles to bring their bat-
teries into close proximity to each other.
Do not allow the two vehicles to touch.
2. Apply parking brake. Move the shift lever to
ªNeutralº (On automatic transmission mod-
els, move the lever to ªPº). Switch off all
unnecessary electrical systems (light,
heater, air conditioner, etc.).3. Remove vent caps on the battery (if so
equipped). Cover the battery with an old
cloth to reduce explosion hazard.
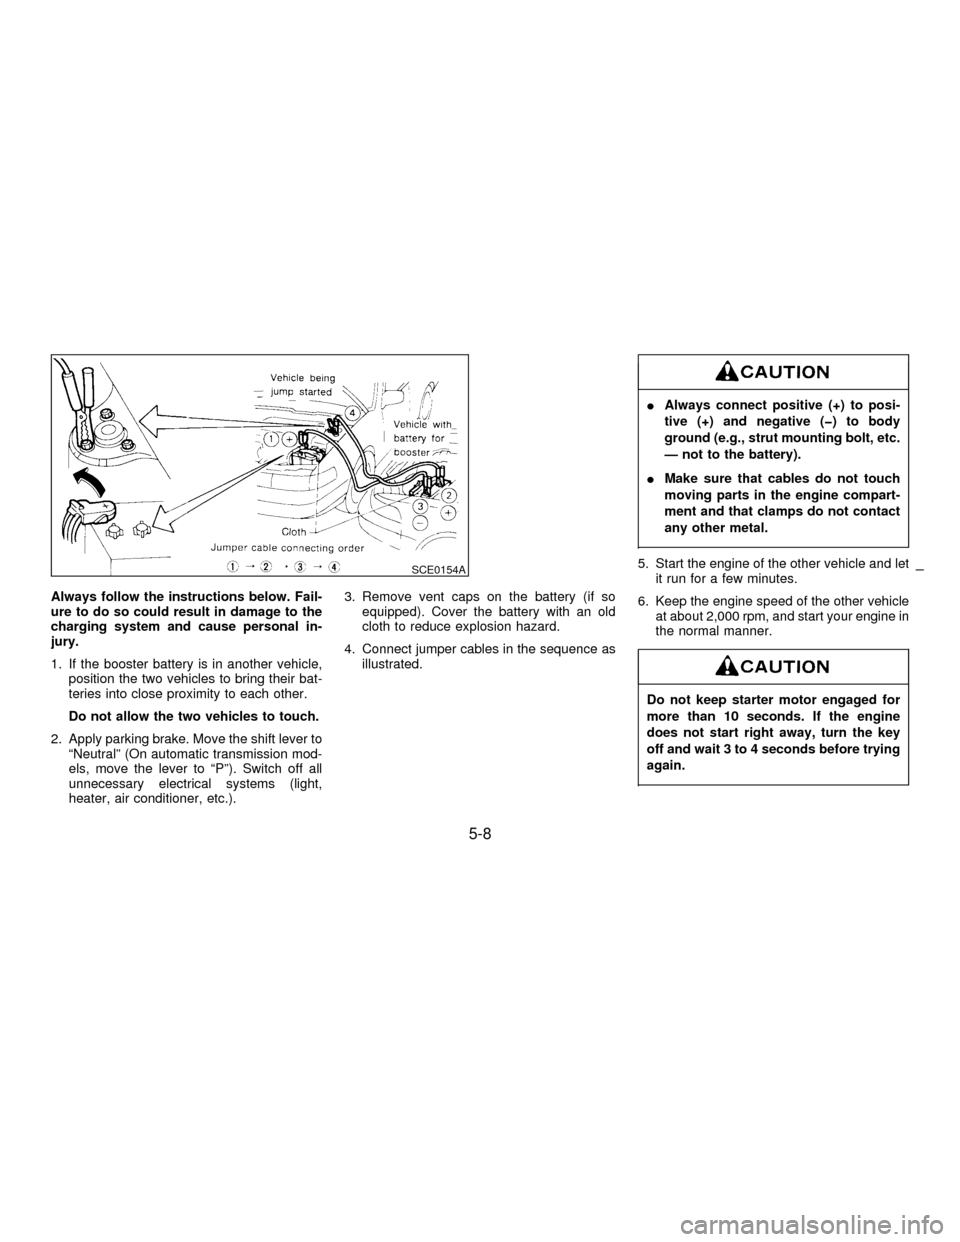
4. Connect jumper cables in the sequence as
illustrated.
IAlways connect positive (+) to posi-
tive (+) and negative (þ) to body
ground (e.g., strut mounting bolt, etc.
Ð not to the battery).
IMake sure that cables do not touch
moving parts in the engine compart-
ment and that clamps do not contact
any other metal.
5. Start the engine of the other vehicle and let
it run for a few minutes.
6. Keep the engine speed of the other vehicle
at about 2,000 rpm, and start your engine in
the normal manner.
Do not keep starter motor engaged for
more than 10 seconds. If the engine
does not start right away, turn the key
off and wait 3 to 4 seconds before trying
again.
SCE0154A
5-8
Z01.2.1/A32-DX
Page 134 of 215
7. After starting your engine, carefully discon-
nect the negative cable and then the posi-
tive cable.
8. Replace the vent caps (if so equipped). Be
sure to dispose of the cloth used to cover
the vent holes as it may be contaminated
with corrosive acid.
IAutomatic transmission models can-
not be push started. This may cause
transmission damage.
IThree-way catalyst equipped models
should not be started by pushing
since the three-way catalyst may be
damaged.
INever try to start the vehicle by tow-
ing it; when the engine starts, the
forward surge could cause the ve-
hicle to collide with the tow vehicle.
If your vehicle is overheating (indicated by an
extremely high temperature gauge reading), or
if you feel a lack of engine power, detect
abnormal noise, etc., take the following steps:
IDo not continue to drive if your ve-
hicle overheats. Doing so could
cause a vehicle fire.
ITo avoid the danger of being scalded,
never remove the radiator cap while
the engine is still hot. When the radia-
tor cap is removed, pressurized hot
water will spurt out, possibly causing
serious injury.
IDo not open the hood if steam is
coming out.
1. Move the vehicle safely off the road, apply
the parking brake and move the gearshift
lever to neutral (automatic transmission to
ªPº).
Do not stop the engine.
2. Turn off the air conditioner switch. Open all
the windows, move the heater or air condi-
tioner temperature control to ªmaximum
PUSH STARTING IF YOUR VEHICLE OVERHEATS
5-9
Z01.2.1/A32-DX
Page 180 of 215
During the normal day-to-day operation of the
vehicle, general maintenance should be per-
formed regularly as prescribed in this section.
If you detect any unusual sounds, vibrations or
smell, be sure to check for the cause or have
your NISSAN dealer do it promptly. In addition,
you should notify your NISSAN dealer if you
think that repairs are required.
When performing any checks or maintenance
work, closely observe the precautions in the
ªDo-it-yourself operationsº section.
Additional information on the following
items with ª*º is found in the ªDo-it-
yourself operationsº section.
OUTSIDE THE VEHICLE
The maintenance items listed here should be
performed from time to time, unless otherwise
specified.
Tires*Check the pressure with a gauge peri-
odically when at a service station, including the
spare, and adjust to the specified pressure if
necessary. Check carefully for damage, cuts
or excessive wear.
Wheel nuts*When checking the tires, make
sure no nuts are missing, and check for any
loose nuts. Tighten if necessary.
Tire rotation*Tires should be rotated every7,500 miles (12,000 km).
Wheel alignment and balanceIf the vehicle
pulls to either side while driving on a straight
and level road, or if you detect uneven or
abnormal tire wear, there may be a need for
wheel alignment.
If the steering wheel or seat vibrates at normal
highway speeds, wheel balancing may be
needed.
Windshield wiper blades*Check for cracks
or wear if they do not wipe properly.
Doors and engine hoodCheck that all doors
and the engine hood operate smoothly as well
as the trunk lid or back hatch. Also make sure
that all latches lock securely. Lubricate if nec-
essary. Make sure that the secondary latch
keeps the hood from opening when the pri-
mary latch is released.
When driving in areas using road salt or other
corrosive materials, check lubrication fre-
quently.
INSIDE THE VEHICLE
The maintenance items listed here should be
checked on a regular basis, such as when
performing periodic maintenance, cleaning the
vehicle, etc.
Lights*Make sure that the headlights, stop
lights, tail lights, turn signal lights, and other
lights are all operating properly and installed
securely. Also check headlight aim.
Warning lights and buzzers/chimesMake
sure that all warning lights and buzzers/chimes
are operating properly.
Windshield wiper and washer*Check that
the wipers and washer operate properly and
that the wipers do not streak.
Windshield defrosterCheck that the air
comes out of the defroster outlets properly and
in good quantity when operating the heater or
air conditioner.
Steering wheelCheck that it has the specified
play. Be sure to check for changes in the
steering conditions, such as excessive play,
hard steering or strange noises.
SeatsCheck seat position controls such as
seat adjusters, seatback recliner, etc. to make
sure they operate smoothly and that all latches
lock securely in every position. Check that the
GENERAL MAINTENANCE
8-3
Z01.2.1/A32-DX
Page 182 of 215
Fluid leaksCheck under the vehicle for fuel,
oil, water or other fluid leaks after the vehicle
has been parked for a while. Water dripping
from the air conditioner after use is normal. If
you should notice any leaks or if gasoline
fumes are evident, check for the cause and
have it corrected immediately.To ensure smooth, trouble-free, safe and eco-
nomical driving, NISSAN provides two differ-
ent maintenance schedules that may be used,
depending upon the conditions in which you
usually drive. These schedules contain both
distance and time intervals, up to 60,000 miles
(96,000 km)/48 months. For most people, the
odometer reading will indicate when service is
needed. However, if you drive very little, your
vehicle should be serviced at the regular time
intervals shown in the schedule.After 60,000
miles (96,000 km) or 48 months, continue
the periodic maintenance at the same
mileage/time intervals.
SCHEDULE 1
Follow Periodic Maintenance Schedule 1 if
your driving habits frequently include one or
more of the following driving conditions:
IRepeated short trips of less than 5 miles
(8 km).
IRepeated short trips of less than 10
miles (16 km) with outside temperatures
remaining below freezing.
IOperating in hot weather in stop-and-go
ªrush hourº traffic.
IExtensive idling and/or low speed driv-
ing for long distances, such as police,
taxi or door-to-door delivery use.IDriving in dusty conditions.
IDriving on rough, muddy, or salt spread
roads.
ITowing a trailer, using a camper or a
car-top carrier.
SCHEDULE 2
Follow Periodic Maintenance Schedule 2 if
none of the driving conditions shown in Sched-
ule 1 apply to your driving habits.
PERIODIC MAINTENANCE
8-5
Z01.2.1/A32-DX
Page 183 of 215

SCHEDULE 1
Abbreviations: R = Replace I = Inspect. Correct or replace if necessary. [ ]: At the mileage intervals only
MAINTENANCE OPERATIONMAINTENANCE INTERVAL
Perform at number of miles,
kilometers or months, which-
ever comes first.Miles x 1,000 3.75 7.5 11.25 15 18.75 22.5 26.25 30 33.75 37.5 41.25 45 48.75 52.5 56.25 60
(km x 1,000) (6) (12) (18) (24) (30) (36) (42) (48) (54) (60) (66) (72) (78) (84) (90) (96)
Months 3 6 9 12 15 18 21 24 27 30 33 36 39 42 45 48
Emission control system maintenanceDrive belts See NOTE (1)I*
Air cleaner filter See NOTE (2) [R] [R]
Vapor linesI* I*
Fuel linesI* I*
Fuel filter See NOTE (3)*
Engine coolant See NOTE (4)R*
Engine oilRRRRRRRRRRRRRRRR
Engine oil filter (Use part No. 15208-31U00 or equivalent)RRRRRRRRRRRRRRRR
Spark plugs (Use PLATINUM-TIPPED type)[R]
Intake & exhaust valve clearance See NOTE (5)
NOTE: (1) After 60,000 miles (96,000 km) or 48 months, inspect every 15,000 miles (24,000 km) or 12 months.
(2) If operating mainly in dusty conditions, more frequent maintenance may be required.
(3) If vehicle is operated under extremely adverse weather conditions or in areas where ambient temperatures are either
extremely low or extremely high, the filters might become clogged. In such an event, replace them immediately.
(4) After 60,000 miles (96,000 km) or 48 months, replace every 30,000 miles (48,000 km) or 24 months.
(5) If valve noise increases, inspect valve clearance.
(6) Maintenance items and intervals with ª*º are recommended by NISSAN for reliable vehicle operation. The owner need not
perform such maintenance in order to maintain the emission warranty or manufacturer recall liability. Other maintenance
items and intervals are required.
8-6
Z01.2.1/A32-DX