1997 NISSAN FRONTIER heating
[x] Cancel search: heatingPage 62 of 204
WARNING
cThe air conditioner cooling function
operates only when the engine is
running.
cDo not leave children, unreliable
adults, or pets alone in your vehicle.
On hot sunny days, temperatures in
a closed vehicle could quickly be-
come high enough to cause severe
or possibly fatal injuries to people or
animals.
cDo not use the recirculation mode
for long periods as it may cause theinterior air to become stale and the
windows to fog up.
cPositioning of the heating or air con-
ditioning controls should not be
done while driving, so that full atten-
tion may be given to the driving
operation.
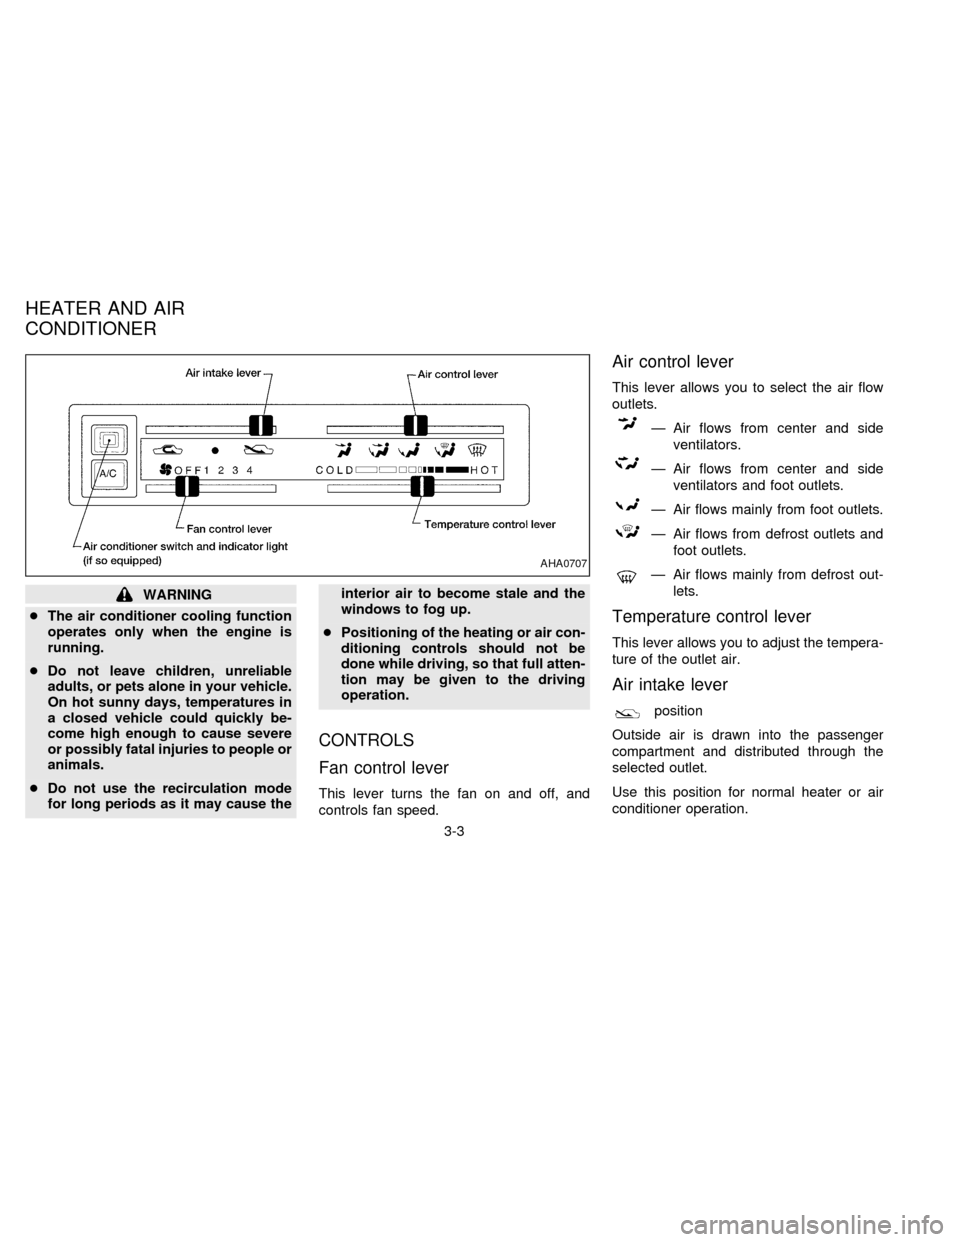
CONTROLS
Fan control lever
This lever turns the fan on and off, and
controls fan speed.
Air control lever
This lever allows you to select the air flow
outlets.
Ð Air flows from center and side
ventilators.
Ð Air flows from center and side
ventilators and foot outlets.
Ð Air flows mainly from foot outlets.
Ð Air flows from defrost outlets and
foot outlets.
Ð Air flows mainly from defrost out-
lets.
Temperature control lever
This lever allows you to adjust the tempera-
ture of the outlet air.
Air intake lever
position
Outside air is drawn into the passenger
compartment and distributed through the
selected outlet.
Use this position for normal heater or air
conditioner operation.
AHA0707
HEATER AND AIR
CONDITIONER
3-3
ZX
Page 63 of 204

position
Interior air is recirculated inside the vehicle.
Move the air intake lever to the
posi-
tion:
cwhen driving on a dusty road.
cto prevent traffic fumes from entering the
passenger compartment.
cfor maximum cooling when using the air
conditioner.
Air conditioner switch
(if so equipped)
This button is provided only for vehicles with
an air conditioner.
Start the engine, push the switch and move
the fan control lever to the desired speed.
The indicator light comes on when the air
conditioner is on.
HEATER OPERATION
Heating
This mode directs hot air to the foot outlets.
A small amount of air is also directed to the
defrost outlets.
1. Move the air intake lever to the
po-sition for normal heating.
2. Move the air control lever to the
position.
3. Move the fan control lever to the desired
speed.
4. Move the temperature control lever to the
desired position between the middle and
the HOT position.
Ventilation
This mode directs outside air to the side and
center ventilators.
1. Move the air intake lever to the
po-
sition.
2. Move the air control lever to the
position.
3. Move the fan control lever to the desired
speed.
4. Move the temperature control lever to the
desired position.
Defrosting or defogging
This mode defrosts/defogs the windows.
1. Move the air intake lever to the
po-
sition.2. Move the air control lever to the
position.
3. Move the fan control lever to the desired
speed.
4. Move the temperature control lever to the
desired position between the middle and
the HOT position.
cIf it is difficult to defog the windshield,
turn the air conditioner switch on (if so
equipped).
Bi-level heating
This mode directs cooler air from the side
and center ventilators and warmer air from
the foot outlets.
1. Move the air intake lever to the
po-
sition.
2. Move the air control lever to the
position.
3. Move the fan control lever to the desired
speed.
4. Move the temperature control lever to the
desired position.
3-4
ZX
Page 64 of 204

Heating and defrosting
This mode heats the interior and defogs the
windshield.
1. Move the air intake lever to the
po-
sition.
2. Move the air control lever to the
position.
3. Move the fan control lever to the desired
speed.
4. Move the temperature control lever to the
desired position between the middle and
the HOT position.
Operating tips
Clear snow and ice from the wiper blade
and air inlet in front of the windshield. This
improves heater and defroster operation.
AIR CONDITIONER OPERATION
(if so equipped)
Start the engine, move the fan control lever
to the desired (1 to 4) position, and push in
the air conditioner switch to activate the air
conditioner. When the air conditioner is on,
cooling and dehumidifying functions are
added to the heater operation.The air conditioner cooling function op-
erates only when the engine is running.
Cooling
This mode cools and dehumidifies.
1. Move the air intake lever to the
po-
sition.
2. Move the air control lever to the
position.
3. Move the fan control lever to the desired
position.
4. Push in the air conditioner switch. The
indicator light comes on.
5. Move the temperature control lever to the
desired position.
cFor quick cooling when the outside tem-
perature is high, move the air intake lever
to the
position. Be sure to return
the air intake lever to theposition
for normal cooling.
Dehumidified heating
This mode heats and dehumidifies.
1. Move the air intake lever to the
po-
sition.
2. Move the air control lever to the
position.3. Move the fan control lever to the desired
position.
4. Push in the air conditioner switch. The
indicator light comes on.
5. Move the temperature control lever to the
desired position.
Dehumidified defrosting
This mode defrosts/defogs the windows and
dehumidifies.
1. Move the air intake lever to the
po-
sition.
2. Move the air control lever to the
position.
3. Move the fan control lever to the desired
position.
4. Push in the air conditioner switch. The
indicator light comes on.
5. Move the temperature control lever to the
desired position.
Operating tips
cKeep windows and sunroof closed while
operating the air conditioner.
cAfter parking in the sun, drive for two or
3-5
ZX
Page 65 of 204

three minutes with the windows open to
vent hot air from the passenger compart-
ment. Then, close the windows. This
allows the air conditioner to cool the
interior more quickly.
cThe air conditioning system should be
operated for about ten minutes at least
once a month, especially in winter. This
helps prevent damage to the system due
to lack of lubrication.
cIf the coolant temperature gauge ex-
ceeds the (hot) position, turn the air
conditioner off. Have your vehicle in-
spected by a NISSAN dealer. See ``If
your vehicle overheats'' in the ``In case of
emergency'' section for additional infor-
mation.
AIR FLOW CHARTS
The following charts show the switch and
lever positions forMAXIMUM and QUICK
heating, cooling or defrosting.
The air intake lever should always be in
the
position for heating and de-
frosting.
AHA0700
3-6
ZX
Page 106 of 204
The brake system has two separate hydrau-
lic circuits. If one circuit develops a problem,
you will still have braking at two wheels.
Vacuum assisted brakes
The brake booster aids braking by using
engine vacuum. If the engine stops, you can
stop the vehicle by depressing the brake
pedal. However, greater foot pressure on
the brake pedal will be required to stop the
vehicle and the stopping distance will be
longer.
Wet brakes
When the vehicle is washed or driven
through water, the brakes may get wet. As a
result, your braking distance will be longer
and the vehicle may pull to one side during
braking.
To dry brakes, drive the vehicle at a safe
speed while lightly pressing the brake pedal
to heat the brakes. Do this until the brakes
return to normal. Avoid driving the vehicle at
high speeds until the brakes function cor-
rectly.Using the brakes
Avoid resting your foot on the brake pedal
while driving. This will overheat the brakes,
wear out the brake linings and pads faster,
and reduce gas mileage.
To help reduce brake wear, and to prevent
the brakes from overheating, reduce speed
and downshift to a lower gear before going
down a slope or long grade.
WARNING
While driving on a slippery surface, be
careful when braking, accelerating or
downshifting. Abrupt braking actions
or sudden acceleration could cause the
wheels to skid and result in an acci-
dent.
Normal Operation
The rear anti-lock brake system does not
operate at speeds below 3 to 6 MPH (5 to 10
km/h). (The speeds vary according to road
conditions.)
When driving in the 2-wheel drive mode, the
rear anti-lock brake system controls the rear
wheels so they will not lock when braking
abruptly or when braking on a slippery road.
Thus, difficult steering and swerving of the
vehicle due to locked rear wheels is mini-
mized. The system detects the rear wheel
rotation rate and electronically controls the
pressure applied to each rear brake. Slight
vibration on the brake pedal accompanied
by noise usually occurs while the ABS sys-
tem is operating. Such vibration and noise
encountered during abrupt braking is not a
problem, but indicates that the system is
functioning.
Even with the rear anti-lock brake sys-
tem, your front wheels can still lock. If
this happens, release the brake pedal
slightly and then reapply pressure.
Self-test feature
The rear anti-lock brake system consists of
an electronic sensor and two hydraulic so-
BRAKE SYSTEM REAR ANTI-LOCK BRAKE
SYSTEM (R-ABS)
4-25
ZX
Page 118 of 204
cMake sure that cables do not touch
moving parts in the engine compart-
ment and that clamps do not contact
any other metal.
5. Start the engine of the booster vehicle
and let it run for a few minutes.
6. Keep the engine speed of the booster
vehicle at about 2,000 r/min, and start
your engine in the normal manner.
CAUTION
Do not keep the starter motor engaged
for more than 10 seconds. If the engine
does not start right away, turn the key
off and wait 3 to 4 seconds before
trying again.
7. After starting your engine, carefully dis-
connect the negative cable and then the
positive cable.
8. Replace the vent caps (if so equipped).
Be sure to dispose of the cloth used to
cover the vent holes as it may be con-
taminated with corrosive acid.
CAUTION
cAutomatic transmission models can-
not be started by pushing. This may
cause transmission damage.
cThree-way catalyst equipped models
should not be started by pushing
since the three-way catalyst may be
damaged.
cNever try to start the vehicle by tow-
ing it. When the engine starts, the
forward surge could cause the ve-
hicle to collide with the tow vehicle.If your vehicle is overheating (indicated by
an extremely high temperature gauge read-
ing), or if you feel a lack of engine power, or
detect abnormal noise, etc., take the follow-
ing steps:
WARNING
cDo not continue to drive if your ve-
hicle overheats. Doing so could
cause a vehicle fire.
cTo avoid the danger of being
scalded, never remove the radiator
cap while the engine is still hot.
When the radiator cap is removed,
pressurized hot water will spurt out,
possibly causing serious injury.
cDo not open the hood if steam is
coming out.
1. Move the vehicle safely off the road,
apply the parking brake and move the
gearshift lever to Neutral, or the auto-
matic transmission into P (Park).
Do not stop the engine.
2.
Turn off the air conditioner (if so
equipped). Open all of the windows,
move the heater or air conditioner tem-
PUSH STARTING IF YOUR VEHICLE
OVERHEATS
5-9
ZX
Page 119 of 204
perature control to maximum hot and fan
control to high speed.
3. If engine overheating is caused by climb-
ing a long hill on a hot day, run the engine
at a fast idle (approximately 1,500 r/min)
until the temperature gauge indicator re-
turns to normal.
4. Get out of the vehicle. Look and listen for
steam or coolant escaping from the ra-
diator before opening the hood. Wait until
no steam or coolant can be seen before
proceeding.
5. Open the hood.
WARNING
If steam or water is coming from the
engine, stand clear to prevent getting
burned.
6. Visually check drive belts for damage or
looseness. Also check if the cooling fan
is running. The radiator hoses and radia-
tor should not leak water. If coolant is
leaking, or the water pump belt is missing
or loose, or the cooling fan does not run,
stop the engine.
WARNING
cBe careful not to allow your hands,
hair, jewelry or clothing to come into
contact with, or to get caught in, the
running fan or belts.
7. After the engine cools down, check the
coolant level in the reservoir tank with the
engine running. Add coolant to the res-
ervoir tank if necessary. Have your ve-
hicle repaired at the nearest NISSAN
dealer.When towing your vehicle, all state (provin-
cial in Canada) and local regulations for
towing must be followed. Incorrect towing
equipment could damage your vehicle. Tow-
ing instructions are available from your NIS-
SAN dealer. Local service operators are
generally familiar with the applicable laws
and procedures for towing. To assure proper
towing and to prevent accidental damage to
your vehicle, NISSAN recommends having a
service operator tow your vehicle. It is advis-
able to have the service operator carefully
read the following precautions:
WARNING
cNever ride in a vehicle that is being
towed.
cNever get under your vehicle after it
has been lifted by a tow truck.
CAUTION
cWhen towing, make sure that the
transmission, axles, steering system
and powertrain are in working con-
dition. If any unit is damaged, a dolly
must be used.
TOW TRUCK TOWING
5-10
ZX
Page 134 of 204
If the cooling system frequently requires
coolant, have it checked by your NISSAN
dealer.
CHANGING ENGINE COOLANT
cMajor cooling system repairs should be
performed by your NISSAN dealer. The
service procedures can be found in the
appropriate NISSAN Service Manual.
cImproper servicing can result in reduced
heater performance and engine over-
heating.
WARNING
cTo avoid the danger of being
scalded, never change the coolant
when the engine is hot.cNever remove the radiator cap when
the engine is hot. Serious burns
could be caused by high pressure
fluid escaping from the radiator.
1. Move the heater or air conditioner tem-
perature control to the maximum hot
position.
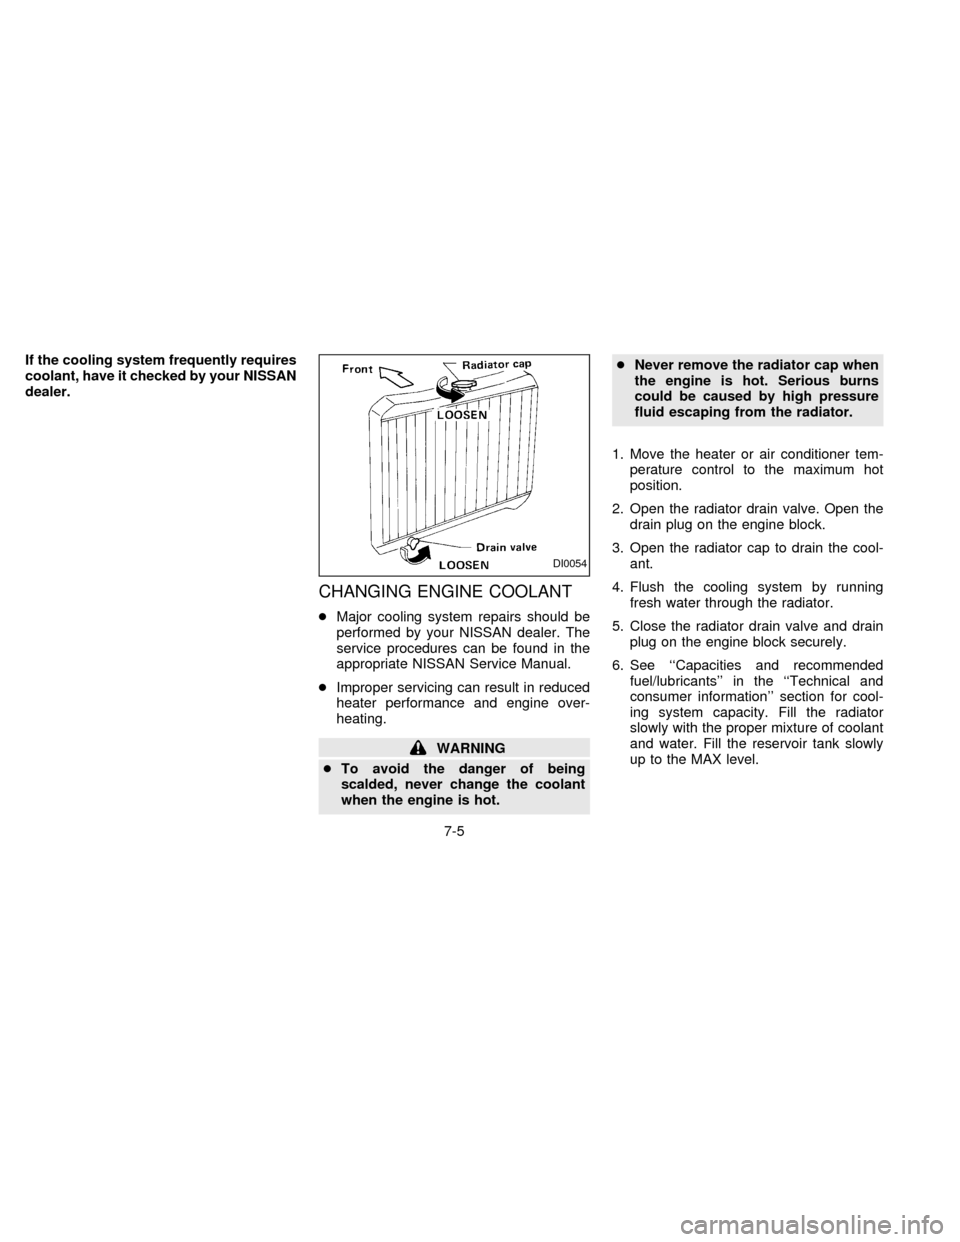
2. Open the radiator drain valve. Open the
drain plug on the engine block.
3. Open the radiator cap to drain the cool-
ant.
4. Flush the cooling system by running
fresh water through the radiator.
5. Close the radiator drain valve and drain
plug on the engine block securely.
6. See ``Capacities and recommended
fuel/lubricants'' in the ``Technical and
consumer information'' section for cool-
ing system capacity. Fill the radiator
slowly with the proper mixture of coolant
and water. Fill the reservoir tank slowly
up to the MAX level.
DI0054
7-5
ZX